补充:
删除js中的数组:
可以直接 使 lenght =0


 1 <!DOCTYPE html>
 2 <html lang="en">
 3 <head>
 4     <meta charset="UTF-8">
 5     <title></title>
 6
 7 </head>
 8 <body>
 9     <script>
10         var arr =[1,32,4,3,34,2];
11         console.log(arr);
12
13         if(0){
14             arr.length = 0;//这就把数组给清空了
15             console.log(arr);
16         }
17
18     </script>
19
20 </body>
21 </html>
DOM 的作用及概念:


需要补充的是:如果你用word 存储数据,它是需要有软件才能打开的,但是xml 文件,是不需要软件,就可以打开。


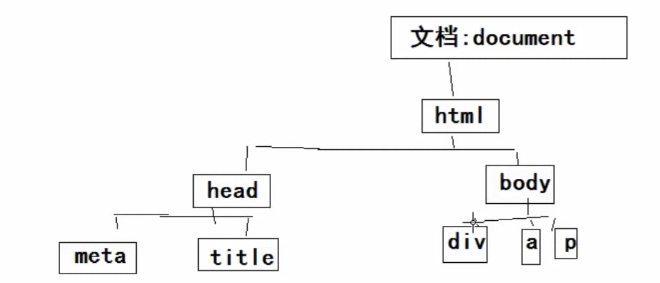

节点的范围是大于 元素(标签)的 ,但是他们都在 文档 中。
学习DOM 的作用 就是去操作 页面的元素。
初次体验DOM:
 1 <!DOCTYPE html>
 2 <html lang="en">
 3 <head>
 4     <meta charset="UTF-8">
 5     <title></title>
 6     <script>
 7
 8     </script>
 9 </head>
10 <body>
11     <input type="button" value="点我啊" onclick="alert('我又变帅了')"/>
12
13 </body>
14 </html>
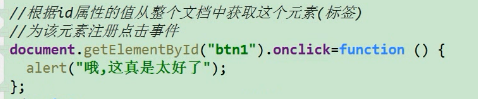
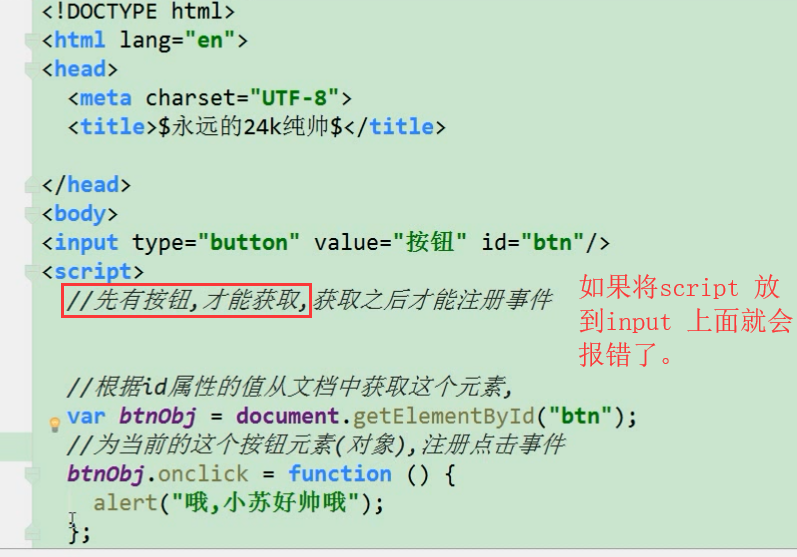
真实体验DOM(先体验):
 1 <!DOCTYPE html>
 2 <html lang="en">
 3 <head>
 4     <meta charset="UTF-8">
 5     <title></title>
 6
 7 </head>
 8 <body>
 9     <input type="button" value="点我" id="btn"/>
10     <script>
11         document.getElementById('btn').onclick = function (){
12             alert("我又变帅了!");
13         }
14     </script>
15 </body>
16 </html>
案例:点击按钮弹出对话框:


最终版本:
案例:点击按钮显示图片:
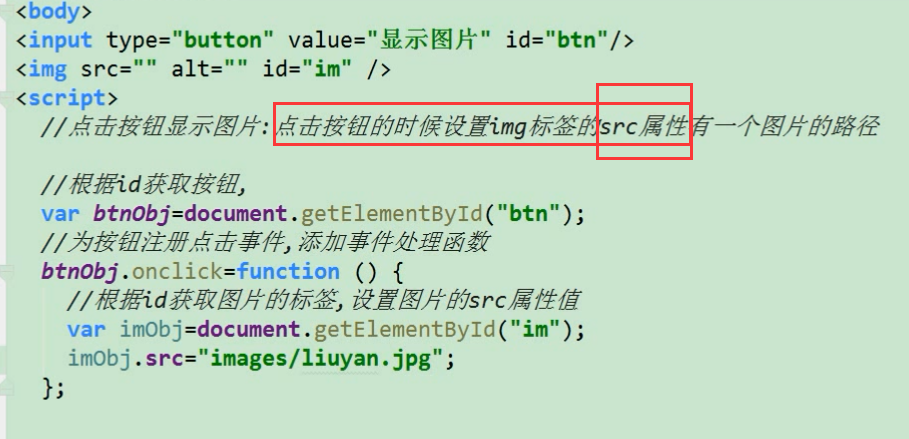
整体思路就是当点击按钮时候,给Img 标签的src 属性赋值。
具体实现是,先用id 去找到 按钮,然后再用id 找到 img .

 1 <!DOCTYPE html>
 2 <html lang="en">
 3 <head>
 4     <meta charset="UTF-8">
 5     <title></title>
 6
 7 </head>
 8 <body>
 9     <input type="button" value="点我" id="btn"/>
10     <img src="" alt="" id ='img'>
11     <script>
12         var btnObj = document.getElementById('btn');
13         btnObj.onclick = function () {
14             var imgObj = document.getElementById('img');
15             imgObj.src = "images/mayun.jpg";
16             imgObj.width = 300;
17             imgObj.height = 400;
18         };
19     </script>
20 </body>
21 </html>

案例:点击按钮修改p标签的显示内容:

 1 <!DOCTYPE html>
 2 <html lang="en">
 3 <head>
 4     <meta charset="UTF-8">
 5     <title></title>
 6
 7 </head>
 8 <body>
 9     <input type="button" value="修改p标签的显示内容" id="btn"/>
10     <p id="p1">这是p标签</p>
11     <script>
12         document.getElementById('btn').onclick = function () {
13             document.getElementById('p1').innerText = "你是个p";
14         };
15     </script>
16
17 </body>
18 </html>
案例:点击按钮修改a标签的超链接地址 和 热点文字:
 1 <!DOCTYPE html>
 2 <html lang="en">
 3 <head>
 4     <meta charset="UTF-8">
 5     <title></title>
 6
 7 </head>
 8 <body>
 9     <input type="button" value="修改a标签的地址和 热点文字" id="btn"/>
10     <a href="https://www.baidu.com" id="a">百度</a>
11     <script>
12         document.getElementById('btn').onclick =function () {
13             var aObj = document.getElementById('a');
14             aObj.href = "https://www.sina.com";
15             aObj.innerText = "新浪";
16         };
17
18     </script>
19
20 </body>
21 </html>
案例:点击按钮修改多个p标签的显示内容:
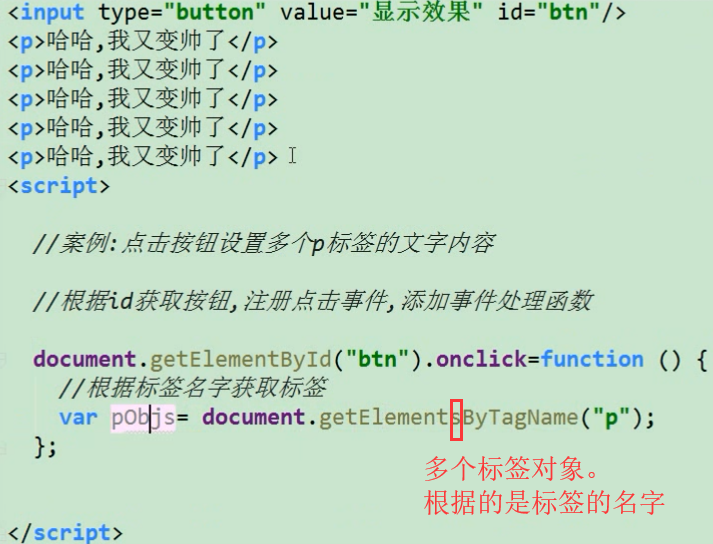
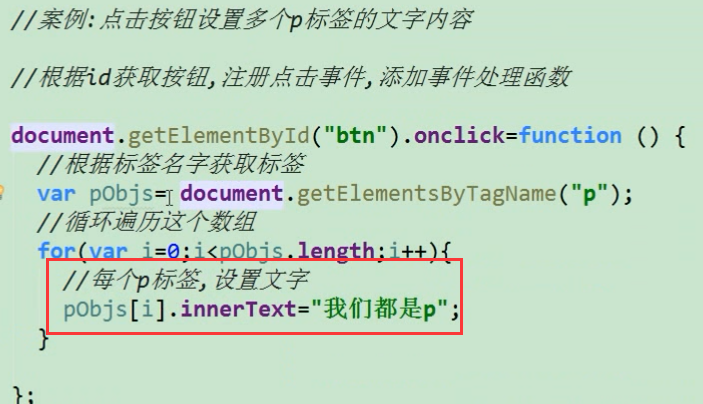
 1 <!DOCTYPE html>
 2 <html lang="en">
 3 <head>
 4     <meta charset="UTF-8">
 5     <title></title>
 6
 7 </head>
 8 <body>
 9     <input type="button" value="修改多个p标签" id="btn"/>
10     <p>我是p标签</p>
11     <p>我是p标签</p>
12     <p>我是p标签</p>
13     <p>我是p标签</p>
14     <script>
15         document.getElementById('btn').onclick =function () {
16             var pObjs = document.getElementsByTagName('p');
17             //注 pObjs 是个数组
18             for(var i =0;i<pObjs.length;i++){
19                 pObjs[i].innerText = "我是个屁";
20             }
21         };
22     </script>
23
24 </body>
25 </html>
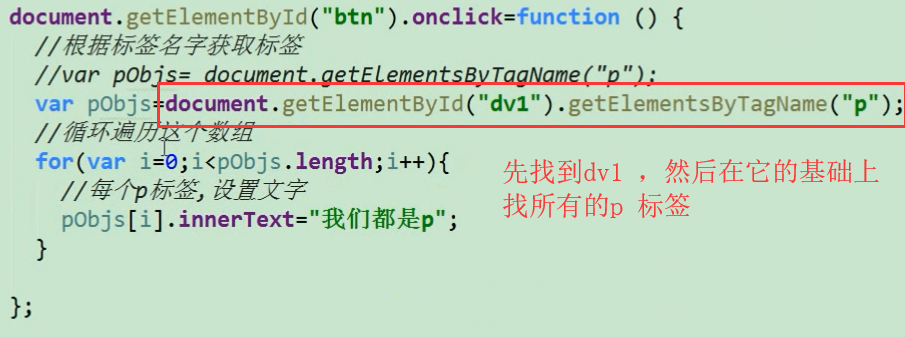
 1 <!DOCTYPE html>
 2 <html lang="en">
 3 <head>
 4     <meta charset="UTF-8">
 5     <title></title>
 6
 7 </head>
 8 <body>
 9     <input type="button" value="修改多个p标签" id="btn"/>
10     <div id="div1">
11         <p>我是p标签</p>
12         <p>我是p标签</p>
13         <p>我是p标签</p>
14         <p>我是p标签</p>
15     </div>
16     <div id ="div2">
17         <p>我是p标签</p>
18         <p>我是p标签</p>
19         <p>我是p标签</p>
20         <p>我是p标签</p>
21     </div>
22
23     <script>
24         document.getElementById('btn').onclick =function () {
25             var pObjs = document.getElementById('div1').getElementsByTagName('p');
26             //这时pObjs中只有  div1 容器中的 p标签
27             for(var i =0;i<pObjs.length;i++){
28                 pObjs[i].innerText = "我是个屁";
29             }
30         };
31     </script>
32
33 </body>
34 </html>
案例:点击按钮修改图片的alt 和 title 属性:
title 是鼠标放在图片上时的效果。
alt 是当图片为显示的时候,会代替显示它 。
 1 <!DOCTYPE html>
 2 <html lang="en">
 3 <head>
 4     <meta charset="UTF-8">
 5     <title></title>
 6
 7 </head>
 8 <body>
 9     <input type="button" value="点击我啊" id ="btn"/>
10     <img src="images/mayun.jpg" alt="图片加载失败" title="我是Jack Ma">
11     <script>
12         document.getElementById("btn").onclick =function () {
13             var imgObjs = document.getElementsByTagName("img");
14             imgObjs[0].alt= "The picture fails to display!";
15             imgObjs[0].title = "I am Jack Ma";
16         };
17     </script>
18
19 </body>
20 </html>
案例:点击按钮修改所有文本框的值:
 1 <!DOCTYPE html>
 2 <html lang="en">
 3 <head>
 4     <meta charset="UTF-8">
 5     <title></title>
 6
 7 </head>
 8 <body>
 9     <input type="button" value="点击按钮修改所有文本框的值" id="btn" /> <br />
10     <input type="text" value="">
11     <input type="text" value="">
12     <input type="text" value="">
13     <input type="text" value="">
14     <input type="text" value="">
15     <input type="text" value="">
16     <script>
17         document.getElementById("btn").onclick = function () {
18             var inputs = document.getElementsByTagName("input");
19             for(var i = 0;i<inputs.length;i++){
20                 if(inputs[i].type != "button"){ //这里是排除第一个
21                     inputs[i].value = "Haha ,都被我改变了";
22
23                 }
24             }
25         };
26     </script>
27
28 </body>
29 </html>
案例:点击图片弹出对话框:
 1 <!DOCTYPE html>
 2 <html lang="en">
 3 <head>
 4     <meta charset="UTF-8">
 5     <title></title>
 6     <style>
 7         img{
 8             width: 50px;
 9             height: 50px;
10         }
11     </style>
12 </head>
13 <body>
14     <img src="images/alipay.png" id="im1">
15     <img src="images/taobao.png" id = "im2">
16     <img src="images/mayun.jpg" id = "im3">
17     <script>
18         document.getElementById("im1").onclick = function () {
19             alert("被点了");
20         };
21         document.getElementById("im2").onclick = function () {
22             alert("被点了");
23         };
24         document.getElementById("im3").onclick = function () {
25             alert("被点了");
26         };
27
28
29     </script>
30 </body>
31 </html>
 1 <!DOCTYPE html>
 2 <html lang="en">
 3 <head>
 4     <meta charset="UTF-8">
 5     <title></title>
 6     <style>
 7         img{
 8             width: 50px;
 9             height: 50px;
10         }
11     </style>
12 </head>
13 <body>
14     <img src="images/alipay.png" >
15     <img src="images/taobao.png" >
16     <img src="images/mayun.jpg" >
17     <script>
18         var imgs = document.getElementsByTagName("img");
19         for(var i = 0;i<imgs.length;i++){
20             imgs[i].onclick = function () {
21                 alert("被点了");
22             };
23         }
24     </script>
25 </body>
26 </html>
案例:点击按钮修改 自己的value 的属性:
 1 <!DOCTYPE html>
 2 <html lang="en">
 3 <head>
 4     <meta charset="UTF-8">
 5     <title></title>
 6
 7 </head>
 8 <body>
 9     <input type="button" value="点击修改我的的value" id="btn" />
10     <script>
11         var btnObj =  document.getElementById("btn");
12         btnObj.onclick = function () {
13             btnObj.value = "我是按钮,我被我自己修改了";
14         };
15     </script>
16 </body>
17 </html>
修改id 和 type 类型:
 1 <!DOCTYPE html>
 2 <html lang="en">
 3 <head>
 4     <meta charset="UTF-8">
 5     <title></title>
 6
 7 </head>
 8 <body>
 9     <input type="button" value="点击修改我的的value" id="btn" />
10     <script>
11         var btnObj =  document.getElementById("btn");
12         btnObj.onclick = function () {
13             btnObj.value = "我是按钮,我被我自己修改了";
14             btnObj.id='btn2';
15             btnObj.type = "text";
16
17         };
18     </script>
19 </body>
20 </html>
进一步用this 做简化:
 1 <!DOCTYPE html>
 2 <html lang="en">
 3 <head>
 4     <meta charset="UTF-8">
 5     <title></title>
 6
 7 </head>
 8 <body>
 9     <input type="button" value="点击修改我的的value" id="btn" />
10     <script>
11         var btnObj =  document.getElementById("btn");
12         btnObj.onclick = function () {
13             this.value = "我是按钮,我被我自己修改了";
14             this.id='btn2';
15             this.type = "text";
16         };
17     </script>
18 </body>
19 </html>

案例:点击图片 修改自己的 宽和高:
 1 <!DOCTYPE html>
 2 <html lang="en">
 3 <head>
 4     <meta charset="UTF-8">
 5     <title></title>
 6
 7 </head>
 8 <body>
 9     <img src="images/alipay.png" id="im">
10     <script>
11         var imgObj = document.getElementById('im');
12         imgObj.onclick = function () {
13             this.width = 400;
14             this.height = 400;
15         };
16     </script>
17 </body>
18 </html>
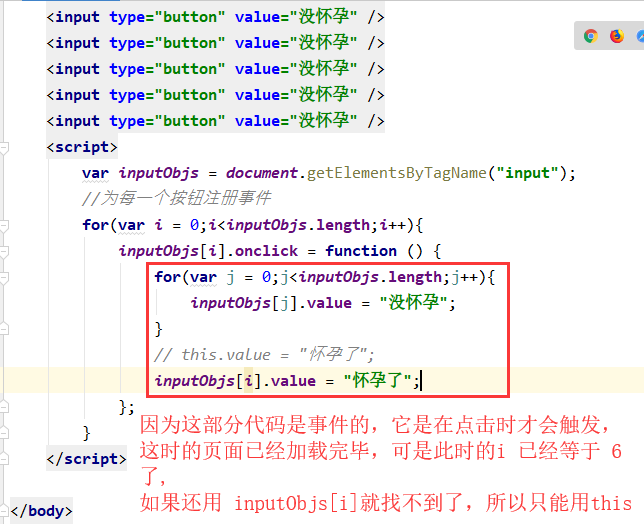
案例:按钮的排他功能:
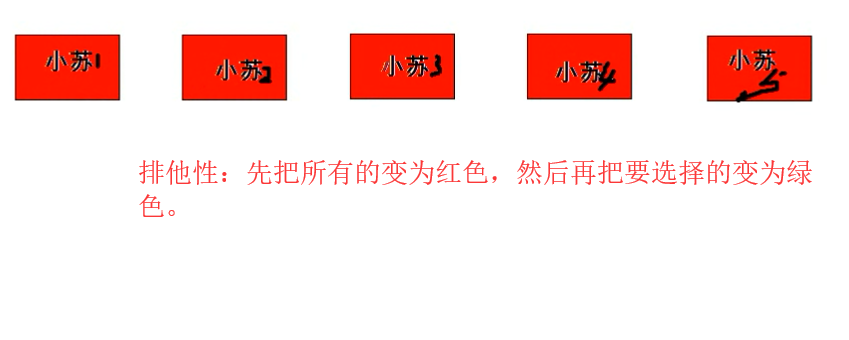

先把所有的都变红,再把要操作的变为绿色。

 1 <!DOCTYPE html>
 2 <html lang="en">
 3 <head>
 4     <meta charset="UTF-8">
 5     <title></title>
 6
 7 </head>
 8 <body>
 9     <input type="button" value="没怀孕" />
10     <input type="button" value="没怀孕" />
11     <input type="button" value="没怀孕" />
12     <input type="button" value="没怀孕" />
13     <input type="button" value="没怀孕" />
14     <input type="button" value="没怀孕" />
15     <script>
16         var inputObjs = document.getElementsByTagName("input");
17         //为每一个按钮注册事件
18         for(var i = 0;i<inputObjs.length;i++){
19             inputObjs[i].onclick = function () {
20                 for(var j = 0;j<inputObjs.length;j++){
21                     inputObjs[j].value = "没怀孕";
22                 }
23                 this.value = "怀孕了"; //当前点击的会变为  怀孕了
24             };
25         }
26     </script>
27
28 </body>
29 </html>
不过,这里有些问题:


案例:点击超链接切换图片:
 1 <!DOCTYPE html>
 2 <html lang="en">
 3 <head>
 4     <meta charset="UTF-8">
 5     <title></title>
 6
 7 </head>
 8 <body>
 9     <a id="a" href="images/alipay.png"><img src="images/mayun.jpg" id ='im'></a>
10     <script>
11         document.getElementById('im').onclick =function () {
12             this.src = document.getElementById('a').href;
13             return false;  //关于这句的作用,后面说
14         };
15     </script>
16
17 </body>
18 </html>
案例:点击按钮切换图片:
 1 <!DOCTYPE html>
 2 <html lang="en">
 3 <head>
 4     <meta charset="UTF-8">
 5     <title></title>
 6
 7 </head>
 8 <body>
 9     <input type="button" value="切换图片" id="btn"/>
10     <img src="images/mayun.jpg" id="im">
11     <script>
12         document.getElementById('btn').onclick = function () {
13             document.getElementById('im').src = "images/alipay.png";
14         }
15     </script>
16
17 </body>
18 </html>
 1 <!DOCTYPE html>
 2 <html lang="en">
 3 <head>
 4     <meta charset="UTF-8">
 5     <title></title>
 6
 7 </head>
 8 <body>
 9     <input type="button" value="切换图片" id="btn"/>
10     <img src="images/mayun.jpg" id="im">
11     <script>
12         function myfunc$(id){
13             //形参不用 声明的
14             return document.getElementById(id);
15         }
16         myfunc$('btn').onclick = function () {
17             myfunc$('im').src = "images/alipay.png";
18         }
19     </script>
20
21 </body>
22 </html>
案例:点击按钮选择性别和兴趣:
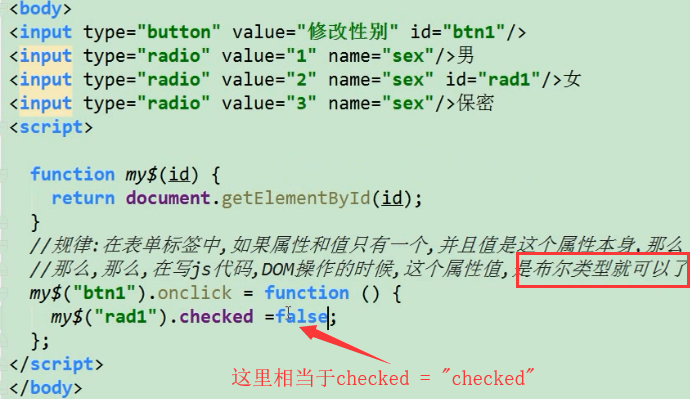
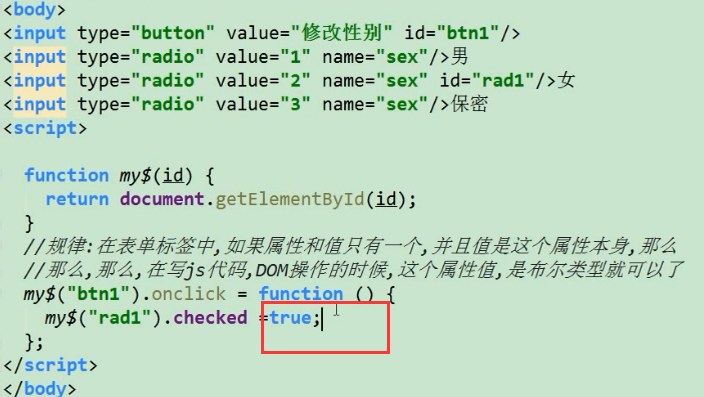
 1 <!DOCTYPE html>
 2 <html lang="en">
 3 <head>
 4     <meta charset="UTF-8">
 5     <title></title>
 6
 7 </head>
 8 <body>
 9     <input type="button" value="选择性别" id ='btn'>
10     <input type="radio" value="1" name="sex">男
11     <input type="radio" value="2" name="sex" id="rd1">女
12     <input type="radio" value="3" name="sex">保密
13     <script>
14         function myfun$(id) {
15             return document.getElementById(id);
16         }
17         myfun$('btn').onclick = function () {
18             myfun$('rd1').checked = true;  //点击按钮之后会选择 它
19         }
20     </script>
21     <br />
22
23     <input type="button" value="选择兴趣" id="btn2">
24     <input type="checkbox" value="1" name="enjoy">吃饭
25     <input type="checkbox" value="2" name="enjoy" id="ck1">睡觉
26     <input type="checkbox" value="3" name="enjoy">打豆豆
27     <input type="checkbox" value="4" name="enjoy">打篮球
28     <input type="checkbox" value="5" name="enjoy">足球
29     <input type="checkbox" value="6" name="enjoy" id="ck2">乒乓球
30     <script>
31         myfun$('btn2').onclick = function () {
32             myfun$('ck1').checked = true;
33             myfun$('ck2').checked = true;
34         }
35     </script>
36
37
38
39
40 </body>
41 </html>
案例:选择下拉框和文本域 的相关属性设置:
 1 <!DOCTYPE html>
 2 <html lang="en">
 3 <head>
 4     <meta charset="UTF-8">
 5     <title>Title</title>
 6 </head>
 7 <body>
 8     <input type="button" value="点菜" id="btn" />
 9     <select name="" id="ss">
10         <option value="1">1发的防空警</option>
11         <option value="2">2发的防空警</option>
12         <option value="3">3发的防空警</option>
13         <option value="4" id="op1">4发的防空警</option>
14 <!--        <option value="4" selected="selected">4发的防空警</option>-->
15         <option value="5">5发的防空警</option>
16     </select>
17
18     <script src="common.js"></script>
19     <script>
20         my$('btn').onclick = function () {
21             my$('op1').selected = true ;
22         };
23
24     </script>
25
26 </body>
27 </html>
这里(包括下面的)的common.js 代码如下:
 1 /**
 2  * 根据id 返回相应的元素
 3  * */
 4 function my$(id){
 5     /*
 6     * id :string 类型
 7     * return :element
 8     * */
 9     return document.getElementById(id);
10 }
 1 <!DOCTYPE html>
 2 <html lang="en">
 3 <head>
 4     <meta charset="UTF-8">
 5     <title>Title</title>
 6 </head>
 7 <body>
 8     <br />
 9     <textarea name="caution" id="" cols="50" rows="10" disabled="disabled">
10         注意:
11         打瞌睡的就分开了警方的撒酒疯了空间
12         发生尽快付款的积分卡垃圾分
13         就看到就看见扩大进口家妇科大夫健康健康
14         都快撒酒疯空间看了就放假打开是
15         附近的上课放假啊离开
16     </textarea>
17
18 </body>
19 </html>
 1 <!DOCTYPE html>
 2 <html lang="en">
 3 <head>
 4     <meta charset="UTF-8">
 5     <title>Title</title>
 6 </head>
 7 <body>
 8     <br />
 9     <!--        注:当html 中属性和值相同时,可以后面不赋值,即 readonly 即可-->
10     <textarea name="caution" id="" cols="50" rows="10" readonly="readonly">
11         注意:
12         打瞌睡的就分开了警方的撒酒疯了空间
13         发生尽快付款的积分卡垃圾分
14         就看到就看见扩大进口家妇科大夫健康健康
15         都快撒酒疯空间看了就放假打开是
16         附近的上课放假啊离开
17     </textarea>
18
19 </body>
20 </html>
 1 <!DOCTYPE html>
 2 <html lang="en">
 3 <head>
 4     <meta charset="UTF-8">
 5     <title>Title</title>
 6 </head>
 7 <body>
 8     <br />
 9     <!--        注:当html 中属性和值相同时,可以后面不赋值,即 readonly 即可-->
10     <textarea name="caution" id="ta" cols="50" rows="10" readonly="readonly">
11         注意:
12         打瞌睡的就分开了警方的撒酒疯了空间
13         发生尽快付款的积分卡垃圾分
14         就看到就看见扩大进口家妇科大夫健康健康
15         都快撒酒疯空间看了就放假打开是
16         附近的上课放假啊离开
17     </textarea>
18     <input type="button" value="点我啊" id="btn" />
19     <script src="common.js"></script>
20     <script>
21         my$("btn").onclick = function () {
22             my$("ta").value = "哈哈哈,我修改你!";   //推荐用它改
23
24             // my$("ta").innerText = "哈哈哈哈"; //另一种方式修改,
25         };
26     </script>
27 </body>
28 </html>
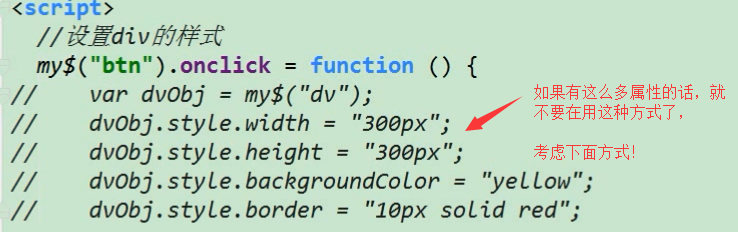
点击按钮修改 div 的宽,高,背景颜色:
 1 <!DOCTYPE html>
 2 <html lang="en">
 3 <head>
 4     <meta charset="UTF-8">
 5     <title>Title</title>
 6 </head>
 7 <body>
 8     <input type="button" value="点击我修改样式" id="btn">
 9     <div id="div"></div>
10     <script src="common.js"></script>
11     <script>
12         my$("btn").onclick = function () {
13             my$("div").style.width = "300px";
14             my$("div").style.height = "300px";
15             my$("div").style.backgroundColor = "cyan";  //凡是两个单词的属性在js 中都是将后面的单词首字母大写即可!
16         }
17     </script>
18
19 </body>
20 </html>
点击按钮显示和隐藏div :
 1 <!DOCTYPE html>
 2 <html lang="en">
 3 <head>
 4     <meta charset="UTF-8">
 5     <title>Title</title>
 6     <style>
 7         #div{
 8              300px;
 9             height: 300px;
10             background-color: darkblue;
11         }
12     </style>
13 </head>
14 <body>
15     <input type="button" value="隐藏" id="btn1">
16     <input type="button" value="显示" id="btn2">
17     <div id ='div'></div>
18     <script src="common.js"></script>
19     <script>
20         my$('btn1').onclick=function () {
21             my$('div').style.display = 'none';
22         };
23         my$('btn2').onclick=function () {
24             my$('div').style.display = 'block';
25         };
26
27     </script>
28
29 </body>
30 </html>
上面是通过两个按钮进行控制,下面只用一个按钮进行控制,
第一种:我自己写的:
 1 <!DOCTYPE html>
 2 <html lang="en">
 3 <head>
 4     <meta charset="UTF-8">
 5     <title>Title</title>
 6     <style>
 7         #div{
 8              300px;
 9             height: 300px;
10             background-color: darkblue;
11         }
12     </style>
13 </head>
14 <body>
15     <input type="button" value="显示/隐藏" id="btn">
16     <div id ='div'></div>
17     <script src="common.js"></script>
18     <script>
19         my$('btn').onclick=function () {
20             var obj = my$('div');
21             if( obj.style.display == 'none'){
22                  obj.style.display = 'block';
23             }else{
24                  obj.style.display= 'none';
25             }
26         };
27     </script>
28 </body>
29 </html>
第二个:标准:通过判断value
 1 <!DOCTYPE html>
 2 <html lang="en">
 3 <head>
 4     <meta charset="UTF-8">
 5     <title>Title</title>
 6     <style>
 7         #div{
 8              300px;
 9             height: 300px;
10             background-color: darkblue;
11         }
12     </style>
13 </head>
14 <body>
15     <input type="button" value="隐藏" id="btn">
16     <div id ='div'></div>
17     <script src="common.js"></script>
18     <script>
19         my$('btn').onclick=function () {
20             if(this.value == '隐藏'){
21                 my$('div').style.display = 'none';
22                 this.value = '显示';
23             }else if(this.value == '显示'){   //这里用 else if 更严谨
24                 my$('div').style.display = 'block';
25                 this.value = '隐藏';
26             }
27         };
28     </script>
29
30 </body>
31 </html>
点击按钮设置类样式(class) 以设置标签的样式 :
 1 <!DOCTYPE html>
 2 <html lang="en">
 3 <head>
 4     <meta charset="UTF-8">
 5     <title>Title</title>
 6     <style>
 7         .cls {
 8              300px;
 9             height: 300px;
10             background-color: darkblue;
11             border : 10px solid red;
12         }
13     </style>
14 </head>
15 <body>
16     <input type="button" value="设置样式" id="btn">
17     <div id ='div'></div>
18     <script src="common.js"></script>
19     <script>
20         my$('btn').onclick = function () {
21             // my$('div').class = 'cls'; //此时不行的,因为js DOM操作的时候用的关键字是className
22             my$('div').className = 'cls' ;
23         }
24     </script>
25 </body>
26 </html>
点击按钮,通过设置类样式的方式控制div 的显示和隐藏:(前面也有相同的需求)
 1 <!DOCTYPE html>
 2 <html lang="en">
 3 <head>
 4     <meta charset="UTF-8">
 5     <title>Title</title>
 6     <style>
 7         div {
 8             width: 300px;
 9             height: 300px;
10             background-color: darkblue;
11             border : 10px solid red;
12         }
13         .cls { /*设置为隐藏*/
14             display: none;
15         }
16     </style>
17 </head>
18 <body>
19     <input type="button" value="隐藏" id="btn">
20     <div id ='div'></div>
21     <script src="common.js"></script>
22     <script>
23         my$('btn').onclick = function () {
24             var obj = my$('div');
25             if ( obj.className != 'cls'){
26                 obj.className = 'cls';
27                 this.value = '显示';
28             }else{
29                 obj.className = '';
30                 this.value = '隐藏';
31             }
32         };
33     </script>
34 </body>
35 </html>
 1 <!DOCTYPE html>
 2 <html lang="en">
 3 <head>
 4     <meta charset="UTF-8">
 5     <title>Title</title>
 6     <style>
 7
 8         .cls{
 9             background-color: black;
10         }
11     </style>
12 </head>
13 <body>
14     <input type="button" value="关灯/开灯" id="btn">
15     <script src="common.js"></script>
16     <script>
17         my$('btn').onclick = function () {
18             document.body.className = document.body.className =="cls" ? "" :"cls";
19         }
20     </script>
21 </body>
22 </html>