Routing(路由)之订阅模型-Direct(直连)
在Fanout模式中,一条消息,会被所有订阅的队列都消费。
但是,在某种场景下,我们希望不同的消息被不同的队列消费。
这是就要用到Direct类型的Exchange。
在Direct模型下:
- 队列与交换机的绑定,不能是任意绑定了,而是要指定一个RoutingKey(路由key)
- 消息的发送方在 向Exchange发送消息时,也必须指定消息的RoutingKey。
- Exchange不在把消息交给每一个绑定的队列,而是根据消息的RoutingKey进行判断,只有列队的RoutingKey和消息的Routing key完全一致,才会接收到消息

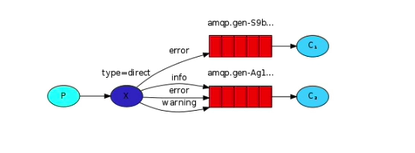
图解:
- P:生产者,向Exchange发送消息,发送消息时,会指定一个RoutingKey
- X:Exchange(交换机),接收生产者的消息,然后把消息递交给 与RoutingKey完全匹配的队列
- C1:消费者,其所在队列指定了需要RoutingKey为error的消息
- C2:消费者,其所在队列制定了需要的RoutingKey为info,worning,error的消息
生产者:
public class Provider {
    public static void main(String[] args) throws IOException {
        Connection connection = rabbitMQUtils.getConnection();
        Channel channel = connection.createChannel();
        String exchange="logs_direct";
        //通过通道声明交换机  参数1交换机名称  参数2交换机类型direct路由模式
        channel.exchangeDeclare(exchange,"direct");
        //发送消息
        String routingkey="info";
        channel.basicPublish(exchange,routingkey,null,("这是direct模型发布的基于routing key:["+routingkey+"]发送的消息").getBytes());
        rabbitMQUtils.connectionAndchannelClose(connection,channel);
    }
}
消费者1:
public class Customer1 {
    public static void main(String[] args) throws IOException {
        Connection connection = rabbitMQUtils.getConnection();
        Channel channel = connection.createChannel();
        String exchange="logs_direct";
        //通道声明交换机以及交换机的类型
        channel.exchangeDeclare(exchange,"direct");
        //创建一个临时队列
        String queue = channel.queueDeclare().getQueue();
        //基于routing key绑定队列和交换机
        channel.queueBind(queue,exchange,"error");
        //获取消费信息
        channel.basicConsume(queue,true,new DefaultConsumer(channel){
            @Override
            public void handleDelivery(String consumerTag, Envelope envelope, AMQP.BasicProperties properties, byte[] body) throws IOException {
                super.handleDelivery(consumerTag, envelope, properties, body);
                System.out.println("消费者-1"+new String(body));
            }
        });
    }
}
消费者2:
public class Customer2 {
    public static void main(String[] args) throws IOException {
        Connection connection = rabbitMQUtils.getConnection();
        Channel channel = connection.createChannel();
        String exchange="logs_direct";
        channel.exchangeDeclare(exchange,"direct");
        String queue = channel.queueDeclare().getQueue();
        channel.queueBind(queue,exchange,"info");
        channel.queueBind(queue,exchange,"error");
        channel.queueBind(queue,exchange,"warning");
        channel.basicConsume(queue,true,new DefaultConsumer(channel){
            @Override
            public void handleDelivery(String consumerTag, Envelope envelope, AMQP.BasicProperties properties, byte[] body) throws IOException {
                super.handleDelivery(consumerTag, envelope, properties, body);
                System.out.println("消费者-2"+new String(body));
            }
        });
    }
}