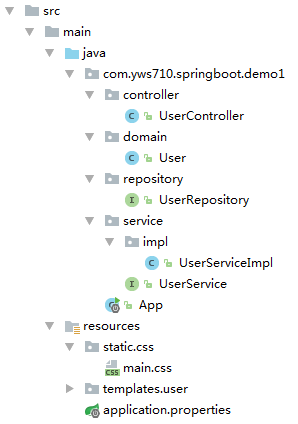
今天打算从数据库中取数据,并展示到视图中。不多说,先上图:
第一步:添加依赖。打开pom.xml文件,添加必要的依赖,完整代码如下:
<?xml version="1.0" encoding="UTF-8"?>
<project xmlns="http://maven.apache.org/POM/4.0.0"
         xmlns:xsi="http://www.w3.org/2001/XMLSchema-instance"
         xsi:schemaLocation="http://maven.apache.org/POM/4.0.0 http://maven.apache.org/xsd/maven-4.0.0.xsd">
    <modelVersion>4.0.0</modelVersion>

    <groupId>com.yws710.springboot</groupId>
    <artifactId>demo1</artifactId>
    <version>1.0-SNAPSHOT</version>
    <packaging>war</packaging>

    <parent>
        <groupId>org.springframework.boot</groupId>
        <artifactId>spring-boot-starter-parent</artifactId>
        <version>1.5.4.RELEASE</version>
    </parent>

    <dependencies>
        <dependency>
            <groupId>org.springframework.boot</groupId>
            <artifactId>spring-boot-starter-web</artifactId>
        </dependency>

        <!-- spring-data-jpa -->
        <dependency>
            <groupId>org.springframework.boot</groupId>
            <artifactId>spring-boot-starter-data-jpa</artifactId>
        </dependency>

        <!-- 使用Freemarker替代JSP做页面渲染 -->
        <dependency>
            <groupId>org.springframework.boot</groupId>
            <artifactId>spring-boot-starter-freemarker</artifactId>
        </dependency>

        <!-- mysql驱动 -->
        <dependency>
            <groupId>mysql</groupId>
            <artifactId>mysql-connector-java</artifactId>
        </dependency>
    </dependencies>
</project>
第二步:配置数据源(前提是数据库已经建好了)。在classpath:resources目录下新建一个名为application.properties的文件。在文件中添加如下内容:
spring.datasource.url=jdbc:mysql://localhost:3306/springbootdemo1
spring.datasource.username=root
spring.datasource.password=root
spring.datasource.driver-class-name=com.mysql.jdbc.Driver
spring.jpa.properties.hibernate.hbm2ddl.auto=update
这是今天仅有的配置信息。
第三步:domain层。创建实体类,在domain包中新建一个User类:
package com.yws710.springboot.demo1.domain;

import javax.persistence.*;
import java.io.Serializable;
import java.math.BigDecimal;
import java.util.Date;

@Entity
@Table(name="t_user")
public class User implements Serializable {

    @Id
    @GeneratedValue(strategy = GenerationType.AUTO)
    private int id;
    private String name;
    private Date birthday;
    private BigDecimal salary;

    public User(){}

    public User(int id, String name, Date birthday, BigDecimal salary) {
        this.id = id;
        this.name = name;
        this.birthday = birthday;
        this.salary = salary;
    }

    public int getId() {
        return id;
    }

    public void setId(int id) {
        this.id = id;
    }

    public String getName() {
        return name;
    }

    public void setName(String name) {
        this.name = name;
    }

    public Date getBirthday() {
        return birthday;
    }

    public void setBirthday(Date birthday) {
        this.birthday = birthday;
    }

    public BigDecimal getSalary() {
        return salary;
    }

    public void setSalary(BigDecimal salary) {
        this.salary = salary;
    }
}
第四步:dao层。在repository包中新建一个UserRepository接口:
package com.yws710.springboot.demo1.repository;

import com.yws710.springboot.demo1.domain.User;
import org.springframework.data.jpa.repository.JpaRepository;

public interface UserRepository extends JpaRepository<User, Integer> {

}
神奇的Spring Data JPA,自从用了它,我连最简单的查询语句都不会写了。
第五步:service层。在service包中创建UserService接口,以及它的实现类UserServiceImpl。
package com.yws710.springboot.demo1.service;

import com.yws710.springboot.demo1.domain.User;

import java.util.List;

public interface UserService {

    List<User> userList();
}
package com.yws710.springboot.demo1.service.impl;

import com.yws710.springboot.demo1.domain.User;
import com.yws710.springboot.demo1.repository.UserRepository;
import com.yws710.springboot.demo1.service.UserService;
import org.springframework.beans.factory.annotation.Autowired;
import org.springframework.stereotype.Service;

import java.util.List;

@Service
public class UserServiceImpl implements UserService {

    @Autowired
    UserRepository userRepository;

    @Override
    public List<User> userList() {
        return userRepository.findAll();
    }
}
第六步:控制层。在controller包中创建UserController类:
package com.yws710.springboot.demo1.controller;

import com.yws710.springboot.demo1.service.UserService;
import org.springframework.beans.factory.annotation.Autowired;
import org.springframework.stereotype.Controller;
import org.springframework.web.bind.annotation.RequestMapping;
import org.springframework.web.bind.annotation.ResponseBody;
import org.springframework.web.servlet.ModelAndView;

@Controller
@RequestMapping("/user")
public class UserController {

    @Autowired
    UserService userService;

    @RequestMapping("/list")
    public ModelAndView userList() throws Exception {
        ModelAndView mv = new ModelAndView();
        mv.addObject("userList", userService.userList());
        mv.setViewName("/user/list");

        return mv;
    }
}
第七步:视图层。在classpath:resources中创建一个名为templates的文件夹,这是Spring Boot默认的视图文件存放位置,创建一个user目录,在user中建立一个名为list.ftl的文件(Freemarker模板文件),文件内容如下:
<!DOCTYPE html>
<html lang="zh-CN">
<head>
    <meta charset="UTF-8">
    <title>用户列表</title>
    <link href="/css/main.css" rel="stylesheet" />
</head>
<body>
    <table>
        <thead>
            <tr>
                <th>ID</th>
                <th>姓名</th>
                <th>生日</th>
                <th>薪资</th>
            </tr>
        </thead>
        <tbody>
            <#list userList as user>
            <tr>
                <td>${user.id}</td>
                <td>${user.name}</td>
                <td>${user.birthday?string('yyyy-MM-dd')}</td>
                <td>${user.salary}</td>
            </tr>
            </#list>
        </tbody>
    </table>
</body>
</html>
为了展示静态资源的访问,特地在classpath:resources中创建了一个static文件夹。你猜的没错,这就是Spring Boot默认的静态资源存放位置(其实默认的位置有三个,详见Spring Boot官方文档),main.css文件就存放在static中的css文件夹中。注意模板文件中引用css文件的写法(感觉自己好啰嗦)。
第八步:创建启动类。在demo1包中新建一个App类:
package com.yws710.springboot.demo1;

import org.springframework.boot.SpringApplication;
import org.springframework.boot.autoconfigure.SpringBootApplication;

@SpringBootApplication
public class App {

    public static void main(String[] args) {
        SpringApplication.run(App.class, args);
    }

}
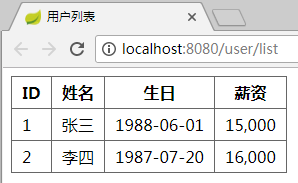
第九步:运行App类中的main方法。在浏览器中输入 http://localhost:8080/user/list,页面显示结果如下:
最后啰嗦一句,注意项目结构图中各文件的位置。
收工,明天打算使用日志和阿里巴巴的数据连接池Druid。