本系列简单介绍自己搭建微服务架构的过程,如有问题,请多指正!
1.集群部署
微服务被调用后,如果意外停止服务,将会影响系统的部分功能运行,于是采用集群来解决这个问题。
创建.Net Core的WebApi项目,编译后启动
dotnet MicService.dll --urls="http://*:7002" --text="我是7002"

dotnet MicService.dll --urls="http://*:7003" --text="我是7003"

dotnet MicService.dll --urls="http://*:7004" --text="我是7004"

2.Nginx负载均衡
集群过多之后,需要做负载均衡,引入了Nginx。
Nginx有4种经典方式:轮询方式,权重方式,ip_hash方式,第三方模块方式
本次我们采用权重方式
nginx.conf的配置如下:
 1 upstream myserver {
 2     server localhost:7002 weight=1;
 3     server localhost:7003 weight=3;
 4     server localhost:7004 weight=6;
 5 }
 6 server {
 7     listen   82;
 8     server_name localhost;
 9     location / {
10         proxy_pass   http://myserver;
11     }
12 }
Nginx启动,双击即可。

如果Nginx启动出错,可能安装路径含有中文,错误如下图所示:

结果如下:监听82端口,根据分配权重,跳转到7002,7003,或7004端口下


3.Consul服务发现与治理
Nginx使用的过程中,需要手动配置对应的微服务地址,无法主动发现,通过Ocelot来处理解决服务治理的问题。服务通过再Consul注册,从而发现服务,统一管理。
Consul下载地址:https://www.consul.io/downloads.html
下载完成后启动: consul.exe agent -dev
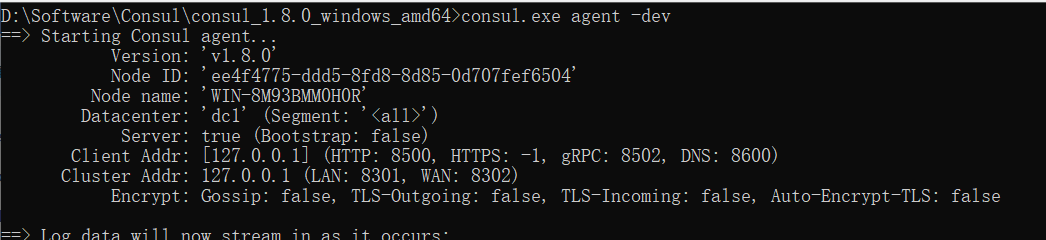
Consul的默认端口是8500,访问本地8500,localhost:8500

(1)服务注册
引入Consul的Nuget包
 1 public static async void ConsulRegist(this IConfiguration configuration)
 2     {
 3         string ip = configuration["ip"];
 4         int port = int.Parse(configuration["port"]);
 5         int weight = string.IsNullOrWhiteSpace(configuration["weight"]) ? 1 : int.Parse(configuration["weight"]);
 6         using (ConsulClient client = new ConsulClient(c =>
 7         {
 8             c.Address = new Uri("http://localhost:8500/");
 9             c.Datacenter = "dc1";
10         }))
11         {
12             await client.Agent.ServiceRegister(new AgentServiceRegistration()
13             {
14                 ID = "service " + ip + ":" + port,// 服务唯一标识
15                 Name = "MicServiceName",//分组
16                 Address = ip,
17                 Port = port,
18                 Tags = new string[] { weight.ToString() }, //额外信息传递
19                 //心跳检查
20                 Check = new AgentServiceCheck()
21                 {
22                     Interval = TimeSpan.FromSeconds(12),  //12秒间隔一次
23                     HTTP = $"http://{ip}:{port}/Api/Health/Index", //心跳检查地址
24                     Timeout = TimeSpan.FromSeconds(5), //监测等待时间
25                     DeregisterCriticalServiceAfter = TimeSpan.FromSeconds(20) //失败后20秒移除
26                 }
27             });
28
29         }
30     }
在startup.cs文件的Configure添加注册
this.Configuration.ConsulRegist();
(2)服务发现之WebApi
dotnet MicService.dll --urls="http://*:7002" --ip="127.0.0.1" --port=7002 --weight=1

dotnet MicService.dll --urls="http://*:7003" --ip="127.0.0.1" --port=7003 --weight=1
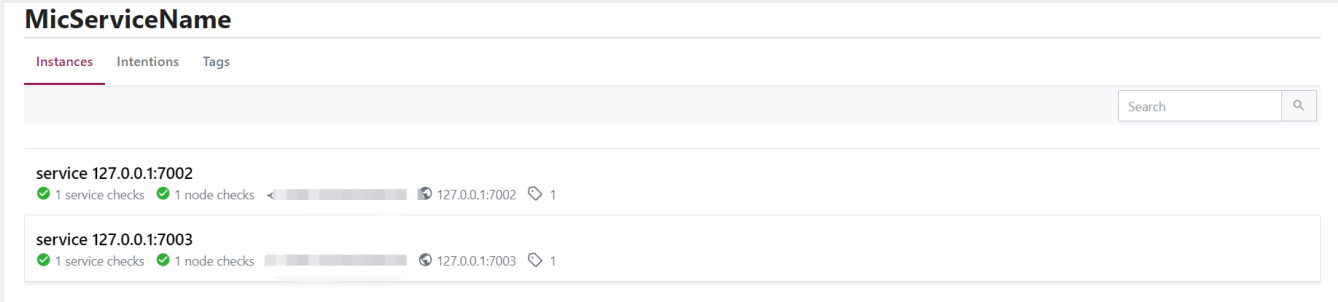
MicServiceName的Instance实例数变为2个

点击“MicServiceName”详情,可以看到两个注册的服务在运行中
(2)服务发现之GPRPC
====待补充===
4.使用服务
(1)创建客服端WebAPI项目
引入Consul的Nuget包
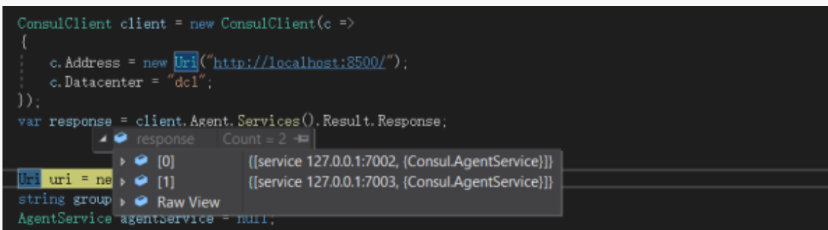
新建API控制器“ClienterController.cs”,注意其中的url,对应步骤3中的服务名称(MicServiceName),"http://MicServiceName/WeatherForecast"
 1 public class ClienterController : ControllerBase
 2 {
 3     private static int _iTotalCount = 0;
 4     private static int iTotalCount
 5     {
 6         get
 7         {
 8             return _iTotalCount;
 9         }
10         set
11         {
12             _iTotalCount = value >= Int32.MaxValue ? 0 : value;
13         }
14     }
15     /// <summary>
16     /// GetConsulMic
17     /// </summary>
18     /// <returns></returns>
19     [HttpPost("GetConsulMic")]
20     public async  Task<string> GetConsulMic()
21     {
22         string url = null;
23
24         #region Consul
25         url = "http://MicServiceName/WeatherForecast";//客户端得知道调用啥服务,啥名字---consul就是个DNS
26
27         ConsulClient client = new ConsulClient(c =>
28         {
29             c.Address = new Uri("http://localhost:8500/");
30             c.Datacenter = "dc1";
31         });
32         var response = client.Agent.Services().Result.Response;
33
34
35         Uri uri = new Uri(url);
36         string groupName = uri.Host;
37         AgentService agentService = null;
38
39         //找到的全部服务
40         var serviceDictionary = response.Where(s => s.Value.Service.Equals(groupName, StringComparison.OrdinalIgnoreCase)).ToArray();
41         {
42
43             //有多个服务 选择一个 用到负载均衡策略
44             int index = iTotalCount++ % serviceDictionary.Length;
45             agentService = serviceDictionary[index].Value;
46         }
47         url = $"{uri.Scheme}://{agentService.Address}:{agentService.Port}{uri.PathAndQuery}";
48         #endregion
49
50         return InvokeApi(url);
51     }
52     public static string InvokeApi(string url)
53     {
54         using (HttpClient httpClient = new HttpClient())
55         {
56             HttpRequestMessage message = new HttpRequestMessage();
57             message.Method = HttpMethod.Get;
58             message.RequestUri = new Uri(url);
59             var result = httpClient.SendAsync(message).Result;
60             string content = result.Content.ReadAsStringAsync().Result;
61             return content;
62         }
63     }
64 }
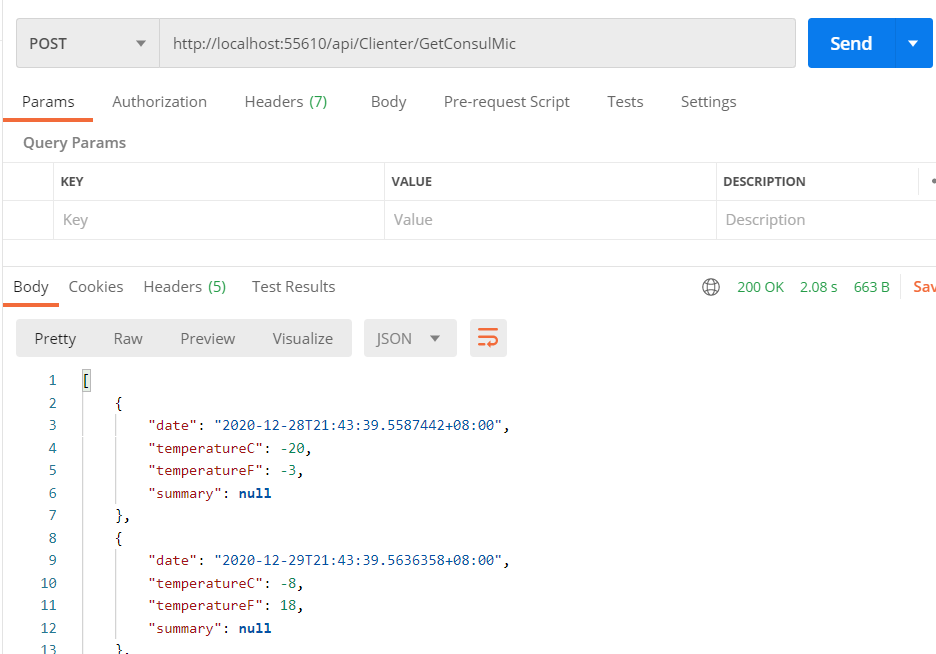
运行结果如下:
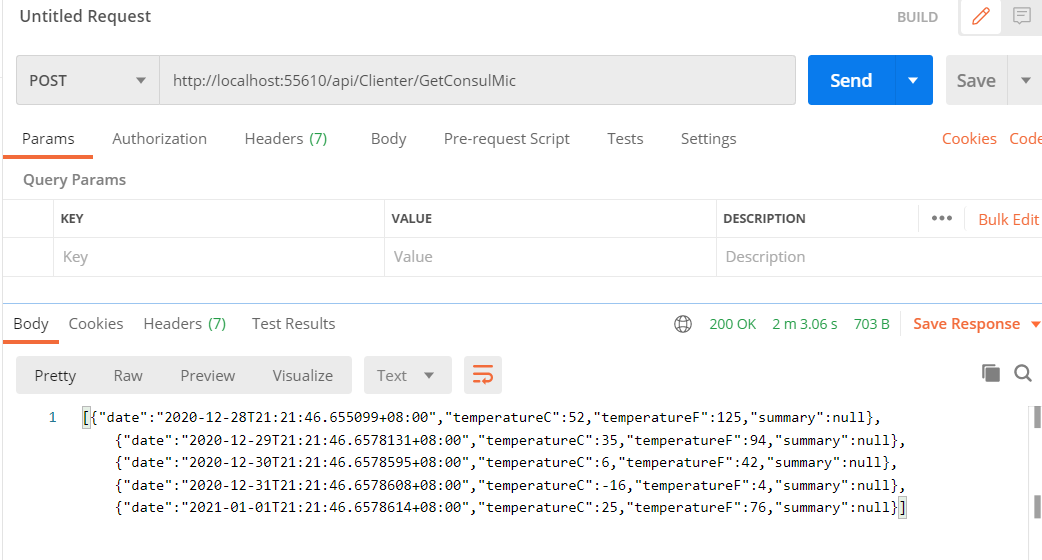
(2)对字符串进行解析,返回实体数组
1 return Newtonsoft.Json.Linq.JArray.Parse(content).ToObject<List<WeatherForecast>>();
结果如下:
以上,仅用于学习和总结!