基本选择器
下面所有的基本选择器都是在demo1.html的基础上面添加部分样式实现的。
demo1.html
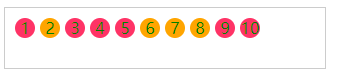
<!DOCTYPE html>
<html>
<head>
    <meta charset="UTF-8">
    <style type="text/css">
    .demo{
        width:400px;
        height:50px;
        border:1px solid #ccc;
        padding:10px;
    }
    ul{
        height:30px;
    }
    li{
        text-decoration: none;
        list-style: none;
        float:left;
        height:20px;
        line-height: 20px;
        width:20px;
        border-radius:10px;
        text-align:center;
        background:#f36;
        color:green;
        margin-right:5px;

    }
    </style>
</head>
<body>
    <div class="demo">
        <ul class="clearfix">
            <li id="first" class="first">1</li>
            <li class="active important">2</li>
            <li class="important items">3</li>
            <li class="important">4</li>
            <li class="items">5</li>
            <li>6</li>
            <li>7</li>
            <li>8</li>
            <li>9</li>
            <li id="last" class="last">10</li>
        </ul>
    </div>
</body>
</html>
通配符选择器(*)
通配符选择器用来选择所有元素,也可以选择某个元素下的所有元素。
*{margin:0;padding:0;}
.demo *{border:1px solid blue;}
元素选择器(E)
元素选择器用于选择文档元素
li{background-color:grey;color:orange;}

类名选择器
.important{font-weight:bold;color:yellow;}

类选择器结合元素选择器使用
li.important{font-weight:bold;color:yellow;}

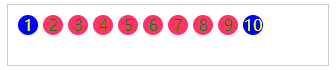
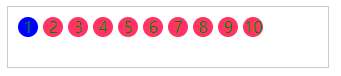
id选择器
id选择器,同类选择器相同,具有唯一使用性的用ID选择器
#first{color:blue;}

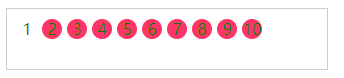
后代选择器(E F)
选择元素E下面所有的后代F元素,不论之间隔了多少层, 都能被选中。
.demo li{color:blue;}
子元素选择器(E > F)
此时的F是E的直接子元素,他们之间只隔了一层,为父子关系
ul>li{color:yellow;}

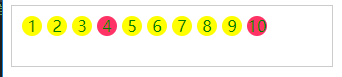
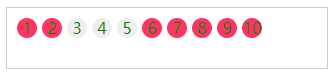
相邻兄弟元素选择器(E + F)
EF两元素具有相同的父元素,而且F元素在E元素后面,二者相邻(此时只有第2开始的li满足条件)
li + li{border:1px solid blue;}

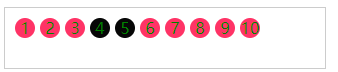
通用兄弟选择器(E ~F)
此时的EF具有相同的父元素,F在E后面,选择所有在E后面且和E拥有统一父元素的多个F
li ~ li{border:1px solid blue;}

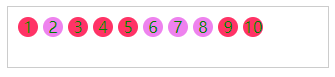
群组选择器
.first,.last{background-color:red;}

属性选择器
常见的属性选择器包括以下几类:
- E[attr]:只使用属性名,但没有确定任何属性值
- E[attr = "value"]:指定属性名,并指定了该属性的属性值
- E[attr~="value"]:指定属性名,并且具有属性值,此属性值是一个词列表,并且以空格隔开,其中词列表中包含了一个value词,而且等号前面的~不能不写
- E[attr^="value"]:指定了属性名。并且有属性值,属性值是以value开头的
- E[attr$="value"]:指定了属性名,并且有属性值,且属性值是以value结束的
- E[attr*="value"]:指定了属性名,并且有属性值,且属性值中包含了value
- E[attr|="value"]:指定了属性名,并且属性值是value或者以"value-"开头的值
在这些属性选择器中,E[attr="value"]和E[attr*="value"]是最实用的,其中E[attr="value"]能帮我们定位不同类型的元素,特别是表单form元素的操作,比如说input[type="text"],input[type="checkbox"]等,而E[attr*="value"]能在网站中帮助我们匹配不同类型的文件,比如说你的网站上不同的文件类型的链接需要使用不同的icon图标,用来帮助你的网站提高用户体验,就像前面的实例,可以通过这个属性给".doc",".pdf",".png",".ppt"配置不同的icon图标。
下面所有的属性选择器都是在demo2.html的基础上加入相关样式实现的。
demo2.html
<!DOCTYPE html>
<html>
<head>
    <meta charset="UTF-8">
    <style type="text/css">
    .demo{
        width:300px;
        height:40px;
        border:1px solid #ccc;
        padding:10px;
    }
    .demo a{
        float:left;
        display:block;
        height:20px;
        line-height:20px;
        width:20px;
        border-radius:10px;
        text-align:center;
        background:#f36;
        color:green;
        margin-right:5px;
        text-decoration:none;
    }
    </style>
</head>
<body>
    <div class="demo clearfix">
        <a href="http://www.w3cplus.com" target="_blank" class="links item first" id="first" title="123"> 1</a>
        <a href="" class="links active item" title="test website" target="_blank" lang="zh">2</a>
        <a href="sites/file/test.html" class="links item" title="this is a link" lang="zh-cn">3</a>
        <a href="sites/file/test.png" class="links item"  target="_blank" lang="zh-tw">4</a>
        <a href="sites/file/image.png" class="links item" title="zh-cn">5</a>
        <a href="mailto:w3cplus@hotmail" class="links item" title="website link" lang="zh">6</a>
        <a href="" class="links item" title="open the website"  lang="cn">7</a>
        <a href="" class="links item" title="close the website"  lang="en-zh">8</a>
        <a href="" class="links item" title="http://www.sina.com" >9</a>
        <a href="" class="links item last" id="last">10</a>
    </div>
</body>
</html>
E[attr]
.demo a[id]{background:blue;color:yellow;}
.demo a[href][title]{background: yellow;}
E[attr = "value"]
.demo a[id="first"]{background:blue;}
.demo a[href="http://www.w3cplus.com"][title]{background-color: #fff;}
E[attr~="value"]
.demo a[title~="website"]{background:orange;}
E[attr^="value"]
.demo a[href^="sites/"]{background:#eee;}
E[attr$="value"]
.demo a[href$="png"]{background:#070707;}
E[attr*="value"]
.demo a[title*="site"]{background-color: violet;}
E[attr|="value"]
.demo a[lang|="zh"]{background:gray;}

伪类选择器
下面所有的伪类选择器都是在demo3.html的基础上加入相关样式实现的。
demo3.html
<!DOCTYPE html>
<html>
<head>
    <meta charset="UTF-8">
    <style type="text/css">
    .demo{
        width:400px;
        height:50px;
        border:1px solid #ccc;
        padding:10px;
    }
    li{
        border:1px solid #ccc;
        padding:2px;
        float:left;
        margin-right:4px;
        list-style: none;
    }
    a{
        float:left;
        display:block;
        height:20px;
        line-height:20px;
        width:20px;
        border-radius:10px;
        text-align:center;
        background:#f36;
        color:green;
        text-decoration:none;
    }
    </style>
</head>
<body>
    <div class="demo clearfix">
        <ul class="clearfix">
            <li class="first links" id="first"><a href="">1</a></li>
            <li class="links"><a href="">2</a></li>
            <li class="links"><a href="">3</a></li>
            <li class="links"><a href="">4</a></li>
            <li class="links"><a href="">5</a></li>
            <li class="links"><a href="">6</a></li>
            <li class="links"><a href="">7</a></li>
            <li class="links"><a href="">8</a></li>
            <li class="links"><a href="">9</a></li>
            <li class="links last" id="last"><a href="">10</a></li>
        </ul>
    </div>
</body>
</html>

动态伪类
动态伪类:只有当用户和网站交互的时候才能体现出来的,link:链接没有被访问时的样式,visited:链接被访问以后的样式,hover:鼠标悬浮时的样式,active:鼠标点中激活的已瞬间的样式。
.demo a:link{color:gray;}
.demo a:visited{color:yellow;}
.demo a:hover{color:green;}
.demo a:active{color:blue;}


UI元素状态伪类
UI元素状态伪类主要指type=text时的enable和disabled,type=radio和type=checkbox的checked和unchecked等。
input[type="text"]:disabled {border:1px solid red;}
:nth选择器
:first-child用来选择某个元素的第一个子元素,:last-child用来选择某个元素的最后一个子元素。
.demo li:first-child{background:green;}
.demo li:last-child{background:green;}

:nth-child()用来选择某个元素的一个或多个特定的子元素
.demo li:nth-child(n){background:green;}  /*选择demo下的所有li*/
.demo li:nth-child(n+5){background:green;}    /*选择demo下从第五个开始的li*/
.demo li:nth-child(-n+5){background:green;}       /*选择demo下的前五个li*/
.demo li:nth-child(5){background:green;}     /*选择demo下的第五个li*/
.demo li:nth-child(5n){background:green;}      /*选择demo下5的倍数的li*/
.demo li:nth-child(3n+1){background:green;}      /*每隔3个选一个*/
.demo li:nth-child(even){background:green;}      /*偶数个li*/
.demo li:nth-child(odd){background:green;}      /*奇数个li*/
:nth-last-child()同:nth-child()作用相同,只是一个是从前面开始计算,一个是从后面开始计算
:nth-of-type:类似于:nth-child,不同的是这个只计算选择器中指定的那个元素,主要用来定位元素中包含了好多不同类型的元素
:only-child
:only-child:表示该元素是其父元素的唯一的子元素
:only-of-type:表示一个元素有很多个子元素,而其中只有一个子元素是唯一的,
例如,在一个div中,包含有div、li、p等等,而p只有一个,具有唯一性,就可以这样写 p:only-of-type{background-color: green}
:empty
:empty:用来选择没有任何内容的元素,包括空格都没有
p:empty{display: none}
:has
:has:用来选择包含某元素的元素
a:has( img ){border:1px solid red;} /*为所有包含img的a添加边框*/
:not
:not:用来选择不包含某元素的元素
li:not(:has(p)){padding-top:10px;} /*选择不包含p的li元素*/
:matches
:matches用于匹配是否包含某些类或id。
p:matches(.alert,.error,.warn){color:red;} /*只要元素p带有.alert,.error,.warn中的任何一个类名,文本颜色就变为red*/
伪元素
::first-line:选择元素的第一行
::first-letter:选择文本块的第一个字母
::before和::after:主要用来在元素的前后插入内容
::selection用来改变浏览网页选中的默认效果