一、消息概述
-
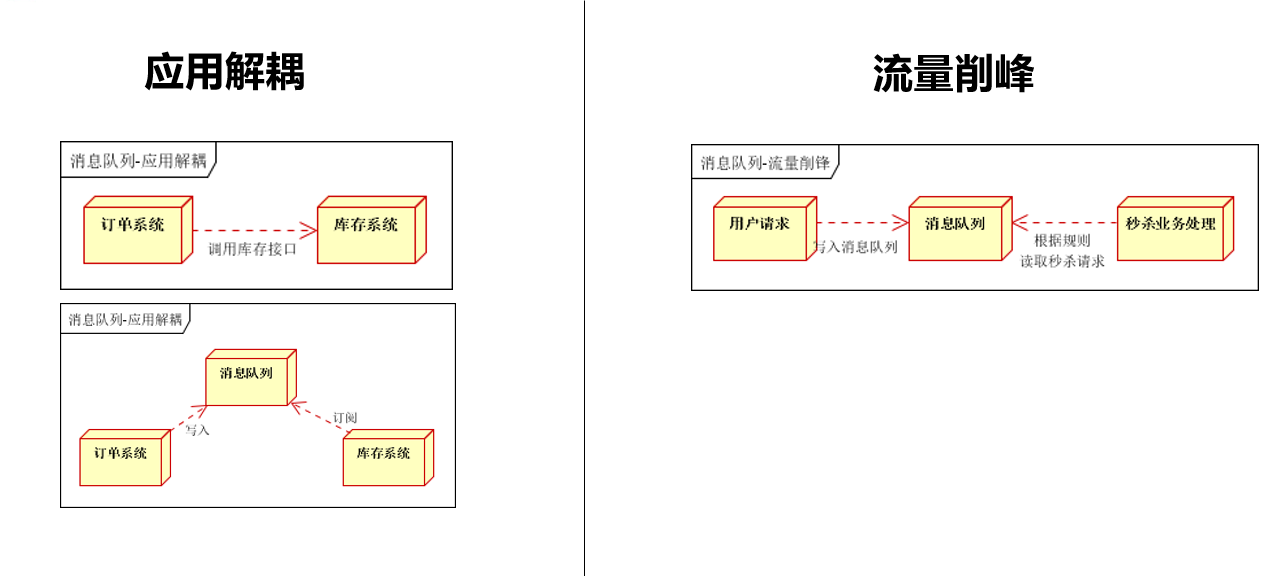
在大多数应用中,可以通过消息服务中间件来提升系统的异步通信、扩展解耦和流量削峰等能力。

-
当消息发送者发送消息后,将由消息代理接管,消息代理保证消息传递到指定目的地。
-
消息队列主要有两种形式的目的地:
- 队列(queue):点对点消息通信(point-to-point):消息发送者发送消息,消息代理将其送入一个队列中,消息接收者从队列中获取消息,消息被读取后被移出队列。注意:每一个消息只能从一个发送者发送到达唯一一个接收者。
- 主题(topic):发布(publish)/订阅(subscribe)消息通信:发送者(发布者)发送消息到主题,多个接收者(订阅者)监听(订阅)这个主题,那么接收者(订阅者)就会在消息到达时同时收到消息。
-
JMS(Java Message Service):JAVA 消息服务--基于 JVM 消息代理的规范。ActiveMQ、HornetMQ 是 JMS 的实现。
-
AMQP(Advanced Message Queuing Protocol):高级消息队列协议,也是一个消息代理的规范,兼容 JMS,RabbitMQ是 AMQP 的实现。
二、RabbitMQ
-
简介:RabbitMQ 是一个由 erlang 开发的 AMQP 的开源实现。
-
核心概念:
- Message:消息,消息是不具名的,它由消息头和消息体组成。消息体是不透明的,而消息头则由一系列的可选属性组成,这些属性包括 routing-key(路由键)、priority(相对于其他消息的优先权)、delivery-mode(指出该消息可能需要持久性存储)等。
- Publisher:消息的生产者,也是一个向交换器发布消息的客户端应用程序。
- Exchange:交换器,用来接收生产者发送的消息并将这些消息路由给服务器中的队列。
- Queue:消息队列,用来保存消息直到发送给消费者一个消息可投入一个或多个队列。
- Binding:绑定,用于关联消息队列和交换器。一个绑定就是基于路由键将交换器和消息队列连接起来的路由规则,所以可以将交换器理解成一个由绑定构成的路由表。Exchange 和 Queue 之间的绑定可以多对多的。
- Connection:网络连接,比如一个 TCP 连接。
- Channel:信道,多路复用连接中的一条独立的双向数据流通道。信道是建立在真实的 TCP 连接内的虚拟连接,AMQP 的命令都是通过信道发送出去的。因为建立和销毁一条 TCP 连接开销太大,所以使用信道来复用 TCP 连接。
- Consumer:消息的消费者,表示一个从消息队列中取得消息的客户端应用程序。
- Virtual Host:虚拟主机,表示一批交换器、消息队列和相关对象。虚拟主机是共享相同的身份认证和加密环境的独立服务器域。每个 vhost 本质就是一个 mini 版的 RabbitMQ 服务器,拥有自己的队列、交换器、绑定和权限机制。vhost 是 AMQP 概念的基础,必须在连接时指定,RabbitMQ 默认的 vhost 是/。
- Broker:消息队列服务器实体。

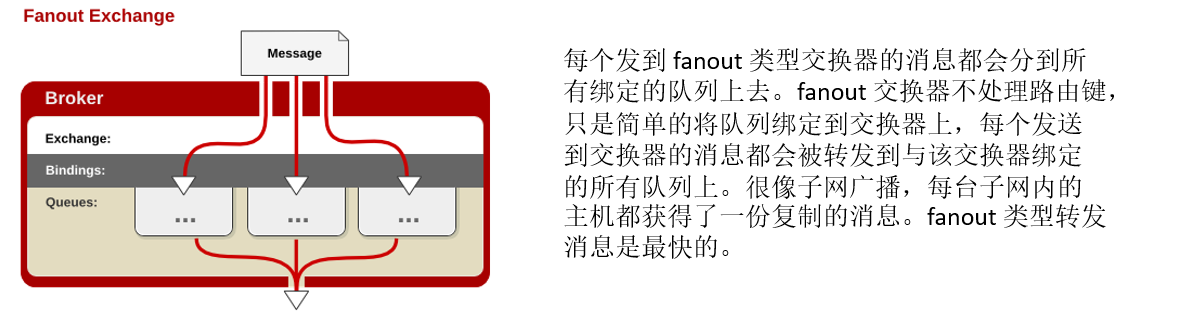
Exchange 类型:Exchange分发消息时根据类型的不同分发策略有区别,目前共四种类型:direct、fanout、topic、headers(性能较差,几乎不用)。


1、docker 安装 RabbitMQ
拉取镜像(阿里云服务器上):
[root@izwz9d74k4cznxtxjeeur9z ~]# docker pull rabbitmq:3-management
镜像实例化为容器:
[root@izwz9d74k4cznxtxjeeur9z ~]# docker run -d -p 5672:5672 -p 15672:15672 --name myrabbitmq a7f2574d507f

# 第一个端口映射为 rabbitmq 客户端服务,第二个端口映射为 web 管理界面
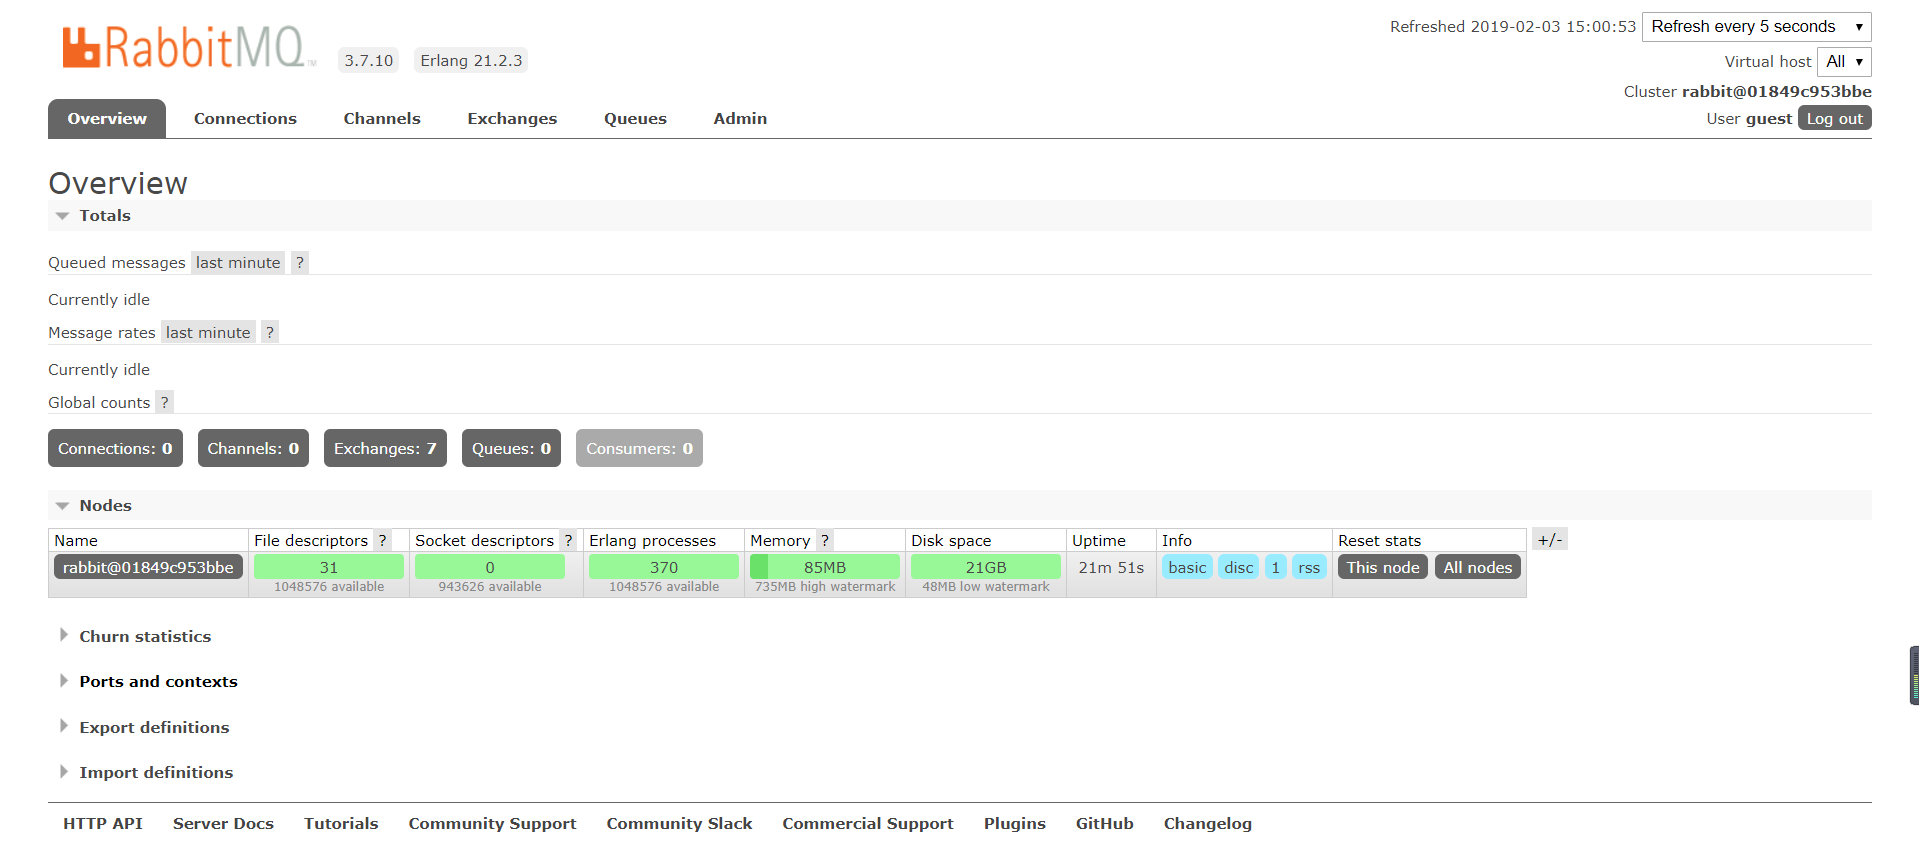
测试访问(IP + 端口):

输入账号:guest 密码:guest
2、测试 RabbitMQ
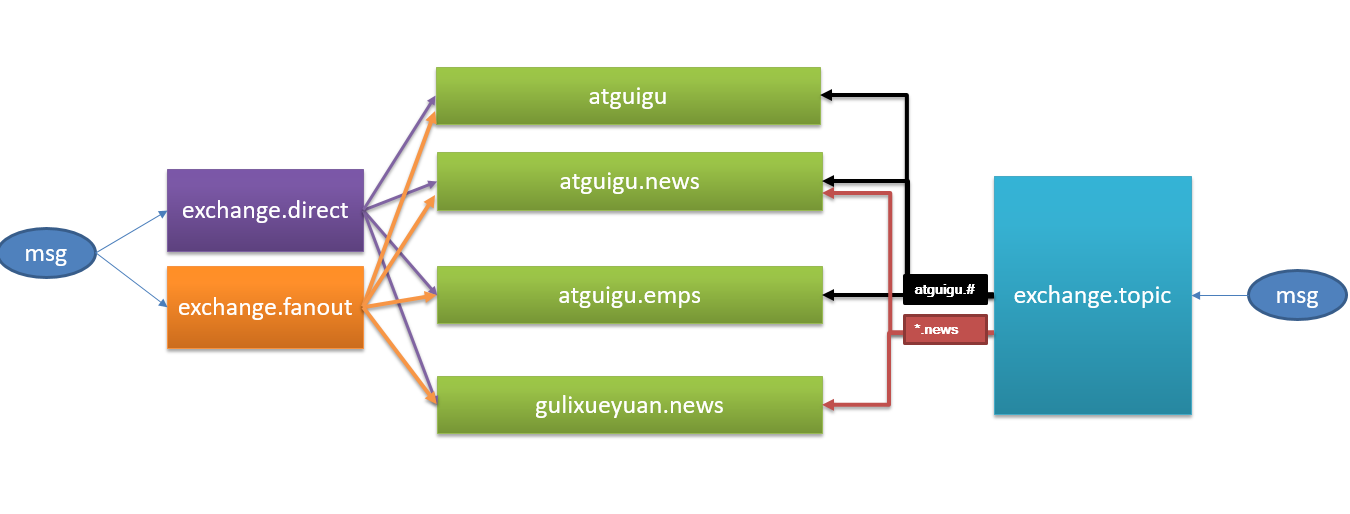
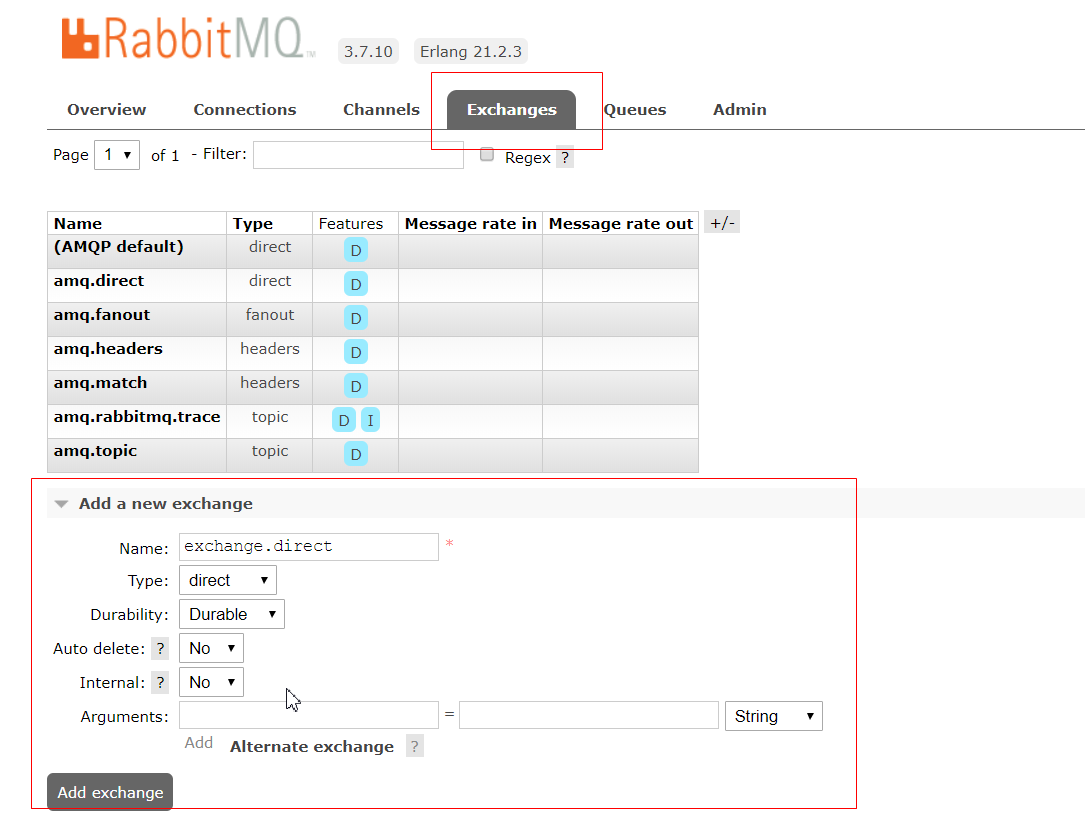
以上图中的 3 种交换器、4 个队列为例,测试 RabbitMQ:
-
添加一个名为 exchange.direct ,类型为 direct 交换器;添加一个名为 exchange.fanout,类型为 fanout 的交换器;添加一个名为 exchange.topic,类型为 topic 的交换器。
-
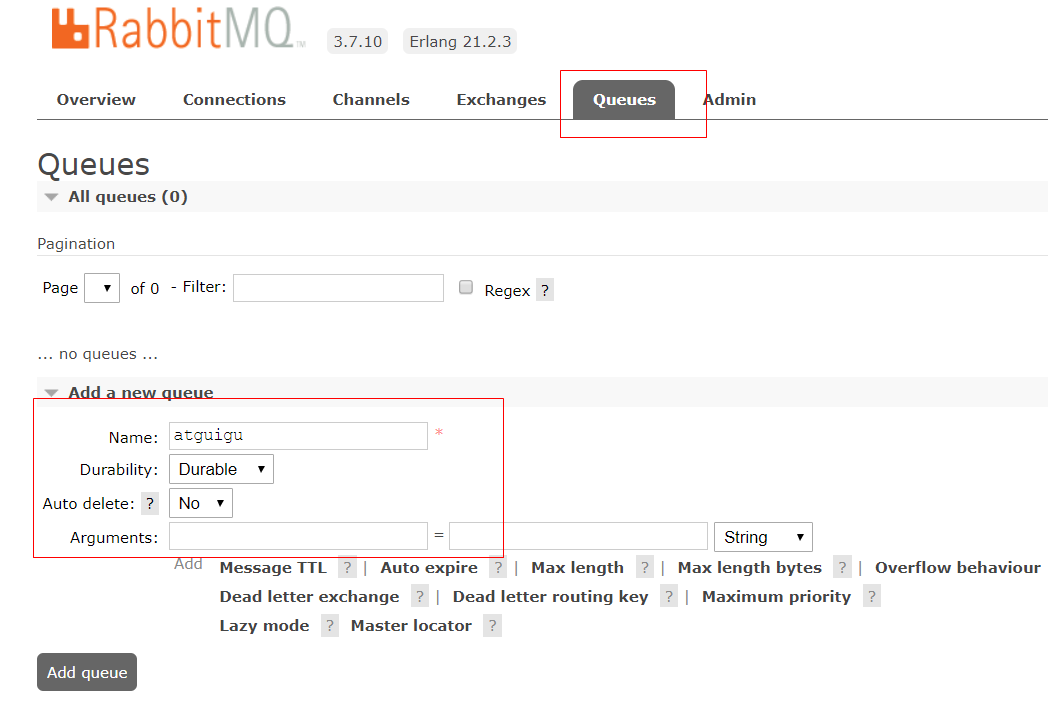
添加 4 个队列,分别名为 atguigu、atguigu.news、atguigu.emps 和 gulixueyuan.news。
-
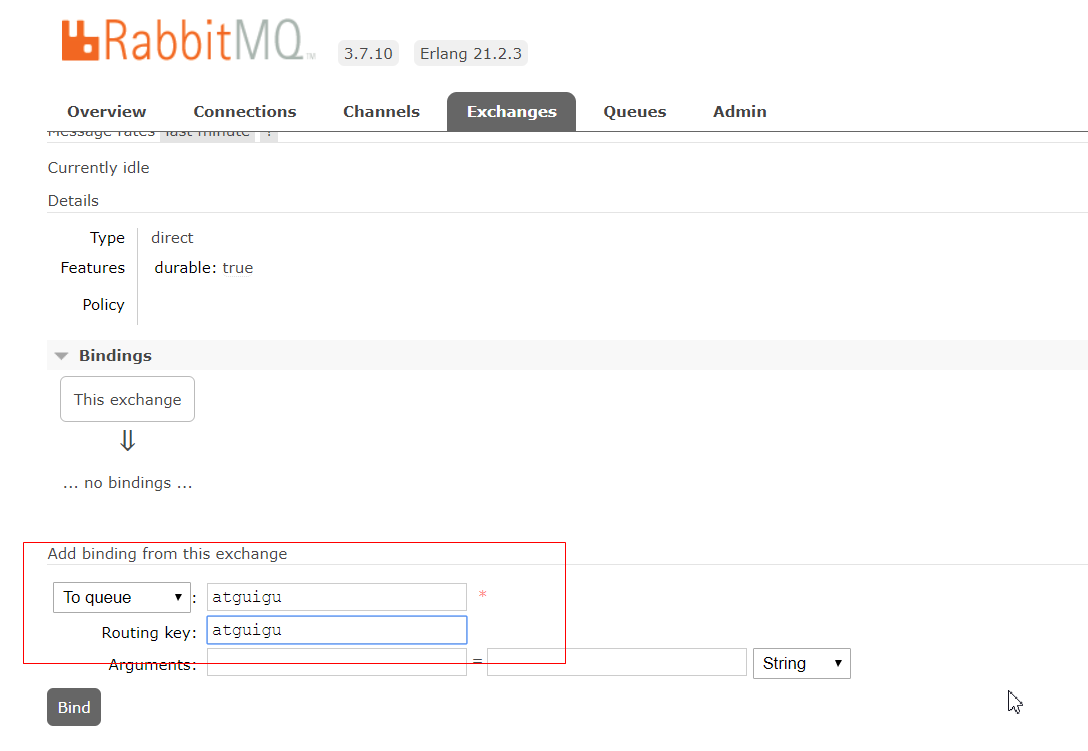
添加交换器 和 队列之间的绑定(Routing Key):①为 exchange.direct 与 4 个队列之间添加 Bindings,Routing Key 分别为队列名 atguigu、atguigu.news、atguigu.emps 和 gulixueyuan.news。(direct 类型交换器精确匹配路由键)
②为 exchange.fanout 与 4 个队列之间添加 Bindings,Routing Key 分别为队列名 atguigu、atguigu.news、atguigu.emps 和 gulixueyuan.news。(fanout 类型交换器与路由键无关,它是广播的)
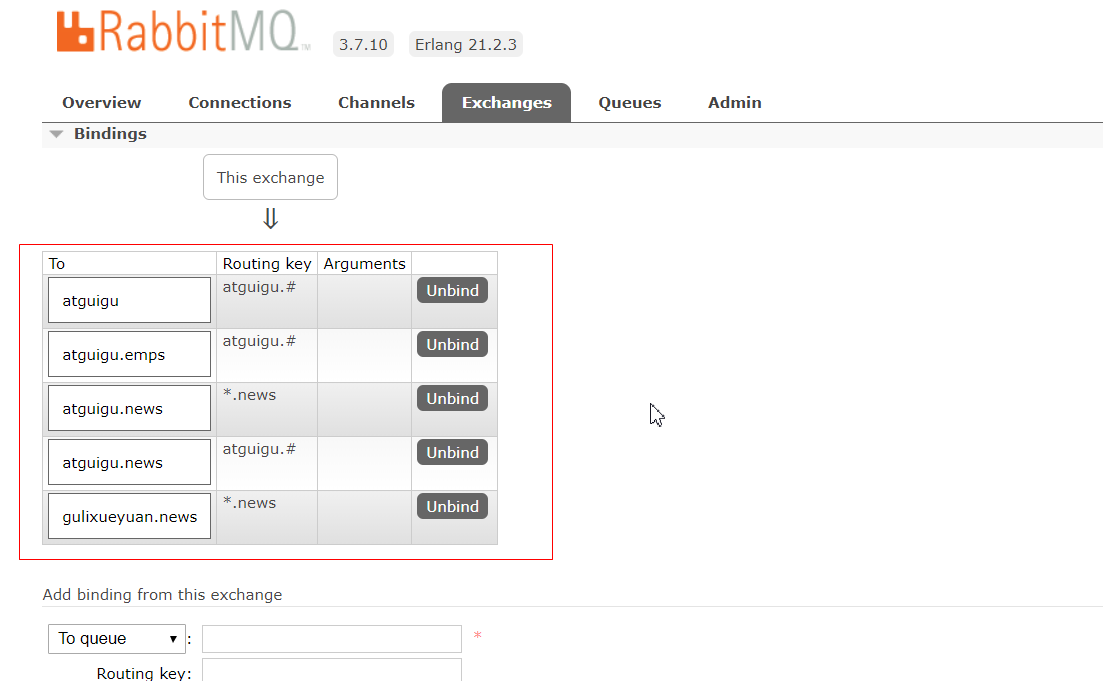
③为 exchange.topic 与 4 个队列之间添加如示意图所示的 Bindings。绑定结果如下:
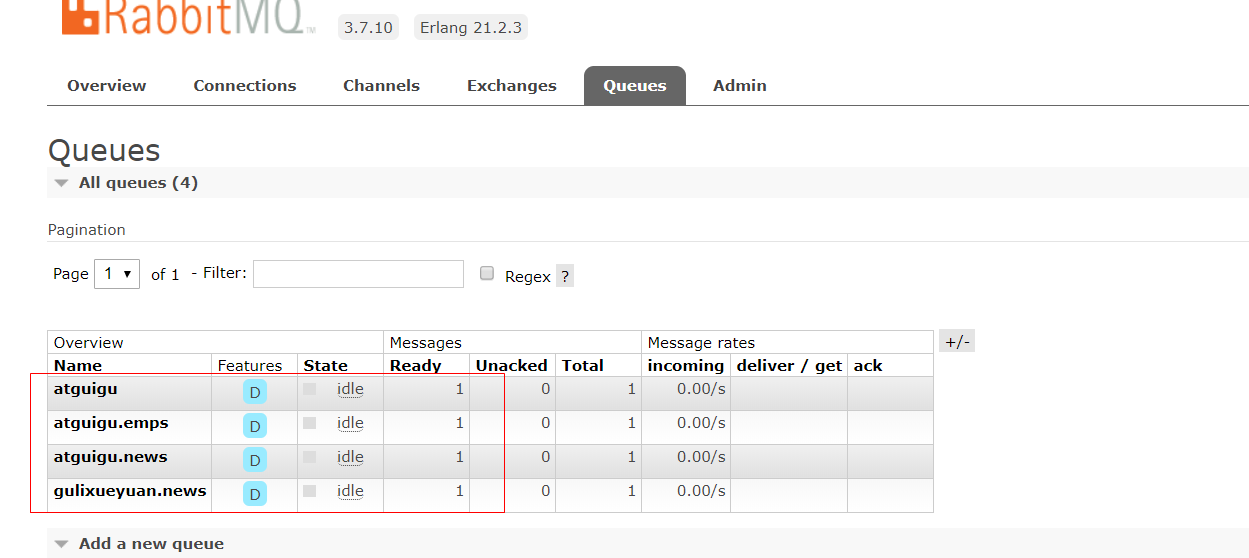
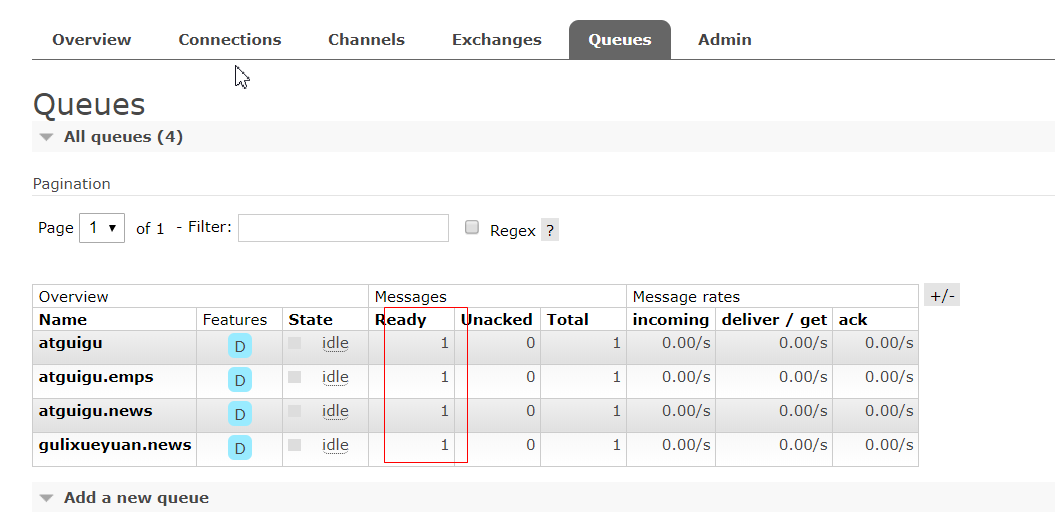
4.发布消息:①向 exchange.direct 发送 4 条消息,消息的 Routing key 分别为 atguigu、atguigu.news、atguigu.emps 和 gulixueyuan.news。
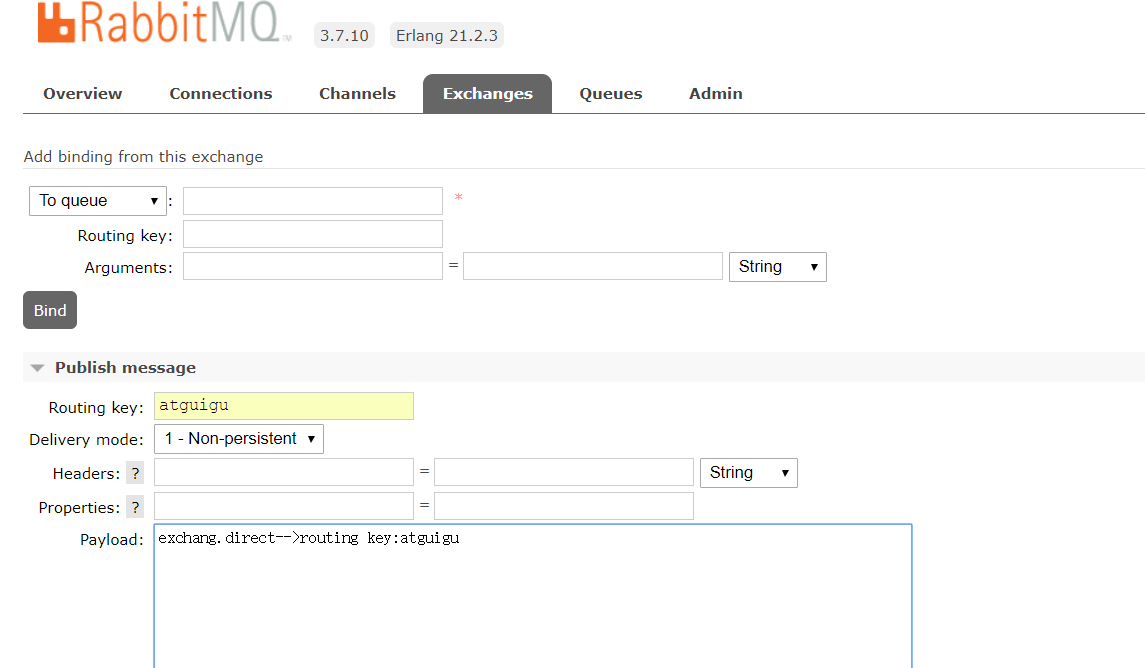
预测 4 个队列各自有一条消息,消息发送到队列根据路由键来的。
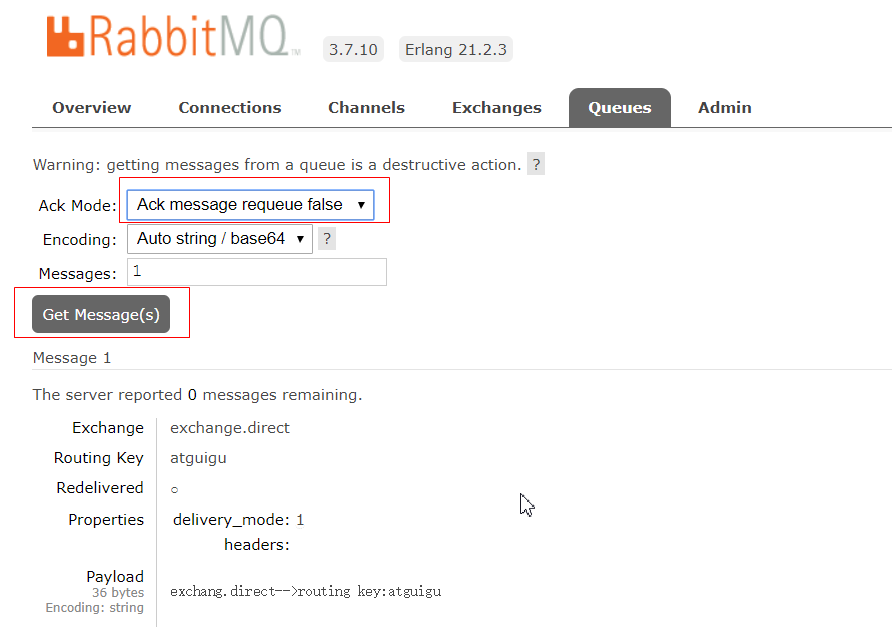
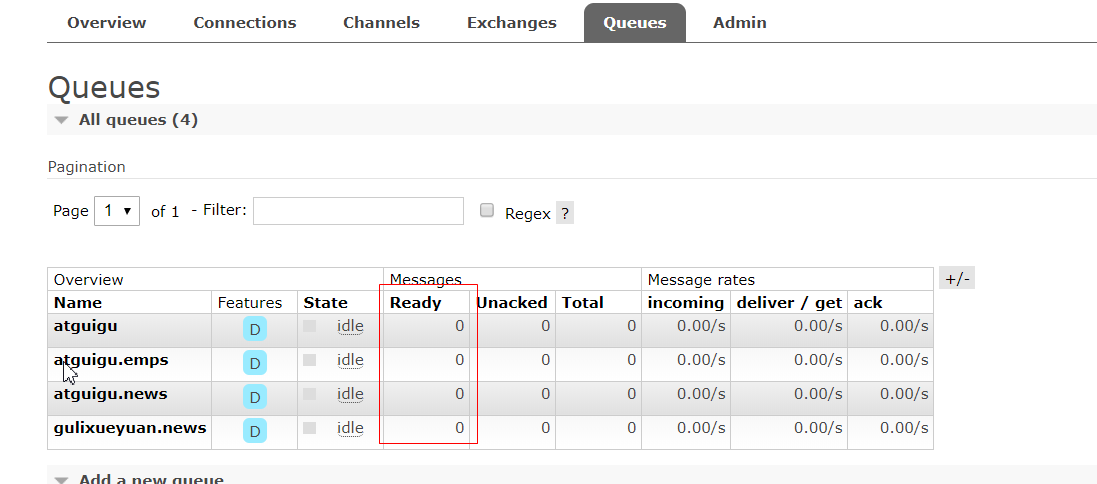
依次读取消息并从队列中移除:
②向 exchange.fanout 中 发送一条消息,路由键随意,由于它是广播的,所以 4 个队列都会得到该消息。

移除所有消息。
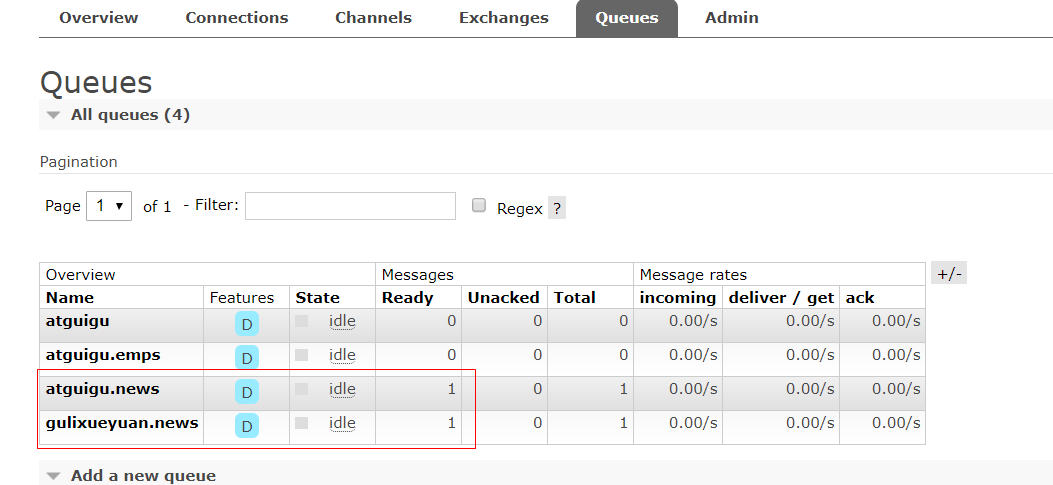
③向 exchan.topic 中 发送一条消息,路由键为 atguigu.news,由于队列 atguigu 绑定的路由键为 atguigu.#,匹配成功,收到消息,队列 gulixueyuan.news 绑定的路由键为*.news,匹配成功收到消息。同理另外 2 个队列也会收到消息。若发送的消息键值为 abc.news, 则只有队列 gulixueyuan.news 和 guigu.news 收到消息。
3、Spring Boot 使用 RabbitMQ
-
RabbitAutoConfiguration 自动配置了连接工厂 rabbitConnectionFactory
@Configuration @ConditionalOnClass({ RabbitTemplate.class, Channel.class }) @EnableConfigurationProperties(RabbitProperties.class) @Import(RabbitAnnotationDrivenConfiguration.class) public class RabbitAutoConfiguration { @Configuration @ConditionalOnMissingBean(ConnectionFactory.class) protected static class RabbitConnectionFactoryCreator { @Bean public CachingConnectionFactory rabbitConnectionFactory( RabbitProperties properties, ObjectProvider<ConnectionNameStrategy> connectionNameStrategy) throws Exception { PropertyMapper map = PropertyMapper.get(); CachingConnectionFactory factory = new CachingConnectionFactory( getRabbitConnectionFactoryBean(properties).getObject()); map.from(properties::determineAddresses).to(factory::setAddresses); map.from(properties::isPublisherConfirms).to(factory::setPublisherConfirms); -
RabbitProperties 封装了 RabbitMQ 的配置
@ConfigurationProperties(prefix = "spring.rabbitmq") public class RabbitProperties { /** * RabbitMQ host. */ private String host = "localhost"; /** * RabbitMQ port. */ private int port = 5672; /** * Login user to authenticate to the broker. */ private String username = "guest"; -
AmqpAdmin : RabbitMQ 系统管理功能组件,创建和删除 Queue,Exchange,Binding
    @Bean
   @ConditionalOnSingleCandidate(ConnectionFactory.class)
   @ConditionalOnProperty(prefix = "spring.rabbitmq", name = "dynamic", matchIfMissing = true)
   @ConditionalOnMissingBean
   public AmqpAdmin amqpAdmin(ConnectionFactory connectionFactory) {
      return new RabbitAdmin(connectionFactory);
   }

}
@ManagedResource(description = "Admin Tasks") public class RabbitAdmin implements AmqpAdmin, ApplicationContextAware, ApplicationEventPublisherAware, BeanNameAware, InitializingBean { ... @Override public void declareExchange(final Exchange exchange) { try { this.rabbitTemplate.execute(channel -> { declareExchanges(channel, exchange); return null; }); } catch (AmqpException e) { logOrRethrowDeclarationException(exchange, "exchange", e); } } @Override @ManagedOperation(description = "Delete an exchange from the broker") public boolean deleteExchange(final String exchangeName) { return this.rabbitTemplate.execute(channel -> { // NOSONAR never returns null -
RabbitTemplate :给 RabbitMQ 发送和接受消息
@Bean
@ConditionalOnSingleCandidate(ConnectionFactory.class)
@ConditionalOnMissingBean
public RabbitTemplate rabbitTemplate(ConnectionFactory connectionFactory) {
   PropertyMapper map = PropertyMapper.get();
   RabbitTemplate template = new RabbitTemplate(connectionFactory);
   MessageConverter messageConverter = this.messageConverter.getIfUnique();
   if (messageConverter != null) {
      template.setMessageConverter(messageConverter);
   }
public class RabbitTemplate extends RabbitAccessor // NOSONAR type line count/comment density implements BeanFactoryAware, RabbitOperations, MessageListener, ListenerContainerAware, PublisherCallbackChannel.Listener, Lifecycle, BeanNameAware { ... @Override public void convertAndSend(Object object) throws AmqpException { convertAndSend(this.exchange, this.routingKey, object, (CorrelationData) null); }
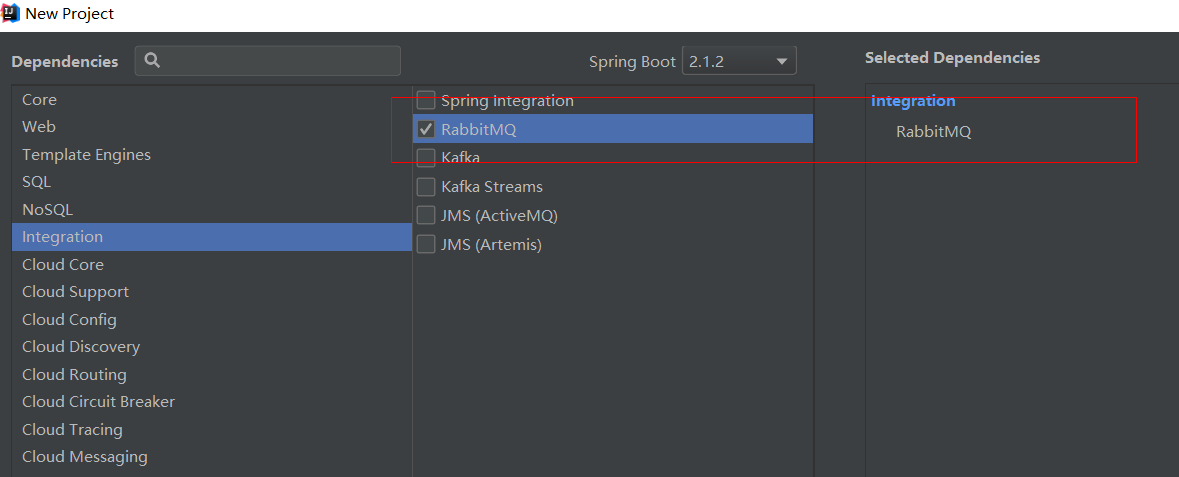
1.使用 IDEA Spring Initializer 创建 Spring Boot 项目并选中 RabbitMQ 模块。
2.配置 RabbitMQ
application.properties:
spring.rabbitmq.host=xx.xx.xx.xx
spring.rabbitmq.virtual-host=/
spring.rabbitmq.username=guest
spring.rabbitmq.password=guest
3.测试
-
使用 AmqpAdmin 创建 Exchange、队列和相应的 Bindings。
package com.yunche; import org.junit.Test; import org.junit.runner.RunWith; import org.springframework.amqp.core.AmqpAdmin; import org.springframework.amqp.core.Binding; import org.springframework.amqp.core.DirectExchange; import org.springframework.amqp.core.Queue; import org.springframework.beans.factory.annotation.Autowired; import org.springframework.boot.test.context.SpringBootTest; import org.springframework.test.context.junit4.SpringRunner; @RunWith(SpringRunner.class) @SpringBootTest public class SpringRabbitmqApplicationTests { @Autowired AmqpAdmin amqpAdmin; @Test public void contextLoads() { amqpAdmin.declareExchange(new DirectExchange("test-direct-exchange")); System.out.println("创建了一个 direct 类型的 exchange"); amqpAdmin.declareQueue(new Queue("test-queue")); System.out.println("创建了一个队列"); amqpAdmin.declareBinding(new Binding("test-queue", Binding.DestinationType.QUEUE, "test-direct-exchange", "test-routingkey", null)); System.out.println("添加了绑定,路由键为 test-routingkey"); } } -
使用 RabbitTemplate 发送和接收消息:
@Autowired
RabbitTemplate rabbitTemplate;
@Test
public void sendMsg() {
    rabbitTemplate.convertAndSend("test-direct-exchange","test-routingkey", "hello world");
}
@Test public void receiveMsg() { String msg = (String)rabbitTemplate.receiveAndConvert("test-queue"); System.out.println(msg); } /*Output:hello world*/@Test public void sendObject() { rabbitTemplate.convertAndSend("test-direct-exchange","test-routingkey", new Book("红楼梦", "曹雪芹")); } private static class Book implements Serializable { private String name; private String author; public String getName() { return name; } public void setName(String name) { this.name = name; } public Book(String name, String author) { this.name = name; this.author = author; } public String getAuthor() { return author; } public void setAuthor(String author) { this.author = author; } } @Test public void receiveObject() { Book b = (Book)rabbitTemplate.receiveAndConvert("test-queue"); System.out.println(b.name); } /*Output: 红楼梦*/
4.监听消息
@RabbitListener 监听消息队列的内容;首先用@EnableRabbit 开启基于注解的 RabbitMQ 模式
package com.yunche;

import org.springframework.amqp.rabbit.annotation.EnableRabbit;
import org.springframework.boot.SpringApplication;
import org.springframework.boot.autoconfigure.SpringBootApplication;

@EnableRabbit
@SpringBootApplication
public class SpringRabbitmqApplication {

    public static void main(String[] args) {
        SpringApplication.run(SpringRabbitmqApplication.class, args);
    }

}
首先运行单元测试中的 sendObject() 方法发送消息,然后控制台立即输出消息。
@RabbitListener(queues = "test-queue")
public void msgListener(Book book) {
    System.out.println(book.getAuthor());
} /*Output:曹雪芹*/
三、参考资料
尚硅谷.Spring Boot 高级