一、eureka注册中心
1、创建一个工程
工程名:microservicecloud-eureka-7001
2、向pom文件中增加如下:
<dependencies>
        <!--eureka-server服务端 -->
        <dependency>
            <groupId>org.springframework.cloud</groupId>
            <artifactId>spring-cloud-starter-eureka-server</artifactId>
        </dependency>
</dependencies>
3、添加application.yml文件
server:
  port: 7001
eureka:
  instance:
    hostname: localhost #eureka服务端的实例名称
  client:
    register-with-eureka: false #false表示不向注册中心注册自己。Eureka不响自己注册
    fetch-registry: false       #false表示自己端就是注册中心,我的职责就是维护服务实例,并不需要去检索服务
    service-url:
      #defaultZone: http://${eureka.instance.hostname}:${server.port}/eureka/ (单机)
      #设置与Eureka Server交互的地址查询服务和注册服务都需要依赖这个地址(单机)。
      defaultZone: http://${eureka.instance.hostname}:${server.port}/eureka/
4、增加服务启动类,并在类上增加 @EnableEurekaServer 注解, 如下所示:
import org.springframework.boot.SpringApplication;
import org.springframework.boot.autoconfigure.SpringBootApplication;
import org.springframework.cloud.netflix.eureka.server.EnableEurekaServer;

@SpringBootApplication
@EnableEurekaServer       // EurekaServer服务器端启动类,接受其它微服务注册进来
public class EurekaServer7001
{
    public static void main(String[] args)
    {
        SpringApplication.run(EurekaServer7001.class, args);
    }
}
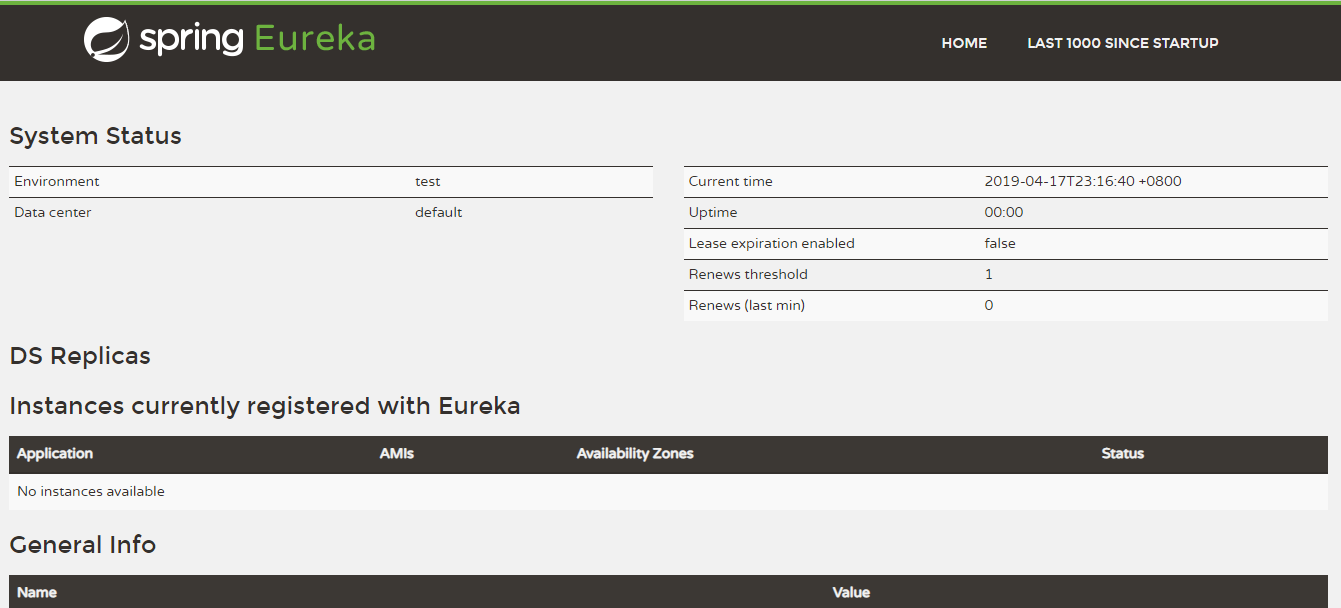
5、启动服务,在浏览器中打开 http://localhost:7001,显示如下图

二、服务注册到Eureka
1、创建工程
工程名:microservicecloud-provider-dept-8001
2、在pom.xml文件,新增Eureka的客户端依赖,如下:
<dependency>
    <groupId>org.springframework.cloud</groupId>
    <artifactId>spring-cloud-starter-eureka</artifactId>
</dependency>
<dependency>
     <groupId>org.springframework.cloud</groupId>
      <artifactId>spring-cloud-starter-config</artifactId>
</dependency>
3、配置文件application.yaml,新增如下内容:
eureka:
  client:  # 客户端注册进eureka内
    service-url:
      defaultZone: http://localhost:7001/eureka/
application.yaml中的全部内容如下:
server:
  port: 8001

mybatis:
  config-location: classpath:mybatis/mybatis.cfg.xml        # mybatis配置文件所在路径
  type-aliases-package: com.yufeng.springcloud.entities    # 所有Entity别名类所在包
  mapper-locations:
  - classpath:mybatis/mapper/**/*.xml                       # mapper映射文件

spring:
   application:
    name: microservicecloud-dept
   datasource:
    type: com.alibaba.druid.pool.DruidDataSource            # 当前数据源操作类型
    driver-class-name: org.gjt.mm.mysql.Driver              # mysql驱动包
    url: jdbc:mysql://192.168.172.20:3306/cloudDB01         # 数据库名称
    username: root
    password: root
    dbcp2:
      min-idle: 5                                           # 数据库连接池的最小维持连接数
      initial-size: 5                                       # 初始化连接数
      max-total: 5                                          # 最大连接数
      max-wait-millis: 200                                  # 等待连接获取的最大超时时间


eureka:
  client:  # 客户端注册进eureka内
    service-url:
      defaultZone: http://localhost:7001/eureka/
4、代码的启动类中增加 @EnableEurekaClient 注解;
@SpringBootApplication
@EnableEurekaClient
public class DeptProvider8001_App
{
    public static void main(String[] args)
    {
        SpringApplication.run(DeptProvider8001_App.class, args);
    }
}
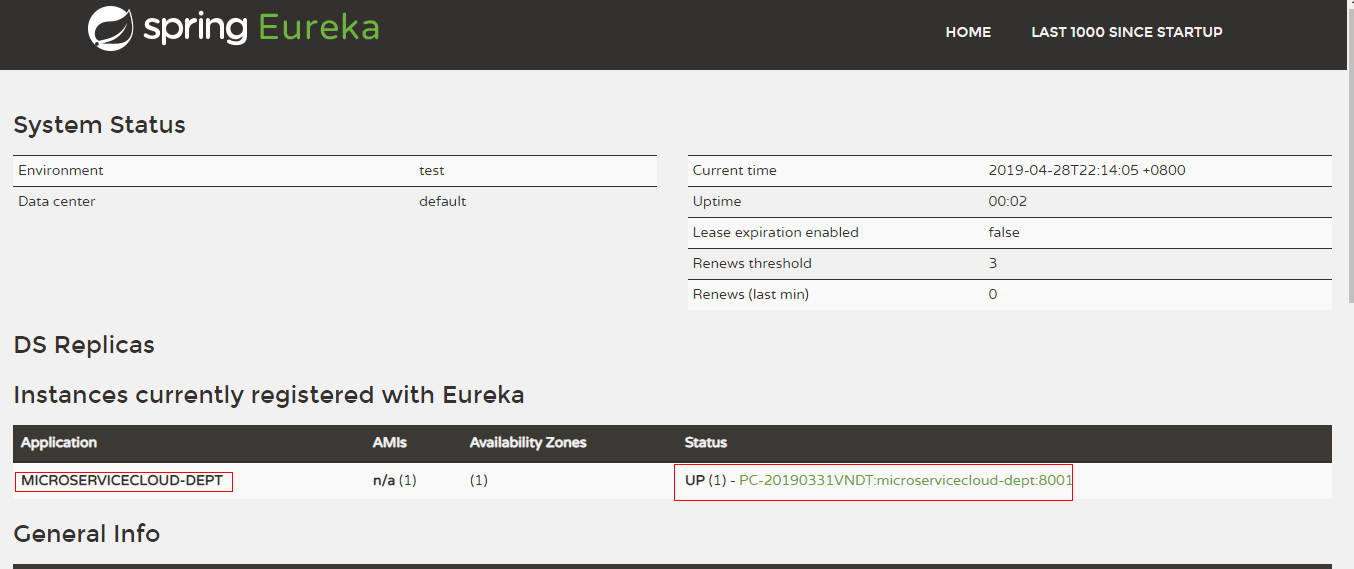
5、按照顺序启动服务,先启动 eureka7001 服务,接着启动 microservicecloud-provider-dept-8001 服务,浏览器打开: http://localhost:7001

三、服务的发现
对于注册到Eureka里面的微服务,可以通过服务发现来获得该服务的信息。
1、在服务提供的微服务的controller注入DiscoveryClient类
@RestController
public class DeptController
{
    @Autowired
    //@Resource(name = "deptServiceImpl")
    private DeptService service;

    @Autowired
    private DiscoveryClient discoveryClient;

    @RequestMapping(value = "/dept/add", method = RequestMethod.POST)
    public boolean add(@RequestBody Dept dept)
    {
        return service.add(dept);
    }

    @RequestMapping(value = "/dept/discovery", method = RequestMethod.GET)
    public Object discovery()
    {
        List<String> list = discoveryClient.getServices(); //发现eureka中的微服务列表
        System.out.println("eureka中所有的微服务的name列表" + list);

        //从eureka中获取指定name的微服务的信息(yml文件中配置的 spring.application.name)
        List<ServiceInstance> instances = discoveryClient.getInstances(list.get(0));
        for(ServiceInstance instance : instances)
        {
            System.out.println(instance.getServiceId() + "	" + instance.getHost() + "	"
            + instance.getPort() + "	" + instance.getUri());
        }
        return this.discoveryClient;
    }
}
2、启动类中增加 @EnableDiscoveryClient 注解
@SpringBootApplication
@EnableEurekaClient     //本服务启动后自动注册到eureka中
@EnableDiscoveryClient  //服务的发现, 暴露出来
public class DeptProvider8001_App
{
    public static void main(String[] args)
    {
        SpringApplication.run(DeptProvider8001_App.class, args);
    }
}