1、作用
引入一个设计原则:类应该对扩展开发,对修改关闭。简单的说,就是允许我们的我们的类进行扩展,在不修改现有代码的情况 下,适应新的行为改变。
当实现好的类有了新的需求,不考虑重用的话,会直接修改(现在写代码都这样,没有满足开闭原则的修改关闭原则),如果考虑代码的重用,以面向对象的设计思想,多数会想到使用继承,增加新添加的需求,但是如果需求很多,继承类的层次就很深,不方便维护和使用。使用装饰器模式,可以满足新加需求的功能,同时照顾的重用代码,并且避免继承的层次很深。
对原有的输出进行处理得到需要的输出(修饰),而不是修改原点代码,来改变原来代码的输出。这个模式最能够用到编写的脚本上,扩展脚本的功能。
2、实现方式
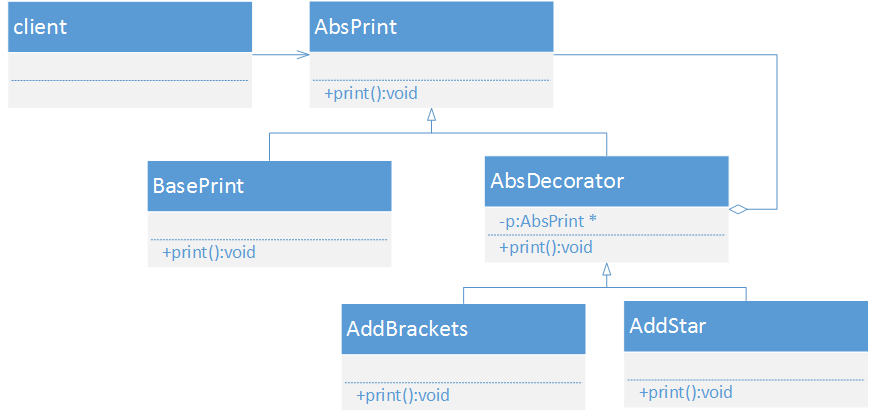
假设要实现一个简单的打印功能,实用了一个抽象类AbsPrint定义了接口,同时实现了一个具体的打印类BasePrint类,完成打印的基本功能。

但是后续需要添加新的打印需求,比如在打印内容的前后增加"*"和给打印内容加“()”。前面已经分析过,如果直接使用继承的方式,会导致类的层次很深,比利于后期维护,并且在设计模式中:Favor object composition over class inheritance,所以使用装饰器模式是一个比较好的方法(装饰类与原有类是一个关联关系),在不改变原有接口的情况下,添加新的功能,原有接口输出的内容进行处理。
使用Decorator模式,要添加一个中间类:AbsDecorator,这个类唯一功能就是封装一个AbsPrint对象(有的像),从AbsDecorator扩展出两个装饰类,AddBrackets和AddStar类来实现新增的功能。
装饰器可以嵌套使用(即使用AddBrackets又使用AddStart)

3、C++代码
print.h
#include <iostream>

#ifndef __PRINT__H__
#define __PRINT__H__

using namespace std;

class AbsPrint {
    public:
        AbsPrint() = default;
        virtual ~AbsPrint() = default;
        virtual void print(const string &str) = 0;
};

class BasePrint : public AbsPrint {                     // 已有的功能,下面的都是新增的需求
    public:
        void print(const string &str) override {
            cout<<str;
        }
};


class AbsDecorator : public AbsPrint {                    // 这个类的唯一目的就是封装AbsPrint对象,这样可以避免每个装饰器类都加这个成员。
    public:
        AbsDecorator(AbsPrint *p) : p(p) {}
        ~AbsDecorator() { delete p; }
    protected:
        AbsPrint *p;
};

class AddBrackets : public AbsDecorator {                  // 添加换行符的装饰器
    public:
        AddBrackets(AbsPrint *p):AbsDecorator(p){}
        void print(const string &str) override {
            cout<<"(";
            p->print(str);
            cout<<")";
        }
};


class AddStar : public AbsDecorator {                       // 首尾添加*的装饰器
    public:
        AddStar(AbsPrint *p): AbsDecorator(p) {}
        void print(const string &str) override {
            cout<<"*";
            p->print(str);
            cout<<"*";
        }
};

#endif
test.cc
#include <iostream>
#include "print.h"

using namespace std;

int main() {
    AbsPrint *p1 = new BasePrint;
    p1->print("hello world!");      // 直接使用基本的功能
    cout<<endl;

    AbsPrint *p2 = new AddStar(new BasePrint);
    p2->print("hello world!");      // 使用了添加"*"的装饰器
    cout<<endl;

    AbsPrint *p3 = new AddBrackets(new BasePrint);
    p3->print("hello world!");      // 使用了添加"()"的装饰器
    cout<<endl;

    AbsPrint *p4 = new AddBrackets(new AddStar(new BasePrint));
    p4->print("hello world!");      // 同时使用了加"*"和加"()"的装饰器
    cout<<endl;

    return 0;
}
输出:
