准备数据
1、设计表

2、加入相关信息

代码
package jdbc;
import java.sql.*;
import java.util.ResourceBundle;
import java.util.HashMap;
import java.util.Map;
import java.util.Scanner;
public class simpLogin {
public static void main(String[] args) {
//初始化界面
Map<String,String> userLoginInfo = initUI();
//验证用户名和密码
boolean loginSuccess = login(userLoginInfo);
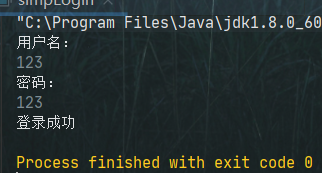
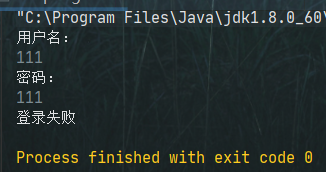
System.out.println(loginSuccess ? "登录成功" : "登录失败");
}
/**
* @param userLoginInfo 用户登录信息
* @return false表示失败,true表示成功
*/
private static boolean login(Map<String, String> userLoginInfo) {
boolean loginSuccess = false;
String loginName = userLoginInfo.get("loginName");
String loginPwd = userLoginInfo.get("loginPwd");
//JDBC代码
ResourceBundle bundle = ResourceBundle.getBundle("jdbc.info");
String driver = bundle.getString("driver");
String url = bundle.getString("url");
String user = bundle.getString("user");
String password = bundle.getString("password");
Connection conn = null;
Statement stmt = null;
ResultSet rs = null;
try{
Class.forName(driver);
conn = DriverManager.getConnection(url, user, password);
stmt = conn.createStatement();
String sql = "select * from user where loginName='" +loginName +"' and loginPwd='" +loginPwd+ "'";
rs = stmt.executeQuery(sql);
while (rs.next()){
loginSuccess = true;
}
}catch (SQLException | ClassNotFoundException e){
e.printStackTrace();
}finally {
if (rs != null) {
try {
rs.close();
} catch (SQLException e) {
e.printStackTrace();
}
}
if (stmt != null) {
try {
stmt.close();
} catch (SQLException e) {
e.printStackTrace();
}
}
if (conn != null) {
try {
conn.close();
} catch (SQLException e) {
e.printStackTrace();
}
}
}
return loginSuccess;
}
/**
* 初始化用户界面
* @return 用户输入的用户名和密码等登录信息
*/
private static Map<String, String> initUI() {
Scanner in = new Scanner(System.in);
System.out.println("用户名:");
String loginName = in.nextLine();
System.out.println("密码:");
String loginPwd = in.nextLine();
Map<String, String> userLoginInfo = new HashMap<>();
userLoginInfo.put("loginName", loginName);
userLoginInfo.put("loginPwd", loginPwd);
return userLoginInfo;
}
}
SQL注入现象
示例
用户名输入:aaa
密码输入:aaa' or '1'='1
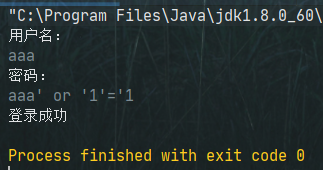
还是会显示登录成功,这就产生了SQL注入现象。所以当前程序存在安全隐患。
原因
1、Debug:

select * from user where
loginName='aaa' and
loginPwd='aaa' or '1'='1'
可以看出SQL语句完全被修改了。
2、在数据库查询:

3、分析
String sql = "select * from user where loginName='" +loginName +"' and loginPwd='" +loginPwd+ "'";
rs = stmt.executeQuery(sql);
以上代码先完成了SQL语句的拼接,再发送SQL语句给DBMS进行SQL编译。(先拼接,再编译)
在拼接的时候将用户提供的“非法信息”编译进去,导致了原SQL语句的含义被扭曲了。
4、根本原因
用户输入的信息中含有SQL语句的关键字,并且这些关键字参与SQL语句的编译过程,导致SQL语句的原意被扭曲,进而达到SQL注入。
解决SQL注入问题
1、只要用户提供的信息不参与SQL语句的编译过程,问题就解决了。即使用户提供的信息中含有SQL语句的关键字,但是没有参与编译,不起作用。
2、要想用户信息不参与SQL语句的编译,那么必须使用java.sql.PreparedStatement,该接口继承了java.sql.Statement
3、PreparedStatement是属于预编译的数据库操作对象。原理是:预先对SQL语句的框架进行编译,然后再给SQL语句传"值"。
4、帮助文档
public interface PreparedStatement extends Statement
表示预编译的SQL语句的对象。
SQL语句已预编译并存储在PreparedStatement对象中。 然后可以使用该对象多次有效地执行此语句。
注意:setter方法( setShort , setString用于设置IN参数值必须指定与所定义的SQL类型的输入参数的兼容的类型,等等)。 例如,如果IN参数具有SQL类型INTEGER ,则应使用方法setInt 。
如果需要任意参数类型转换,方法setObject应与目标SQL类型一起使用。
在设定的参数的以下示例中, con表示一个活动连接:
PreparedStatement pstmt = con.prepareStatement("UPDATE EMPLOYEES
                                     SET SALARY = ? WHERE ID = ?");
pstmt.setBigDecimal(1, 153833.00)
pstmt.setInt(2, 110592)
解决SQL注入代码示例
package jdbc;

import java.sql.*;
import java.util.HashMap;
import java.util.Map;
import java.util.ResourceBundle;
import java.util.Scanner;

/**
 * 解决SQL注入问题
 */
public class simpLoginPlus {
    public static void main(String[] args) {
        //初始化界面
        Map<String,String> userLoginInfo = initUI();
        //验证用户名和密码
        boolean loginSuccess = login(userLoginInfo);
        System.out.println(loginSuccess ? "登录成功" : "登录失败");
    }

    /**
     * @param userLoginInfo 用户登录信息
     * @return false表示失败,true表示成功
     */
    private static boolean login(Map<String, String> userLoginInfo) {
        boolean loginSuccess = false;
        String loginName = userLoginInfo.get("loginName");
        String loginPwd = userLoginInfo.get("loginPwd");
        //JDBC代码
        ResourceBundle bundle = ResourceBundle.getBundle("jdbc.info");
        String driver = bundle.getString("driver");
        String url = bundle.getString("url");
        String user = bundle.getString("user");
        String password = bundle.getString("password");

        Connection conn = null;
        PreparedStatement pstmt = null;
        ResultSet rs = null;
        try{
            Class.forName(driver);
            conn = DriverManager.getConnection(url, user, password);
            /*这相当于SQL语句的架子。
            其中一个问号(?)表示一个占位符,
            一个?将来接收一个"值"。
            注意:占位符不能使用单引号括起来。*/
            String sql = "select * from user where loginName= ? and loginPwd= ?";
            /*程序执行到此处,会发送SQL语句架子给DBMS,
            然后DBMS进行SQL语句的预先编译。*/
            pstmt = conn.prepareStatement(sql);
            /*给占位符?传值,
            * 第一个?下标是1,
            * 第二个?下标是2*/
            pstmt.setString(1,loginName);
            pstmt.setString(2,loginPwd);
            //执行SQL
            rs = pstmt.executeQuery();
            while (rs.next()){
                loginSuccess = true;
            }
        }catch (SQLException | ClassNotFoundException e){
            e.printStackTrace();
        }finally {
            if (rs != null) {
                try {
                    rs.close();
                } catch (SQLException e) {
                    e.printStackTrace();
                }
            }

            if (pstmt != null) {
                try {
                    pstmt.close();
                } catch (SQLException e) {
                    e.printStackTrace();
                }
            }

            if (conn != null) {
                try {
                    conn.close();
                } catch (SQLException e) {
                    e.printStackTrace();
                }
            }

        }
        return loginSuccess;
    }

    /**
     * 初始化用户界面
     * @return 用户输入的用户名和密码等登录信息
     */
    private static Map<String, String> initUI() {
        Scanner in = new Scanner(System.in);
        System.out.println("用户名:");
        String loginName = in.nextLine();
        System.out.println("密码:");
        String loginPwd = in.nextLine();
        Map<String, String> userLoginInfo = new HashMap<>();
        userLoginInfo.put("loginName", loginName);
        userLoginInfo.put("loginPwd", loginPwd);
        return userLoginInfo;
    }
}
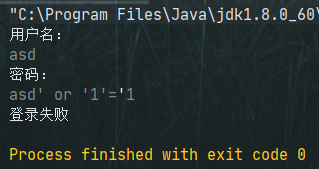
再输入asd' or '1'='1已经不起作用了。
解决SQL注入的关键是:用户提供的信息中即使含有SQL语句的关键字,但是这些关键字并没有参与编译,不起作用。