本文章来自网络仅供个人学习记录之用
一:安装Git(如果未安装)
1, yum install git
2, git  --version  #查看版本
二:安装node(如果未安装)
三:安装grunt(如果未安装,head插件的启动使用grunt)
   npm install -g grunt-cli  #安装grunt命令行工具grunt-cli

   npm install grunt --save-dev  #安装grunt及其插件

  grunt -version   #查看安装版本情况
四:下载并安装elasticsearch-head
# 选择一个目录下执行下面命令,别把head插件clone后放到 elasticsearch的plugins目录下,否则会报错

git clone git://github.com/mobz/elasticsearch-head.git   #git下载

cd elasticsearch-head  #进入目录

npm install  # 如果npm使用很多错误,尝试使用cnpm

npm install grunt --save  #安装grunt到模块中并保存
五:修改两处的配置
(1):修改elasticsearch-5.5.2 安装目录下的config/elasticsearch.yml
 # 增加如下字段
http.cors.enabled: true
http.cors.allow-origin: "*"
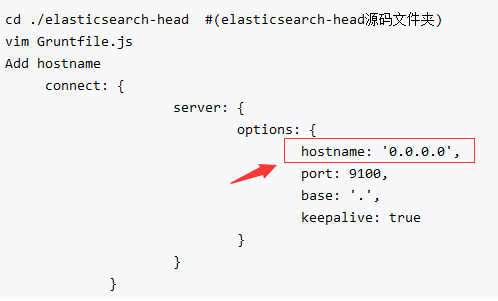
(2):修改elasticsearch-head下的Gruntfile.js
#其中增加一个
hostname: '0.0.0.0'  或者是 hostname: '*'
六:启动elasticsearch和head插件
(1):启动elasticsearch,进入elasticsearch的bin
sh elasticsearch #执行该命令(2):启动head插件,进入elasticsearch-head目录
grunt server #执行该命令七:如果是学习环境建议关闭防火墙
systemctl stop firewalld.service  #停止firewall
systemctl disable firewalld.service  #禁止firewall开机启动
firewall-cmd --state #查看默认防火墙状态(关闭后显示notrunning,开启后显示running)
八:很多时候重启会遇上9200,或者9100端口占用
netstat -tunlp |grep 端口号  #查看某个端口情况
kill -9 pid #杀死该占用,pid如下图,如kill -9 2411
