Thymeleaf
为什么使用Thymeleaf?
在进行我们web项目开发时,会有一个比较严重的问题,素材中提供给我们的是全部是html静态页面,如果是我们以前开发,我们需要把这此些html页面转换成jsp页面。而转换之后的页面美工无法在维护. 且页面添加了很多c标签,需要经过容器编译,SpringBoot项目首先是以jar包的方式存在而不是以前的web项目,另外我们SpringBoot项目使用的是嵌入式的tomcat插件。所以SpringBoot项目是默认不支持JSP。
引入thymeleaf依赖
1 <dependency>
2     <groupId>org.springframework.boot</groupId>
3     <artifactId>spring-boot-starter-thymeleaf</artifactId>
4 </dependency>
5 注:可切换thymeleaf版本
6 <properties>
7    <thymeleaf.version>3.0.11.RELEASE</thymeleaf.version>
8    <thymeleaf-layout-dialect.version>2.1.1</thymeleaf-layout-dialect.version>
9 </properties>
通过ThymeleafProperties属性文件中的源码。(Ctrl+N快速搜索ThymeleafProperties类)

使用thymeleaf时只需要将文件存放到目录:”classpath:thmplates”,文件后缀为:”.html”可直接使用
若想修改配置,自定义的自己thymeleaf路径
在application.properties添加配置。即项目所需要被存放到resources/html目录中,手动创建html目录。
spring.thymeleaf.prefix=classpath:html/
spring.thymeleaf.suffix=.html
禁用掉模板引擎的缓存
有时在修改完页面后,刷新浏览器发现页面没有更新,这是因为模板引擎存在缓存。
编辑application.properties文件,添加禁用模板引擎缓存的代码。在页面按住ctrl+F9编译
#禁用模板引擎缓存
spring.thymeleaf.cache=false
在页面导入Thymeleaf的名称空间
<html lang="en" xmlns:th="http://www.thymeleaf.org">
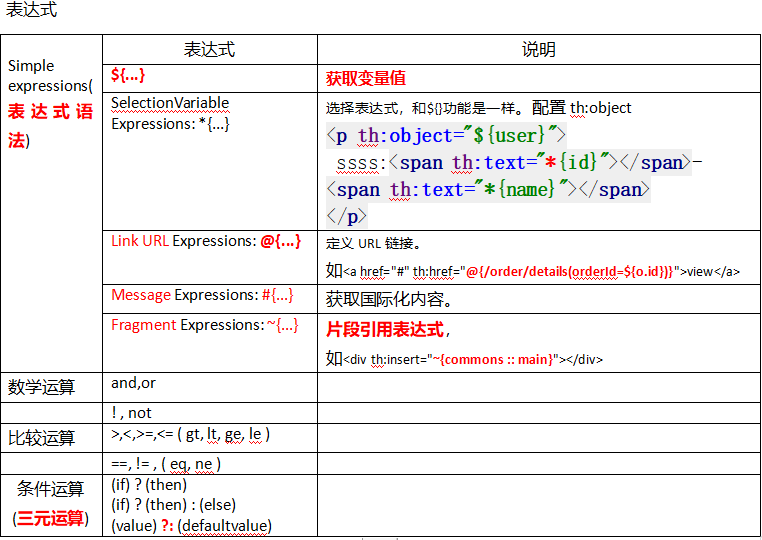
常用的th标签如下


