声明:本笔记是自己在学习“传智播客”视频中对知识点的记录,仅供自己平时的知识积累以便日后查询方便。该博文如有任何错误,请各位博友指出。以便随时修改!!!
一、项目框架及介绍
本项目主要是学习MVC的开发方式,体会他的开发效率和便捷性,在本项目中采用ASP.NET MVC+Jquery easy UI +简单三层架构+sqlhelper。主要使用到异步进行数据操作(增删改)。
二、系统框架搭建
开发工具:vs2012
开发语言:c#
数据库:sqlserver2008R2
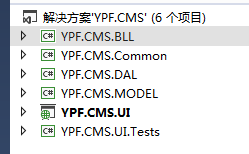
框架图:

说明:YPF.CMS.Common这个类库是用来存放公共类文件。
三、后台开发
一般后台为了开发效率和美观性,我们一般都会使用jQuery easy UI来进行页面的布局。所以后台的开发中我们大量使用到了它,相应的由于大量的加入它所以页面在访问速度上有明显的下降,请理解!
1、 登录页面
(1)先创建Login控制器,并添加index视图。
(2)使用中美工的登录页面对index页面进行替换。

注意:在这里我们要说明下就是这个文件夹和文件名:在mvc中是“约定大于配置”。视图view的文件夹必须和控制器是一一对应的,视图文件必须和控制器中的Action一致。
(3)在登录页面的表单中我们使用了mvc的ajax异步对表单进行提交。
<div id="login"> <div id="loginlogo"> </div> <div id="loginpanel"> <div class="panel-h"> </div> <div class="panel-c"> <div class="panel-c-l"> @using (Ajax.BeginForm("UserLogin", "Login", new AjaxOptions {HttpMethod = "post", OnSuccess = "afterLogin"}, new {id = "LoginForm"})) { <table cellpadding="0" cellspacing="0"> <tbody> <tr> <td align="left" colspan="2"> <h3>请使用传智播客CMS系统账号登录</h3> </td> </tr> <tr> <td align="right">账号: </td> <td align="left"> <input type="text" name="LoginCode" id="LoginCode" class="login-text" value="itcast" /> </td> </tr> <tr> <td align="right">密码: </td> <td align="left"> <input type="password" name="LoginPwd" id="LoginPwd" value="123" class="login-text" /> </td> </tr> <tr> <td>验证码: </td> <td align="left"> <input type="text" class="login-text" id="code" name="vCode" /> </td> </tr> <tr> <td></td> <td> <img id="img" src="/Login/ShowValidateCode" style="float: left; height: 24px;" /> <div style="float: left; margin-left: 5px; margin-top: 10px;"> <a href="javascript:void(0)" onclick="changeCheckCode();return false;">看不清,换一张</a> </div> </td> </tr> <tr> <td align="center" colspan="2"> <input type="submit" id="btnLogin" value="登录" class="login-btn" /> <span id="errorMsg" style="color:red"></span> </td> </tr> </tbody> </table> } </div> <div class="panel-c-r"> <p> 请从左侧输入登录账号和密码登录 </p> <p> 如果遇到系统问题,请联系网络管理员。 </p> <p> 如果没有账号,请联系网站管理员。 </p> <p> ...... </p> </div> </div> <div class="panel-f"> </div> </div> <div id="logincopyright"> Copyright © 2012 YPF.com </div> </div>
在这里我们需要注意的是:必须要引用下面2个js。一个是jquery,一个是mvc的异步提交表单所使用到的js
    <script src="~/Scripts/jquery-1.8.2.min.js"></script>
    <script src="~/Scripts/jquery.unobtrusive-ajax.min.js"></script>
下面关于mvc异步提交表单方法说明:

UserLogin:提交表单到控制器的Action
Login:提交表单到控制器
HttpMethod="post" 异步提交方式
OnSuccess="afterLogin" 异步提交的回到函数(我们需要在js中添加该js函数)
(4)登录的回调函数。
 <script type="text/javascript">
        //验证码更换
        function changeCheckCode() {
            var myDate = new Date();
            $("#img").attr("src", "/Login/ShowValidateCode?milliseconds=" + myDate.getMilliseconds());
        }
        //登录的回调函数
        function afterLogin(data) {
            var serverData = data.split(':');
            //登录成功
            if (serverData[0] == "ok") {
                window.location.href = "/Home/Index";
                //登录失败
            } else if (serverData[0] == "no") {
                $("#errorMsg").text(serverData[1]);
                changeCheckCode();//再次调用“验证码”更换目的是为了登录失败后,对验证码进行刷新。
                //登录异常
            } else {
                $("#errorMsg").text("系统繁忙!!");
            }
        }
我们可以看到在afterLogin(data)这个回调函数中我们对返回值进行了各种判断:当返回ok时,对页面进行跳转到主页面;当登录失败时进行提示和验证码进行更新。
验证码的更新,我们需要注意的是:当我们给<img>标签的src属性只赋值为地址时候,当我们在使用”换一张“的功能是不能实现对验证码图片进行更换的。这个是由于如果请求同一图片的ur地址时,浏览器会将缓存中图片给你。所以我们需要在他的”src“属性上做手脚。这里我们采用了:url+当前时间的毫秒数。经过这样改造后就可以更新图片了。当然也有其他很多方法可以实现,只要明白他的原理即可。
(5)登录后台代码
#region 获取验证码
        public ActionResult ShowValidateCode()
        {
            ValidateCode code = new ValidateCode();
            string validatecode = code.CreateValidateCode(4);
            Session["validtaeCode"] = validatecode;
            byte[] bytes = code.CreateValidateGraphic(validatecode);
            return File(bytes, "image/jpeg");
        }
        #endregion
#region 登录验证
        /// <summary>
        /// 登录验证
        /// </summary>
        /// <returns></returns>
        public ActionResult UserLogin()
        {
            string validateCode = Session["validtaeCode"] == null ? string.Empty : Session["validtaeCode"].ToString();
            if (string.IsNullOrEmpty(validateCode))
            {
                return Content("no:验证码不能为空!");
            }
            Session["validtaeCode"] = null;
            string txtcode = Request.Form["vcode"];
            if (string.IsNullOrEmpty(txtcode))
            {
                return Content("no:请输入验证码!");
            }
            else
            {
                if (!validateCode.Equals(txtcode, StringComparison.InvariantCultureIgnoreCase))
                {
                    return Content("no:验证码错误!");
                }
                string userName = Request.Form["LoginCode"].ToString();
                string LoginPwd = Request.Form["LoginPwd"].ToString();
                if (string.IsNullOrEmpty(userName) || string.IsNullOrEmpty(LoginPwd))
                {
                    return Content("no:用户名或密码不能为空!");
                }
                UserInfoBLL userinfoBLL = new UserInfoBLL();
                UserInfo userinfo = userinfoBLL.GetUserInfo(userName, LoginPwd);
                if (userinfo != null)
                {
                    Session["UserInfo"] = userinfo;
                    return Content("ok:登录成功!");
                }
                else
                {
                    return Content("no:登录失败!");
                }
            }
        }
        #endregion
验证码类
using System;
using System.Collections.Generic;
using System.Drawing;
using System.Drawing.Drawing2D;
using System.Drawing.Imaging;
using System.IO;
using System.Linq;
using System.Text;
using System.Threading.Tasks;
using System.Web;

namespace YPF.CMS.Common
{
    /// <summary>
    /// 验证码
    /// </summary>
   public class ValidateCode
    {
        public ValidateCode()
        {
        }
        /// <summary>
        /// 验证码的最大长度
        /// </summary>
        public int MaxLength
        {
            get { return 10; }
        }
        /// <summary>
        /// 验证码的最小长度
        /// </summary>
        public int MinLength
        {
            get { return 1; }
        }
        /// <summary>
        /// 生成验证码值
        /// </summary>
        /// <param name="length">指定验证码的长度</param>
        /// <returns>string</returns>
        public string CreateValidateCode(int length)
        {
            int[] randMembers = new int[length];
            int[] validateNums = new int[length];
            string validateNumberStr = "";
            //生成起始序列值
            int seekSeek = unchecked((int)DateTime.Now.Ticks);
            Random seekRand = new Random(seekSeek);
            int beginSeek = (int)seekRand.Next(0, Int32.MaxValue - length * 10000);
            int[] seeks = new int[length];
            for (int i = 0; i < length; i++)
            {
                beginSeek += 10000;
                seeks[i] = beginSeek;
            }
            //生成随机数字
            for (int i = 0; i < length; i++)
            {
                Random rand = new Random(seeks[i]);
                int pownum = 1 * (int)Math.Pow(10, length);
                randMembers[i] = rand.Next(pownum, Int32.MaxValue);
            }
            //抽取随机数字
            for (int i = 0; i < length; i++)
            {
                string numStr = randMembers[i].ToString();
                int numLength = numStr.Length;
                Random rand = new Random();
                int numPosition = rand.Next(0, numLength - 1);
                validateNums[i] = Int32.Parse(numStr.Substring(numPosition, 1));
            }
            //生成验证码
            for (int i = 0; i < length; i++)
            {
                validateNumberStr += validateNums[i].ToString();
            }
            return validateNumberStr;
        }
        /// <summary>
        /// 创建验证码的图片
        /// </summary>
        /// <param name="context">要输出到的page对象</param>
        /// <param name="validateNum">验证码</param>
        public void CreateValidateGraphic(string validateCode, HttpContext context)
        {
            Bitmap image = new Bitmap((int)Math.Ceiling(validateCode.Length * 12.0), 22);
            Graphics g = Graphics.FromImage(image);
            try
            {
                //生成随机生成器
                Random random = new Random();
                //清空图片背景色
                g.Clear(Color.White);
                //画图片的干扰线
                for (int i = 0; i < 25; i++)
                {
                    int x1 = random.Next(image.Width);
                    int x2 = random.Next(image.Width);
                    int y1 = random.Next(image.Height);
                    int y2 = random.Next(image.Height);
                    g.DrawLine(new Pen(Color.Silver), x1, y1, x2, y2);
                }
                Font font = new Font("Arial", 12, (FontStyle.Bold | FontStyle.Italic));
                LinearGradientBrush brush = new LinearGradientBrush(new Rectangle(0, 0, image.Width, image.Height),
                 Color.Blue, Color.DarkRed, 1.2f, true);
                g.DrawString(validateCode, font, brush, 3, 2);
                //画图片的前景干扰点
                for (int i = 0; i < 100; i++)
                {
                    int x = random.Next(image.Width);
                    int y = random.Next(image.Height);
                    image.SetPixel(x, y, Color.FromArgb(random.Next()));
                }
                //画图片的边框线
                g.DrawRectangle(new Pen(Color.Silver), 0, 0, image.Width - 1, image.Height - 1);
                //保存图片数据
                MemoryStream stream = new MemoryStream();
                image.Save(stream, ImageFormat.Jpeg);
                //输出图片流
                context.Response.Clear();
                context.Response.ContentType = "image/jpeg";
                context.Response.BinaryWrite(stream.ToArray());
            }
            finally
            {
                g.Dispose();
                image.Dispose();
            }
        }
        /// <summary>
        /// 得到验证码图片的长度
        /// </summary>
        /// <param name="validateNumLength">验证码的长度</param>
        /// <returns></returns>
        public static int GetImageWidth(int validateNumLength)
        {
            return (int)(validateNumLength * 12.0);
        }
        /// <summary>
        /// 得到验证码的高度
        /// </summary>
        /// <returns></returns>
        public static double GetImageHeight()
        {
            return 22.5;
        }


        //C# MVC 升级版
        /// <summary>
        /// 创建验证码的图片并生成byte[]
        /// </summary>
        /// <param name="validateNum">验证码值</param>
        public byte[] CreateValidateGraphic(string validateCode)
        {
            Bitmap image = new Bitmap((int)Math.Ceiling(validateCode.Length * 12.0), 22);
            Graphics g = Graphics.FromImage(image);
            try
            {
                //生成随机生成器
                Random random = new Random();
                //清空图片背景色
                g.Clear(Color.White);
                //画图片的干扰线
                for (int i = 0; i < 25; i++)
                {
                    int x1 = random.Next(image.Width);
                    int x2 = random.Next(image.Width);
                    int y1 = random.Next(image.Height);
                    int y2 = random.Next(image.Height);
                    g.DrawLine(new Pen(Color.Silver), x1, y1, x2, y2);
                }
                Font font = new Font("Arial", 12, (FontStyle.Bold | FontStyle.Italic));
                LinearGradientBrush brush = new LinearGradientBrush(new Rectangle(0, 0, image.Width, image.Height),
                 Color.Blue, Color.DarkRed, 1.2f, true);
                g.DrawString(validateCode, font, brush, 3, 2);
                //画图片的前景干扰点
                for (int i = 0; i < 100; i++)
                {
                    int x = random.Next(image.Width);
                    int y = random.Next(image.Height);
                    image.SetPixel(x, y, Color.FromArgb(random.Next()));
                }
                //画图片的边框线
                g.DrawRectangle(new Pen(Color.Silver), 0, 0, image.Width - 1, image.Height - 1);
                //保存图片数据
                MemoryStream stream = new MemoryStream();
                image.Save(stream, ImageFormat.Jpeg);
                //输出图片流
                return stream.ToArray();
            }
            finally
            {
                g.Dispose();
                image.Dispose();
            }
        }
    }
}