前言
目前项目是tomcat单机部署的,图片、视频也是上传到tomcat目录下,关键是此项目的主要内容还就是针对图片、视频的,这让我非常担忧;文件服务器的应用是必然的,而且时间还不会太久。之前一直有听说fastdfs,但一直没去认真琢磨他,最近才开始去研究它,今天只是去搭建一个简单的单机版,集群版后续再出;至于架构、原理什么我就不写了,网上资料非常多。
环境准备
系统:Centos6.7
fastdfs:到https://github.com/happyfish100下载,都下载最新的:fastdfs-master、libfastcommon-master、fastdfs-nginx-module-master,避免版本问题
Linux终端工具:xshell、xftp
Linux ip:192.168.1.207
fastdfs安装
上传相关包到/opt下,如图

安装zip、unzip
[root@fastdfs2 opt]# yum install -y unzip zip
解压fastdfs-master.zip
[root@fastdfs2 opt]# unzip -o fastdfs-master.zip -d /usr/local
编译安装fast
[root@fastdfs2 opt]# cd /usr/local/fastdfs-master
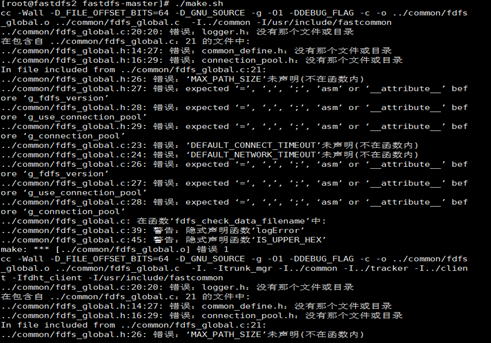
[root@fastdfs2 fastdfs-master]# ./make.sh
报错:./make.sh: line 146: perl: command not found
安装perl
[root@fastdfs2 fastdfs-master]# yum -y install perl
再运行./make.sh,报错:make: cc:命令未找到
安装gcc
[root@fastdfs2 fastdfs-master]# yum install gcc-c++
再运行./make.sh,仍出现如下错误:
缺少libfastcommon中的相关基础库
安装libfastcommon
解压libfastcommon-master.zip
[root@fastdfs2 fastdfs-master]# cd /opt
[root@fastdfs2 opt]# unzip -o libfastcommon-master.zip -d /usr/local
安装libfastcommon
[root@fastdfs2 opt]# cd /usr/local/libfastcommon-master/
[root@fastdfs2 libfastcommon-master]# ./make.sh
[root@fastdfs2 libfastcommon-master]# ./make.sh install
再装fastdfs
[root@fastdfs2 local]# cd /usr/local/fastdfs-master/
[root@fastdfs2 fastdfs-master]# ./make.sh
[root@fastdfs2 fastdfs-master]# ./make.sh install
拷贝配置文件
将fastdfs安装目录下的conf下的文件拷贝到/etc/fdfs/下
[root@fastdfs2 fastdfs-master]# cp -r conf/* /etc/fdfs/
自此fastdfs安装完成了,接下来配置trackerd和storaged,并启动它们。
fdfs可执行命令
[root@fastdfs2 fdfs]# ll /usr/bin/fdfs*


-rwxr-xr-x. 1 root root 210899 6月   8 21:00 /usr/bin/fdfs_appender_test
-rwxr-xr-x. 1 root root 210868 6月   8 21:00 /usr/bin/fdfs_appender_test1
-rwxr-xr-x. 1 root root 198740 6月   8 21:00 /usr/bin/fdfs_append_file
-rwxr-xr-x. 1 root root 198044 6月   8 21:00 /usr/bin/fdfs_crc32
-rwxr-xr-x. 1 root root 198735 6月   8 21:00 /usr/bin/fdfs_delete_file
-rwxr-xr-x. 1 root root 199112 6月   8 21:00 /usr/bin/fdfs_download_file
-rwxr-xr-x. 1 root root 198960 6月   8 21:00 /usr/bin/fdfs_file_info
-rwxr-xr-x. 1 root root 211836 6月   8 21:00 /usr/bin/fdfs_monitor
-rwxr-xr-x. 1 root root 762687 6月   8 21:00 /usr/bin/fdfs_storaged
-rwxr-xr-x. 1 root root 212997 6月   8 21:00 /usr/bin/fdfs_test
-rwxr-xr-x. 1 root root 212618 6月   8 21:00 /usr/bin/fdfs_test1
-rwxr-xr-x. 1 root root 329821 6月   8 21:00 /usr/bin/fdfs_trackerd
-rwxr-xr-x. 1 root root 199076 6月   8 21:00 /usr/bin/fdfs_upload_appender
-rwxr-xr-x. 1 root root 203766 6月   8 21:00 /usr/bin/fdfs_upload_file
配置并启动trackerd
修改trackerd.conf
不改也可以,但是要保证/home/yuqing/fastdfs路径存在
[root@fastdfs2 fdfs]# cd /etc/fdfs/
[root@fastdfs2 fdfs]# vi tracker.conf
将base_path=/home/yuqing/fastdfs改成base_path=/data/fastdfs
创建trackerd数据、日志目录
[root@fastdfs2 fdfs]# mkdir -p /data/fastdfs
启动trackerd
[root@fastdfs2 fdfs]# /usr/bin/fdfs_trackerd /etc/fdfs/tracker.conf restart
查看trackerd进程,如下图:

说明trackered已经启动起来;其实也可以查看日志:/data/fastdfs/logs/trackerd.log,来判断trackerd是否正常启动起来。
配置并启动storaged
修改storage.conf
[root@fastdfs2 fdfs]# cd /etc/fdfs/
[root@fastdfs2 fdfs]# vi storage.conf
base_path=/home/yuqing/fastdfs改为:base_path=/data/fastdfs
store_path0=/home/yuqing/fastdfs改为:store_path0=/data/fastdfs/storage
tracker_server=192.168.209.121:22122改为:tracker_server=192.168.1.207:22122,这个ip改成自己的
创建storaged数据、日志目录
[root@fastdfs2 fdfs]# mkdir -p /data/fastdfs/storage
启动storaged
[root@fastdfs2 fdfs]# /usr/bin/fdfs_storaged /etc/fdfs/storage.conf restart
查看storaged进程,如下图:

说明storaged已经启动起来;其实也可以查看日志:/data/fastdfs/logs/storaged.log来判断storaged是否正常启动起来。
上传图片测试
本地(win环境)安装fastdfs连接驱动
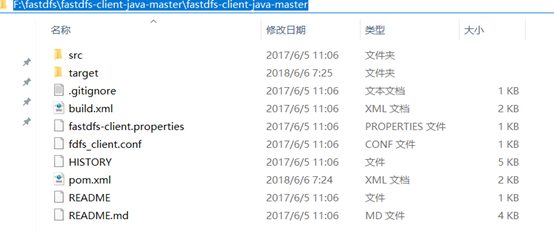
从https://github.com/happyfish100/fastdfs-client-java下载源码,我下载的是zip包,解压后目录如下图:
maven本地安装:mvn clean install

当然也可以用ant构建:ant clean package
书写测试代码
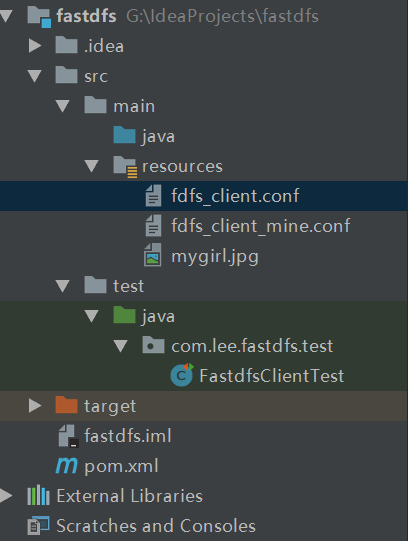
代码结构如图
fdfs_client_mine.conf:
connect_timeout = 2
network_timeout = 30
charset = UTF-8
http.tracker_http_port = 8080
http.anti_steal_token = no
http.secret_key = FastDFS1234567890

tracker_server = 192.168.1.207:22122
FastdfsClientTest.java:
package com.lee.fastdfs.test;

import org.csource.common.NameValuePair;
import org.csource.fastdfs.*;
import org.junit.Test;

import java.io.FileNotFoundException;
import java.io.IOException;

public class FastdfsClientTest {

    //客户端配置文件
    public String conf_filename = "fdfs_client_mine.conf";
    //本地文件,要上传的文件
    public String local_filename = "G:\IdeaProjects\fastdfs\src\main\resources\mygirl.jpg";

    //上传文件
    @Test
    public void testUpload() {

        for(int i=0;i<10;i++){

            try {
                ClientGlobal.init(conf_filename);

                TrackerClient tracker = new TrackerClient();
                TrackerServer trackerServer = tracker.getConnection();
                StorageServer storageServer = null;

                StorageClient storageClient = new StorageClient(trackerServer,
                        storageServer);
                NameValuePair nvp [] = new NameValuePair[]{
                        new NameValuePair("item_id", "100010"),
                        new NameValuePair("width", "80"),
                        new NameValuePair("height", "90")
                };
                String fileIds[] = storageClient.upload_file(local_filename, null,
                        nvp);

                System.out.println(fileIds.length);
                System.out.println("组名:" + fileIds[0]);
                System.out.println("路径: " + fileIds[1]);

            } catch (FileNotFoundException e) {
                e.printStackTrace();
            } catch (IOException e) {
                e.printStackTrace();
            } catch (Exception e) {
                e.printStackTrace();
            }
        }
    }

}
上传图片:mygirl.jpg
执行测试代码,当输出如下信息时,表示上传成功:
2
组名:group1
路径: M00/00/00/wKgBz1salX-AKZMdAABHO7x65CM183.jpg
2
组名:group1
路径: M00/00/00/wKgBz1salX-ATR4PAABHO7x65CM553.jpg
2
组名:group1
路径: M00/00/00/wKgBz1salX-AKFyFAABHO7x65CM038.jpg
2
组名:group1
路径: M00/00/00/wKgBz1salX-ASse4AABHO7x65CM705.jpg
2
组名:group1
路径: M00/00/00/wKgBz1salX-AKUn7AABHO7x65CM247.jpg
2
组名:group1
路径: M00/00/00/wKgBz1salX-AdT4cAABHO7x65CM342.jpg
2
组名:group1
路径: M00/00/00/wKgBz1salX-AR0V0AABHO7x65CM992.jpg
2
组名:group1
路径: M00/00/00/wKgBz1salX-AMpoLAABHO7x65CM691.jpg
2
组名:group1
路径: M00/00/00/wKgBz1salX-AcjanAABHO7x65CM587.jpg
2
组名:group1
路径: M00/00/00/wKgBz1salX-Ab8qnAABHO7x65CM687.jpg
我们到服务器上看看,图片确实已经上传了,如下图:

由于现在还没有和nginx整合无法使用http下载。
FastDFS 和nginx整合
fastdfs-nginx-module安装
解压
[root@fastdfs2 00]# cd /opt
[root@fastdfs2 opt]# unzip -o fastdfs-nginx-module-master.zip -d /usr/local
拷贝配置文件
[root@fastdfs2 opt]# cd /usr/local/fastdfs-nginx-module-master/src
[root@fastdfs2 src]# cp mod_fastdfs.conf /etc/fdfs/
编辑配置文件
[root@fastdfs2 src]# cd /etc/fdfs/
[root@fastdfs2 fdfs]# vi mod_fastdfs.conf
base_path=/tmp改成:base_path=/data/fastdfs
tracker_server=tracker:22122改成:tracker_server=192.168.1.207:22122
url_have_group_name = false改成:url_have_group_name = true;#url中包含group名称
store_path0=/home/yuqing/fastdfs改成:store_path0=/data/fastdfs/storage
nginx安装
nginx依赖包安装
[root@fastdfs2 fdfs]# cd /opt
[root@fastdfs2 opt]# yum -y install zlib zlib-devel openssl openssl--devel pcre pcre-devel
解压nginx
[root@fastdfs2 opt]# tar -zxvf nginx-1.13.12.tar.gz
安装nginx并添加fastdfs模块
[root@fastdfs2 opt]# cd nginx-1.13.12
[root@fastdfs2 nginx-1.13.12]# ./configure --prefix=/usr/local/nginx --add-module=/usr/local/fastdfs-nginx-module-master/src
[root@fastdfs2 nginx-1.13.12]# make
[root@fastdfs2 nginx-1.13.12]# make install
检查nginx模块
[root@fastdfs2 nginx-1.13.12]# cd /usr/local/nginx/sbin/
[root@fastdfs2 sbin]# ./nginx -V
nginx version: nginx/1.13.12
uilt by gcc 4.4.7 20120313 (Red Hat 4.4.7-18) (GCC)
configure arguments: --prefix=/usr/local/nginx --add-module=/usr/local/fastdfs-nginx-module-master/src
已经把fastdfs模块添加进去了。
配置nginx配置文件
[root@fastdfs2 sbin]# cd /usr/local/nginx/conf
[root@fastdfs2 conf]# vi nginx-fdfs.conf
内容如下,ip注意改成自己的:
events {
    use epoll;

    worker_connections  1024;
}
http {
    server {
        listen       80;
        server_name  192.168.1.207;

        location /group1/M00/{
                #root /home/FastDFS/fdfs_storage/data;
                ngx_fastdfs_module;
        }
    }
    server {
        listen 8888;
    server_name 192.168.1.207;
        location / {
            root   html;
            index  index.html index.htm;
        }
    }
}
启动nginx
[root@fastdfs2 conf]# cd /usr/local/nginx/sbin/
[root@fastdfs2 sbin]# ./nginx -c /usr/local/nginx/conf/nginx-fdfs.conf
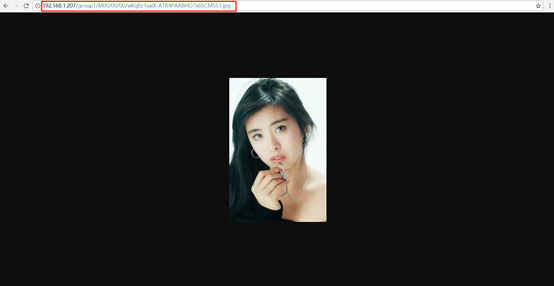
访问图片
文件路径在上面的上传图片的测试代码中有输入,我们进行拼装下:
http://192.168.1.207/group1/M00/00/00/wKgBz1salX-ATR4PAABHO7x65CM553.jpg
总结
1、fastdfs相关包推荐直接到官网下载,能避免因为版本而造成的问题
2、上传成功而访问却出现nginx:400问题,极有可能url_have_group_name = false没有改成:url_have_group_name = true;
大家搭建的时候一定要细心再细心,也祝大家能够顺利的完成!(我是搭建了一段时间,中间各种小插曲 )
)