getting-started是官方根据其在线文档(https://docs.docker.com/get-started/)专门制作的一个镜像(全名是:docker/getting-started)。相比在线文档,步骤更详细清晰,作者就是按照这个镜像一步一步实践快速入门了Docker。
如何安装使用这个镜像,可以去docker hub镜像仓库(https://hub.docker.com/r/docker/getting-started)看介绍,但是对于新手,我更推荐根据在线文档中的指引来上手,链接我放在下面了:
# 从docker hub拉取镜像到本地,docker是用户名,后面的是镜像名称
$ docker pull docker/getting-started

# 显示本地安装镜像
$ docker image ls
REPOSITORY               TAG           IMAGE ID       CREATED        SIZE
docker/getting-started   latest        083d7564d904   4 months ago   28MB

# 启动容器,-d代表后台,-表示端口映射
$ docker run -d -p 3000:3000 docker/getting-started
cb4fa2673b034053134efb4c72646083cba5cf6d86b372c6f8893d1646f257bc
docker run -d -p 80:80 docker/getting-started
You’ll notice a few flags being used. Here’s some more info on them:
-d - run the container in detached mode (in the background)
-p 80:80 - map port 80 of the host to port 80 in the container
docker/getting-started - the image to use
此时,打开浏览器,输入 localhost 出现如下getting-started界面。
请先按照这个教程一步一步来吧!
提前剧透一下,通过这个教程,您将学习到:
- 将镜像构建并运行为容器
- 使用Docker Hub镜像仓库,共享镜像
- 使用带有数据库的多个容器部署Docker应用程序
- 使用Docker Compose运行应用程序
当然,还有特定语言的getting-started(比如Go),但是我还是建议你先看完这个。
本教程将通过一个最简单的、使用 JavaScript 开发的待办事项管理 Web 应用程序贯穿始终,下文简称为:todo-app。这个应用程序的代码已经写好并提供了源码的下载地址,所以如果你不太熟悉 JavaScript 和 Node.js 也完全没有任何关系,依旧可以很轻松的学习本教程,因为我们的学习重点是 Docker,所以放心的继续往下看吧。
此时,你只是想开发一个最小可行产品(MVP)来证明自己的想法,展示它的工作原理和功能,暂时无需考虑其他复杂因素。
获取 todo-app 源码
在运行 todo-app 之前,需要将它的源代码下载到自己的计算机上。在实际工作中开发的项目,通常是去公司的代码仓库克隆。但是,针对本教程,我们创建好了一个包含应用程序源码的 ZIP 压缩文件。
- 点击这里下载 并解压,解压之后默认文件夹名称是
app, 非必要的情况下,不要修改文件夹名称,因为保存名称一致,有利于后续文档的说明。 - 使用你喜欢的编辑器打开,下图使用的是 Visual Studio Code 编辑器作为演示,你可以使用任何自己喜欢的编辑器打开它,打开之后会看到
package.json文件、yarn.lock文件和两个子目录src和spec。
Building the App's Container Image
In order to build the application, we need to use a Dockerfile. A Dockerfile is simply a text-based script of instructions that is used to create a container image. If you've created Dockerfiles before, you might see a few flaws in the Dockerfile below. But, don't worry! We'll go over them.
-
Create a file named
Dockerfilein the same folder as the filepackage.jsonwith the following contents.FROM node:12-alpine # Adding build tools to make yarn install work on Apple silicon / arm64 machines RUN apk add --no-cache python2 g++ make WORKDIR /app COPY . . RUN yarn install --production CMD ["node", "src/index.js"]Please check that the file
Dockerfilehas no file extension like.txt. Some editors may append this file extension automatically and this would result in an error in the next step. -
If you haven't already done so, open a terminal and go to the
appdirectory with theDockerfile. Now build the container image using thedocker buildcommand.docker build -t getting-started .This command used the Dockerfile to build a new container image. You might have noticed that a lot of "layers" were downloaded. This is because we instructed the builder that we wanted to start from the
node:12-alpineimage. But, since we didn't have that on our machine, that image needed to be downloaded.After the image was downloaded, we copied in our application and used
yarnto install our application's dependencies. TheCMDdirective specifies the default command to run when starting a container from this image.Finally, the
-tflag tags our image. Think of this simply as a human-readable name for the final image. Since we named the imagegetting-started, we can refer to that image when we run a container.The
.at the end of thedocker buildcommand tells that Docker should look for theDockerfilein the current directory.
-
这个
Dockerfile的每一行都代表着告诉 Docker 镜像构造器每一步该怎么做:- 我们的镜像要基于
node: 12-alpine镜像 - 指定镜像的工作目录是
/app - 接着将主机上当前项目目录下的所有内容(即:
app目录下的所有内容)复制到镜像中的当前工作目录(即:/app目录下) - 接着执行
yarn install --production命令为todo-app安装依赖 - 最后一步通过
CMD指定镜像被启动时默认要执行的命令,即通过 node 真正启动我们的todo-appWeb 应用程序。
备注:确保刚刚创建的
Dockerfile文件没有文件扩展名,有些编辑器可能会自动附加文件扩展名。 - 我们的镜像要基于
-
打开命令行并进入到
Dockerfile文件所在的app目录,执行如下命令:docker build -t todo-app .这条命令就是使用刚刚创建的
Dockerfile文件构建出一个新的容器镜像。从这条命令的输出结果中,你应该已经注意到有很多步骤,对应着Dockerfile文件的每一行。-t标志代表为我们的镜像打标签,可以简单地理解成为镜像取一个易于理解的名称。由于我们将镜像命名为todo-app因此可以在运行容器时引用这个镜像名称。docker build 命令最后的.代表告诉 Docker 在当前目录下查找Dockerfile文件。
nodejs应用打包成docker镜像
上面的
FROM node:12-alpine 太慢了,alpine太慢了
用最新的 FROM node:latest - 指定使用最新版本的node基础镜像
node:lasted 使用的是centos系统。
cat /etc/redhat-release
CentOS Linux release 7.9.2009 (Core).
FROM node:latest
WORKDIR /app
COPY . .
RUN yarn install --production
CMD ["node", "src/index.js"]
执行成功。
Successfully built 76aba7b7ce4b
Successfully tagged getting-started:latest
参考:https://blog.csdn.net/w_wjy520/article/details/116782886
假设我们的项目名为express,在express项目中创建编辑Dockerfile文件:


$ vim Dockerfile

FROM node:latest

RUN mkdir -p /home/www/express
WORKDIR /home/www/express

COPY . /home/www/express

RUN npm install

EXPOSE 3000

ENTRYPOINT ["npm", "run"]
CMD ["start"]
这个文件包含了以下命令:

 FROM node:latest - 指定使用最新版本的node基础镜像
 RUN mkdir -p /home/www/express - 在容器内创建/home/www/express目录
 WORKDIR /home/www/express - 将容器内工作目录设置为/home/www/express
 COPY . /home/www/express - 将宿主机当前目录下内容复制到镜像/home/www/express目录下
 RUN npm install - npm install安装应用所需的NPM包
 EXPOSE 3000 - 对外开放容器的3000端口
 ENTRYPOINT ["npm", "run"] - 容器启动后执行的命令。不可被docker run提供的参数覆盖
 CMD ["start"] - 在容器启动时,执行的命令,可被docker run提供的参数覆盖
Starting an App Container
Now that we have an image, let's run the application! To do so, we will use the docker run command (remember that from earlier?).
-
Start your container using the
docker runcommand and specify the name of the image we just created:docker run -dp 3000:3000 getting-startedRemember the
-dand-pflags? We're running the new container in "detached" mode (in the background) and creating a mapping between the host's port 3000 to the container's port 3000. Without the port mapping, we wouldn't be able to access the application. -
After a few seconds, open your web browser to http://localhost:3000. You should see our app!
用刚创建的镜像启动容器
现在已经为我们的 todo-app 应用创建了一个名字为 todo-app 的 Docker 镜像,看看如何使用它:
-
使用
docker run命令启动一个新容器,并指定使用我们刚刚创建的镜像:docker run -dp 3000:3000 todo-app还记得
-d和-p标记吗?-d- 让容器保持在后台运行;-p 3000:3000- 将容器中的 3000 端口映射到本机的 3000 端口。
因此,通过这条命令,我们使用自己创建的todo-app镜像启动了一个新容器。在容器中的 3000 端口上启动着我们自己的todo-appWeb 应用程序,并将容器中的 3000 端口映射到本机的 3000 端口。 -
在本机上访问 http://localhost:3000 就可以看到我们自己的应用了:
Recap
In this short section, we learned the very basics about building a container image and created a Dockerfile to do so. Once we built an image, we started the container and saw the running app!
Next, we're going to make a modification to our app and learn how to update our running application with a new image. Along the way, we'll learn a few other useful commands
Update the application
Update the source code
-
In the
src/static/js/app.jsfile, update line 56 to use the new empty text.- <p className="text-center">No items yet! Add one above!</p> + <p className="text-center">You have no todo items yet! Add one above!</p> -
Let’s build our updated version of the image, using the same command we used before.
$ docker build -t getting-started . -
Let’s start a new container using the updated code.
$ docker run -dp 3000:3000 getting-started
Uh oh! You probably saw an error like this (the IDs will be different):
docker: Error response from daemon: driver failed programming external connectivity on endpoint laughing_burnell
(bb242b2ca4d67eba76e79474fb36bb5125708ebdabd7f45c8eaf16caaabde9dd): Bind for 0.0.0.0:3000 failed: port is already allocated.
So, what happened? We aren’t able to start the new container because our old container is still running. It is because the container is using the host’s port 3000 and only one process on the machine (containers included) can listen to a specific port. To fix this, we need to remove the old container.
Replace the old container
To remove a container, it first needs to be stopped. Once it has stopped, it can be removed. We have two ways that we can remove the old container. Feel free to choose the path that you’re most comfortable with.
Remove a container using the CLI
-
Get the ID of the container by using the
docker pscommand.$ docker ps -
Use the
docker stopcommand to stop the container.# Swap out <the-container-id> with the ID from docker ps $ docker stop <the-container-id> -
Once the container has stopped, you can remove it by using the
docker rmcommand.$ docker rm <the-container-id>
更新应用并重新构建 Docker 镜像
修改源码
-
修改
src/static/js/app.js文件的第 56 行:将No items yet! Add one above!修改为You have no todo items yet! Add one above! -
输入之前使用过的命令,重新构建镜像
docker build -t todo-app . -
使用新版本镜像运行容器
docker run -dp 3000:3000 todo-app你可能会看到如下错误信息:
docker: Error response from daemon: driver failed ...... Bind for 0.0.0.0:3000 failed: port is already allocated.
之所以出现这个问题,是因为本机的 3000 端口已经被我们之前启动的容器占用了。要解决此问题,我们可以删除旧的容器
回顾
在本节中,我们修改了源代码,同时重新执行了构建镜像命令。
虽然我们成功构建了新版本镜像,但是你可能已经注意到了两个小问题:
- 镜像更新之前添加的所有代办事项,全部都消失了,数据没有被保存起来
- 本次修改只是一个非常简单的文字更新,但是重新构建镜像的过程中,
Dockerfile文件列出的每一个步骤都需要重新执行一遍。肯定还有更高效的方式让容器感知代码的变化,而不必重新执行所有步骤。
之后的章节将会解决这两个问题,在开始解决这些问题之前,让我们先快速了解一下如何把我们构建好的镜像分享给其他人使用。
Share the application
分享自己创建的 Docker 镜像
bxbz - 2021-09-02 23:16:39 - 所属文档:Docker 快速入门文档
现在我们已经构建了自己的镜像,是时候把它分享给其他人使用了!要分享 Docker 镜像,需要使用 Docker registry,默认的 registry 是 Docker Hub
备注:本文档不对
registry和repository进行翻译,出现它们的地方都保留原始英文。
Registry 和 Repository 的区别
- Registry 的官方解释:The Registry is a stateless, highly scalable server side application that stores and lets you distribute Docker images. The Registry is open-source, under the permissive Apache license. Registry 是一个无状态、高可用的服务端程序,用于存储和分发 Docker 镜像。同时它是一个基于 Apache license 的开源程序。正是由于它是开源的,所有除了 Docker 官方的 registry (即:Docker Hub)还有很多第三代的 registry,甚至你还可以自己部署一个 registry。
- Repository 是 registry 内部真正保存具体每个镜像内容的地方。
创建 Repository
本文以 Docker 默认的 registry,也就是 Docker Hub 为例进行说明。要推送镜像,首先需要在 Docker Hub 上创建一个 Repository。
- 访问 Docker Hub 并登录
- 点击 Create Repository 按钮
- Repository 名称使用
todo-app,将 Visibility 设置为Public - 点击 Create 按钮
在页面的右侧会看到一个名为 Docker commands 的部分。列出了一个示例命令,参考示例命令将自己的镜像推送到仓库。
推送自己的镜像
-
执行
docker login -u YOUR-USER-NAME命令,登录到 Docker Hub -
使用
docker tag命令为todo-app镜像指定一个新名称。确保用您的 Docker ID 替换YOUR-USER-NAME。# 用你的 Docker ID 替换 `YOUR-USER-NAME` docker tag todo-app YOUR-USER-NAME/todo-app -
使用
docker push推送镜像。如果不指定标签,则 Docker 将默认使用名为latest的标签# 用你的 Docker ID 替换 `YOUR-USER-NAME` docker push YOUR-USER-NAME/todo-app
Use the docker tag command to give the getting-started image a new name. Be sure to swap out YOUR-USER-NAME with your Docker ID.
docker tag getting-started YOUR-USER-NAME/getting-started
运行刚刚推送到仓库的镜像
现在,我们已经将镜像推送到 registry 中,如果其他人要使用我们分享的镜像,就可以通过执行以下命令来使用了:
# 用你的 Docker ID 替换 `YOUR-USER-NAME` docker run -dp 3000:3000 YOUR-USER-NAME/todo-app官方教程:
https://docs.docker.com/get-started/
http://www.bianxuebianzuo.com/docs/lecture/docker-bind-mounts__doc
https://blog.csdn.net/itguangit/article/details/109056698
Docker 多容器应用 Multi-Container Apps
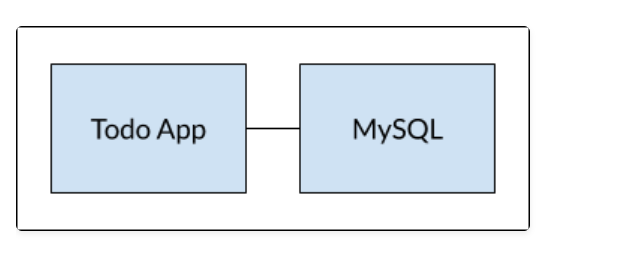
到目前为止,我们一直在使用单个容器应用程序。但是,我们现在想将 MySQL 添加到应用程序架构中。那么,问题来了:MySQL 将在哪里运行?是将它安装在同一容器中还是在另外的单独容器中运行?
一般来说,一个容器应该只做一件事。 原因:
- 虽然你可以在开发阶段使用本地数据库,但是很可能要在生产环境中使用云数据库。所以,将数据库与应用程序运行在同一个容器中不太合适。
- 一般情况下,一个容器应该仅启动一个进程,如果在同一个容器中运行多个进程会增加容器启动/关闭/服务运行情况监听的复杂性。
还有其他更多原因。因此,我们会新启动一个容器运行 MySQL 服务,结构如下:
容器 Networking
默认情况下,容器是独立运行的,并且对同一台主机上的其他进程或容器一无所知。So, how do we allow one container to talk to another? The answer is networking. Now, you don't have to be a network engineer (hooray!). Simply remember this rule...那么,我们如何允许一个容器与另一个容器对话?答案是通过 networking - 网络。你不必具备网络工程师的知识,只需要记住一个最简单的规则就够用了:如果两个容器在同一个网络中,它们就可以相互通信。否则,就不行。
docker compose安装
https://docs.docker.com/compose/install/
On Linux, you can download the Docker Compose binary from the Compose repository release page on GitHub. Follow the instructions from the link, which involve running the curl command in your terminal to download the binaries. These step-by-step instructions are also included below.
 sudo curl -L "https://github.com/docker/compose/releases/download/1.29.2/docker-compose-$(uname -s)-$(uname -m)" -o /usr/local/bin/docker-compose


$(uname -s) 会显示linux
uname -m  x86_64
Apply executable permissions to the binary:
$ sudo chmod +x /usr/local/bin/docker-compose-
Optionally, install command completion for the
bashandzshshell. -
Test the installation.
$ docker-compose --version docker-compose version 1.29.2, build 1110ad01 -