https://blog.csdn.net/yin20100522/article/details/107415398
https://www.jianshu.com/p/c3a9d20db4e5
变量标识符 { }
Robot Framework的变量分为标量, 列表和字典, 分别使用语法格式 ${SCALAR}, @{LIST} 和 &{DICT} 来定义。

标量(Scalar)变量是指用${}标识的变量。
用例脚本中关键字之间使用4个空格进行间隔。
${name} Set Variable robotframework
]
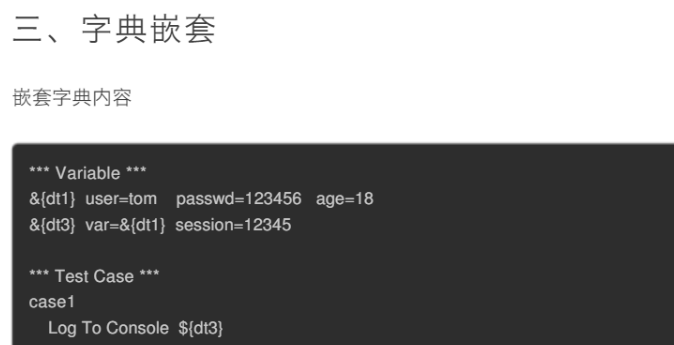
嵌套字典


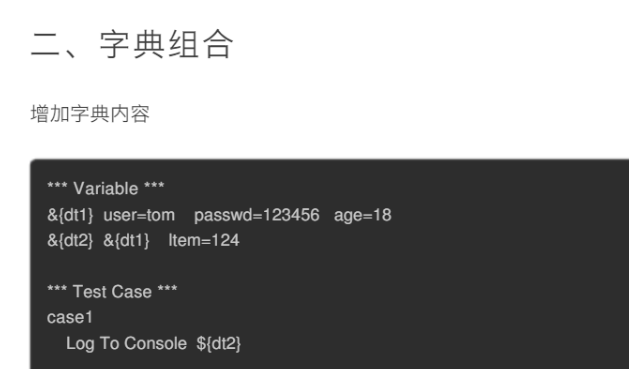
典变量用&{}标识,使用Create Dictionary来创建一个字典
&{dict3} Create Dictionary name=李四 age=30
先要安装requests,再安装requestsLibrary
使用空格分隔时, 空格的数量是不定的, 最少需要2个, 可以尽量将数据对齐的更好看点. 当使用文本编辑器时, 这点相对TSV格式来说是一大优势, 因为TSV的对齐没法控制.
关键字和参数之间推荐使用4个空格隔开.
robot变量类型;
数值是通过${数值}来表示的,其中的数值可以是整形也可以是浮点型; 元组的表示${数值1,数值2,...}; 列表的定义@{列表名称};
数字变量
如下面例子中所示,变量语法能用来创建 整型 和 浮点型 数据。当一个关键字需要 真实的数字而非对应的数字字符串作为参数时,这种创建数字变量的方法是很有用的。
*** Test Cases ***
Example 1A
Connect example.com 80 # Connect 获得两个字符串作为参数Example 1B
Connect example.com ${80} # Connect 获得一个字符串和一个整数作为参数Example 2
Do X ${3.14} ${‐1e‐4} # Do X 获得浮点数 3.14 和 ‐0.0001 作为参数
————————————————
原文链接:https://blog.csdn.net/hxiongge/article/details/109240899
发送和接受json:
*** Test Cases ***
testcaseJson
    ${headers}    Create Dictionary    Content-Type=application/json;charset=UTF-8
    Create Session    httpbin    ${HOST}
    &{body}    Create Dictionary    aa=3
    ${resp}    Post On Session   httpbin    /path   headers=${headers}    json=${body} 注意这里是json不是data.
    log    ${resp}
    ${json}  Set Variable  ${resp.json()}
    log    ${json}
    Log to console    ${json}
可以用requests请求,也可以用Requestlibrary请求(前提一定要安装requests)

http请求的7种方法
get post delete head options patch put
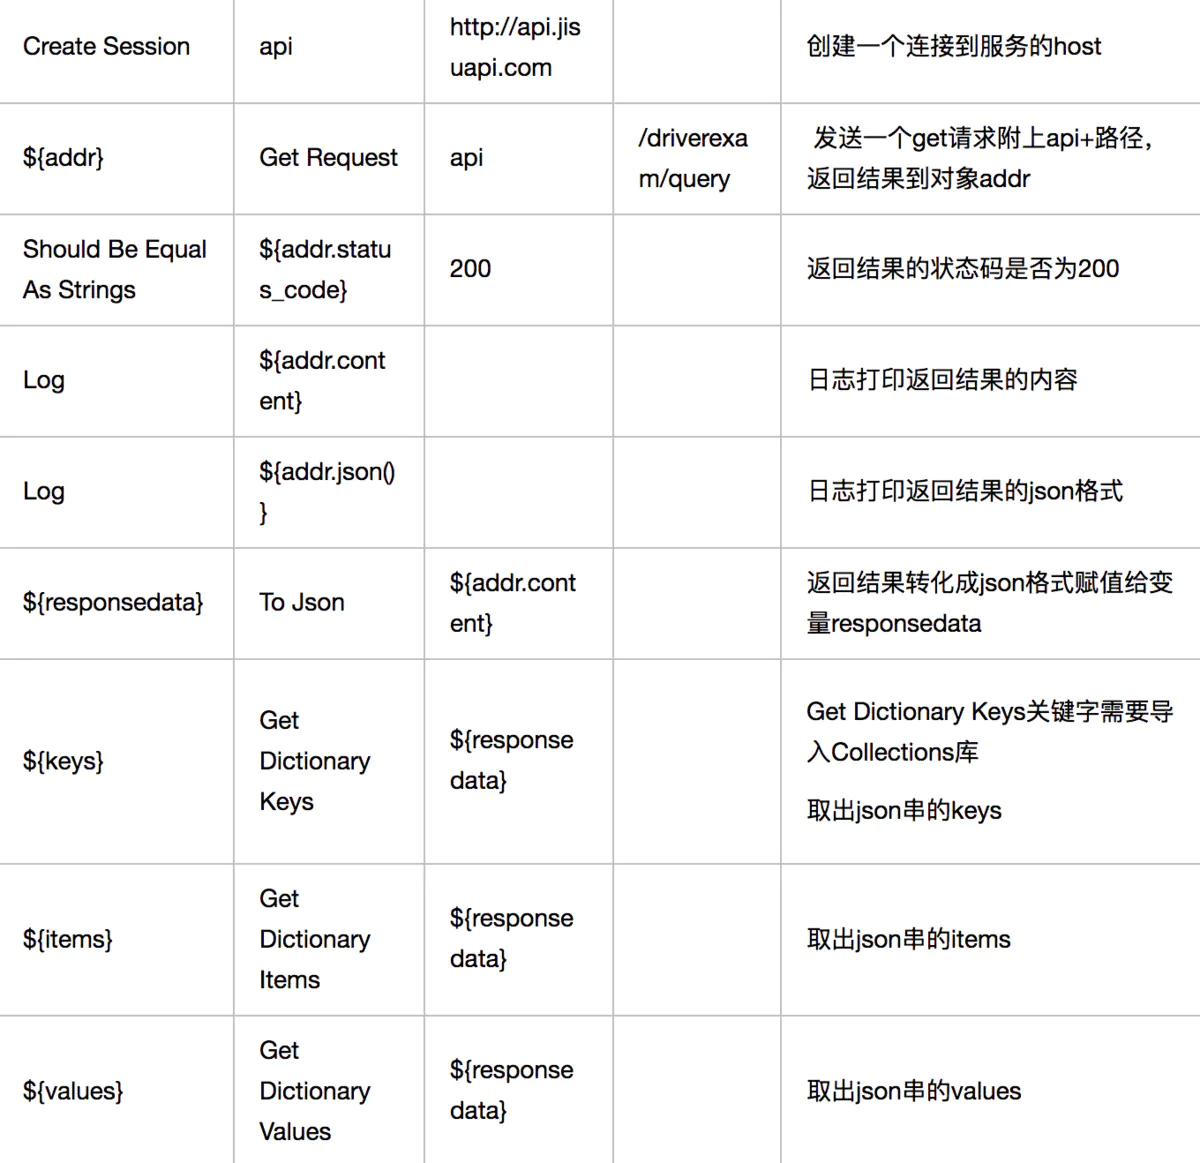
RequestsLibrary关键字
| 关键字 | 备注&参数 |
|---|---|
| Create Session | 创建一个HTTP会话:alias, url, headers={}, cookies=None, auth=None, timeout=None, proxies=None, verify=False。 url:即服务器的url。 alias:使用Robot Framework的别名表示当前会话。 header:使用默认的headers字段。 auth:NTLM鉴权需用username&password格式。 timeout:会话超时时长。 proxies:代理服务器的url。 verify:如果需要证书请求则置为true |
| Delete All Sessions | 删除全部的会话 |
| Delete Request | alias, uri, data=(), headers=None, allow_redirects=None |
| Get Request | 根据提供的别名查找会话并在会话中发送GET请求 alias, uri, headers=None, params={}, allow_redirects=None |
| Post Request | 根据提供的别名查找会话并在会话中发送POST请求 alias, uri, data={}, headers=None, files={}, allow_redirects=None |
| To Json | 将文本转换成json对象 content pretty_print |
例子

作者:heyzql
链接:https://www.jianshu.com/p/ea94fea6f37c
来源:简书
著作权归作者所有。商业转载请联系作者获得授权,非商业转载请注明出处。
pip install requests
pip install robotframework-requests


Keyword 'RequestsLibrary.Get Request' is deprecated. Please use `GET On Session` instead.
关键字介绍:
1)Create Session:创建一个与服务器的会话
参数说明:
alias:别名。作为当前会话的标识符。
url:服务器地址。基本地址,而不是接口的地址。
2)Post Request:发送一个post请求,并返回一个响应对象。
参数说明:
alias:选择一个会话的别名。来自于 Create Session 关键字。
url:接口地址。不包含服务器地址。
data:post请求体数据。
返回值:response 对象(requests 库的 response 对象)
注意:post请求一定要添加消息头,否则会发送请求失败。
3)Get Request:发送一个get请求,并返回一个响应对象。
参数说明:
alias:选择一个会话的别名。来自于 Create Session 关键字。
url:接口地址。不包含服务器地址。
data:post请求体数据。
返回值:response 对象(requests 库的 response 对象)
Response 对象,就是 python request 中的 Response 类。该类有什么方法这里就可以使用什么方法。
stauts_code:当前 http 通信的状态码
text:响应数据的响应数据部分 - 字符串
json():转换成 json 对象。
headers:消息头对象
*** Settings ***
Library    RequestsLibrary
Suite Setup    Create Session    register
http://xxx.xx.xx.xxx:8080

*** Varibales ***
&{data1}    mobilephone=13744441100    pwd=1234567890
&{data2}    mobilephone=13744441100    pwd=${EMPTY}
${url}    XXXxxx/xxxxxx/xxxxxx/register

*** Test Cases ***
注册-get
    &{req_data}    Create Dictionary    mobilephone=13744441100  pwd=1234567890
    &{resp}    Get Request    register    ${url}  params=&{req_data}
    Log    ${resp.status_code}
    Log    ${resp.text}
    Log    ${resp.json()}

注册-post
    &{req_data}    Create Dictionary    mobilephone=13744441100  pwd=1234567890
    &{header}    Create Dictionary    Content-Type=application/x-www-form-urlencoded
    &{resp}    Post Request    register    ${url}    &{req_data}    headers=${header}
    Log    ${resp.status_code}
    Log    ${resp.text}
    Log    ${resp.json()}
变量作用域
通常情况下,每个变量默认都是局部变量,但如果想让这个变量在各个用例中都可以使用,就需要赋值在Variables里面
| 变量赋值位置 | 作用域 |
|---|---|
| 测试用例 | 在这个测试用例内部 |
| Variables | 测试用例集(该文件所有用例均可使用) |
*** Variables ***
${hh}    121
@{list}    12    13    43    2
*** Test Cases ***
用例4-获取列表第二位置的值
    Log    ${list[1]}
用例5-RF变量
   Log    ${hh}
   Log    ${list[2]}
外部变量.py文件

data1 = "hello,RF"

LIST__strings = ["one", "two", "three", "four", "five"]

DICT__person_info = {"name":"xiao", "sex":"女", "hobby":"sleep"}

测试用例集.robot文件

*** Settings ***
Variables    外部变量.py
*** Test Cases ***
用例6-从变量文件中读取变量
    Log    ${data1}
    Log    ${strings[0]}
    Log    ${person_info.sex}
————————————————
版权声明:本文为CSDN博主「萌萌哒小宝宝」的原创文章,遵循CC 4.0 BY-SA版权协议,转载请附上原文出处链接及本声明。
原文链接:https://blog.csdn.net/qq_38889350/article/details/109770071
资源文件 这一概念了:
资源文件 其实就是RF层面的库文件(不能包含测试用例表),里面的内容为共享的变量和关键字
导入资源文件
新建一个 common.robot 文件
common.robot
*** Settings ***
Library     SeleniumLibrary

*** Keywords ***
登录网易邮箱
    # 打开chrome浏览器访问163邮箱
    open browser    https://mail.163.com/       chrome
    sleep    5
    maximize browser window
    # 切换到iframe
    select frame    xpath=//iframe[contains(@id,'iframe')]
    # 用户名输入框中输入 用户名
    sleep    2
    input text    xpath=//*[@name="email"]     你的用户名
    sleep    2
    # 密码输入框中输入 密码
    input text    xpath=//*[@name="password"]   你的密码
    sleep    2
    # 点击登录按钮
    click element    xpath=//*[@id="dologin"]
    sleep    10

关闭浏览器
    close browser
通过在测试用例文件的Settings表中Resource common.robot导入资源文件,即可使用 资源文件 里共享的变量和关键字的内容
*** Settings ***
Library     SeleniumLibrary
Resource    common.robot

*** Test Cases ***
网易邮箱2
    登录网易邮箱
    log to console    这里是用例主体部分
    关闭浏览器
用log to console 可以直接控制台打印
在大多数时候,登录会变成测试套件的用例前置的内容,关闭浏览器是用例后置的内容,所以,通常在测试套件中,会这样来写
test.robot
*** Settings ***
Library SeleniumLibrary
Resource common.robot
Suite Setup 登录网易邮箱
Suite Teardown 关闭浏览器
*** Test Cases ***
用例1
log to console 这里是用例主体部分
用例2
log to console 这里是用例主体部分
使用 套件级别的 Suite Setup,将登录网易邮箱关键字作为前置内容,将关闭浏览器关键字作为后置内容,执行用例1和用例2前就已执行登录操作,用例1和用例2执行结束,关闭浏览器
资源文件的作用是对用户关键字进行管理,将重复的内容提取出来,简化测试用例中的操作步骤
原文链接:https://blog.csdn.net/qq_44614026/article/details/115450095
首先需要声明使用Library:

*** Settings ***
Library    RequestsLibrary
接下来定义访问的地址:

*** Variables ***
${HOST}    http://localhost/myapi
然后就可以写用例了:

*** Test Cases ***
API Test Example
    Create Session    my_session    ${HOST}
    ${headers}=    Create Dictionary    Accept=application/json    Content-Type=application/json    charset=utf-8

    # POST request with params
    ${data}=    Create dictionary    field1=value1    field2=value2
    ${response}=    Post Request    my_session    my-endpoint    headers=${headers}    data=${data}

    Should be equal as strings    ${response.status_code}    200
    Log    ${response}
这里使用的是POST方法,向api发送的键值对定义在data中,这里使用了创建键值对字典的关键字Create Dictionary。返回的对象定义在变量${response}中,使用Post Request可以执行访问。

数据库相关测试
8.Should Be Equal As Integers与Should not Be Equal As Integers
转化成字符串类型在对比
原文链接:https://blog.csdn.net/saber_sss/article/details/110558840
https://blog.csdn.net/be5yond/article/details/54754954


简单测试脚本
*** Settings ***
Documentation     Example using the space separated format.
Library           OperatingSystem

*** Variables ***
${MESSAGE}        Hello, world!

*** Test Cases ***
My Test
    [Documentation]    Example test.
    Log    ${MESSAGE}
    My Keyword    ${CURDIR}

Another Test
    Should Be Equal    ${MESSAGE}    Hello, world!

*** Keywords ***
My Keyword
    [Arguments]    ${path}
    Directory Should Exist    ${path}
自定义关键字
使用Robotframework对Api接口进行测试,每次测试都需要先登录,为了减少重复的登录脚本,使用Robotframework自定义关键字简化登录过程的脚本。代码如下:
*** Keywords ***
登录到平台
    [Arguments]    ${host}    ${username}    ${password}
    Create Session    my_session    ${host}
    ${data}=    Create dictionary    UserName=${username}    Password=${password}
    ${response}=    POST On Session    my_session    url=/api/Account/Login    json=${data}
    Log    ${response}
    [Return]    my_session
为了方便使用,我们使用中文作为关键字的名称。然后定义三个输入变量,${host}是需要登录的网址,${username}和${password}是用户名和密码。使用POST On Session实现登录,登录后返回登录过程创建的会话。这个关键字可以在测试用例中使用,比如:
*** Test Cases ***
TestLogin
    ${mysession}=    登录到平台    host=${HOST}    username=saleuser1    password=1
    ${datalist}=    Create dictionary    WorkFlow_Name=LeaveApply1
    ${responselist}=    POST On Session    ${mysession}    url=${GetActivateListUrl}    json=${datalist}
    Log    ${responselist}
我们可以将自定义的关键字保存在资源文件中,便于在多个测试用例中共用。资源文件的结构与测试文件基本相同,只是没有测试用例,变量和自定义关键字部分完全相同。在测试文件的设置部分引用资源文件,比如:
*** Settings ***
Library           RequestsLibrary
Resource          ../../Resources/flowresources.robot
资源文件的位置相对于当前路径,路径中也可以包含变量,比如${RESOURCES}/common.tsv。
如果多个资源文件中包含相同的自定义关键字,在使用这些关键字时,需要使用资源文件名作为前缀。如果多个资源文件中包含相同的变量,那么先加载的变量起作用。
很多情况下,我们需要自定义关键字可以接收多个参数,且参数的个数不确定,这种情况下,可以将参数声明为列表,使用@修饰符,示例代码如下:
MultiArguments
    [Arguments]    ${par1}    @{dic}
    Log    ${par1}
    FOR    ${v}    IN    @{dic}
        Log    ${v}
    END
在上面的例子中${par1}是固定参数,后面的@{dic}是可变参数列表,在自定义关键字中采用循环处理列表中的参数。调用的示例如下:
MultiArgumetns para1 u1 u2 u3 u4
为Robotframework开发自定义库
Robotframework基于Python开发,我们使用Python开发自定义库,对Robotframework提供扩展。开发和使用都非常简单,由于python是解释语言,自定义库不需要编译部署等等步骤,使用任何文本编辑器都可以实现。这里通过实现一个简单的需求说明创建和使用过程。需求很简单,需要从一个字符串中获取flowid=后面的值。
首先我们创建一个python文件,代码如下:
def get_flow_id(url):
    idx = url.index('flowid=')+7
    le = len(url)
    flow_id = url[idx:le]
    return flow_id
然后就可以在robot文件中引用这个库了,在Settings中增加:
*** Settings ***
Library           ../pylibs/getflowid.py
这里库的位置相对于当前文件的位置。
在测试用例或者关键字中就可以使用自定义库中定义的新关键字了,这里get_flow_id对应的新关键字是Get Flow Id,"_"符号被空格替换,并且后面的字符变为大写。下面是使用的示例:
${fid}    Get Flow Id    ${rurl}
参考接:https://www.cnblogs.com/zhenl/p/15786035.html