目录
#整合思路
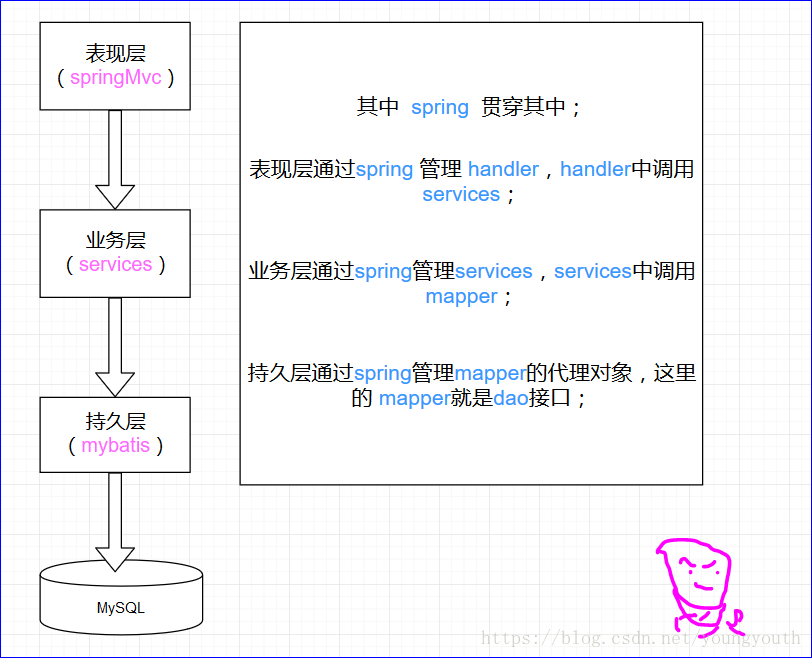
整合是将spring 看做是一个大的容器,将其他东西整合进来,是以 spring 为大环境的;
-
整合
springMvcspringMvc是spring的一个子模块,二者之间不需要整合包进行整合,只需要加载一些文件 ; -
整合
services层在
spring配置文件中,配置services接口 ,将services对象注册到spring中;事务操作,一般都在业务层 ;
-
整合
dao层在
spring配置文件中,配置mapper接口 ,将mapper代理对象对象注册到spring中;
整合 dao 层
也就是整合 mybatis 整合 spring ;
导入spring 包、mybatis 包、mybatis-spring 整合包,以及它们的依赖包 log4j 的包, 还有 数据源 包 ;
-
创建
log4j.properties配置文件#### 开发用debug 生产用 info log4j.rootLogger=DEBUG, stdout log4j.appender.stdout=org.apache.log4j.ConsoleAppender log4j.appender.stdout.layout=org.apache.log4j.PatternLayout log4j.appender.stdout.layout.ConversionPattern=[service] %d - %c -%-4r [%t] %-5p %c %x - %m%n # mybatis 的打印输出 log4j.logger.java.sql.Statement = debug log4j.logger.java.sql.PreparedStatement = debug log4j.logger.java.sql.ResultSet =debug -
创建
mybatis的配置文件在里面进行
mybatis的基本配置全局参数、别名设定;<?xml version="1.0" encoding="UTF-8" ?> <!DOCTYPE configuration PUBLIC "-//mybatis.org//DTD Config 3.0//EN" "http://mybatis.org/dtd/mybatis-3-config.dtd"> <configuration> <!--全局参数设置,看情况设定--> <!--<settings>--> <!--<setting name="" value=""/>--> <!--</settings>--> <!--别名设定--> <typeAliases> <!--批量别名,po--> <package name="xin.ijava.ssm.po"/> </typeAliases> <!--本来还需要批量扫描 mapper 的,但是现在跟 spring整合,这一步由 spring 完成--> </configuration> -
编写
ApplicationContext-dao.xml里面进行
mybatis和spring整合的配置 ;<?xml version="1.0" encoding="UTF-8"?> <beans xmlns="http://www.springframework.org/schema/beans" xmlns:xsi="http://www.w3.org/2001/XMLSchema-instance" xmlns:mvc="http://www.springframework.org/schema/mvc" xmlns:context="http://www.springframework.org/schema/context" xmlns:aop="http://www.springframework.org/schema/aop" xmlns:tx="http://www.springframework.org/schema/tx" xsi:schemaLocation=" http://www.springframework.org/schema/beans http://www.springframework.org/schema/beans/spring-beans.xsd http://www.springframework.org/schema/mvc http://www.springframework.org/schema/mvc/spring-mvc.xsd http://www.springframework.org/schema/context http://www.springframework.org/schema/context/spring-context.xsd http://www.springframework.org/schema/tx http://www.springframework.org/schema/tx/spring-tx.xsd http://www.springframework.org/schema/aop http://www.springframework.org/schema/aop/spring-aop.xsd "> <!--加载数据库配置文件--> <context:property-placeholder location="classpath:xin/ijava/ssm/config/spring/db.properties"/> <!--配置数据源--> <bean id="dataSource" class="org.apache.commons.dbcp2.BasicDataSource"> <property name="driver" value="${jdbc.driver}"/> <property name="url" value="${jdbc.url}"/> <property name="username" value="${jdbc.username}"/> <property name="password" value="${jdbc.password}"/> <property name="maxOpenPreparedStatements" value="30"/> <property name="maxIdle" value="5"/> </bean> <!--配置 sqlSessionFactory --> <bean id="sqlSessionFactory" class="org.mybatis.spring.SqlSessionFactoryBean"> <property name="dataSource" ref="dataSource" /> <property name="configLocation" value="xin/ijava/ssm/config/mybatis/SqlMapperConfig.xml"/> </bean> <!--批量扫描 mapper,自动生成代理对象 --> <bean class="org.mybatis.spring.mapper.MapperScannerConfigurer"> <property name="sqlSessionFactoryBeanName" value="sqlSessionFactory"/> <property name="basePackage" value="xin.ijava.ssm.mapper"/> </bean> </beans> -
逆向工程生成单表的
po 、mapper如何逆向工程生成,自己百度去,简单的很!
-
自定义编写复杂查询的
mappermybatis逆向工程生成的单表之间的关系,复杂的,还需要我们手写 ;这里自定义一个
mapper,查询 购买商品关联用户 ; -
创建
po增强对象当进行复杂查询的时候,需要对我们的
po类,进行增强,来满足我们的需求,但是我们不会直接在逆向工程生成的po里面进行增加新的属性,这样后期如果表的增加字段,逆向工程重新生成po,会覆盖掉我们之前修改的po;选择新建一个po,继承要增强的po! -
创建
Vo包装对象包装类,是为了扩展,方便我们进行后面复杂查询(多表查询)的时候,比如我们的条件,往往会重名,不使用复杂查询,参数绑定会有问题;
比如查询购买某些书的用户,书和用户,都有user属性,我们要是不使用包装类的话,就会为pojo对象很难赋值;
因此,我们写包装类;
至于包装类中既含有增强类,又含有原始类,是有的时候,我们可能只需要用到原始类 ;
构建复杂的查询条件?
-
编写自定义
mapper的映射关系为了可扩展性,使用动态sql;
sql返回的对象是增强对象,传入的对象是包装对象;<?xml version="1.0" encoding="UTF-8" ?> <!DOCTYPE mapper PUBLIC "-//mybatis.org//DTD Mapper 3.0//EN" "http://mybatis.org/dtd/mybatis-3-mapper.dtd" > <mapper> <sql id="query_items_where"> <if test="itemCustomer !=null"> <if test="itemCustomer.name !=null and itemCustomer.name != ''"> `name` LIKE '%${itemCustomer.name}%' </if> </if> </sql> <select id="queryItemsCustomer" parameterType="itemQueryVo" resultType="itemsCustomer"> SELECT* FROM items <where> <include refid="query_items_where"/> </where> </select> </mapper> -
自定义
mapper接口也就是
dao接口public interface ItemCustomerMapper { public List<ItemCustomer> queryItemsCustomer(ItemQueryVo itemQueryVo) throws Exception ; }
#整合 services 层
-
编写
services接口public interface ItemsServices { public List<ItemCustomer> queryItemsCustomer(ItemQueryVo itemQueryVo) throws Exception ; } -
编写
services实现类public class ItemsServicesImpl implements ItemsServices { /** * 将自动生成的 mapper 代理对象,注入 */ @Autowired private ItemCustomerMapper itemCustomerMapper ; @Override public List<ItemCustomer> queryItemsCustomer(ItemQueryVo itemQueryVo) throws Exception { List<ItemCustomer> itemCustomers = itemCustomerMapper.queryItemsCustomer(itemQueryVo) ; return itemCustomers; } } -
创建
AppLicationContext-services.xml配置文件在这里进行
services的管理,将它们注册到spring中 ;<?xml version="1.0" encoding="UTF-8"?> <beans xmlns="http://www.springframework.org/schema/beans" xmlns:xsi="http://www.w3.org/2001/XMLSchema-instance" xmlns:mvc="http://www.springframework.org/schema/mvc" xmlns:context="http://www.springframework.org/schema/context" xmlns:aop="http://www.springframework.org/schema/aop" xmlns:tx="http://www.springframework.org/schema/tx" xsi:schemaLocation=" http://www.springframework.org/schema/beans http://www.springframework.org/schema/beans/spring-beans.xsd http://www.springframework.org/schema/mvc http://www.springframework.org/schema/mvc/spring-mvc.xsd http://www.springframework.org/schema/context http://www.springframework.org/schema/context/spring-context.xsd http://www.springframework.org/schema/tx http://www.springframework.org/schema/tx/spring-tx.xsd http://www.springframework.org/schema/aop http://www.springframework.org/schema/aop/spring-aop.xsd "> <!--将 ItemServicesImpl 注册到 `spring` 中,--> <bean class="xin.ijava.ssm.services.impl.ItemsServicesImpl" id="itemsServices"/> </beans> ``` -
创建
AppLicationContext-transaction.xml配置文件在里面进行
事务的管理 ;(注意,spring事务,也是基于aop,而使用aop,需要导入AspectJ的包)<?xml version="1.0" encoding="UTF-8"?> <beans xmlns="http://www.springframework.org/schema/beans" xmlns:xsi="http://www.w3.org/2001/XMLSchema-instance" xmlns:mvc="http://www.springframework.org/schema/mvc" xmlns:context="http://www.springframework.org/schema/context" xmlns:aop="http://www.springframework.org/schema/aop" xmlns:tx="http://www.springframework.org/schema/tx" xsi:schemaLocation=" http://www.springframework.org/schema/beans http://www.springframework.org/schema/beans/spring-beans.xsd http://www.springframework.org/schema/mvc http://www.springframework.org/schema/mvc/spring-mvc.xsd http://www.springframework.org/schema/context http://www.springframework.org/schema/context/spring-context.xsd http://www.springframework.org/schema/tx http://www.springframework.org/schema/tx/spring-tx.xsd http://www.springframework.org/schema/aop http://www.springframework.org/schema/aop/spring-aop.xsd "> <!--开启事务管理,告诉spring,对什么数据源进行 事务 管理--> <bean id="transactionManager" class="org.springframework.jdbc.datasource.DataSourceTransactionManager"> <!-- dataSource 定义在 ApplicationContext-dao.xml 中,这里需要告诉它 fix 所有的spring配置文件--> <property name="dataSource" ref="dataSource"/> </bean> <!--配置增强的方法,也就是对什么方法使用 事务--> <tx:advice id="transactionInterceptor"> <tx:attributes> <!--对于 增删改 方法需要开启事务--> <tx:method name="save*" propagation="REQUIRED"/> <tx:method name="insert*" propagation="REQUIRED"/> <tx:method name="update*" propagation="REQUIRED"/> <tx:method name="delete*" propagation="REQUIRED"/> <!--对于 查 ,级别设为 SUPPORTS ,支持事务 --> <tx:method name="find*" propagation="SUPPORTS" read-only="true"/> <tx:method name="get*" propagation="SUPPORTS" read-only="true"/> </tx:attributes> </tx:advice> <!--配置切入点,也就是配置,在什么地方使用事务--> <aop:config> <aop:advisor advice-ref="transactionInterceptor" pointcut="execution(* xin.ijava.ssm.services.impl.*.*(..))"/> </aop:config> <!--加上这句话,不然 services的层,创建会报错,报 actually of type 'com.sun.proxy.$Proxy12'--> <!--报 这样的 类型错误--> <aop:aspectj-autoproxy proxy-target-class="true"/> </beans>
整合 springMvc
-
配置
springMvc.xml文件配置其他组件,诸如:注解映射器、注解适配器、视图解析器; 并其开启批量扫描
处理器;<?xml version="1.0" encoding="UTF-8"?> <beans xmlns="http://www.springframework.org/schema/beans" xmlns:xsi="http://www.w3.org/2001/XMLSchema-instance" xmlns:mvc="http://www.springframework.org/schema/mvc" xmlns:context="http://www.springframework.org/schema/context" xmlns:aop="http://www.springframework.org/schema/aop" xmlns:tx="http://www.springframework.org/schema/tx" xsi:schemaLocation=" http://www.springframework.org/schema/beans http://www.springframework.org/schema/beans/spring-beans.xsd http://www.springframework.org/schema/mvc http://www.springframework.org/schema/mvc/spring-mvc.xsd http://www.springframework.org/schema/context http://www.springframework.org/schema/context/spring-context.xsd http://www.springframework.org/schema/tx http://www.springframework.org/schema/tx/spring-tx.xsd http://www.springframework.org/schema/aop http://www.springframework.org/schema/aop/spring-aop.xsd " > <!--配置视图解析器--> <!-- JSP 的视图解析器--> <bean class="org.springframework.web.servlet.view.InternalResourceViewResolver"> <!--配置前后缀--> <property name="prefix" value="/WEB-INF/jsp/"/> <property name="suffix" value=".jsp"/> </bean> <!--使用注解的映射器、适配器--> <mvc:annotation-driven/> <!--批量扫描处理器--> <context:component-scan base-package="xin.ijava.ssm.controller"/> </beans> -
在
web.xml中配置前端控制器<?xml version="1.0" encoding="UTF-8"?> <web-app xmlns="http://xmlns.jcp.org/xml/ns/javaee" xmlns:xsi="http://www.w3.org/2001/XMLSchema-instance" xsi:schemaLocation="http://xmlns.jcp.org/xml/ns/javaee http://xmlns.jcp.org/xml/ns/javaee/web-app_3_1.xsd" version="3.1"> <!-- **************************** 配置springMvc前端控制器(DispatcherServlet)************************* --> <!--前端控制器是个servlet,因此,这里就像配置servlet一样--> <servlet> <servlet-name>springMvc</servlet-name> <servlet-class>org.springframework.web.servlet.DispatcherServlet</servlet-class> <!--初始化读取配置文件,我们指定配置文件在哪; 否则默认加载 /WEB-INF/servlet-name-servlet.xml 我们这里的 servlet-name 是 springMvc ,那么就是去加载 springMvc-servlet.xml --> <init-param> <param-name>contextConfigLocation</param-name> <param-value>classpath:xin/ijava/ssm/config/spring/springMvc.xml</param-value> </init-param> </servlet> <servlet-mapping> <servlet-name>springMvc</servlet-name> <!-- 1、 *.action 拦截 .action 结尾的url 2、/ 拦截所有url,即使是访问 静态资源也会被拦截,全部走前端控制器,可以实现 resultFul 风格的url 3、/* 这样配置不对,当转发到jsp页面时,还是会交给前端控制器,去找处理器 --> <url-pattern>*.action</url-pattern> </servlet-mapping> </web-app> -
编写
Handler使用 注解 开发 ;
@Controller public class ItemsController3 { @Autowired private ItemsServicesImpl itemsServices ; /** * 使用注解进行映射 * 注解内容写上后缀 .action 或者不写都行,但是最后访问的时候,都要带上 .action 后缀 * @return * @throws Exception */ @RequestMapping("/queryItems3") public ModelAndView queryItems() throws Exception { // 调用services层,进行查询,参数传进去 null ,我们在映射关系中,进行了 判读; List<ItemCustomer> items = itemsServices.queryItemsCustomer(null) ; // 创建 ModelAndView ModelAndView modelAndView = new ModelAndView() ; // 添加model,也就是数据。(键值对) // 在页面中取数据,就是根据键名 modelAndView.addObject("items",items) ; Map map = modelAndView.getModel(); // 添加视图,也就是界面 modelAndView.setViewName("Item/ItemController"); return modelAndView; } } -
写一个
jsp测试下 ;随便写个页面,记性了,数据显示出来就OK!
-
加载
spring容器之前,我们将
mapper、controller、services都注册到spring容器中了 ;但是
spring这个大容器,我们还没有加载的,现在加载一下 ;具体操作:就是将
spring相关的配置文件,都加载进来,上面我们创建了多个spring得配置文件,注入Application-dao.xml、Application-services.xml、Application-transaction.xml等 ;<!--配置监听器--> <listener> <listener-class>org.springframework.web.context.ContextLoaderListener</listener-class> </listener> <!--加载spring配置文件--> <context-param> <param-name>contextConfigLocation</param-name> <!--使用通配符--> <param-value>classpath:spring/ApplicationContext-*.xml</param-value> </context-param>
#创建资源文件夹
我们把配置文件所在文件夹,设为资源文件,这样,在访问的时候,可以使用**classpath:** ApplicationContext.xml ,来直接寻找文件;
#后记
终于找到了 bug 所在,孜孜不倦的 debug 一天,玄不救非, 2处错误,都是名字写错了 ;