文章目录
SpringApplication
它提供了一个方便的方法,通过 mian() 方法入口启动一个 Spring 项目,如下所示:
public static void main(String[] args) {
	SpringApplication.run(MySpringConfiguration.class, args);
}
启动的时候,控制台输出如下欢迎页面:
  .   ____          _            __ _ _
 /\ / ___'_ __ _ _(_)_ __  __ _
( ( )\___ | '_ | '_| | '_ / _` |
 \/  ___)| |_)| | | | | || (_| |  ) ) ) )
  '  |____| .__|_| |_|_| |_\__, | / / / /
 =========|_|==============|___/=/_/_/_/
 :: Spring Boot ::        (v2.0.5.RELEASE)
这个图形是可以更改的,可以在类路径下面新建一个文件,名字必须是:banner.txt ,或者通过 spring.banner.location 属性配置,如果文件的编码不是 UTF8,可以通过 spring.banner.charset 属性设置编码;
这样该文件的内容就会被当做欢迎页面;
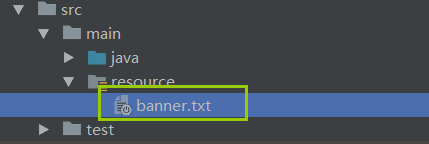
文件内容:
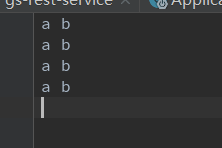
启动项目,欢迎页面:
Connected to the target VM, address: '127.0.0.1:56396', transport: 'socket'
a b
a b
a b
a b
此外,也可以选择图片当作欢迎页面,只是图片的名字必须是 banner ,还是将图片添加到类路径下面,或者通过 spring.banner.image.location 设置,这样图片就会被转为 ASCII 字符画 (博主,测试下不清楚,基本看不出原图片是啥);
关于欢迎页面,Spring 官网 给出了更多的设置,感兴趣,可以自己去看下,就不再介绍了;
SpringApplication 事件
除了平常的 Spring 事件,SpringApplication 还会发送一系列额外的应用事件;一些事件在 ApplicationContext 被创建之前发生,所以不能在 ApplicationContext 里面注册监听器,监听这些事件;
一般使用 SpringApplication.addListeners(…) method 、SpringApplicationBuilder.listeners(…) 方法注册;
如果你想监听器被自动的注册,而不想去关心应用创建的方法,可以创建文件 META-INF/spring.factories 在里面引用监听器:
org.springframework.context.ApplicationListener=com.example.project.MyListener
相关的应用事件的顺序:
ApplicationStartingEvent在运行之前,监听器注册初始化以后,发生;ApplicationEnvironmentPreparedEvent在上下文环境已经被使用之后,在上下文产生之前,发生;ApplicationPreparedEvent在刷新之前,在加载bean之后,发生 ;ApplicationStartedEvent在上下文刷新之后,在调用任何应用/命令行程序之前,发生;ApplicationReadyEvent在调用任何应用/命令行程序之前,发生。它表示应用程序已经准备好为请求提供服务 ;ApplicationFailedEvent在启动失败的时候,发生;
ApplicationContext 类型
SpringApplication 会试图去创建正确类型的 ApplicationContext ;
具体怎么确定正确类型的算法是很简单的e:
- 如果
SpringMvc存在,则使用AnnotationConfigServletWebServerApplicationContext - 如果
SpringMvc不存在,但是Spring WebFlux存在,则使用AnnotationConfigReactiveWebServerApplicationContext; - 否则使用
AnnotationConfigApplicationContext;
从中可以看出,SpringMvc 和 Spring WebFlux 一起存在的时候,默认是按照 SpringMvc l来选取正确的类型的 ;
如果想更改,则自定义 SpringApplication 进行覆盖:
@SpringBootApplication
public class Application {

    public static void main(String[] args) {
     	// 自定义 SpringApplication
        SpringApplication springApplication = new SpringApplication();
        // 设置 ApplicationContext  类型
        springApplication.setWebApplicationType(WebApplicationType);

    }
}
也可以调用 setApplicationContextClass() 方法,完全控制 ApplicationContext 类型;
如果使用 Junit 的时候,则把 ApplicationContext 的类型设置为 NONE :
setWebApplicationType(WebApplicationType.NONE)
访问传递给 SpringApplication 的参数
我们获得传递 SpringApplication.run(...) 方法的参数,通过注入一个 org.springframework.boot.ApplicationArguments 对象;
import org.springframework.boot.*;
import org.springframework.beans.factory.annotation.*;
import org.springframework.stereotype.*;

@Component
public class MyBean {

	@Autowired
	public MyBean(ApplicationArguments args) {
		boolean debug = args.containsOption("debug");
		List<String> files = args.getNonOptionArgs();
		// if run with "--debug logfile.txt" debug=true, files=["logfile.txt"]
	}

}
Spring Boot 在 Spring环境中注册了一个 CommandLinePropertySource 对象,这样,我们就可以使用 @Value 注解,向应用程序注入参数 ;
ApplicationRunner or CommandLineRunner
如果需要在SpringApplication 启动后运行一些特殊代码,我们可以通过实现 ApplicationRunner or CommandLineRunner 这两个接口中的一个,它们有着相同的工作方式,并且都有一个方法 run( ) ,这个方法在 SpringApplication.run(…) 执行完成之前,被调用;
其中 CommandLineRunner 接口,将应用程序的参数,当作一组字符串数组:
@Component
class MyBean implements CommandLineRunner {
    @Override
    public void run(String... args) throws Exception {

    }
}
而 ApplicationRunner 则使用上面说的 org.springframework.boot.ApplicationArguments 对象 :
@Component
class MyBean implements ApplicationRunner {
    @Override
    public void run(ApplicationArguments args) throws Exception {

    }
}
如果有多个 CommandLineRunner or ApplicationRunner 对象被定义,并且他们需要安装一定的顺序得到执行,我们需要实现额外的接口 org.springframework.core.Ordered ,或者实现 org.springframework.core.annotation.Order 接口 ;
@Component
class MyBean implements ApplicationRunner,Order {

    @Override
    public void run(ApplicationArguments args) throws Exception {

    }

    @Override
    public int value() {
        return 1;
    }

    @Override
    public Class<? extends Annotation> annotationType() {
        return null;
    }
}
或者直接使用注解:
@Order(value = 1)
class MyBean implements ApplicationRunner {
    @Override
    public void run(ApplicationArguments args) throws Exception {

    }
}
ExitCodeGenerator应用
每个 SpringApplication 都注册了一个 钩子 在 JVM 中,确保在关闭 JVM 的时候,SpringApplication 可以正常退出;
Bean 还可以实现一个接口,org.springframework.boot.ExitCodeGenerator ,可以在应用程序退出的时候,返回一个我们自定义的状态码;
具体就是在 SpringApplication.exit() 被调用的时候,就会返回我们实现的接口中的状态码,然后传给 System.exit() 当中虚拟机退出的状态码;
@SpringBootApplication
public class Application implements ExitCodeGenerator {

    public static void main(String[] args) {
        // SpringApplication.run(Application.class, args);
        System.exit(SpringApplication.exit(SpringApplication.run(Application.class, args)));

    }

    @Override
    public int getExitCode() {
        return 10086;
    }

}
还可以把 ExitCodeGenerator 接口通过异常类实现,这样触发异常的时候,我们就在异常的构造器里面写上:
System.exit(SpringApplication.exit(上下文)));
就可以返回我们自定义的状态码 ;
配置文件
Spring Boot 允许我们进行许多的外部配置,以保证我们在不同的环境下运行代码,不需要要改动代码,只需要改动配置;
配置的值,可以使用@Value 注入到 Bean 里面,或者通过 @ConfigurationProperties 绑定到结构化的对象中;
配置文件配置的属性有先后关系,有覆盖关系,Spring Boot 的配置文件先后关系如下:
优先级从高到低:

获取配置文件中配置的属性值,比如获取 name 属性:
import org.springframework.stereotype.*;
import org.springframework.beans.factory.annotation.*;

@Component
public class MyBean {
	// 获取name属性
    @Value("${name}")
    private String name;

    // ...

}
-
配置随机数
my.secret=${random.value}
my.number=${random.int}
my.bignumber=${random.long}
my.uuid=${random.uuid}
my.number.less.than.ten=${random.int(10)}
my.number.in.range=${random.int[1024,65536]}
我们可以将我们需要的一些随机数,配置在这里,前面四个,在程序运行期间只会产生一个相同的值,即一个程序多个访问,返回同一个随机值,重启程序以后,就会重新产生一个随机值;
后面两个,每次都产生不同的随机数;
-
获取命令行属性
默认,
SpringApplication将命令行参数(即以--开头的参数:--server.port = 9000),转化为属性,添加到Spring环境中;前面贴的图,上面标识了各个配置的优先级,其中命令行参数配置在第四个,优先于生产中使用的配置文件,因此,可以使用
SpringApplication.setAddCommandLineProperties(false).禁止SpringApplication将命令行参数,转化为属性 ; -
application.properties文件SpringApplication会从下面几个地方加载配置;1、项目根文件夹下面的
config文件夹
2、项目根文件夹下面
3、classpath路径下面的config文件夹
4、classpath路径下面优先级,从高到低 ;
也可以使用
application.yml做配置文件`;
多个配置文件
默认的配置文件名字:application.properties/yml ,我们可以按照 application-【profile】.properties/yml 格式新建许多的配置文件;
但是新建出来的配置文件,必须和 application.properties/yml 放在一个文件夹下面,application.properties/yml 可以看成是配置文件的入口,我们自定义的配置文件,还需要在这里面使用 spring.profiles.active 进行引用一下(多文件之间用逗号分开):
spring.profiles.active=自定义配置文件名字(不加后缀)
这里记住,我们自定义的配置文件,总是会覆盖掉 application.properties/yml 里面的同名属性的,也就是优先级高于 application.properties/yml,前提是使用 spring.profiles.active 启用了我们自定义的配置文件;
至于多个自定义文件之间的优先级,spring.profiles.active 谁最后引用,谁优先级最高;
最后,多个配置文件,由于存在覆盖现象,其实最后加载的属性,就跟一个大的配置文件一样;
配置文件中的占位符
可以使用 ${}:
name = 12
name11=${name}1
YAML 配置文件
官网推荐我们使用 .yml 替代使用 .properties ;
说 YAML 是JSON 的超集,更适合表达配置之间的层级关系;
如果想要使用 YAML ,需要添加它的依赖 SnakeYAML ,如果使用了 spring-boot-starter 启动器,则默认添加了该依赖 ;
-
加载
YAML文件首先
Spring Boot默认会主动加载src/main/resource路径下,名字为:application.yml的yml文件 ;此外,我们的
yml文件放在其他地方,Spring框架本身也提供了两种方法加载YAML文件,一种是利用YamlPropertiesFactoryBean将YAML加载为一个Properties对象,这种方式,将会将所有属性都当作String处理;如果上面的
YamlPropertiesFactoryBean将所有属性都当作字符串,不能满足你的要求,那就用YamlMapFactoryBean将YAML加载为一个Map对象 ;YAML中-表示为下标:my: servers: - dev.example.com - another.example.com // 上面的 yml 格式,被转换为下面的形式 ; my.servers[0]=dev.example.com my.servers[1]=another.example.com示例代码,使用
YamlPropertiesFactoryBean加载:// 加载YML格式自定义配置文件 @Bean public static PropertySourcesPlaceholderConfigurer properties() { PropertySourcesPlaceholderConfigurer configurer = new PropertySourcesPlaceholderConfigurer(); YamlPropertiesFactoryBean yaml = new YamlPropertiesFactoryBean(); // 如果加载多个文件,则传入 ClassPathResource 数组 yaml.setResources(new ClassPathResource("config/application-a.yml"));//class引入 configurer.setProperties(yaml.getObject()); return configurer; } -
获取
yml配置文件的属性值当我们加载过
yml文件以后,还可以直接将配置文件中的属性绑定到ListSet集合里面,通过Spring Boot的@ConfigurationProperties注解;写好
prefix属性,它表示你要加载属性的前缀,然后还要保证 属性名字和 配置文件里面的一样 ,再为要获取的属性,添加对应的setter方法;比如要获取上面
yml文件中的services:@Component @ConfigurationProperties(prefix = "my") public class Config { public void setServers(List<String> servers) { this.servers = servers; } private List<String> servers = new ArrayList<String>(); public List<String> getServers() { return this.servers; } }就可以将
yml文件中的services属性,封装到list集合里面,这是一种获取配置文件属性的方法;还可以通过使用
@Value注解,访问yml配置文件的属性,但是要写配置文件中的key的全部名称 :@Value("${number.int.five}") private int num ; -
全局化
yml属性官网说可以使用
YamlPropertySourceLoader来加载yml文件,然后添加到Spring环境中:package hello.config; import org.springframework.boot.SpringApplication; import org.springframework.boot.env.EnvironmentPostProcessor; import org.springframework.boot.env.YamlPropertySourceLoader; import org.springframework.core.env.ConfigurableEnvironment; import org.springframework.core.env.PropertySource; import org.springframework.core.io.ClassPathResource; import org.springframework.core.io.Resource; import java.io.IOException; public class EnvironmentPostProcessorExample implements EnvironmentPostProcessor { private final YamlPropertySourceLoader loader = new YamlPropertySourceLoader(); @Override public void postProcessEnvironment(ConfigurableEnvironment environment, SpringApplication application) { // 路径记得改为你自己的路径 Resource path = new ClassPathResource("config/application.yml"); PropertySource<?> propertySource = loadYaml(path); environment.getPropertySources().addLast(propertySource); } private PropertySource<?> loadYaml(Resource path) { if (!path.exists()) { throw new IllegalArgumentException("Resource " + path + " does not exist"); } try { return this.loader.load("custom-resource", path).get(0); } catch (IOException ex) { throw new IllegalStateException( "Failed to load yaml configuration from " + path, ex); } } }然后还需要配置一个东西:
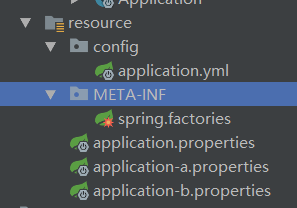
在class path路径下面,新建/META-INF/spring.factories文件,在里面注册下我们刚刚的类:org.springframework.boot.env.EnvironmentPostProcessor=hello.config.EnvironmentPostProcessorExample我没发现,和自己自定义加载有什么不同。没搞懂
Spring环境是什么意思; -
一个
yml文件配置多个部分属性我们可以使用
spring.profiles键,作为分割,在一个文件里面,配置多个场景属性:YAML中使用---分割不同部分;server: address: 192.168.1.100 --- spring: profiles: development server: address: 127.0.0.1 --- spring: profiles: production & eu-central server: address: 192.168.1.120比如上面的配置,当
profiles是development的时候,IP是127.0.0.1;当profiles是production & eu-central的时候,IP是192.168.1.120;当profiles既不是development,也不是production & eu-central的时候,IP是192.168.1.100;这里的
spring: profiles:的值是个表达式,具体支持符号有()、!、|、&,如果要混用& |必须使用(),比如 :production & us-east | eu-central不是有效的表达式。它必须表达为production & (us-east | eu-central);还可以配置一个默认的配置,如果项目启用以后没有特殊配置,则选用这个默认的,比如,配置一个默认米密码:
server:
  port: 8000
---
spring:
  profiles: default
  security:
    user:
      password: weak
这里一定要写上
profiles: default,否则就不是默认配置了,就是妥妥的配置,选用其它配置,密码还会是weak的;profiles不要产生二义性; -
缺点
官网原文如下:
24.7.4 YAML Shortcomings
YAML files cannot be loaded by using the @PropertySource annotation. So, in the case that you need to load values that way, you need to use a properties file.说我们不能再使用
@PropertySource注解,加载YAML文件了,@PropertySource只能用来加载.properties文件了 ;