什么是 OAuth 2
OAuth(开放授权)是一个开放标准,允许用户让第三方应用访问该用户在某一网站上存储的私密的资源(如照片,视频,联系人列表),而无需将用户名和密码提供给第三方应用。
OAuth 2.0 是 OAuth 协议的下一版本,但不向后兼容 OAuth 1.0。
OAuth 2.0 关注客户端开发者的简易性,同时为 Web 应用,桌面应用和手机,和起居室设备提供专门的认证流程。2012 年 10 月,OAuth 2.0 协议正式发布为 RFC 6749.
参考资源
在 Spring Boot 中使用 OAuth 2
Spring Boot 中的 OAuth2 协议是在 Spring Security 的基础上实现的。
令牌存储在 Redis 中,redis 具有过期功能,很适合存储令牌。
准备工作
所需依赖:
       <dependency>
            <groupId>org.springframework.boot</groupId>
            <artifactId>spring-boot-starter-security</artifactId>
        </dependency>
        <dependency>
            <groupId>org.springframework.boot</groupId>
            <artifactId>spring-boot-starter-web</artifactId>
        </dependency>
        <dependency>
            <groupId>org.springframework.security.oauth</groupId>
            <artifactId>spring-security-oauth2</artifactId>
            <version>2.3.6.RELEASE</version>
        </dependency>
        <dependency>
            <groupId>org.springframework.boot</groupId>
            <artifactId>spring-boot-starter-data-redis</artifactId>
        </dependency>
application.properties 配置文件:
# 使用 redis 存储令牌
# redis 基本配置
spring.redis.host=146.56.200.244
spring.redis.password=Test@123456
spring.redis.port=6379
spring.redis.database=0
三大配置类
授权服务配置类:AuthorizationServerConfig
@Configuration
@EnableAuthorizationServer
public class AuthorizationServerConfig extends AuthorizationServerConfigurerAdapter {
    /**
     * 使用 password 登录模式
     * 适用于前后端分离
     */
    @Autowired
    AuthenticationManager authenticationManager;

    @Autowired
    RedisConnectionFactory redisConnectionFactory;

    @Autowired
    UserDetailsService userDetailsService;

    @Bean
    PasswordEncoder passwordEncoder(){
        return new BCryptPasswordEncoder();
    }

    @Override
    public void configure(ClientDetailsServiceConfigurer clients) throws Exception {
        clients.inMemory()
                // 设置认证模式为 password
                .withClient("password")
                // 设置授权模式为 password 和 refresh_token
                // refresh_token 为 Spring Boot 中特有的授权模式
                .authorizedGrantTypes("password", "refresh_token")
                // token 的过期时间
                .accessTokenValiditySeconds(1800)
                // 设置资源 id,也就是资源的名字
                .resourceIds("rid")
                .scopes("all")
                .secret("$2a$10$3exePEMS2hwNVXzg3NRPVurMaA/ksEu5UGe6.cSctS3J7l6RsIarS");
    }

    @Override
    public void configure(AuthorizationServerEndpointsConfigurer endpoints) throws Exception {
        endpoints.tokenStore(new RedisTokenStore(redisConnectionFactory))
                .authenticationManager(authenticationManager)
                .userDetailsService(userDetailsService);
    }

    @Override
    public void configure(AuthorizationServerSecurityConfigurer security) throws Exception {
        security.allowFormAuthenticationForClients();
    }
}
资源服务配置类:ResourceServerConfig:
@Configuration
@EnableResourceServer
public class ResourceServerConfig extends ResourceServerConfigurerAdapter {

    @Override
    public void configure(ResourceServerSecurityConfigurer resources) throws Exception {
        resources.resourceId("rid").stateless(true);
    }

    @Override
    public void configure(HttpSecurity http) throws Exception {
        http.authorizeRequests().antMatchers("/admin/**").hasRole("user")
                .anyRequest().authenticated();
    }
}
Security 配置类:SecurityConfig
@Configuration
public class SecurityConfig extends WebSecurityConfigurerAdapter {

    @Override
    @Bean
    protected AuthenticationManager authenticationManager() throws Exception {
        return super.authenticationManager();
    }

    @Override
    @Bean
    protected UserDetailsService userDetailsService() {
        return super.userDetailsService();
    }

    @Override
    protected void configure(AuthenticationManagerBuilder auth) throws Exception {
        auth.inMemoryAuthentication()
                .withUser("you").password("$2a$10$3exePEMS2hwNVXzg3NRPVurMaA/ksEu5UGe6.cSctS3J7l6RsIarS").roles("admin")
                .and()
                .withUser("fanqie").password("$2a$10$3exePEMS2hwNVXzg3NRPVurMaA/ksEu5UGe6.cSctS3J7l6RsIarS").roles("user");
    }

    @Override
    protected void configure(HttpSecurity http) throws Exception {
        http.antMatcher("/oauth/**")
                .authorizeRequests().antMatchers("/oauth/**").permitAll()
                .and().csrf().disable();
    }
}
控制类:HelloController
@RestController
public class HelloController {

    @GetMapping("/admin/hello")
    public String admin(){
        return "hello admin!";
    }

    @GetMapping("/user/hello")
    public String user(){
        return "hello user!";
    }

    @GetMapping("/hello")
    public String hello(){
        return "hello!";
    }

}
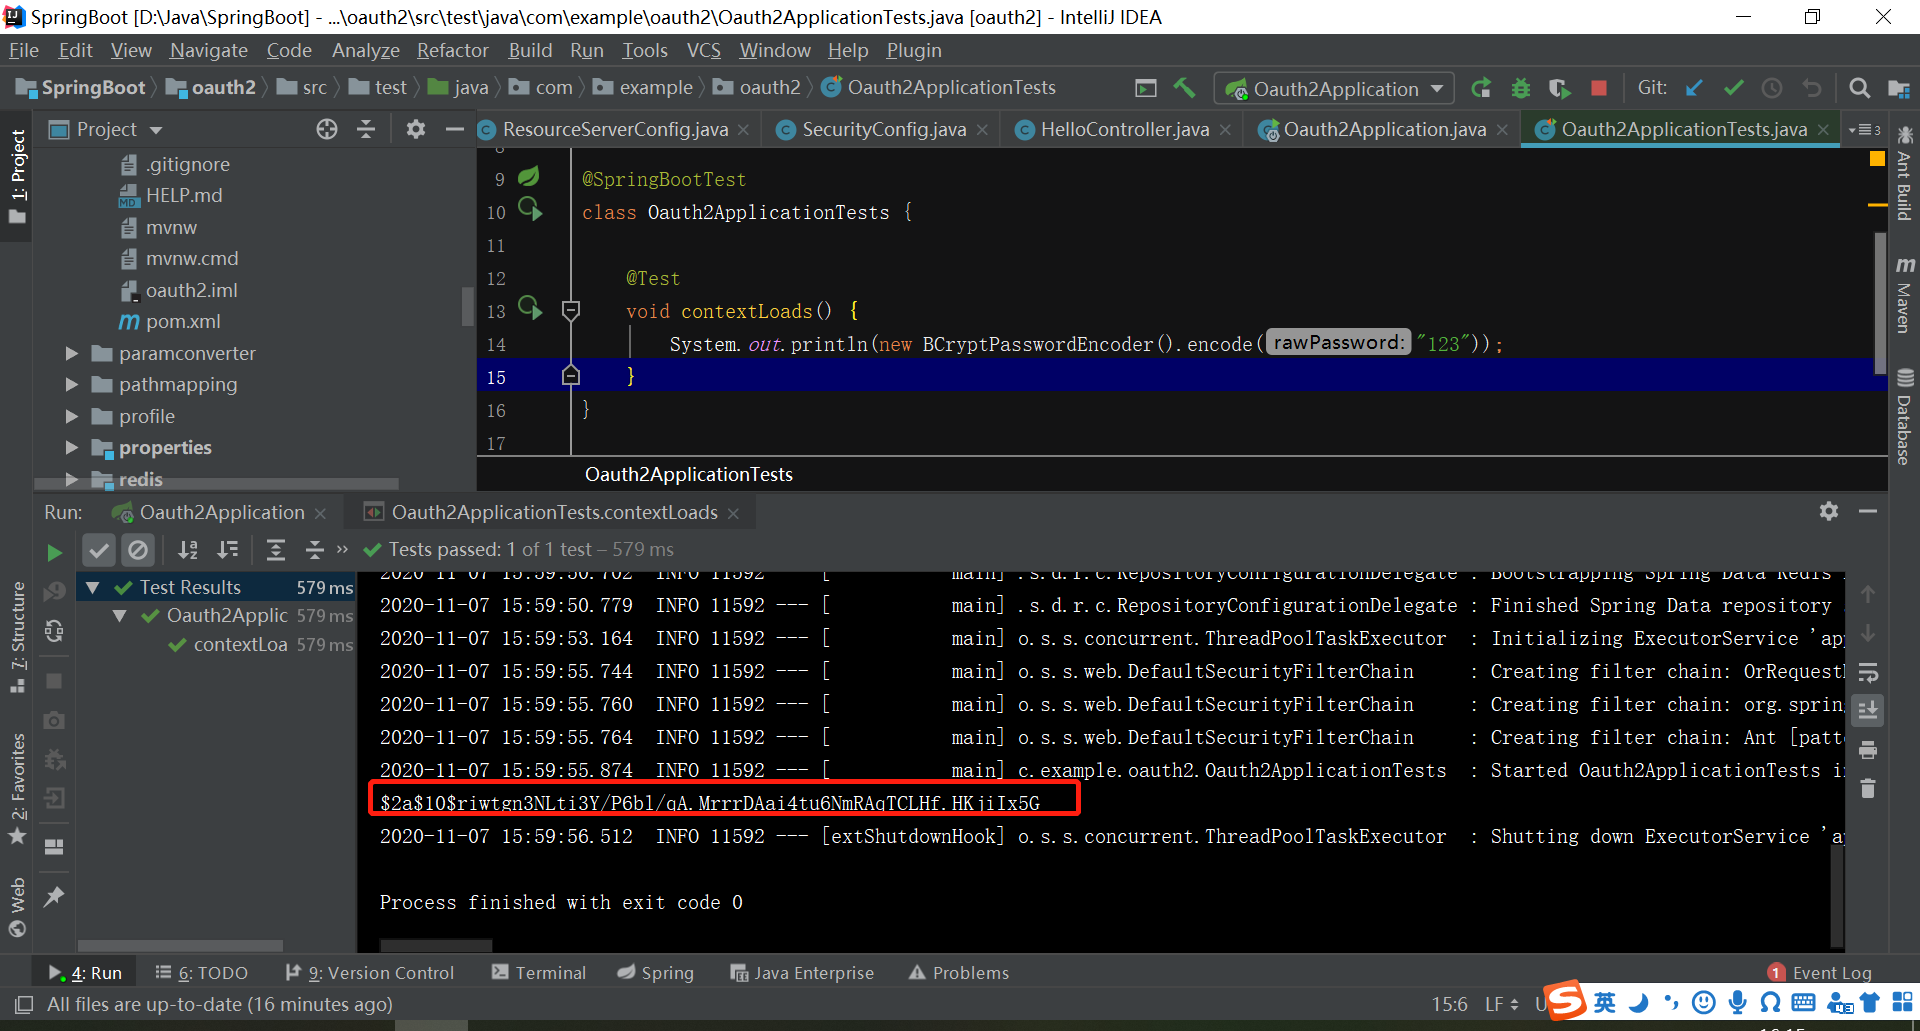
注,SecurityConfig 中的 password 和 AuthorizationServerConfig 中的 secret 是同一个密码。
这个密码是明文 123 通过 BCryptPasswordEncoder 加密后的效果,
在测试类中获取加密后的密码:
@SpringBootTest
class Oauth2ApplicationTests {

    @Test
    void contextLoads() {
        System.out.println(new BCryptPasswordEncoder().encode("123"));
    }
}
如下图:
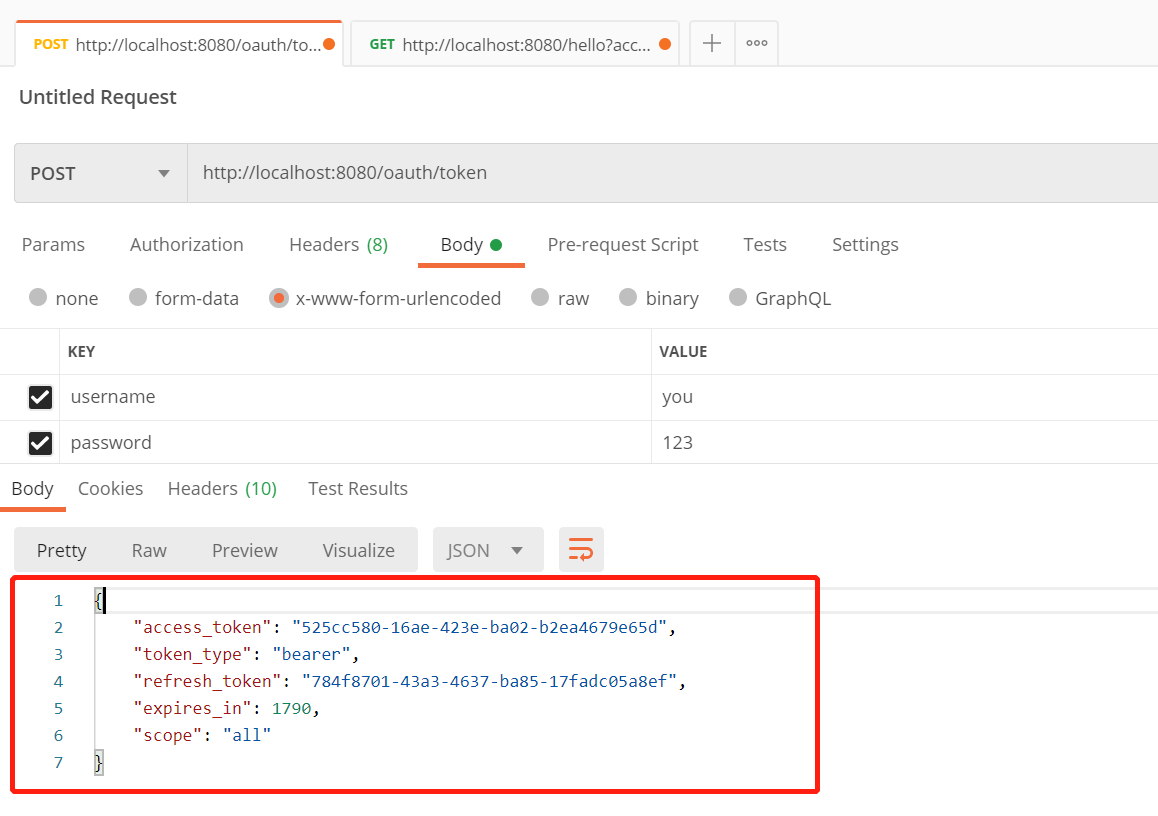
使用 postman 测试
如下图
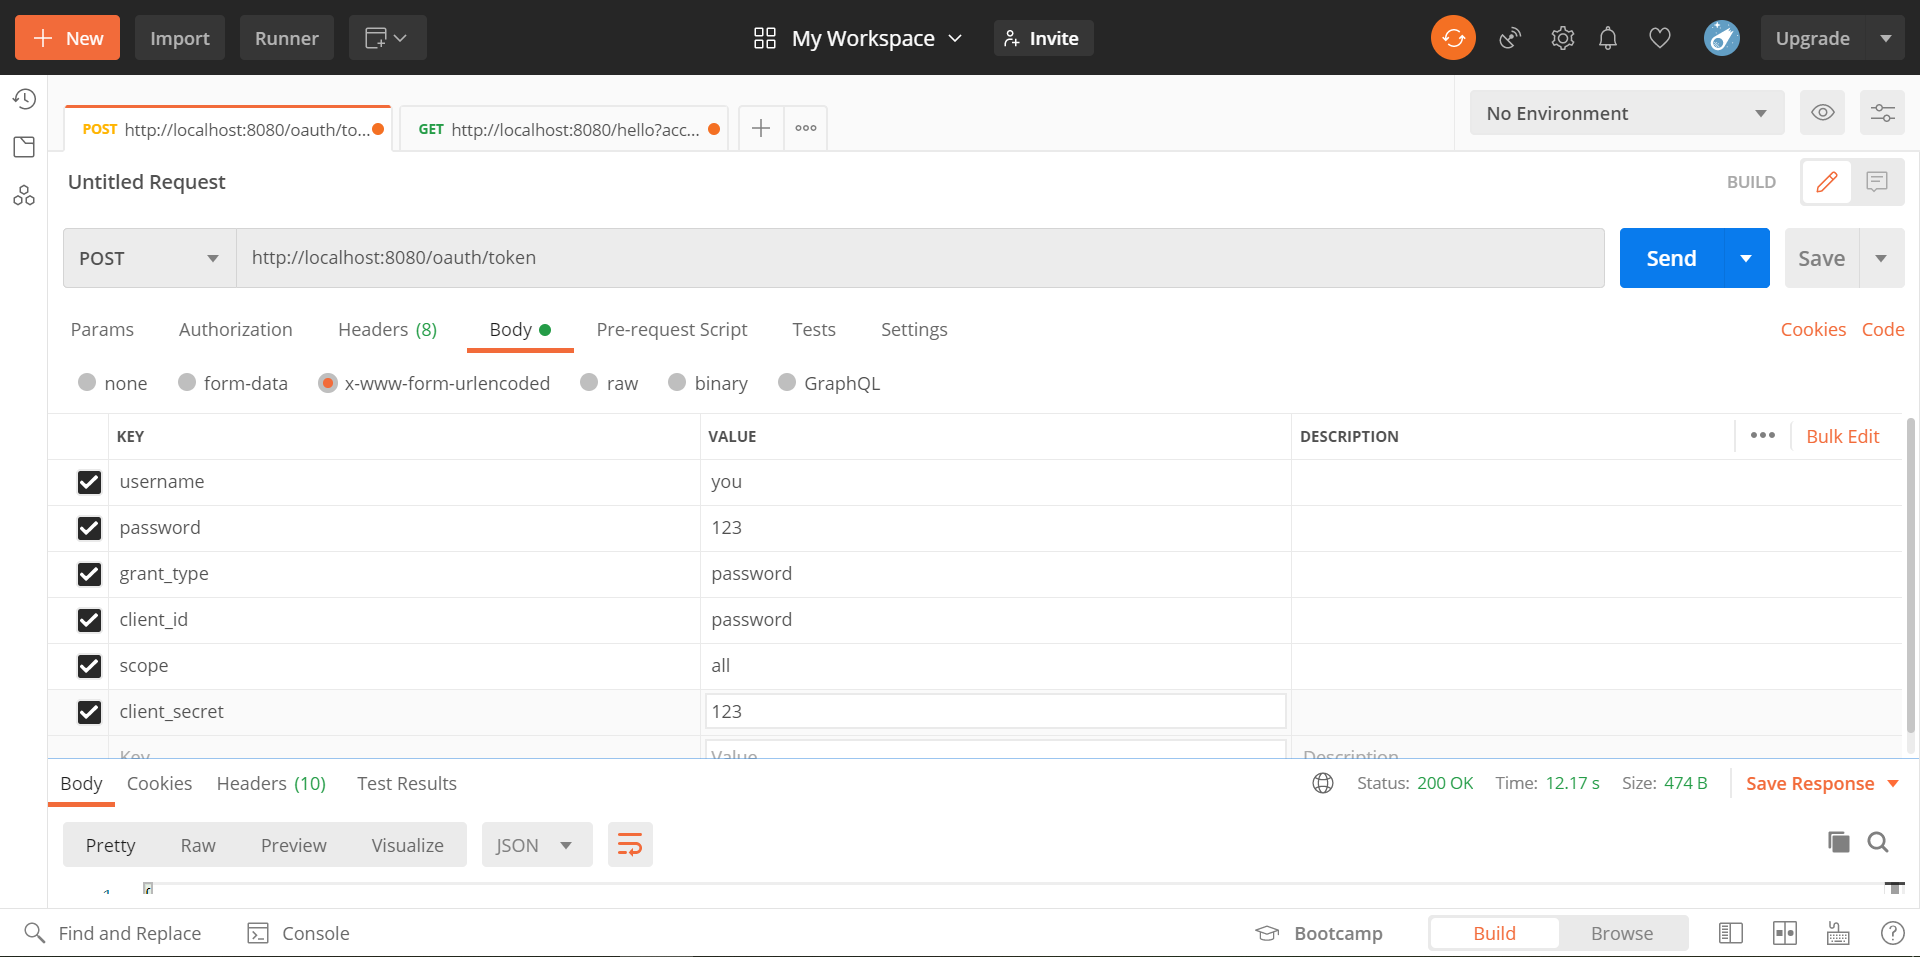
请求结果如下:
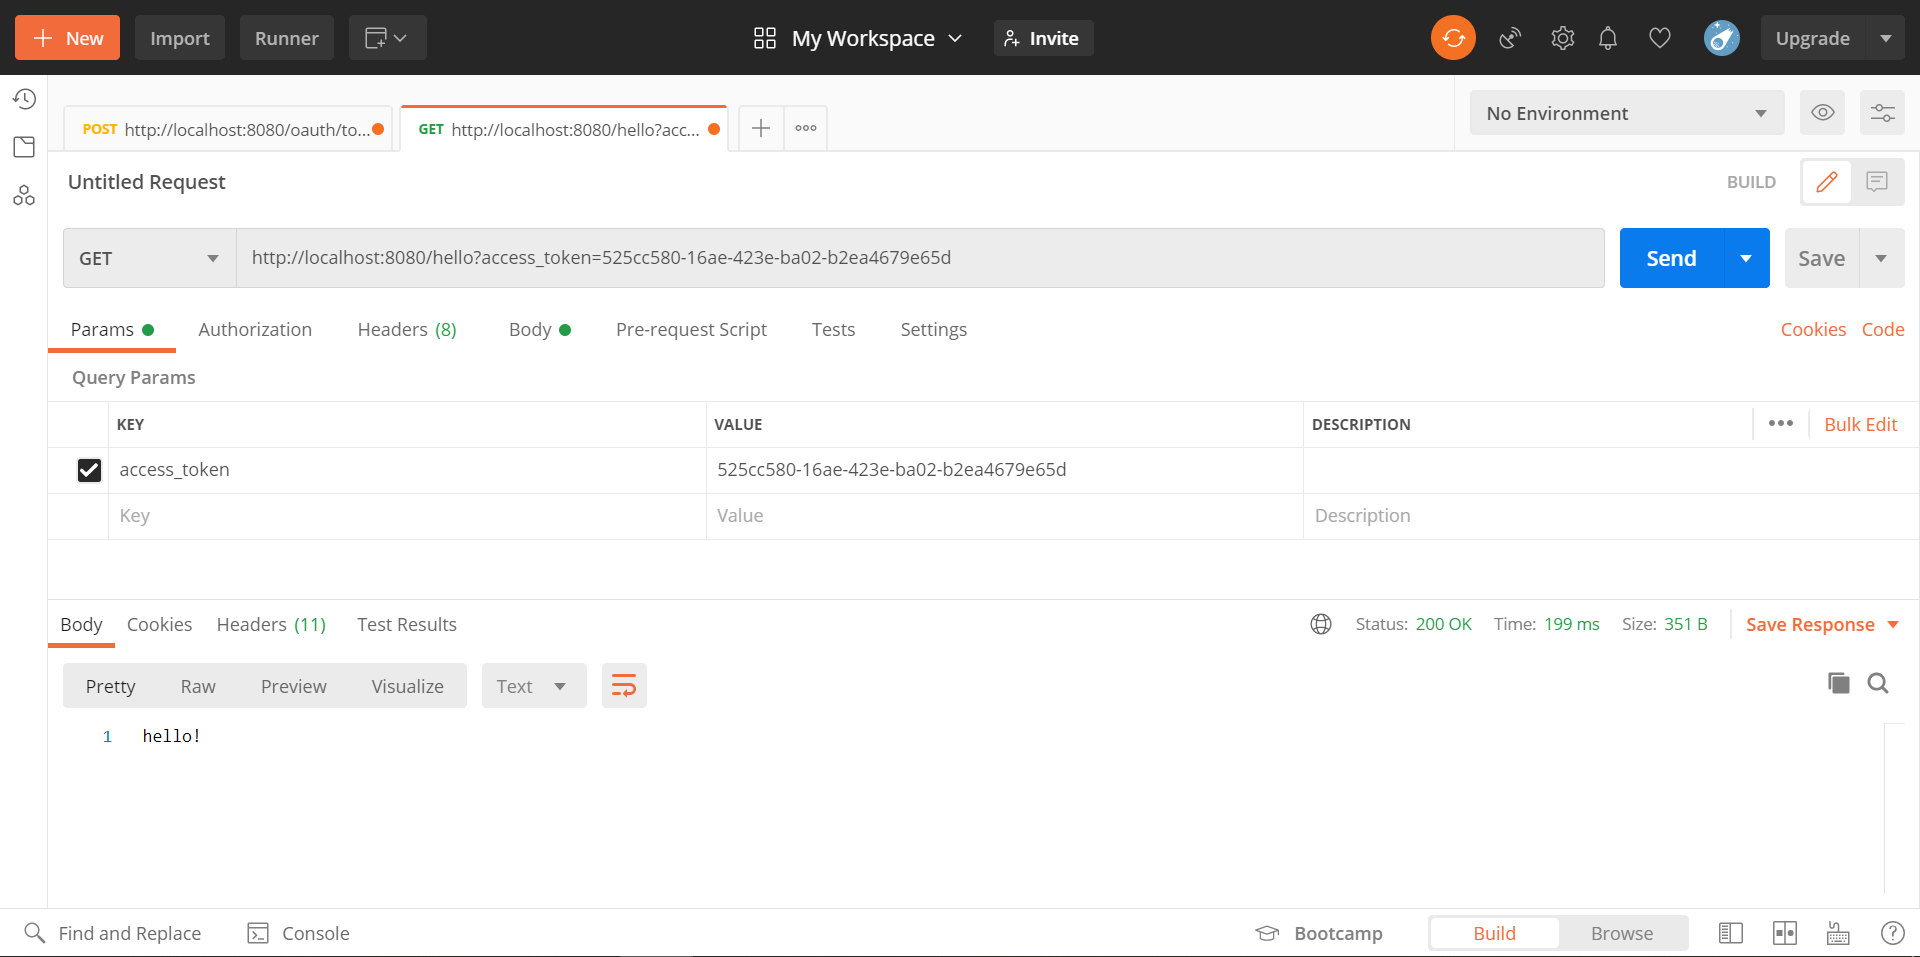
再将获取到的 token 用于 get 请求,效果如下:
每天学习一点点,每天进步一点点。