Actuator 简介
Spring Boot Actuator 的关键特性是在应用程序里提供众多 Web 端点,通过它们了解应用程序运行时的内部状况。
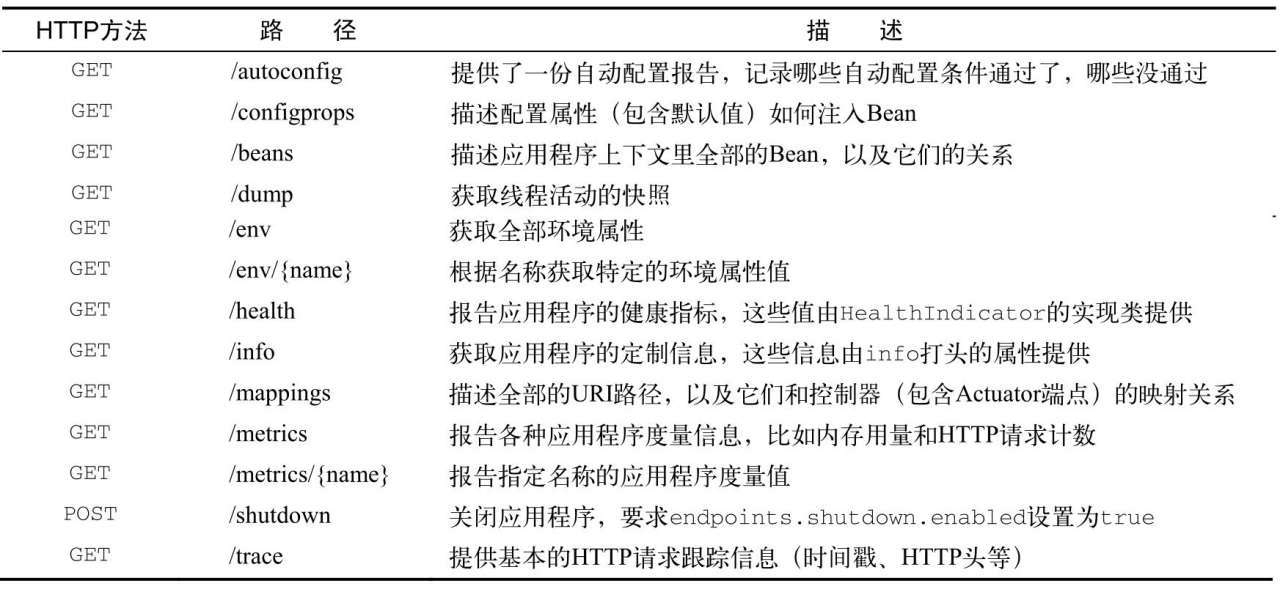
Actuator 提供了 13 个端点,具体如下表示:

在 2.X 版本中,部分端点有所改变,在浏览器访问 http://localhost:8080/actuator, 列出了所有可访问端点:
{
  "_links" : {
    "self" : {
      "href" : "http://localhost:8080/actuator",
      "templated" : false
    },
    "beans" : {
      "href" : "http://localhost:8080/actuator/beans",
      "templated" : false
    },
    "caches-cache" : {
      "href" : "http://localhost:8080/actuator/caches/{cache}",
      "templated" : true
    },
    "caches" : {
      "href" : "http://localhost:8080/actuator/caches",
      "templated" : false
    },
    "health" : {
      "href" : "http://localhost:8080/actuator/health",
      "templated" : false
    },
    "health-path" : {
      "href" : "http://localhost:8080/actuator/health/{*path}",
      "templated" : true
    },
    "info" : {
      "href" : "http://localhost:8080/actuator/info",
      "templated" : false
    },
    "conditions" : {
      "href" : "http://localhost:8080/actuator/conditions",
      "templated" : false
    },
    "configprops" : {
      "href" : "http://localhost:8080/actuator/configprops",
      "templated" : false
    },
    "env" : {
      "href" : "http://localhost:8080/actuator/env",
      "templated" : false
    },
    "env-toMatch" : {
      "href" : "http://localhost:8080/actuator/env/{toMatch}",
      "templated" : true
    },
    "loggers" : {
      "href" : "http://localhost:8080/actuator/loggers",
      "templated" : false
    },
    "loggers-name" : {
      "href" : "http://localhost:8080/actuator/loggers/{name}",
      "templated" : true
    },
    "heapdump" : {
      "href" : "http://localhost:8080/actuator/heapdump",
      "templated" : false
    },
    "threaddump" : {
      "href" : "http://localhost:8080/actuator/threaddump",
      "templated" : false
    },
    "metrics-requiredMetricName" : {
      "href" : "http://localhost:8080/actuator/metrics/{requiredMetricName}",
      "templated" : true
    },
    "metrics" : {
      "href" : "http://localhost:8080/actuator/metrics",
      "templated" : false
    },
    "scheduledtasks" : {
      "href" : "http://localhost:8080/actuator/scheduledtasks",
      "templated" : false
    },
    "mappings" : {
      "href" : "http://localhost:8080/actuator/mappings",
      "templated" : false
    }
  }
}
Actuator 的使用
1、添加依赖
<dependency>
            <groupId>org.springframework.boot</groupId>
            <artifactId>spring-boot-starter-actuator</artifactId>
</dependency>
2、application.yml 配置文件
# 声明暴露出所有接口
management:
  endpoints:
    web:
      exposure:
        include: "*"
# JSON 打印输出
spring:
  jackson:
    serialization:
      indent_output: true
注意,不要使用 application.properties 配置文件,会报一些奇怪的错误。
3、访问各个 web 端点,获取应用运行信息
示例,访问 http://localhost:8080/actuator/beans,获得 Spring 容器中的所有 beans ,以及他们的关系:
{
  "contexts" : {
    "application" : {
      "beans" : {
        "spring.jpa-org.springframework.boot.autoconfigure.orm.jpa.JpaProperties" : {
          "aliases" : [ ],
          "scope" : "singleton",
          "type" : "org.springframework.boot.autoconfigure.orm.jpa.JpaProperties",
          "resource" : null,
          "dependencies" : [ ]
        },
        "endpointCachingOperationInvokerAdvisor" : {
          "aliases" : [ ],
          "scope" : "singleton",
          "type" : "org.springframework.boot.actuate.endpoint.invoker.cache.CachingOperationInvokerAdvisor",
          "resource" : "class path resource [org/springframework/boot/actuate/autoconfigure/endpoint/EndpointAutoConfiguration.class]",
          "dependencies" : [ "environment" ]
        },
        "defaultServletHandlerMapping" : {
          "aliases" : [ ],
          "scope" : "singleton",
          "type" : "org.springframework.web.servlet.HandlerMapping",
          "resource" : "class path resource [org/springframework/boot/autoconfigure/web/servlet/WebMvcAutoConfiguration$EnableWebMvcConfiguration.class]",
          "dependencies" : [ ]
        },
        "metricsRestTemplateCustomizer" : {
          "aliases" : [ ],
          "scope" : "singleton",
          "type" : "org.springframework.boot.actuate.metrics.web.client.MetricsRestTemplateCustomizer",
          "resource" : "class path resource [org/springframework/boot/actuate/autoconfigure/metrics/web/client/RestTemplateMetricsConfiguration.class]",
          "dependencies" : [ "simpleMeterRegistry", "restTemplateExchangeTagsProvider", "management.metrics-org.springframework.boot.actuate.autoconfigure.metrics.MetricsProperties" ]
        },
...

}
参考文档
Spring Boot Actuator Web API Documentation