(一)建立项目文件
先建立一个解决方案文件,然后添加三个项目。
分别是:
(1)Windows服务项目 -----ActiveMQSenderService项目,服务主要是定时轮询某表,将更新发送到Active MQ队列。
(2)测试项目 ----- ActiveMQServiceTest项目,由于Windows服务不便于测试,所以专门建立一个控制台项目用来测试业务逻辑正确性。
(3)业务逻辑项目 ----- ActiveMQProducer项目,将整体业务逻辑从Windows服务分离出去,降低耦合,便于维护。
(二)编写ActiveMQSenderService项目
1。首先添加对ActiveMQProducer的引用
2。建立项目文件如下结构
其中:
(1)ActiveMQSenderService.cs是Windows服务文件
(2)Install.bat和Unstall.bat用来自动安装和卸载ActiveMQSenderService
(3)ActiveMQSendLog用来记录服务运行日志
(4)App.Config用来记录项目配置文件
(5)ProjectInstall.cs是Windows服务安装程序
3.编写服务文件
ActiveMQSenderService.designer.cs:
        /// <summary>
        /// Required method for Designer support - do not modify
        /// the contents of this method with the code editor.
        /// </summary>
        private void InitializeComponent()
        {
            components = new System.ComponentModel.Container();
            this.timer = new System.Timers.Timer();
            ((System.ComponentModel.ISupportInitialize)(this.timer)).BeginInit();
            this.timer.Enabled = true;
            this.timer.Interval = 10000;
            this.timer.Elapsed += new System.Timers.ElapsedEventHandler(this.timer_Elapsed);
            this.ServiceName = "ActiveMQSenderService";
            dsQuery = new DataSet();
            ((System.ComponentModel.ISupportInitialize)(this.timer)).EndInit();
        }
ActiveMQSenderService.cs:
using System;
using System.Collections.Generic;
using System.ComponentModel;
using System.Data;
using System.Data.SqlClient;
using System.Diagnostics;
using System.Linq;
using System.ServiceProcess;
using System.Text;

namespace ActiveMQSenderService
{
    public partial class ActiveMQSenderService : ServiceBase
    {
        private System.Timers.Timer timer;
        private DataSet dsQuery;
        private DataSet dsLose;
        public ActiveMQSenderService()
        {
            InitializeComponent();
        }
        private void timer_Elapsed(object sender, System.Timers.ElapsedEventArgs e)
        {
            ActiveMQProducer producer = new ActiveMQProducer();
            producer.SendMessageArray();
        }
        protected override void OnStart(string[] args)
        {
            this.timer.Enabled = true;
            Log.LogMessage(string.Format("******Time:{0}  Service Started******",DateTime.Now));
        }
        protected override void OnStop()
        {
            this.timer.Enabled = false;
            Log.LogMessage(string.Format("******Time:{0} Service Stopped*******",DateTime.Now));
        }
    }
}
4.编写配置文件
<?xml version="1.0"?>
<configuration>
    <startup>
        <supportedRuntime version="v4.0" sku=".NETFramework,Version=v4.0"/>
    </startup>
    <connectionStrings>
        <add name="conn" connectionString="userid='';password='';initialCatelog='XXXXX';server='127.0.0.1';connectTimeout=30;providerName='System.Data.SqlClient'"/>
        <add name="SqlConnectionString" connectionString="Database=XXXXX;Data Source=localhost;Integrated Security=SSPI;"></add>
    </connectionStrings>
    <appSettings>
        <add key="ActiveMQServerAddress" value="tcp://localhost:61616"/>
        <add key="QueueName" value="activemqtest"/>
    </appSettings>
</configuration>
需要将文件属性BuildAction设置为None
5.编写Install.bat和Uninstall.bat
Uninstall.bat
1: @echo off
2: :uninstall
3: %SystemRoot%/Microsoft.NET/Framework/v4.0.30319/installutil /uninstall ActiveMQSenderService.exe
4: pause
5: :end
1: @echo off
2: :install
3: %SystemRoot%/Microsoft.NET/Framework/v4.0.30319/installutil ActiveMQSenderService.exe
4: net start ActiveMQSenderService
5: pause
6: :end
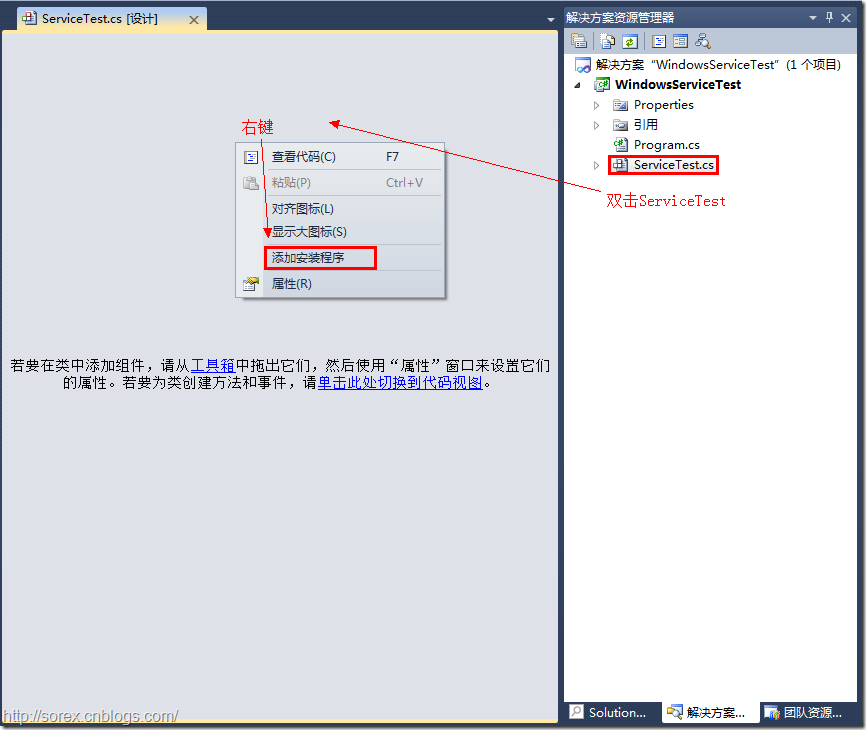
6.设置服务安装文件
(1)打开ProjectInstall右键属性界面,添加一个serviceInstaller1控件,设置控件的右键属性:ServiceName为指定名称。
(2)设置serviceProcessInstaller1控件,将Account设置为LocalSystem.
(三)建立业务逻辑项目:主要包括:操作数据库,日志操作,ActiveMQ操作几个逻辑。
(四)建立业务逻辑测试项目:引用业务逻辑项目,测试想要测试的各种业务逻辑即可。
(五)测试服务方法:
(1)安装服务,运行Install.bat
(2)附加进程
引用:


![[[HR]XT_00~6$Q5]VQ_X$$H [[HR]XT_00~6$Q5]VQ_X$$H](https://images0.cnblogs.com/blog/65488/201312/05114953-5434ac6073cd4e8888ad26f143bb70d8.jpg)


![}D2W48%ORX$F(]$EDKSWQ41 }D2W48%ORX$F(]$EDKSWQ41](https://images0.cnblogs.com/blog/65488/201312/05115012-392401118baa427cbf51b87b48c914d0.jpg)


