inds_inside = np.where(
            (all_anchors[:, 0] >= -self._allowed_border) &
            (all_anchors[:, 1] >= -self._allowed_border) &
            (all_anchors[:, 2] < im_info[1] + self._allowed_border) &  # width
            (all_anchors[:, 3] < im_info[0] + self._allowed_border)    # height
        )[0]

        # keep only inside anchors
        anchors = all_anchors[inds_inside, :]
这部分代码是把所有anchor中超过了图片边界部分的anchor去掉,即论文中说的cross-boundary anchors
        # fg label: for each gt, anchor with highest overlap
        labels[gt_argmax_overlaps] = 1

        # fg label: above threshold IOU
        labels[max_overlaps >= cfg.TRAIN.RPN_POSITIVE_OVERLAP] = 1
这部分代码是把和gt-roi有最大iou的anchor和与任何gt-roi iou大于0.7的anchor的label置为1,即前景。这和论文中所说的是一样的。
if cfg.TRAIN.RPN_CLOBBER_POSITIVES:
            # assign bg labels last so that negative labels can clobber positives
            labels[max_overlaps < cfg.TRAIN.RPN_NEGATIVE_OVERLAP] = 0
把和所有gt-roi iou都小于0.3的achor的label置为0
# label: 1 is positive, 0 is negative, -1 is dont care
        labels = np.empty((len(inds_inside), ), dtype=np.float32)
        labels.fill(-1)
这是label的初始化的代码,所有的label都置为-1
所以总的来看,label分为3类,一类是0,即背景label;一类是1,即前景label;另一类既不是前景也不是背景,置为-1。论文中说只有前景和背景对训练目标有用,这种-1的label对训练没用。
# subsample positive labels if we have too many
        num_fg = int(cfg.TRAIN.RPN_FG_FRACTION * cfg.TRAIN.RPN_BATCHSIZE)
        fg_inds = np.where(labels == 1)[0]
        if len(fg_inds) > num_fg:                        #从所有label为1的anchor中选择128个,剩下的anchor的label全部置为-1
            disable_inds = npr.choice(
                fg_inds, size=(len(fg_inds) - num_fg), replace=False)
            labels[disable_inds] = -1

        # subsample negative labels if we have too many
        num_bg = cfg.TRAIN.RPN_BATCHSIZE - np.sum(labels == 1)#这里num_bg不是直接设为128,而是256减去label为1的个数,这样如果label为1的不够,就用label为0的填充,这个代码实现很巧
        bg_inds = np.where(labels == 0)[0]
        if len(bg_inds) > num_bg:                   #将没被选择作为训练的anchor的label置为-1
            disable_inds = npr.choice(
                bg_inds, size=(len(bg_inds) - num_bg), replace=False)
            labels[disable_inds] = -1
            #print "was %s inds, disabling %s, now %s inds" % (
                #len(bg_inds), len(disable_inds), np.sum(labels == 0))
论文中说从所有anchor中随机选取256个anchor,前景128个,背景128个。注意:那种label为-1的不会当前景也不会当背景。
这两段代码是前一部分是在所有前景的anchor中选128个,后一部分是在所有的背景achor中选128个。如果前景的个数少于了128个,就把所有的anchor选出来,差的由背景部分补。这和fast rcnn选取roi一样。
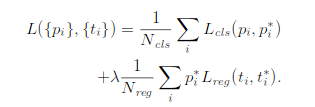
这是论文中rpn的loss函数:

这个loss函数和fast rcnn中的loss函数差不多,所以在计算的时候是每个坐标单独进行smoothL1计算,所以参数Pi*和Nreg必须弄成4维的向量,并不是在论文中的就一个数值
        bbox_inside_weights = np.zeros((len(inds_inside), 4), dtype=np.float32)
        bbox_inside_weights[labels == 1, :] =     np.array(cfg.TRAIN.RPN_BBOX_INSIDE_WEIGHTS)

        bbox_outside_weights = np.zeros((len(inds_inside), 4), dtype=np.float32)
        if cfg.TRAIN.RPN_POSITIVE_WEIGHT < 0:
            # uniform weighting of examples (given non-uniform sampling)
            num_examples = np.sum(labels >= 0)
            positive_weights = np.ones((1, 4)) * 1.0 / num_examples
            negative_weights = np.ones((1, 4)) * 1.0 / num_examples
        else:
            assert ((cfg.TRAIN.RPN_POSITIVE_WEIGHT > 0) &
                    (cfg.TRAIN.RPN_POSITIVE_WEIGHT < 1))
            positive_weights = (cfg.TRAIN.RPN_POSITIVE_WEIGHT /
                                np.sum(labels == 1))
            negative_weights = ((1.0 - cfg.TRAIN.RPN_POSITIVE_WEIGHT) /
                                np.sum(labels == 0))
        bbox_outside_weights[labels == 1, :] = positive_weights
        bbox_outside_weights[labels == 0, :] = negative_weights
bbox_inside_weights实际上指的就是Pi*,bbox_outside_weights指的是Nreg。
论文中说如果anchor是前景,Pi*就是1,为背景,Pi*就是0。label为-1的,在这个代码来看也是设置为0,应该是在后面不会参与计算,这个设置为多少都无所谓。
Nreg是进行标准化操作,就是取平均。这个平均是把所有的label 0和label 1加起来。因为选的是256个anchor做训练,所以实际上这个值是1/256。
值得注意的是,rpn网络的训练是256个anchor,128个positive,128个negative。但anchor_target_layer层的输出并不是只有256个anchor的label和坐标变换,而是所有的anchor。其中_unmap函数就很好体现了这一点。那训练的时候怎么实现训练这256个呢?实际上,这一层的4个输出,rpn_labels是需要输出到rpn_loss_cls层,其他的3个输出到rpn_loss_bbox,label实际上就是loss function前半部分中的Pi*(即计算分类的loss),这是一个log loss,为-1的label是无法进行log计算的,剩下的0、1就直接计算,这一部分实现了256。loss function后半部分是计算bbox坐标的loss,Pi*,也就是bbox_inside_weights,论文中说了activated only for positive anchors,只有为正例的anchor才去计算坐标的损失,这是Pi*是1,其他情况都是0
bbox_inside_weights = np.zeros((len(inds_inside), 4), dtype=np.float32)
bbox_inside_weights[labels == 1, :] = np.array(cfg.TRAIN.RPN_BBOX_INSIDE_WEIGHTS)
这段代码也体现了这个思想,所以这也实现了256。
可以这样去理解:anchor_target_layer输出的是所有anchor的label,bbox_targets。但真正进行了loss计算的只有那256个anchor。可以看下面这个loss函数,i是anchor的下标,这个i计算是计算了所有的anchor的,但只有那256个才真正改变了loss值,其他的都是0。

_unmap函数:因为all_anchors裁减掉了2/3左右,仅仅保留在图像内的anchor。这里就是将其复原作为下一层的输入了,并reshape成相应的格式。