第一:完整性约束介绍
为了防止不符合规范的数据进入数据库,在用户对数据进行插入、修改、删除等操作时,DBMS自动按照一定的约束条件对数据进行监测,使不符合规范的数据不能写入数据库,以确保数据库中存储的数据正确性,有效性
第二:not null 和 default
是否为空,null 表示为空,非字符串
null:空 not null :非空
默认值,创建列时可以指定默认值,当插入数据时如果未主动设置,则自动添加默认值
create table tb1(
nid int not null defalut 2,
num int not null
)
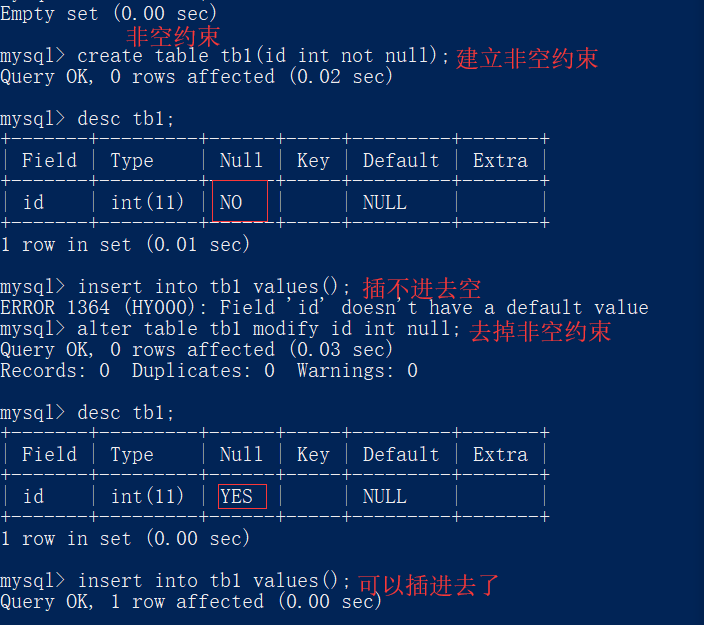
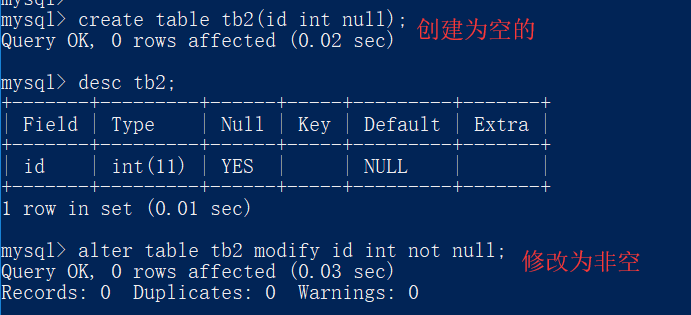
示例一:空与非空


这里需要注意的,如果有数据的话,是不能进行修改的
示例二:default

==================default====================
#设置id字段有默认值后,则无论id字段是null还是not null,都可以插入空,插入空默认填入default指定的默认值
mysql> create table tb3(id int default 1);
mysql> alter table tb3 modify id int not null default 1;
第三:unique
unique:唯一约束
1,设置列级约束:
mysql> create table part1(
    -> id int,
    -> name varchar(55) unique
    -> );
Query OK, 0 rows affected (0.02 sec)


2,设置表级约束:
mysql> create table part2(
    -> id int,
    -> name varchar(55),
    -> constraint uk_name unique(name)
    -> );
Query OK, 0 rows affected (0.03 sec)


检测约束:

mysql> insert into part2 values(1,'IT');
Query OK, 1 row affected (0.01 sec)

mysql> insert into part2 values(1,'IT');
ERROR 1062 (23000): Duplicate entry 'IT' for key 'uk_name'
mysql>

add关键字增加唯一约束:
mysql> alter table part1 add unique(id,name);
Query OK, 0 rows affected (0.03 sec)
Records: 0  Duplicates: 0  Warnings: 0

modify关键字删除或者增加唯一约束
mysql> alter table part1 modify id varchar(255) not null;
Query OK, 0 rows affected (0.05 sec)
Records: 0  Duplicates: 0  Warnings: 0

mysql> alter table part1 modify id varchar(255) not null unique;
Query OK, 0 rows affected (0.03 sec)
Records: 0  Duplicates: 0  Warnings: 0

create table service(
id int primary key auto_increment,
name varchar(20),
host varchar(15) not null,
port int not null,
unique(host,port) #联合唯一或关键字唯一
);

mysql> insert into service values
    -> (1,'nginx','1.1.1.1',80),
    -> (2,'haproxy','2.2.2.2',80),
    -> (3,'mysql','3.3.3.3',3306)
    -> ;
Query OK, 3 rows affected (0.01 sec)
Records: 3  Duplicates: 0  Warnings: 0

mysql> insert into service(name,host,port) values('nginx','1.1.1.1',80);
ERROR 1062 (23000): Duplicate entry '192.168.0.10-80' for key 'host'
第四:primary key
primary key:主键
#主键约束相当于非空约束和唯一约束。
#每个表只允许拥有一个主键,但是这个主键可以由一个数据或者多个数据列组成,这些列组合不能重复
#标准SQL允许给主键自行命名,但是对于Mysql来说自己的名字没有任何作用,总是默认名为PRIMARY
第一:not null+unique作为主键

mysql> create table part3(
    -> id int not null unique,----》主键
    -> name varchar(20) not null unique
    -> );
Query OK, 0 rows affected (0.04 sec)

mysql> desc part3;
+-------+-------------+------+-----+---------+-------+
| Field | Type        | Null | Key | Default | Extra |
+-------+-------------+------+-----+---------+-------+
| id    | int(11)     | NO   | PRI | NULL    |       |
| name  | varchar(20) | NO   | UNI | NULL    |       |
+-------+-------------+------+-----+---------+-------+
2 rows in set (0.01 sec)

第二:在其中一个字段后用primary key
mysql> create table part4(
    -> id int primary key,----》主键
    -> name varchar(20)
    -> );
Query OK, 0 rows affected (0.02 sec)

mysql> desc part4;
+-------+-------------+------+-----+---------+-------+
| Field | Type        | Null | Key | Default | Extra |
+-------+-------------+------+-----+---------+-------+
| id    | int(11)     | NO   | PRI | NULL    |       |
| name  | varchar(20) | YES  |     | NULL    |       |
+-------+-------------+------+-----+---------+-------+
2 rows in set (0.00 sec)

第三:在所有字段后单独定义primary key
mysql> create table part5(
    -> id int,
    -> name varchar(20),
    -> constraint pk_name primary key(id)); 创建主键并为其命名pk_name
Query OK, 0 rows affected (0.02 sec)

mysql> desc part5;
+-------+-------------+------+-----+---------+-------+
| Field | Type        | Null | Key | Default | Extra |
+-------+-------------+------+-----+---------+-------+
| id    | int(11)     | NO   | PRI | NULL    |       |
| name  | varchar(20) | YES  |     | NULL    |       |
+-------+-------------+------+-----+---------+-------+
2 rows in set (0.00 sec)

多列做主键:

mysql> create table service(
    -> ipaddr varchar(20),
    -> port char(5),
    -> service_name varchar(10) not null,
    -> primary key(ipaddr,port)
    -> );
Query OK, 0 rows affected (0.02 sec)

mysql> insert into service values
    -> ('1.1.1.1','3306','mysqld'),
    -> ('2.2.2.2','80','nginx')
    -> ;
Query OK, 2 rows affected (0.01 sec)
Records: 2  Duplicates: 0  Warnings: 0

mysql> insert into service values ('2.2.2.2','80','apache');
ERROR 1062 (23000): Duplicate entry '2.2.2.2-80' for key 'PRIMARY'
mysql>
第五:auto_increment
- #主键列自增长特性:如果某个数据列的类型是整型,而且该列作为主键列,则可指定该列具有自增长功能
- #mysql使用auto_increment来设置自增长,向该表插入记录时可不为该列指定值,由系统生成
#不指定id,则自动增长
mysql> create table tb5(
    -> id int primary key auto_increment,
    -> name varchar(20),
    -> sex enum('man','woman') default 'man'
    -> );
Query OK, 0 rows affected (0.02 sec)

mysql> desc tb5;
+-------+---------------------+------+-----+---------+----------------+
| Field | Type                | Null | Key | Default | Extra          |
+-------+---------------------+------+-----+---------+----------------+
| id    | int(11)             | NO   | PRI | NULL    | auto_increment |
| name  | varchar(20)         | YES  |     | NULL    |                |
| sex   | enum('man','woman') | YES  |     | man     |                |
+-------+---------------------+------+-----+---------+----------------+
3 rows in set (0.00 sec)

mysql> insert into tb5(name) values('zzl'),('zl');
Query OK, 2 rows affected (0.00 sec)
Records: 2  Duplicates: 0  Warnings: 0

mysql> select * from tb5;
+----+------+------+
| id | name | sex  |
+----+------+------+
|  1 | zzl  | man  |
|  2 | zl   | man  |
+----+------+------+
2 rows in set (0.00 sec)


#指定id
mysql> insert into tb5 values(4,'cyy','woman');
Query OK, 1 row affected (0.00 sec)

mysql> insert into tb5 values(6,'cy','woman');
Query OK, 1 row affected (0.00 sec)

mysql> select * from tb5;
+----+------+-------+
| id | name | sex   |
+----+------+-------+
|  1 | zzl  | man   |
|  2 | zl   | man   |
|  4 | cyy  | woman |
|  6 | cy   | woman |
+----+------+-------+
4 rows in set (0.00 sec)


#对于自增的字段,在用delete删除后,再插入值,该字段仍按照删除前的位置继续增长
mysql> delete from tb5;
Query OK, 4 rows affected (0.01 sec)

mysql> select * from tb5;
Empty set (0.00 sec)

mysql> insert into tb5(name) values('zyc');
Query OK, 1 row affected (0.00 sec)

mysql> select * from tb5;
+----+------+------+
| id | name | sex  |
+----+------+------+
|  7 | zyc  | man  |
+----+------+------+
1 row in set (0.00 sec)

#应该用truncate清空表,比起delete一条一条地删除记录,truncate是直接清空表,在删除大表时用它
mysql> truncate tb5;
Query OK, 0 rows affected (0.01 sec)

mysql> select * from tb5;
Empty set (0.00 sec)

mysql> insert into tb5(name) values('zzl');
Query OK, 1 row affected (0.33 sec)

mysql> select * from tb5;
+----+------+------+
| id | name | sex  |
+----+------+------+
|  1 | zzl  | man  |
+----+------+------+
1 row in set (0.00 sec)
第六:foreign key
通过下面的例子理解下foreign key(外键)

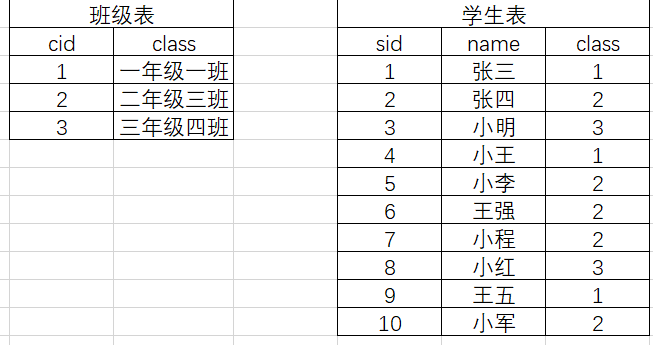
我们完全可以定义一个班级表
然后让学生表关联该表,关联方法即foreign key
eg:
#表类型必须是innodb存储引擎,且被关联的字段,即references指定的另外一个表的字段,必须保证唯一
create table class(
cid int primary key,
name varchar(20) not null
)engine=innodb;

#class_id外键,关联父表(class主键cid),同步更新,同步删除
create table student(
sid int primary key,
name varchar(20) not null,
class_id int,
constraint fk_name foreign key(class_id)
references class(cid)
on delete cascade
on update cascade
)engine=innodb;

#先往父表department中插入记录
insert into class values
(1,'一年级一班'),
(2,'二年级三班'),
(3,'三年级四班');

#再往子表student中插入记录
insert into student values
(1,'张三',1),
(2,'张四',2),
(3,'小明',3),
(4,'小王',1),
(5,'小李',2),
(6,'王强',2),
(7,'小程',2),
(8,'小红',3),
(9,'王五',1),
(10,'小军',2)
;

#删父表class,子表student中对应的记录跟着删
mysql> delete from class where cid=3;
mysql> select * from student;
+----+-------+----------+
|sid | name  | class_id |
+----+-------+----------+
|  1 | 张三  |      1   |
|  3 | 小明  |      3   |
|  3 | 小王  |      1   |
|  8 | 小红  |      3   |
|  9 | 王五  |      1   |
+----+-------+----------+


#更新父表class,子表student中对应的记录跟着改
mysql> update class set cid=3333 where cid=3;
mysql> select * from student;
+----+-------+----------+
|sid | name  | class_id |
+----+-------+----------+
|  1 | 张三  |      1   |
|  3 | 小明  |   3333   |
|  3 | 小王  |      1   |
|  8 | 小红  |   3333                                                         |
|  9 | 王五  |      1   |
+----+-------+----------+
找表中的关系:

分析步骤:
#1、先站在左表的角度去找
是否左表的多条记录可以对应右表的一条记录,如果是,则证明左表的一个字段foreign key 右表一个字段(通常是id)

#2、再站在右表的角度去找
是否右表的多条记录可以对应左表的一条记录,如果是,则证明右表的一个字段foreign key 左表一个字段(通常是id)

#3、总结:
#多对一:
如果只有步骤1成立,则是左表多对一右表
如果只有步骤2成立,则是右表多对一左表

#多对多
如果步骤1和2同时成立,则证明这两张表时一个双向的多对一,即多对多,需要定义一个这两张表的关系表来专门存放二者的关系

#一对一:
如果1和2都不成立,而是左表的一条记录唯一对应右表的一条记录,反之亦然。这种情况很简单,就是在左表foreign key右表的基础上,将左表的外键字段设置成unique即可
最后介绍三种对应的关系:
一对一
两张表:用户表和客户表
一对一:一个用户是一个客户,一个客户有可能变成一个用户,即一对一的关系
关联方式:foreign key+unique

#一定是user来foreign key表customer,这样就保证了:
#1 用户一定是一个客户,
#2 客户不一定是用户,但有可能成为一个用户


create table customer(
id int primary key auto_increment,
name varchar(20) not null,
phone char(16) not null
);


create table user(
id int primary key auto_increment,
user_name varchar(20) not null,
customer_id int unique, #该字段一定要是唯一的
foreign key(customer_id) references customer(id) #外键的字段一定要保证unique
on delete cascade
on update cascade
);


#增加客户
insert into customer(name,phone) values
('张三',13934341230),
('李四',15339326733),
('王五',18820016230),
('赵六',13721748029),
('周八,13721799962),
('蒋二',13403956369)
;


#增加学生
insert into student(user_name,customer_id) values
('季度用户',3),
('月用户',4),
('月用户',5)
;
多对一(一对多):
见上面例子中的学生与班级
多对多:
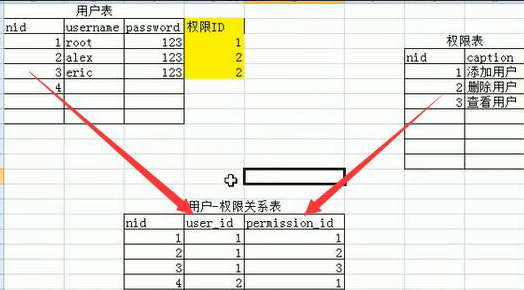
用户权限关系:
一个用户可以有多个权限
一个权限可以供多个用户拥有

mysql> create table userinfo(
    -> nid int primary key auto_increment,
    -> name varchar(20),
    -> password varchar(55));
Query OK, 0 rows affected (0.04 sec)

mysql> create table permission(
    -> nid int primary key auto_increment,
    -> caption varchar(55)
    -> );
Query OK, 0 rows affected (0.02 sec)

mysql> create table user_to_permission(
    ->     nid int not null unique auto_increment,
    ->     user_id int not null,
    ->     permission_id int not null,
    ->     constraint fk_user foreign key(user_id) references userinfo(nid)
    ->     on delete cascade
    ->     on update cascade,
    ->     constraint fk_permission foreign key(permission_id) references permission(nid)
    ->     on delete cascade
    ->     on update cascade,
    ->     primary key(user_id,permission_id)
    ->     );
Query OK, 0 rows affected (0.03 sec)

mysql> insert into userinfo(name,password) values('root','123');
Query OK, 1 row affected (0.01 sec)

mysql> insert into userinfo(name,password) values('alex','123');
Query OK, 1 row affected (0.00 sec)

mysql> insert into userinfo(name,password) values('eric','123');
Query OK, 1 row affected (0.01 sec)

mysql> insert into permission(caption) values('add user'),('delete user'),('select user')
    -> ;
Query OK, 3 rows affected (0.01 sec)
Records: 3  Duplicates: 0  Warnings: 0

mysql> select * from userinfo;
+-----+------+----------+
| nid | name | password |
+-----+------+----------+
|   1 | root | 123      |
|   2 | alex | 123      |
|   3 | eric | 123      |
+-----+------+----------+
3 rows in set (0.01 sec)

mysql> select * from permission;
+-----+-------------+
| nid | caption     |
+-----+-------------+
|   1 | add user    |
|   2 | delete user |
|   3 | select user |
+-----+-------------+
3 rows in set (0.00 sec)


mysql> insert into user_to_permission(user_id,permission_id) values(1,1),(1,2),(1,3),(2,3),(3,3)
    -> ;
Query OK, 5 rows affected (0.01 sec)
Records: 5  Duplicates: 0  Warnings: 0

mysql> select * from user_to_permission;
+-----+---------+---------------+
| nid | user_id | permission_id |
+-----+---------+---------------+
|   1 |       1 |             1 |
|   2 |       1 |             2 |
|   3 |       1 |             3 |
|   4 |       2 |             3 |
|   5 |       3 |             3 |
+-----+---------+---------------+
5 rows in set (0.01 sec)

mysql>
