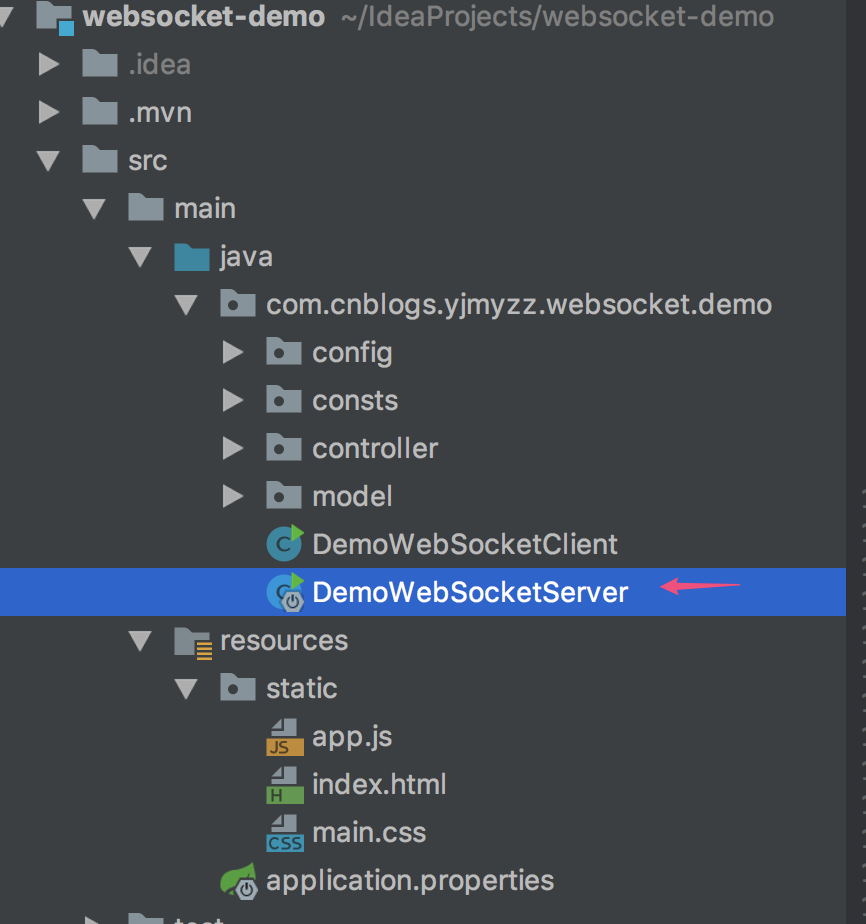
spring boot 2/spring 5自带了websocket,下面是最基本的示例(包括java服务端、java客户端以及js客户端)
一、pom依赖
<dependencies>

        <!--核心依赖项-->
        <dependency>
            <groupId>org.springframework.boot</groupId>
            <artifactId>spring-boot-starter-actuator</artifactId>
        </dependency>
        <dependency>
            <groupId>org.springframework.boot</groupId>
            <artifactId>spring-boot-starter-webflux</artifactId>
        </dependency>
        <dependency>
            <groupId>org.springframework.boot</groupId>
            <artifactId>spring-boot-starter-websocket</artifactId>
        </dependency>

        <dependency>
            <groupId>org.springframework</groupId>
            <artifactId>spring-messaging</artifactId>
        </dependency>

        <!--js客户端的静态资源-->
        <dependency>
            <groupId>org.webjars</groupId>
            <artifactId>webjars-locator-core</artifactId>
        </dependency>
        <dependency>
            <groupId>org.webjars</groupId>
            <artifactId>sockjs-client</artifactId>
            <version>1.0.2</version>
        </dependency>
        <dependency>
            <groupId>org.webjars</groupId>
            <artifactId>stomp-websocket</artifactId>
            <version>2.3.3</version>
        </dependency>
        <dependency>
            <groupId>org.webjars</groupId>
            <artifactId>bootstrap</artifactId>
            <version>3.3.7</version>
        </dependency>
        <dependency>
            <groupId>org.webjars</groupId>
            <artifactId>jquery</artifactId>
            <version>3.1.0</version>
        </dependency>

        <!--简化编码神器-->
        <dependency>
            <groupId>org.projectlombok</groupId>
            <artifactId>lombok</artifactId>
            <optional>true</optional>
        </dependency>

        <!--测试依赖项-->
        <dependency>
            <groupId>org.springframework.boot</groupId>
            <artifactId>spring-boot-starter-test</artifactId>
            <scope>test</scope>
        </dependency>
        <dependency>
            <groupId>io.projectreactor</groupId>
            <artifactId>reactor-test</artifactId>
            <scope>test</scope>
        </dependency>
    </dependencies>
这里直接用了目前spring-boot的最新版本2.0.5 RELEASE.
二、websocket配置类
先定义一些常量,方便后面使用
public class GlobalConsts {

    public static final String TOPIC = "/topic/greetings";

    public static final String ENDPOINT = "/gs-guide-websocket";

    public static final String APP_PREFIX = "/app";

    public static final String HELLO_MAPPING = "/hello";
}
然后才是配置:
import com.cnblogs.yjmyzz.websocket.demo.consts.GlobalConsts;
import org.springframework.context.annotation.Configuration;
import org.springframework.messaging.simp.config.MessageBrokerRegistry;
import org.springframework.web.socket.config.annotation.EnableWebSocketMessageBroker;
import org.springframework.web.socket.config.annotation.StompEndpointRegistry;
import org.springframework.web.socket.config.annotation.WebSocketMessageBrokerConfigurer;


/**
 * @author junmingyang
 */
@Configuration
@EnableWebSocketMessageBroker
public class WebSocketConfig implements WebSocketMessageBrokerConfigurer {

    @Override
    public void configureMessageBroker(MessageBrokerRegistry config) {
        config.enableSimpleBroker("/topic");
        config.setApplicationDestinationPrefixes(GlobalConsts.APP_PREFIX);
    }

    @Override
    public void registerStompEndpoints(StompEndpointRegistry registry) {
        registry.addEndpoint(GlobalConsts.ENDPOINT).withSockJS();
    }

}
这个配置的主要作用是对外暴露访问的端点,以及定义客户端访问时,收发消息的方法url前缀。
三、定义收发消息的实体类
客户端发过来的消息:
import lombok.AllArgsConstructor;
import lombok.Data;


/**
 * @author junmingyang
 */
@Data
@AllArgsConstructor
public class ClientMessage {

    private String name;

    public ClientMessage() {
    }

}
服务端返回的消息:
import lombok.AllArgsConstructor;
import lombok.Data;

/**
 * @author junmingyang
 */
@Data
@AllArgsConstructor
public class ServerMessage {

    private String content;

    public ServerMessage() {
    }

    @Override
    public String toString() {
        return content;
    }

}
重要注意事项:收发的消息类,必须存在"无参的默认构造函数",否则topic订阅会出问题,而且代码不报错!
四、定义Controller类
@Controller
public class GreetingController {

    @MessageMapping(GlobalConsts.HELLO_MAPPING)
    @SendTo(GlobalConsts.TOPIC)
    public ServerMessage greeting(ClientMessage message) throws Exception {
        // 模拟延时,以便测试客户端是否在异步工作
        Thread.sleep(1000);
        return new ServerMessage("Hello, " + HtmlUtils.htmlEscape(message.getName()) + "!");
    }
}
这跟常规的spring mvc中的Controller一样,定义收发消息的具体url映射以及处理逻辑。
五、服务端入口
@SpringBootApplication
public class DemoWebSocketServer {

    public static void main(String[] args) {
        SpringApplication.run(DemoWebSocketServer.class, args);
    }
}
这个类没啥好说的,唯一注意的是,实际调试中发现,这个类的package位置,最好放在"最外"层,移到子package后,client客户端会连接不上。(应该是要同步修改其它地方)

六、js客户端
html文件(主要是提供一个简单的UI)
<!DOCTYPE html>
<html>
<head>
    <title>Hello WebSocket</title>
    <link href="/webjars/bootstrap/css/bootstrap.min.css" rel="stylesheet">
    <link href="/main.css" rel="stylesheet">
    <script src="/webjars/jquery/jquery.min.js"></script>
    <script src="/webjars/sockjs-client/sockjs.min.js"></script>
    <script src="/webjars/stomp-websocket/stomp.min.js"></script>
    <script src="/app.js"></script>
</head>
<body>
<noscript><h2 style="color: #ff0000">Seems your browser doesn't support Javascript! Websocket relies on Javascript being
    enabled. Please enable
    Javascript and reload this page!</h2></noscript>
<div id="main-content" class="container">
    <div class="row">
        <div class="col-md-6">
            <form class="form-inline">
                <div class="form-group">
                    <label for="connect">WebSocket connection:</label>
                    <button id="connect" class="btn btn-default" type="submit">Connect</button>
                    <button id="disconnect" class="btn btn-default" type="submit" disabled="disabled">Disconnect
                    </button>
                </div>
            </form>
        </div>
        <div class="col-md-6">
            <form class="form-inline">
                <div class="form-group">
                    <label for="name">What is your name?</label>
                    <input type="text" id="name" class="form-control" placeholder="Your name here...">
                </div>
                <button id="send" class="btn btn-default" type="submit">Send</button>
            </form>
        </div>
    </div>
    <div class="row">
        <div class="col-md-12">
            <table id="conversation" class="table table-striped">
                <thead>
                <tr>
                    <th>Greetings</th>
                </tr>
                </thead>
                <tbody id="greetings">
                </tbody>
            </table>
        </div>
    </div>
</div>
</body>
</html>
/webjars/xxx.js 这些都是webjars包里打包内置的,真正处理逻辑应用逻辑的,是对应的JS文件app.js
var stompClient = null;

function setConnected(connected) {
    $("#connect").prop("disabled", connected);
    $("#disconnect").prop("disabled", !connected);
    if (connected) {
        $("#conversation").show();
    }
    else {
        $("#conversation").hide();
    }
    $("#greetings").html("");
}

function connect() {
    var socket = new SockJS('/gs-guide-websocket');
    stompClient = Stomp.over(socket);
    stompClient.connect({}, function (frame) {
        setConnected(true);
        console.log('Connected: ' + frame);
        stompClient.subscribe('/topic/greetings', function (greeting) {
            showGreeting(JSON.parse(greeting.body).content);
        });
    });
}

function disconnect() {
    if (stompClient !== null) {
        stompClient.disconnect();
    }
    setConnected(false);
    console.log("Disconnected");
}

function sendName() {
    stompClient.send("/app/hello", {}, JSON.stringify({'name': $("#name").val()}));
}

function showGreeting(message) {
    $("#greetings").append("<tr><td>" + message + "</td></tr>");
}

$(function () {
    $("form").on('submit', function (e) {
        e.preventDefault();
    });
    $( "#connect" ).click(function() { connect(); });
    $( "#disconnect" ).click(function() { disconnect(); });
    $( "#send" ).click(function() { sendName(); });
});
七、java客户端
通常有js客户端,普通Web场景就足够了,但如果需要java的客户端,可以参考下面这样:
/**
 * @author junmingyang
 */
public class DemoWebSocketClient {

    public static final String SEND_URL = GlobalConsts.APP_PREFIX + GlobalConsts.HELLO_MAPPING;

    static public class MyStompSessionHandler extends StompSessionHandlerAdapter {

        private String name;

        public MyStompSessionHandler(String name) {
            this.name = name;
        }

        private void showHeaders(StompHeaders headers) {
            for (Map.Entry<String, List<String>> e : headers.entrySet()) {
                System.err.print("  " + e.getKey() + ": ");
                boolean first = true;
                for (String v : e.getValue()) {
                    if (!first) {
                        System.err.print(", ");
                    }
                    System.err.print(v);
                    first = false;
                }
                System.err.println();
            }
        }

        private void sendJsonMessage(StompSession session) {
            ClientMessage msg = new ClientMessage(name);
            session.send(SEND_URL, msg);
        }

        private void subscribeTopic(String topic, StompSession session) {
            session.subscribe(topic, new StompFrameHandler() {

                @Override
                public Type getPayloadType(StompHeaders headers) {
                    return ServerMessage.class;
                }

                @Override
                public void handleFrame(StompHeaders headers, Object payload) {
                    System.err.println(payload.toString());
                }
            });
        }

        @Override
        public void afterConnected(StompSession session, StompHeaders connectedHeaders) {
            System.err.println("Connected! Headers:");
            showHeaders(connectedHeaders);

            subscribeTopic(GlobalConsts.TOPIC, session);
            sendJsonMessage(session);

            System.err.println("please input your new name:");
        }
    }

    public static void main(String[] args) throws Exception {
        WebSocketClient simpleWebSocketClient = new StandardWebSocketClient();
        List<Transport> transports = new ArrayList<>(1);
        transports.add(new WebSocketTransport(simpleWebSocketClient));

        SockJsClient sockJsClient = new SockJsClient(transports);
        WebSocketStompClient stompClient = new WebSocketStompClient(sockJsClient);
        stompClient.setMessageConverter(new MappingJackson2MessageConverter());
        String url = "ws://localhost:8080" + GlobalConsts.ENDPOINT;
        String name = "spring-" + ThreadLocalRandom.current().nextInt(1, 99);
        StompSessionHandler sessionHandler = new MyStompSessionHandler(name);
        StompSession session = stompClient.connect(url, sessionHandler).get();

        //发送消息
        BufferedReader in = new BufferedReader(new InputStreamReader(System.in));
        for (; ; ) {
            System.out.print(name + " >> ");
            System.out.flush();
            String line = in.readLine();
            if (line == null) {
                break;
            }
            if (line.length() == 0) {
                continue;
            }
            ClientMessage msg = new ClientMessage(name + ": I have a new name [" + line + "]");
            session.send(SEND_URL, msg);
        }
    }
}
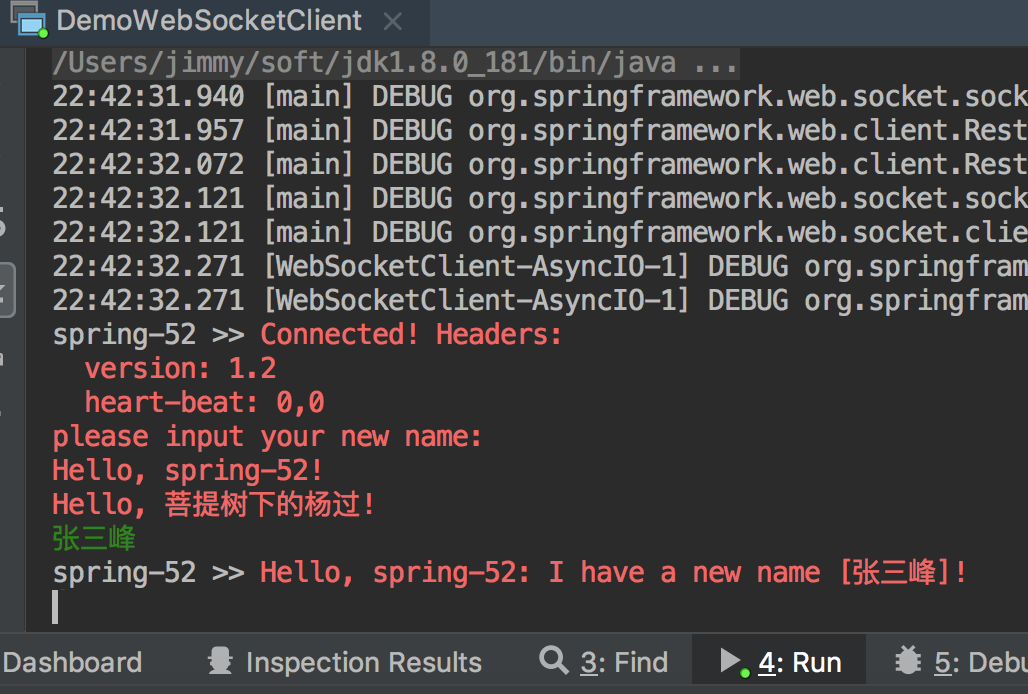
大致逻辑,就是先connect,连上后,就subscribe topic(订阅主题,这样就能收到其它人说的话),发送消息直接用session.send即可。
运行效果:
js客户端

java客户端:

附示例源代码下载:https://github.com/yjmyzz/spring-boot-websocket-sample
参考文章:
https://spring.io/guides/gs/messaging-stomp-websocket/
https://www.sitepoint.com/implementing-spring-websocket-server-and-client/
https://stackoverflow.com/questions/29386301/writing-a-client-to-connect-to-websocket-in-spring-boot