接上回继续,本文以我托管在bitbucket上的一个开源项目spring-boot-rest-framework做为演示,讲解如何创建自动化部署。
一、创建item

点击ok继续,item的详情页面很长,我们分成一段段来讲解,最上面这部分,除了名字要填写外,其它全留空即可

然后是源代码管理部分,这是一个git项目,先在Repository URL这里填写上项目的git地址(即:红字1的位置),bitbucket是需要用户名密码才能访问的,所以Credentials这里要选择相应的用户名、密码(即:红字2的部分),红字3的部分为git获取的源代码分支名称,一般为master主分支,也可以改成自己希望的分支。

可能有同学会问,红字1处的git地址怎么得到? 这个很简单,bitbucket网站项目右上角里就有,见下图:

另外,红字2处对应的下拉框,首次进来时,应该是空的,可点击右侧的Add,添加用户名,密码,见下图:

然后在Build的部分,点击Add Build Step下拉框

本文中的这个项目是maven项目,所以我们选择Invoke Maven3

然后输入maven构建必要的参数,参考下图:

然后保存,创建完成。
二、开始构建
保存后,系统会返回首页,每个项目旁边有一个小三角箭头,选择Build Now

稍等片刻,左侧就会出现一个进度条,表示正在Building...

点击这个进度条上的链接,会看到构建详情

继续点击进度条前的#x的序号,会看到左侧有一个Console Output

点击output,可以实时看到构建过程中的所有输出,内容大致如下:
SuccessConsole Output

Started by user 杨俊明
Building in workspace /Users/yjmyzz/.jenkins/workspace/spring-boot-rest-framework
 > git rev-parse --is-inside-work-tree # timeout=10
Fetching changes from the remote Git repository
 > git config remote.origin.url https://yangjunming@bitbucket.org/yangjunming/spring-boot-rest-framework.git # timeout=10
Fetching upstream changes from https://yangjunming@bitbucket.org/yangjunming/spring-boot-rest-framework.git
 > git --version # timeout=10
using .gitcredentials to set credentials
 > git config --local credential.username yangjunming@huijiame.com # timeout=10
 > git config --local credential.helper store --file=/var/folders/sk/2f7knc1518g57382y5s4zxsr0000gn/T/git8289517448278554241.credentials # timeout=10
 > git -c core.askpass=true fetch --tags --progress https://yangjunming@bitbucket.org/yangjunming/spring-boot-rest-framework.git +refs/heads/*:refs/remotes/origin/*
 > git config --local --remove-section credential # timeout=10
 > git rev-parse refs/remotes/origin/master^{commit} # timeout=10
 > git rev-parse refs/remotes/origin/origin/master^{commit} # timeout=10
Checking out Revision b9f197e3214a6af98a5b039912cf062997593116 (refs/remotes/origin/master)
 > git config core.sparsecheckout # timeout=10
 > git checkout -f b9f197e3214a6af98a5b039912cf062997593116
 > git rev-list b9f197e3214a6af98a5b039912cf062997593116 # timeout=10
Jenkins Artifactory Plugin version: 2.4.7
Artifactory integration is disabled
[spring-boot-rest-framework] $ /Library/Java/JavaVirtualMachines/jdk1.8.0_51.jdK/Contents/Home/bin/java -classpath /Users/yjmyzz/app/apache-maven-3.3.3/boot/plexus-classworlds-2.5.2.jar -Dmaven.home=/Users/yjmyzz/app/apache-maven-3.3.3 -Dclassworlds.conf=/Users/yjmyzz/app/apache-maven-3.3.3/bin/m2.conf -Dmaven.multiModuleProjectDirectory=/Users/yjmyzz/.jenkins/workspace/spring-boot-rest-framework/pom.xml org.codehaus.plexus.classworlds.launcher.Launcher -f pom.xml clean package -Dmaven.test.skip=true
[INFO] Scanning for projects...
[INFO]
[INFO] ------------------------------------------------------------------------
[INFO] Building spring-boot-rest-framework 1.0.0
[INFO] ------------------------------------------------------------------------
[INFO]
[INFO] --- maven-clean-plugin:2.5:clean (default-clean) @ spring-boot-rest-framework ---
[INFO] Deleting /Users/yjmyzz/.jenkins/workspace/spring-boot-rest-framework/target
[INFO]
[INFO] --- maven-resources-plugin:2.6:resources (default-resources) @ spring-boot-rest-framework ---
[INFO] Using 'UTF-8' encoding to copy filtered resources.
[INFO] Copying 1 resource
[INFO] Copying 2 resources
[INFO]
[INFO] --- maven-compiler-plugin:3.1:compile (default-compile) @ spring-boot-rest-framework ---
[INFO] Changes detected - recompiling the module!
[INFO] Compiling 20 source files to /Users/yjmyzz/.jenkins/workspace/spring-boot-rest-framework/target/classes
[WARNING] /Users/yjmyzz/.jenkins/workspace/spring-boot-rest-framework/src/main/java/spring/boot/rest/common/aop/ServiceMonitor.java: /Users/yjmyzz/.jenkins/workspace/spring-boot-rest-framework/src/main/java/spring/boot/rest/common/aop/ServiceMonitor.java uses unchecked or unsafe operations.
[WARNING] /Users/yjmyzz/.jenkins/workspace/spring-boot-rest-framework/src/main/java/spring/boot/rest/common/aop/ServiceMonitor.java: Recompile with -Xlint:unchecked for details.
[INFO]
[INFO] --- maven-resources-plugin:2.6:testResources (default-testResources) @ spring-boot-rest-framework ---
[INFO] Not copying test resources
[INFO]
[INFO] --- maven-compiler-plugin:3.1:testCompile (default-testCompile) @ spring-boot-rest-framework ---
[INFO] Not compiling test sources
[INFO]
[INFO] --- maven-surefire-plugin:2.18.1:test (default-test) @ spring-boot-rest-framework ---
[INFO] Tests are skipped.
[INFO]
[INFO] --- maven-jar-plugin:2.5:jar (default-jar) @ spring-boot-rest-framework ---
[INFO] Building jar: /Users/yjmyzz/.jenkins/workspace/spring-boot-rest-framework/target/spring-boot-rest-framework-1.0.0.jar
[INFO]
[INFO] --- spring-boot-maven-plugin:1.3.0.RELEASE:repackage (default) @ spring-boot-rest-framework ---
[INFO] ------------------------------------------------------------------------
[INFO] BUILD SUCCESS
[INFO] ------------------------------------------------------------------------
[INFO] Total time: 4.234 s
[INFO] Finished at: 2016-01-18T23:41:28+08:00
[INFO] Final Memory: 30M/273M
[INFO] ------------------------------------------------------------------------
Build step 'Invoke Maven 3' changed build result to SUCCES
Finished: SUCCESS
从输出内容可以看出构建的整个过程:先从git上拉取源码,然后调用maven命令进行构建。只不过这一切是在UI界面完成的,以后项目的Build工作就可以交由运维甚至测试人员直接来做了,程序员只管提交代码即可。
三、远程分发
编译成功只是第一步,接下来要将编译后的文件打包上传到远程服务器,通常在上传前会压缩一下,即节省带宽,也方便传输。

参考刚才添加maven参数的做法,再次点击Add build step,只不过这次选择Execute shell,即执行脚本,脚本内容如下:
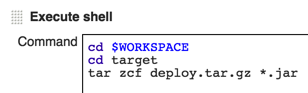
即:进入工作目录下的target目录,然后将编译后的jar包压缩成.tar.gz包,大家可以参考图中的命令自行调整。
接下来要上传到远程服务器,理论上讲,应该继续在上面的脚本里追加一行scp deploy.tar.gz user@remote_server:/remote_path之类的命令,大家可以尝试一下,最后执行时多半会报没有权限,原因是jenkins当前运行的账号通常不是root账号,权限不够。更好的做法是利用scp插件,以证书方式连接到远程服务器(具体配置请参考上节SSH相关的部分),参考下图:
在post-build actions下拉框里,选择Publish articifacts to SCP Repository

然后参考下图填写相应参数

然后保存,再次build,观察Console Output
...
Build step 'Invoke Maven 3' changed build result to SUCCESS
[spring-boot-rest-framework] $ /bin/bash -xe /var/folders/sk/2f7knc1518g57382y5s4zxsr0000gn/T/hudson5867298139164607521.sh
+ cd /Users/yjmyzz/.jenkins/workspace/spring-boot-rest-framework
+ cd target
+ tar zcf deploy.tar.gz spring-boot-rest-framework-1.0.0.jar
[SCP] Connecting to deploy
[SCP] uploading file: '/opt/deploy/deploy.tar.gz'
Finished: SUCCESS
从输出看,上传文件已经ok
四、远程应用重启
最后就是远程将上传文件解压,并启动应用,我们可以事先写一个shell脚本,放在服务器上(或者参考上一步的做法,用scp插件上传到服务器),脚本内容参考下面这样:
#!/bin/bash
export JAVA_HOME=/opt/app/jdk1.8.0_65
echo ${JAVA_HOME}
dir_base=/opt/deploy
cd ${dir_base}
echo 'deploying...'
if [ -r 'deploy.tar.gz'  ];then
  tar -zxvf deploy.tar.gz
fi
rm -rf *.gz
rm -rf ${dir_base}/logs
jar_name='spring-boot-rest-framework-1.0.0.jar'
if [ $(pgrep -f ${jar_name} | wc -l) -gt 0 ]; then
  pkill -9 -f ${jar_name}
fi
echo ${dir_base}/${jar_name}
nohup ${JAVA_HOME}/bin/java -jar ${dir_base}/${jar_name} >/dev/null 2>&1 &
sleep 2
echo 'ok!'
这段脚本的大概意思是,先检测指定目录下有无deploy.tar.gz文件,有的话就解压,本文中的项目是一个spring-boot的项目,解压开后就是一个可独立运行的jar包,然后先检测当前进程中是否已经在运行,如果有,则先kill掉进程,最后用nohup以后台方式运行jar包。假设该脚本文件名为deploy.sh,具备执行权限,我们可以在jenkins中通过插件远程调用它,参考下图的配置:
最后build下,还是观察console output的变化:
Build step 'Invoke Maven 3' changed build result to SUCCESS
[spring-boot-rest-framework] $ /bin/bash -xe /var/folders/sk/2f7knc1518g57382y5s4zxsr0000gn/T/hudson3712003549124736229.sh
+ cd /Users/yjmyzz/.jenkins/workspace/spring-boot-rest-framework
+ cd target
+ tar zcf deploy.tar.gz spring-boot-rest-framework-1.0.0.jar
[SCP] Connecting to deploy
[SCP] uploading file: '/opt/deploy/deploy.tar.gz'
SSH: Connecting from host [yangjunmingdeMacBook-Pro.local]
SSH: Connecting with configuration [deploy] ...
SSH: EXEC: STDOUT/STDERR from command [/opt/deploy/deploy.sh] ...
/opt/app/jdk1.8.0_65
deploying...
spring-boot-rest-framework-1.0.0.jar
tar: spring-boot-rest-framework-1.0.0.jar: time stamp 2016-01-20 22:52:15 is 143461.67416312 s in the future
/opt/deploy/spring-boot-rest-framework-1.0.0.jar
ok!
SSH: EXEC: completed after 2,230 ms
SSH: Disconnecting configuration [deploy] ...
SSH: Transferred 0 file(s)
Finished: SUCCESS
从第16行输出的ok来看,远程部署已经成功。
最后上一张图,大致描述了整个流程:
