事先说明
1.安装RocketMQ需要Java环境的支持
2.两主两从为了演示效果,就使用两台虚拟机
3.两条虚拟机的端口分别是
A:192.168.118.3
B:192.168.118.4
4.A机器是(A主)同时也是(B从),B机器是(B主)同时也是(A从)
1.下载安装包
1.官网下载
https://www.apache.org/dyn/closer.cgi?path=rocketmq/4.3.2/rocketmq-all-4.3.2-bin-release.zip
2.自己去找,看看版本合不合适
https://mirrors.tuna.tsinghua.edu.cn/apache/rocketmq/
2.上传和解压
创建存放压缩包的文件夹,上传压缩包到改文件夹下
cd /usr/local/

mkdir mytool

cd mytool
解压
#解压
unzip rocketmq-all-4.3.2-bin-release.zip
#删除文件夹
rm -rf rocketmq-all-4.3.2-bin-release.zip
#重命名
mv rocketmq-all-4.3.2-bin-release rocketmq4.3.2
3.创建持久化存储目录

按照命令执行就好了
mkdir store
cd store/
mkdir commitlog
mkdir consumequeue
mkdir index

mkdir ../store-s
cd ../store-s
mkdir commitlog
mkdir consumequeue
mkdir index
4.修改JVM参数
RocketMQ默认的JVM参数运行内存大,根据自身机器配置而言,多半是启动不成功的,所以要修改一下
找到bin目录下的这两个文件
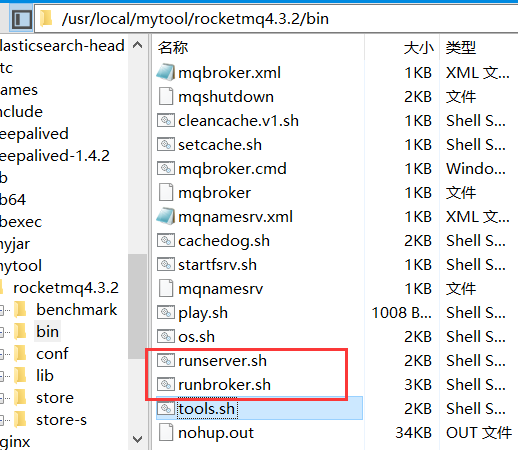
runserver.sh文件修改,将第一行注释更改为
#JAVA_OPT="${JAVA_OPT} -server -Xms4g -Xmx4g -Xmn2g -XX:MetaspaceSize=128m -XX:MaxMetaspaceSize=320m"
JAVA_OPT="${JAVA_OPT} -server -Xms256m -Xmx256m -Xmn512m -XX:MetaspaceSize=128m -XX:MaxMetaspaceSize=320m"
runbroker.sh文件修改,将第一行注释更改为
#JAVA_OPT="${JAVA_OPT} -server -Xms8g -Xmx8g -Xmn4g"
JAVA_OPT="${JAVA_OPT} -server -Xms256m -Xmx256m -Xmn128m"
-------------------------------------------------------------上面的操作两条机器都要做相同的操作------------------------------------------------------------------------------
所有要修改的文件都在一个目录下,一台机器只用改两个
A改-a和-b-s,B改-b和-a-s
/usr/local/mytool/rocketmq4.3.2/conf/2m-2s-async
5.A机器配置文件修改
broker-a.properties
#所属集群名称,如果多个master,那么每个master配置的名称应该一致,要不然识别不了
brokerClusterName=rocketmq-cluster
#broker名称
brokerName=broker-a
#0 表示master,>0 表示slave
brokerId=0
#nameServer地址,分号隔开
namesrvAddr=192.168.118.3:9876;192.168.118.4:9876
#在发送消息时,自动创建服务器不存在的topic,默认创建的队列数
defaultTopicQueueNums=4
#是否允许broker自动创建topic,建议线下开启,线上关闭
autoCreateTopicEnable=true
#是否允许broker自动创建订阅组,建议线下开始,线上关闭
autoCreateSubscriptionGroup=true
#broker对外服务的监听端口,
#同一台机器部署多个broker,端口号要不同,且端口号之间要相距大些
listenPort=10911
#删除文件的时间节点,默认凌晨4点
deleteWhen=04
#文件保留时间,默认48小时
fileReservedTime=120
#commitLog每个文件的大小,默认大小1g
mapedFileSizeCommitLog=1073741824
#consumeQueue每个文件默认存30w条,根据自身业务进行调整
mapedFileSizeConsumeQueue=300000
destroyMapedFileInterval=120000
redeleteHangedFileInterval=120000
#检查物理文件磁盘空间
diskMaxUsedSpaceRatio=88
#store存储路径,master与slave目录要不同
storePathRootDir=/usr/local/mytool/rocketmq4.3.2/store
storePathCommitLog=/usr/local/mytool/rocketmq4.3.2/store/commitlog
#限制的消息大小
maxMessageSize=65536
flushCommitLogLeastPages=4
flushConsumeQueueLeastPages=2
flushCommitLogThoroughInterval=10000
flushConsumeQueueThoroughInterval=60000
checkTransactionMessageEnable=false
#发消息线程池数
sendMessageThreadPoolNums=128
#拉去消息线程池数
pullMessageThreadPoolNums=128
#broker角色:
#ASYSC_MASTER 异步复制master
#SYSC_MASTER 同步复制master
#SLAVE 从
brokerRole=SYSC_MASTER
#刷盘方式
#ASYNC_FLUSH 异步刷盘
#SYNC_FLUSH 同步刷盘
flushDiskType=ASYNC_FLUSH
broker-b-s.properties
brokerClusterName=rocketmq-cluster
brokerName=broker-b
#0 -> master ,>0 -> slave
brokerId=1
namesrvAddr=192.168.118.3:9876;192.168.118.4:9876
defaultTopicQueueNums=4
autoCreateTopicEnable=true
autoCreateSubscriptionGroup=true
listenPort=10950
deleteWhen=04
fileReservedTime=120
mapedFileSizeCommitLog=1073741824
mapedFileSizeConsumeQueue=300000
destroyMapedFileInterval=120000
redeleteHangedFileInterval=120000
diskMaxUsedSpaceRatio=88
storePathRootDir=/usr/local/mytool/rocketmq4.3.2/store-s
storePathCommitLog=/usr/local/mytool/rocketmq4.3.2/store-s/commitlog
maxMessageSize=65536
flushCommitLogLeastPages=4
flushConsumeQueueLeastPages=2
flushCommitLogThoroughInterval=10000
flushConsumeQueueThoroughInterval=60000
checkTransactionMessageEnable=false
sendMessageThreadPoolNums=128
pullMessageThreadPoolNums=128
brokerRole=SLAVE
flushDiskType=ASYNC_FLUSH
A机器的broker-a-s.properties和broker-b.properties其余两个文件不用管
6.B机器配置文件修改
broker-b.properties
brokerClusterName=rocketmq-cluster
brokerName=broker-b
brokerId=0
namesrvAddr=192.168.118.3:9876;192.168.118.4:9876
defaultTopicQueueNums=4
autoCreateTopicEnable=true
autoCreateSubscriptionGroup=true
listenPort=10911
deleteWhen=04
fileReservedTime=120
mapedFileSizeCommitLog=1073741824
mapedFileSizeConsumeQueue=300000
destroyMapedFileInterval=120000
redeleteHangedFileInterval=120000
diskMaxUsedSpaceRatio=88
storePathRootDir=/usr/local/mytool/rocketmq4.3.2/store
storePathCommitLog=/usr/local/mytool/rocketmq4.3.2/store/commitlog
maxMessageSize=65536
flushCommitLogLeastPages=4
flushConsumeQueueLeastPages=2
flushCommitLogThoroughInterval=10000
flushConsumeQueueThoroughInterval=60000
checkTransactionMessageEnable=false
sendMessageThreadPoolNums=128
pullMessageThreadPoolNums=128
brokerRole=SYSC_MASTER
flushDiskType=ASYNC_FLUSH
broker-a-s.properties
brokerClusterName=rocketmq-cluster
brokerName=broker-a
brokerId=1
namesrvAddr=192.168.118.3:9876;192.168.118.4:9876
defaultTopicQueueNums=4
autoCreateTopicEnable=true
autoCreateSubscriptionGroup=true
listenPort=10950
deleteWhen=04
fileReservedTime=120
mapedFileSizeCommitLog=1073741824
mapedFileSizeConsumeQueue=300000
destroyMapedFileInterval=120000
redeleteHangedFileInterval=120000
diskMaxUsedSpaceRatio=88
storePathRootDir=/usr/local/mytool/rocketmq4.3.2/store-s
storePathCommitLog=/usr/local/mytool/rocketmq4.3.2/store-s/commitlog
maxMessageSize=65536
flushCommitLogLeastPages=4
flushConsumeQueueLeastPages=2
flushCommitLogThoroughInterval=10000
flushConsumeQueueThoroughInterval=60000
checkTransactionMessageEnable=false
sendMessageThreadPoolNums=128
pullMessageThreadPoolNums=128
brokerRole=SLAVE
flushDiskType=ASYNC_FLUSH
7.开始启动
1.先分别启动两台机器的NameServer
切换到bin目录下
cd /usr/local/mytool/rocketmq4.3.2/bin
#启动nameser
nohup sh mqnamesrv &
2.按照顺序启动borker
#A机器
nohup sh mqbroker -c /usr/local/mytool/rocketmq4.3.2/conf/2m-2s-async/broker-a.properties &
#B机器
nohup sh mqbroker -c /usr/local/mytool/rocketmq4.3.2/conf/2m-2s-async/broker-b.properties &
#A机器
nohup sh mqbroker -c /usr/local/mytool/rocketmq4.3.2/conf/2m-2s-async/broker-b-s.properties &
#B机器
nohup sh mqbroker -c /usr/local/mytool/rocketmq4.3.2/conf/2m-2s-async/broker-a-s.properties &
3.常用命令
1.查看nameServer进程
ps -ef | grep mqnamesrv
正常启动情况

2.查看broker进程
ps -ef | grep mqbroker
正常启动情况

也可以用jps命令进行查看
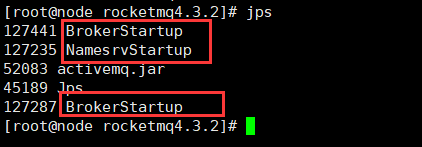
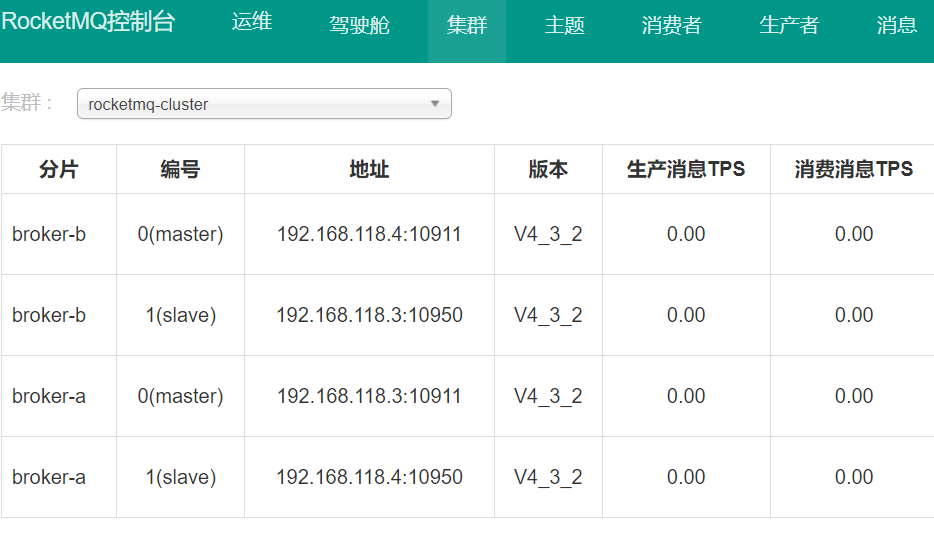
打开RocketMQ的控制台进行查看,如下图就代表已经配置完成
8.控制台配置
1.控制台工程下载地址
https://github.com/apache/rocketmq-externals

2.将下载到本机后的工程解压
进入下面的目录
rocketmq-externals
ocketmq-consolesrcmain
esources
修改application.properties配置文件
也可以修改他的端口号,默认就是8080

windows中打开命令提示符,切换到此目录下
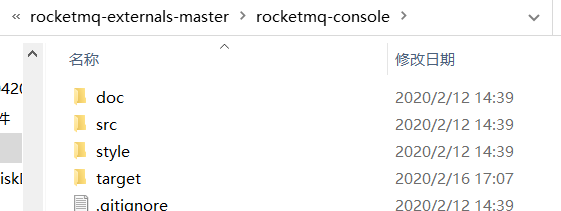
执行打包命令
mvn clean package -Dmaven.test.skip=true
之后会生成上图编译之后的target目录
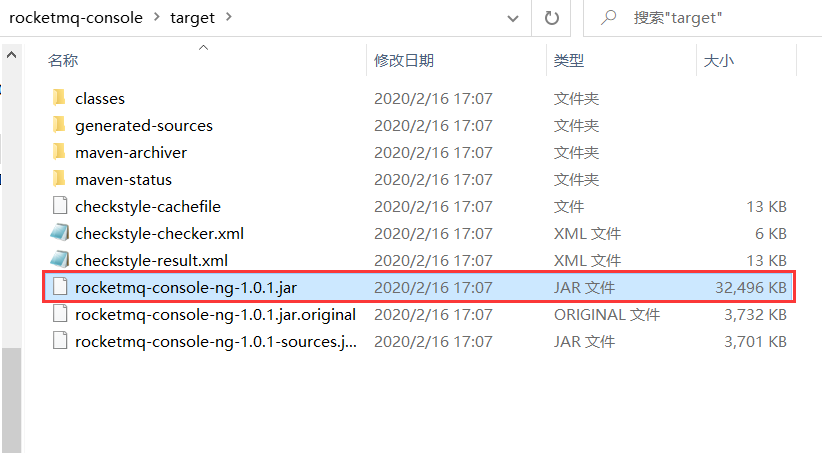
将rocketmq-console-ng-1.0.1.jar上传到任意一个有java环境的虚拟机上
在虚拟机此jar的目录中执行
java -jar rocketmq-console-ng-1.0.1.jar
用浏览器访问此虚拟机的ip加上端口进行访问
所有虚拟机的防火墙都是关闭的,否在无法进行请求和通讯