运维监控-使用Zabbix Server 监控自定义 item
作者:尹正杰
版权声明:原创作品,谢绝转载!否则将追究法律责任。
本篇博客就直接开门见山如何使用Zabbix Server 监控自定义item,其实这个案例我之前在用zabbix3.0时分享过。在zabbix 4.0版本上用法几乎一样。关于 Zabbix Server 和 Zabbix Agent 端的部署我这里就不废话。
一.在Zabbix Agent端编写自定义监控项
1>.查看默认的zabbix agent的item模板
[root@node102 ~]# cd /etc/zabbix/zabbix_agentd.d/                    #我们将自定义的zabbix 的item放在该目录下!
[root@node102 zabbix_agentd.d]#
[root@node102 zabbix_agentd.d]# ll
total 4
-rw-r--r--. 1 root root 1531 Feb  4 02:03 userparameter_mysql.conf
[root@node102 zabbix_agentd.d]#
[root@node102 zabbix_agentd.d]# tail -2 userparameter_mysql.conf
UserParameter=mysql.ping,HOME=/var/lib/zabbix mysqladmin ping | grep -c alive
UserParameter=mysql.version,mysql -V
[root@node102 zabbix_agentd.d]#
[root@node102 zabbix_agentd.d]#
2>.自定义zabbix agent 的item项
[root@node102 zabbix_agentd.d]# pwd
/etc/zabbix/zabbix_agentd.d
[root@node102 zabbix_agentd.d]#
[root@node102 zabbix_agentd.d]# cat monitor_file.conf             #自定义监控项目
#Add by yinzhengjie
UserParameter=monitor_filesize,stat -c %s /etc/services
[root@node102 zabbix_agentd.d]#
[root@node102 zabbix_agentd.d]#
[root@node102 zabbix_agentd.d]# systemctl restart zabbix-agent        #修改了上述的配置文件切记要重启服务!
[root@node102 zabbix_agentd.d]#
[root@node102 zabbix_agentd.d]#
[root@node102 zabbix_agentd.d]# ss -ntl | grep 10050
LISTEN     0      128          *:10050                    *:*
LISTEN     0      128         :::10050                   :::*
[root@node102 zabbix_agentd.d]#
[root@node102 zabbix_agentd.d]#
3>.检查监控项(item)是否生效

[root@node101 ~]# yum  -y install zabbix-get.x86_64
Loaded plugins: fastestmirror
Loading mirror speeds from cached hostfile
 * base: mirrors.tuna.tsinghua.edu.cn
 * extras: mirrors.tuna.tsinghua.edu.cn
 * updates: mirrors.tuna.tsinghua.edu.cn
Resolving Dependencies
--> Running transaction check
---> Package zabbix-get.x86_64 0:4.0.4-1.el7 will be installed
--> Finished Dependency Resolution

Dependencies Resolved

====================================================================================================================================================================
 Package                                  Arch                                 Version                                   Repository                            Size
====================================================================================================================================================================
Installing:
 zabbix-get                               x86_64                               4.0.4-1.el7                               zabbix                               277 k

Transaction Summary
====================================================================================================================================================================
Install  1 Package

Total download size: 277 k
Installed size: 1.1 M
Downloading packages:
zabbix-get-4.0.4-1.el7.x86_64.rpm                                                                                                            | 277 kB  00:00:00
Running transaction check
Running transaction test
Transaction test succeeded
Running transaction
  Installing : zabbix-get-4.0.4-1.el7.x86_64                                                                                                                    1/1
  Verifying  : zabbix-get-4.0.4-1.el7.x86_64                                                                                                                    1/1

Installed:
  zabbix-get.x86_64 0:4.0.4-1.el7

Complete!
[root@node101 ~]#
[root@node101 ~]# hostname
node101.yinzhengjie.org.cn
[root@node101 ~]#
[root@node101 ~]# zabbix_get -s node102.yinzhengjie.org.cn -k monitor_filesize            #发现我们可以获取到相应的数据啦!说明配置生效了!
670293
[root@node101 ~]#
二.在zabbix添加自定义item的监控
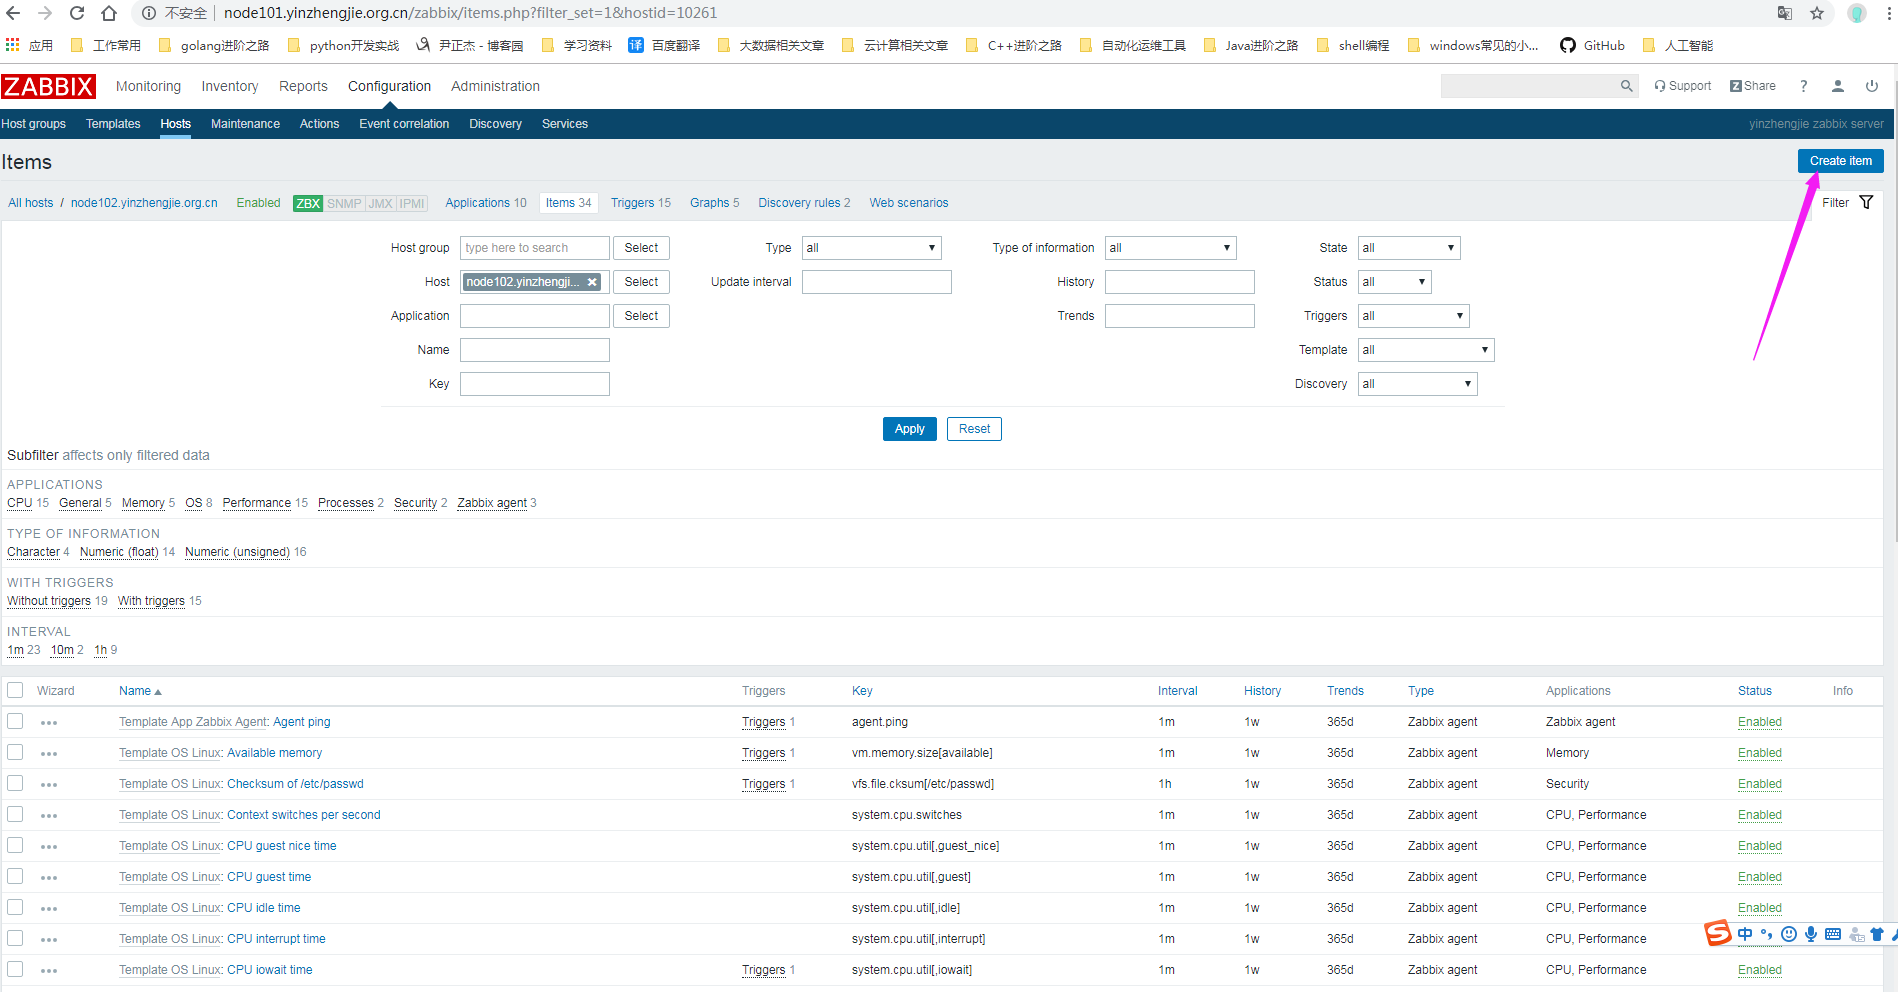
1>.如下图所示,找到已经监控的我们上面配置的zabbix agent自定义监控项的主机中的item(如果主机未被监控,我们自己监控一下即可!)

2>.点击创建item
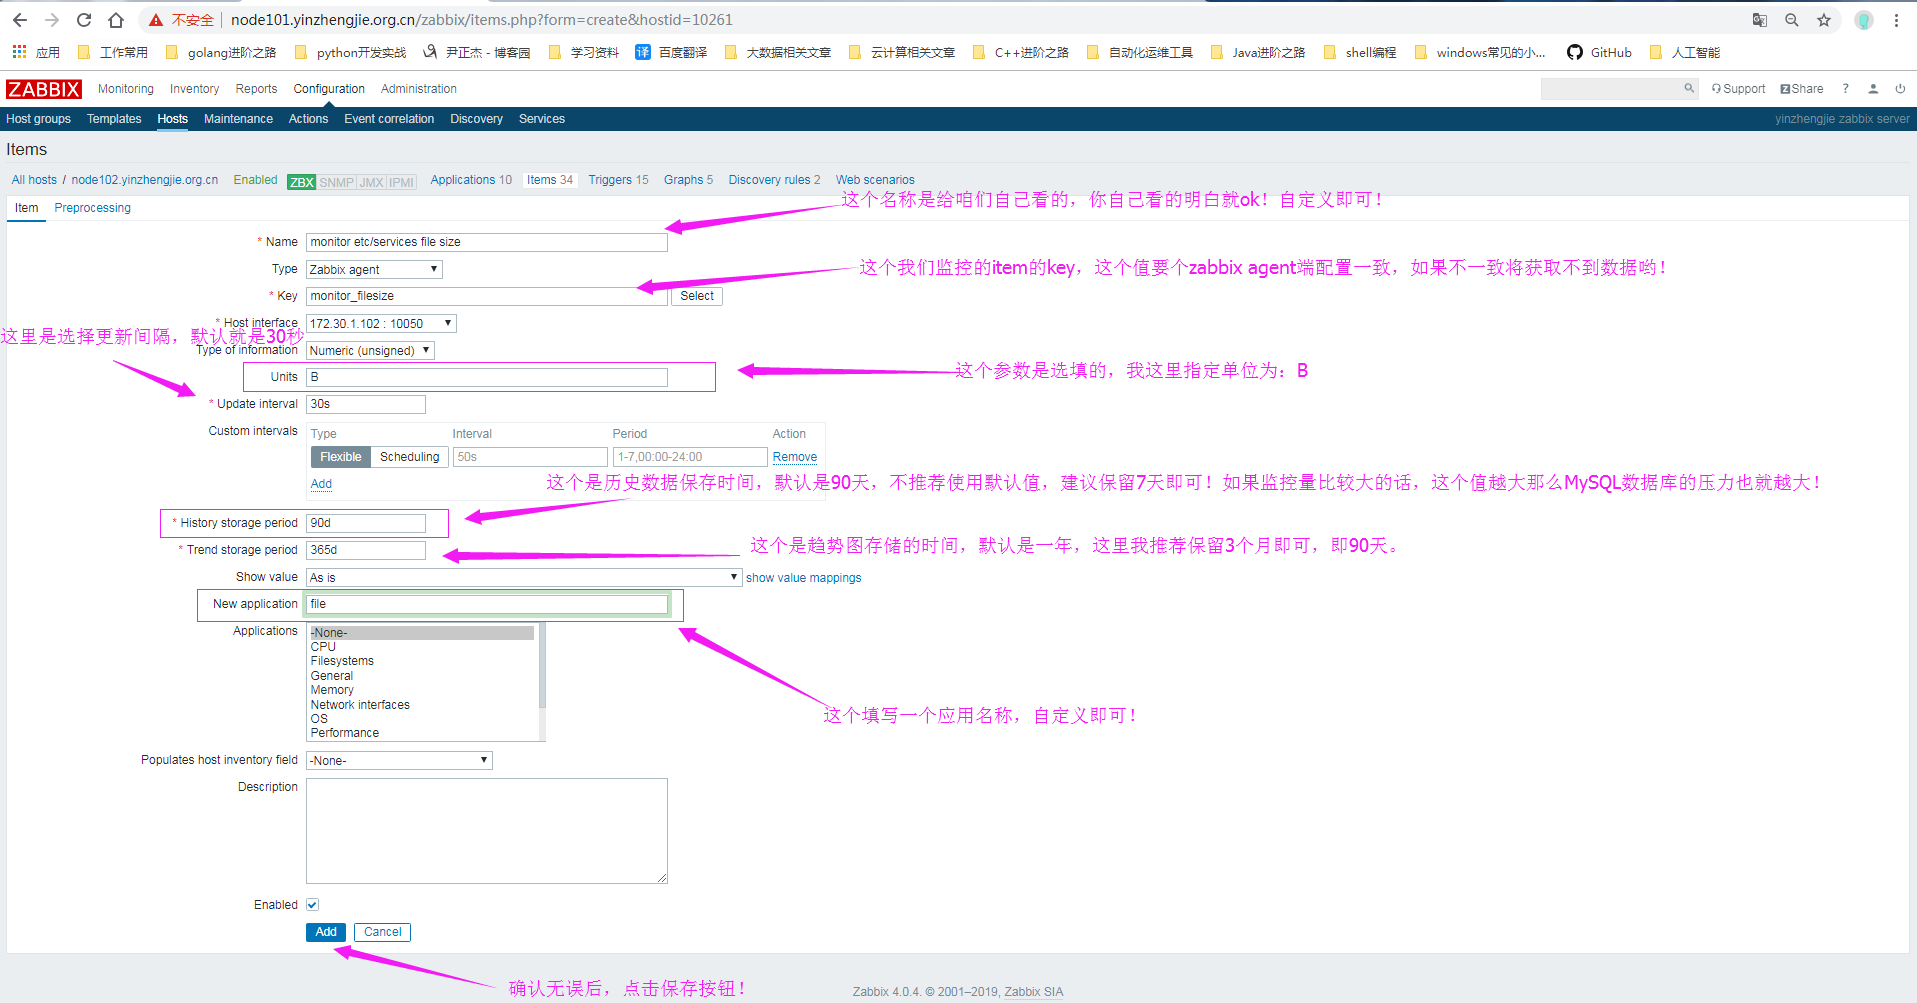
3>.添加自定义item
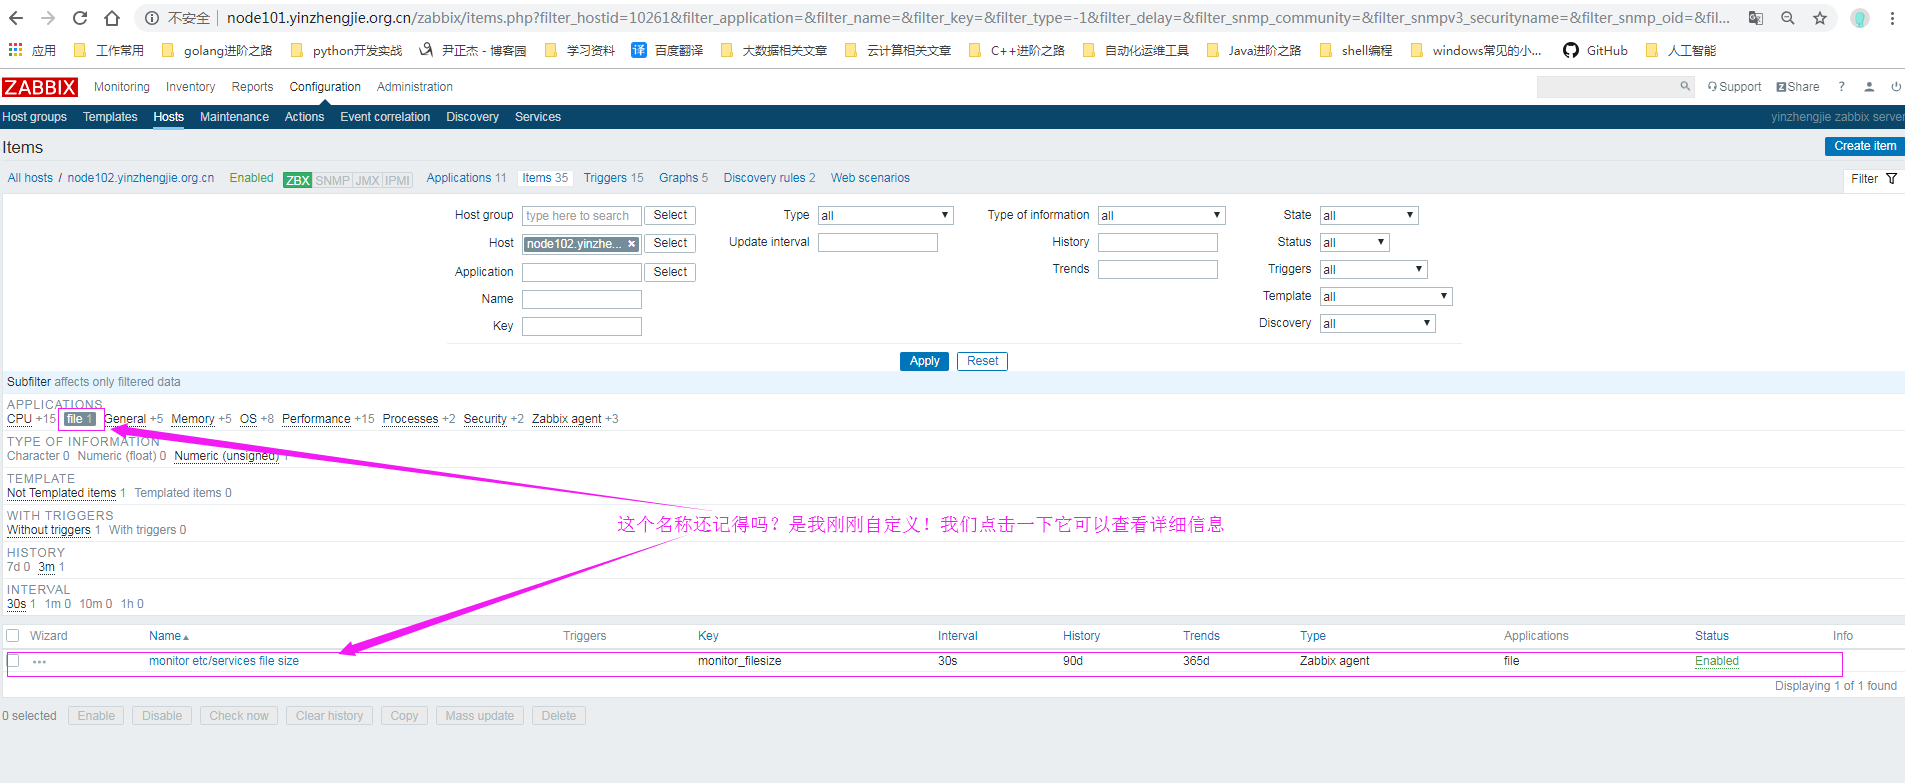
4>.item添加完成
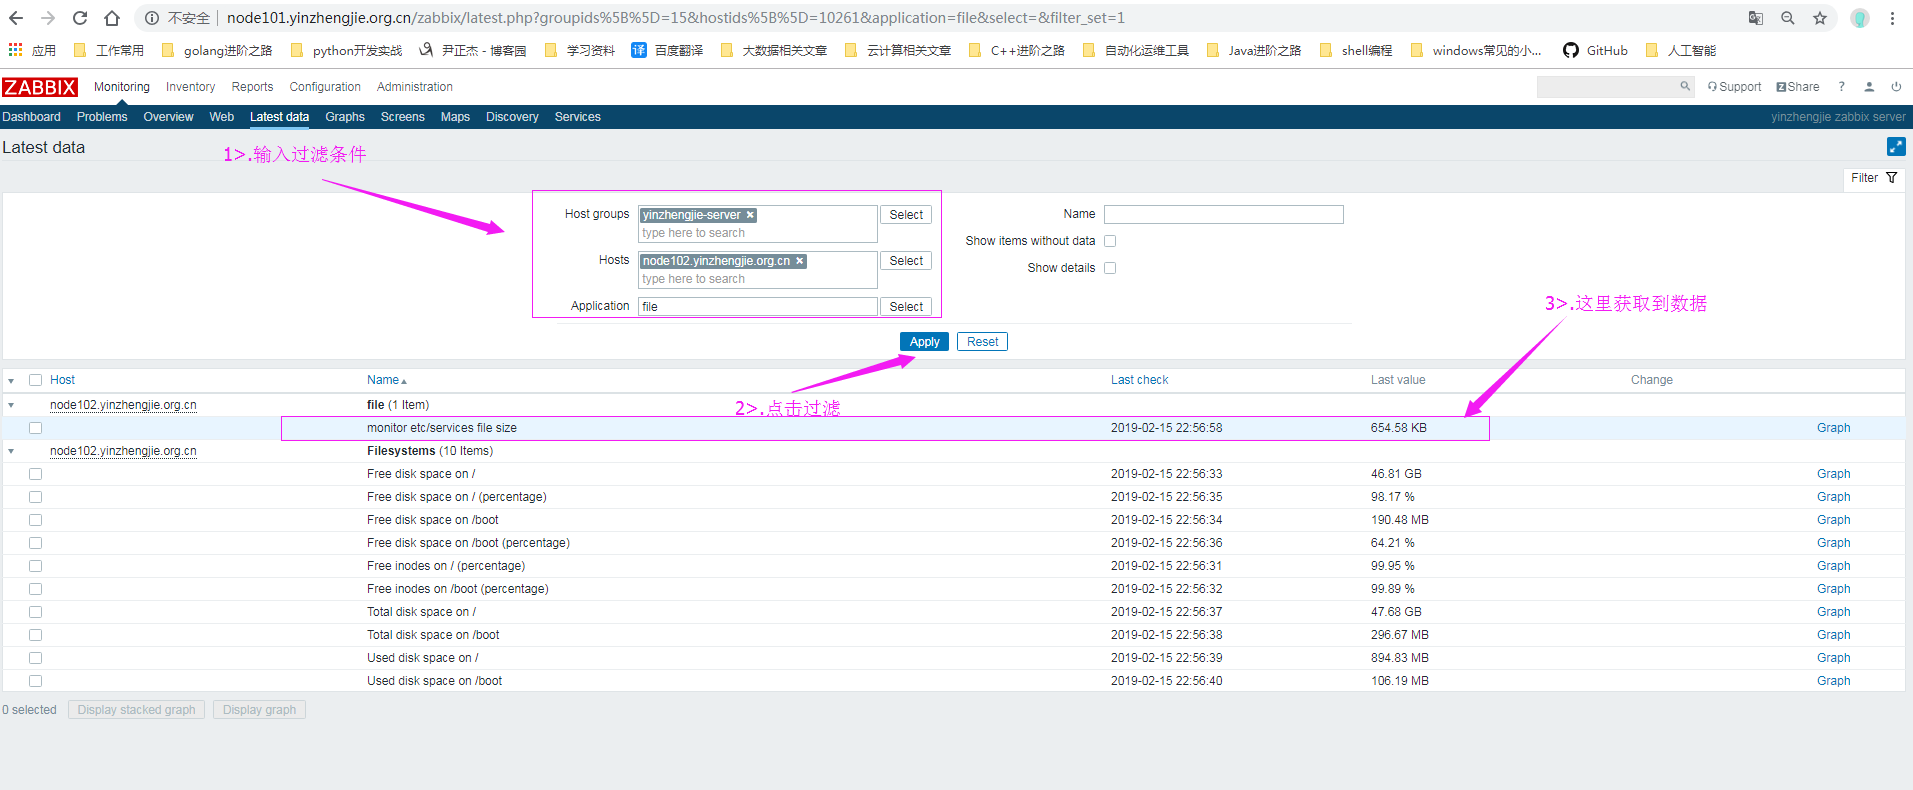
5>.添加item完成后,需要确认是否获取到数据
三.监控httpd服务的80端口
1>.在zabbix agent 安装http并启动

[root@node102 ~]# yum -y install httpd
Loaded plugins: fastestmirror
Loading mirror speeds from cached hostfile
 * base: mirrors.aliyun.com
 * extras: mirrors.aliyun.com
 * updates: mirrors.163.com
Resolving Dependencies
--> Running transaction check
---> Package httpd.x86_64 0:2.4.6-88.el7.centos will be installed
--> Processing Dependency: httpd-tools = 2.4.6-88.el7.centos for package: httpd-2.4.6-88.el7.centos.x86_64
--> Processing Dependency: /etc/mime.types for package: httpd-2.4.6-88.el7.centos.x86_64
--> Processing Dependency: libaprutil-1.so.0()(64bit) for package: httpd-2.4.6-88.el7.centos.x86_64
--> Processing Dependency: libapr-1.so.0()(64bit) for package: httpd-2.4.6-88.el7.centos.x86_64
--> Running transaction check
---> Package apr.x86_64 0:1.4.8-3.el7_4.1 will be installed
---> Package apr-util.x86_64 0:1.5.2-6.el7 will be installed
---> Package httpd-tools.x86_64 0:2.4.6-88.el7.centos will be installed
---> Package mailcap.noarch 0:2.1.41-2.el7 will be installed
--> Finished Dependency Resolution

Dependencies Resolved

====================================================================================================================================================================
 Package                                 Arch                               Version                                          Repository                        Size
====================================================================================================================================================================
Installing:
 httpd                                   x86_64                             2.4.6-88.el7.centos                              base                             2.7 M
Installing for dependencies:
 apr                                     x86_64                             1.4.8-3.el7_4.1                                  base                             103 k
 apr-util                                x86_64                             1.5.2-6.el7                                      base                              92 k
 httpd-tools                             x86_64                             2.4.6-88.el7.centos                              base                              90 k
 mailcap                                 noarch                             2.1.41-2.el7                                     base                              31 k

Transaction Summary
====================================================================================================================================================================
Install  1 Package (+4 Dependent packages)

Total download size: 3.0 M
Installed size: 10 M
Downloading packages:
warning: /var/cache/yum/x86_64/7/base/packages/apr-util-1.5.2-6.el7.x86_64.rpm: Header V3 RSA/SHA256 Signature, key ID f4a80eb5: NOKEY.0 B/s |    0 B  --:--:-- ETA
Public key for apr-util-1.5.2-6.el7.x86_64.rpm is not installed
(1/5): apr-util-1.5.2-6.el7.x86_64.rpm                                                                                                       |  92 kB  00:00:00
(2/5): apr-1.4.8-3.el7_4.1.x86_64.rpm                                                                                                        | 103 kB  00:00:00
(3/5): mailcap-2.1.41-2.el7.noarch.rpm                                                                                                       |  31 kB  00:00:00
(4/5): httpd-tools-2.4.6-88.el7.centos.x86_64.rpm                                                                                            |  90 kB  00:00:00
(5/5): httpd-2.4.6-88.el7.centos.x86_64.rpm                                                                                                  | 2.7 MB  00:00:02
--------------------------------------------------------------------------------------------------------------------------------------------------------------------
Total                                                                                                                               1.5 MB/s | 3.0 MB  00:00:02
Retrieving key from file:///etc/pki/rpm-gpg/RPM-GPG-KEY-CentOS-7
Importing GPG key 0xF4A80EB5:
 Userid     : "CentOS-7 Key (CentOS 7 Official Signing Key) <security@centos.org>"
 Fingerprint: 6341 ab27 53d7 8a78 a7c2 7bb1 24c6 a8a7 f4a8 0eb5
 Package    : centos-release-7-2.1511.el7.centos.2.10.x86_64 (@anaconda)
 From       : /etc/pki/rpm-gpg/RPM-GPG-KEY-CentOS-7
Running transaction check
Running transaction test
Transaction test succeeded
Running transaction
  Installing : apr-1.4.8-3.el7_4.1.x86_64                                                                                                                       1/5
  Installing : apr-util-1.5.2-6.el7.x86_64                                                                                                                      2/5
  Installing : httpd-tools-2.4.6-88.el7.centos.x86_64                                                                                                           3/5
  Installing : mailcap-2.1.41-2.el7.noarch                                                                                                                      4/5
  Installing : httpd-2.4.6-88.el7.centos.x86_64                                                                                                                 5/5
  Verifying  : httpd-tools-2.4.6-88.el7.centos.x86_64                                                                                                           1/5
  Verifying  : apr-1.4.8-3.el7_4.1.x86_64                                                                                                                       2/5
  Verifying  : mailcap-2.1.41-2.el7.noarch                                                                                                                      3/5
  Verifying  : httpd-2.4.6-88.el7.centos.x86_64                                                                                                                 4/5
  Verifying  : apr-util-1.5.2-6.el7.x86_64                                                                                                                      5/5

Installed:
  httpd.x86_64 0:2.4.6-88.el7.centos

Dependency Installed:
  apr.x86_64 0:1.4.8-3.el7_4.1         apr-util.x86_64 0:1.5.2-6.el7         httpd-tools.x86_64 0:2.4.6-88.el7.centos         mailcap.noarch 0:2.1.41-2.el7

Complete!
[root@node102 ~]#
[root@node102 ~]#
[root@node102 ~]#
[root@node102 ~]# systemctl start httpd
[root@node102 ~]#
[root@node102 ~]# systemctl status httpd
● httpd.service - The Apache HTTP Server
   Loaded: loaded (/usr/lib/systemd/system/httpd.service; disabled; vendor preset: disabled)
   Active: active (running) since Fri 2019-02-15 07:08:29 PST; 6s ago
     Docs: man:httpd(8)
           man:apachectl(8)
 Main PID: 9887 (httpd)
   Status: "Processing requests..."
   CGroup: /system.slice/httpd.service
           ├─9887 /usr/sbin/httpd -DFOREGROUND
           ├─9888 /usr/sbin/httpd -DFOREGROUND
           ├─9889 /usr/sbin/httpd -DFOREGROUND
           ├─9890 /usr/sbin/httpd -DFOREGROUND
           ├─9891 /usr/sbin/httpd -DFOREGROUND
           └─9892 /usr/sbin/httpd -DFOREGROUND

Feb 15 07:08:29 node102.yinzhengjie.org.cn systemd[1]: Starting The Apache HTTP Server...
Feb 15 07:08:29 node102.yinzhengjie.org.cn systemd[1]: Started The Apache HTTP Server.
[root@node102 ~]#
[root@node102 ~]#
[root@node102 ~]# systemctl enable httpd
Created symlink from /etc/systemd/system/multi-user.target.wants/httpd.service to /usr/lib/systemd/system/httpd.service.
[root@node102 ~]#
[root@node102 ~]#
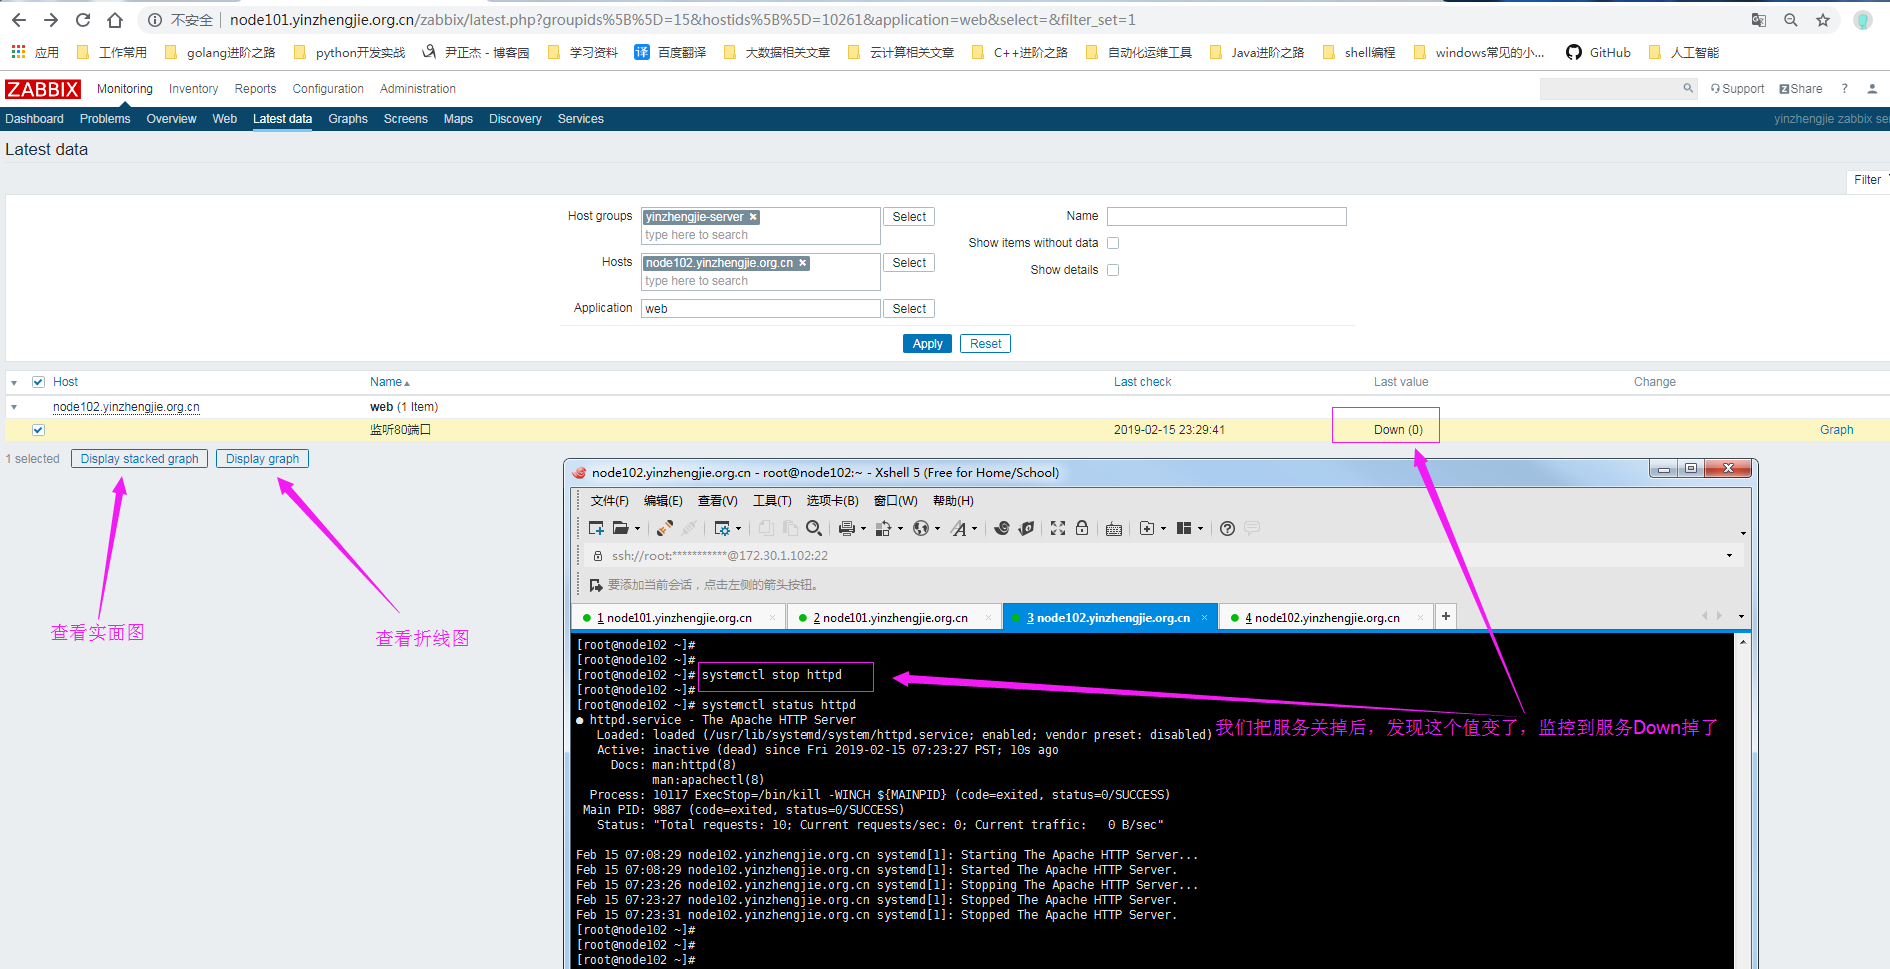
2>.在zabbix server进行监控

3>.停掉httpd服务,观察监控到的值
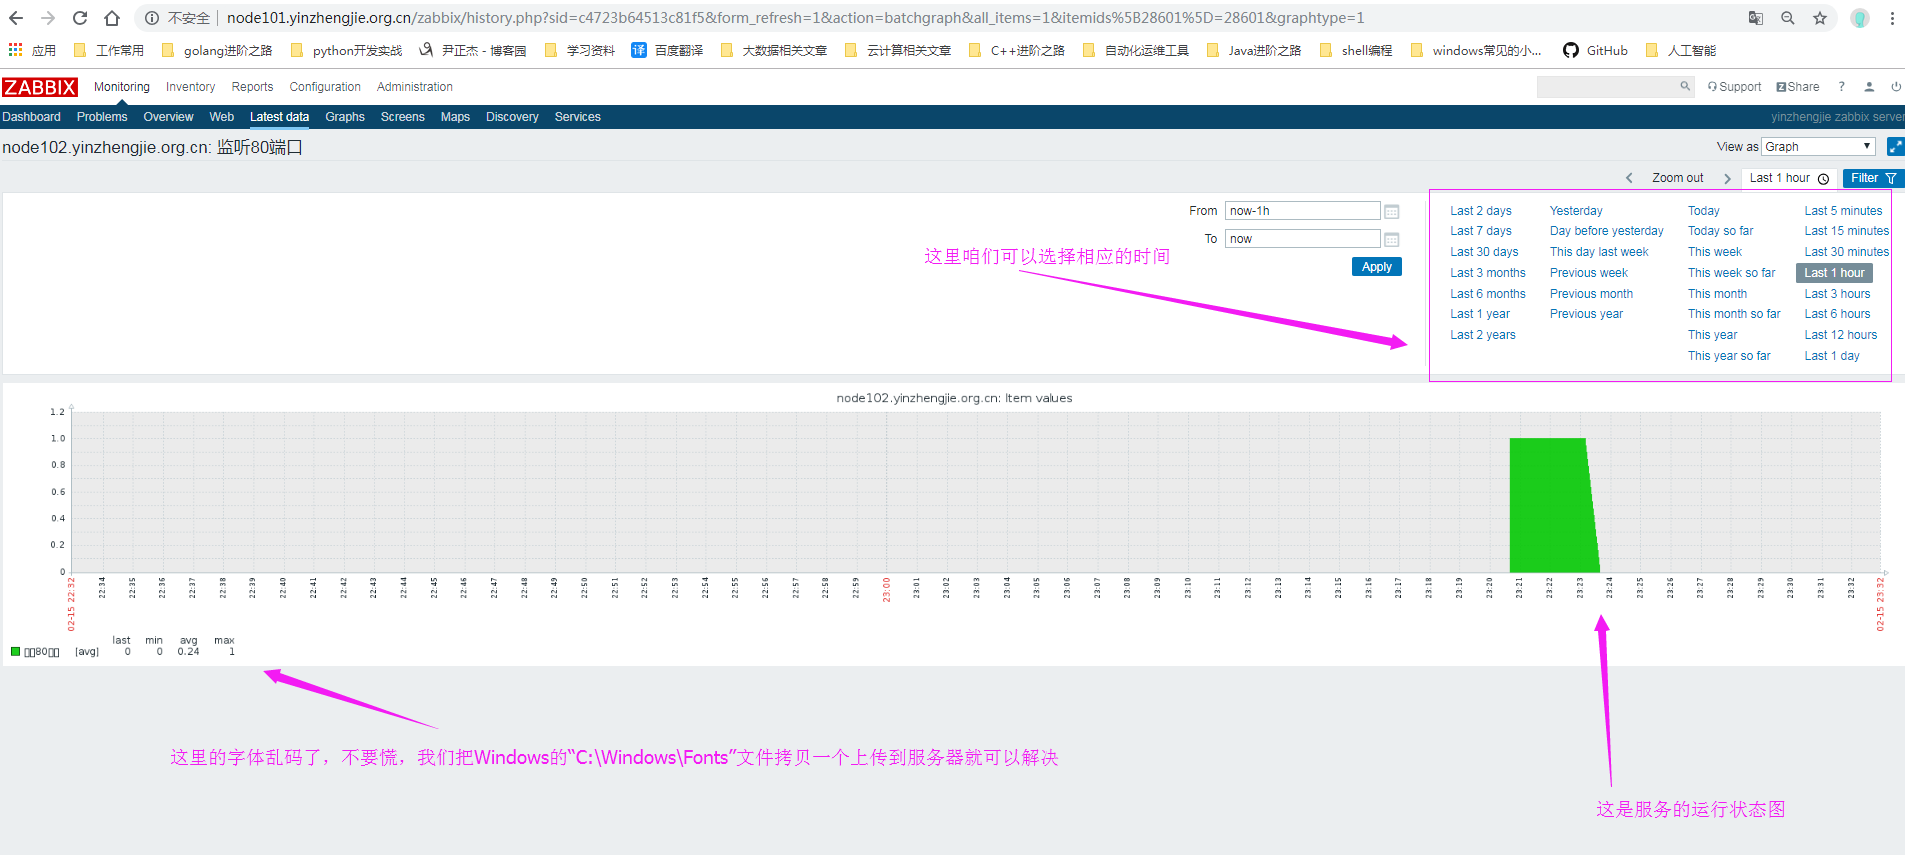
4>.查看监控的图像(解决中文乱码问题)

[root@node101 fonts]# yum -y install lrzsz
Loaded plugins: fastestmirror
Loading mirror speeds from cached hostfile
 * base: mirrors.tuna.tsinghua.edu.cn
 * extras: mirrors.tuna.tsinghua.edu.cn
 * updates: mirrors.tuna.tsinghua.edu.cn
Resolving Dependencies
--> Running transaction check
---> Package lrzsz.x86_64 0:0.12.20-36.el7 will be installed
--> Finished Dependency Resolution

Dependencies Resolved

====================================================================================================================================================================
 Package                              Arch                                  Version                                       Repository                           Size
====================================================================================================================================================================
Installing:
 lrzsz                                x86_64                                0.12.20-36.el7                                base                                 78 k

Transaction Summary
====================================================================================================================================================================
Install  1 Package

Total download size: 78 k
Installed size: 181 k
Downloading packages:
lrzsz-0.12.20-36.el7.x86_64.rpm                                                                                                              |  78 kB  00:00:00
Running transaction check
Running transaction test
Transaction test succeeded
Running transaction
  Installing : lrzsz-0.12.20-36.el7.x86_64                                                                                                                      1/1
  Verifying  : lrzsz-0.12.20-36.el7.x86_64                                                                                                                      1/1

Installed:
  lrzsz.x86_64 0:0.12.20-36.el7

Complete!
[root@node101 fonts]#
[root@node101 fonts]#
[root@node101 fonts]# pwd        #zabbix存放字体的路径!
/usr/share/zabbix/fonts
[root@node101 fonts]#
[root@node101 fonts]# ls
graphfont.ttf
[root@node101 fonts]#
[root@node101 fonts]# ll
total 0
lrwxrwxrwx. 1 root root 33 Feb 15 05:43 graphfont.ttf -> /etc/alternatives/zabbix-web-font
[root@node101 fonts]#
[root@node101 fonts]#
[root@node101 fonts]# ls
graphfont.ttf  simkai.ttf
[root@node101 fonts]#
[root@node101 fonts]# rz

[root@node101 fonts]#
[root@node101 fonts]# mv simkai.ttf graphfont.ttf
[root@node101 fonts]#
[root@node101 fonts]# ll
total 11512
-rw-r--r--. 1 root root 11785184 Jun 10  2009 graphfont.ttf
[root@node101 fonts]#
只需要将Windows的机器字体上传到服务器上并替换即可让字体显示正常。

5>.
6>.
