运维监控-基于yum的方式部署 Zabbix Agent 4.0 版本
作者:尹正杰
版权声明:原创作品,谢绝转载!否则将追究法律责任。
上一篇博客我们分享了如何基于yum的方式部署zabbix 4.0.0版本。接下来,我们就监控其他主机的item项吧。
一.在需要监控的主机上部署zabbix-agent服务
1>.安装zabbix-agent


[root@node102 ~]# rpm -Uvh https://repo.zabbix.com/zabbix/4.0/rhel/7/x86_64/zabbix-release-4.0-1.el7.noarch.rpm
Retrieving https://repo.zabbix.com/zabbix/4.0/rhel/7/x86_64/zabbix-release-4.0-1.el7.noarch.rpm
warning: /var/tmp/rpm-tmp.pYEOk0: Header V4 RSA/SHA512 Signature, key ID a14fe591: NOKEY
Preparing...                          ################################# [100%]
Updating / installing...
   1:zabbix-release-4.0-1.el7         ################################# [100%]
[root@node102 ~]#
[root@node102 ~]#
[root@node102 ~]# cat /etc/yum.repos.d/zabbix.repo
[zabbix]
name=Zabbix Official Repository - $basearch
baseurl=https://mirrors.aliyun.com/zabbix/zabbix/4.0/rhel/7/$basearch/
enabled=1
gpgcheck=1
gpgkey=file:///etc/pki/rpm-gpg/RPM-GPG-KEY-ZABBIX-A14FE591

[zabbix-non-supported]
name=Zabbix Official Repository non-supported - $basearch
baseurl=https://mirrors.aliyun.com/zabbix/non-supported/rhel/7/$basearch/
enabled=1
gpgkey=file:///etc/pki/rpm-gpg/RPM-GPG-KEY-ZABBIX
gpgcheck=1
[root@node102 ~]#
[root@node102 ~]# yum -y install zabbix-agent
Loaded plugins: fastestmirror
zabbix                                                                                                          | 2.9 kB  00:00:00
zabbix-non-supported                                                                                            |  951 B  00:00:00
Loading mirror speeds from cached hostfile
 * base: mirrors.aliyun.com
 * extras: mirrors.aliyun.com
 * updates: mirrors.163.com
Resolving Dependencies
--> Running transaction check
---> Package zabbix-agent.x86_64 0:4.0.4-1.el7 will be installed
--> Finished Dependency Resolution

Dependencies Resolved

=======================================================================================================================================
 Package                            Arch                         Version                            Repository                    Size
=======================================================================================================================================
Installing:
 zabbix-agent                       x86_64                       4.0.4-1.el7                        zabbix                       388 k

Transaction Summary
=======================================================================================================================================
Install  1 Package

Total size: 388 k
Installed size: 1.5 M
Downloading packages:
warning: /var/cache/yum/x86_64/7/zabbix/packages/zabbix-agent-4.0.4-1.el7.x86_64.rpm: Header V4 RSA/SHA512 Signature, key ID a14fe591: NOKEY
Retrieving key from file:///etc/pki/rpm-gpg/RPM-GPG-KEY-ZABBIX-A14FE591
Importing GPG key 0xA14FE591:
 Userid     : "Zabbix LLC <packager@zabbix.com>"
 Fingerprint: a184 8f53 52d0 22b9 471d 83d0 082a b56b a14f e591
 Package    : zabbix-release-4.0-1.el7.noarch (installed)
 From       : /etc/pki/rpm-gpg/RPM-GPG-KEY-ZABBIX-A14FE591
Running transaction check
Running transaction test
Transaction test succeeded
Running transaction
Warning: RPMDB altered outside of yum.
  Installing : zabbix-agent-4.0.4-1.el7.x86_64                                                                                     1/1
  Verifying  : zabbix-agent-4.0.4-1.el7.x86_64                                                                                     1/1

Installed:
  zabbix-agent.x86_64 0:4.0.4-1.el7

Complete!
[root@node102 ~]#
2>.配置zabbix-agent
[root@node102 ~]# cat /etc/hosts | grep yinzhengjie
172.30.1.101 node101.yinzhengjie.org.cn
172.30.1.102 node102.yinzhengjie.org.cn
172.30.1.103 node103.yinzhengjie.org.cn
[root@node102 ~]#
[root@node102 ~]# hostname
node102.yinzhengjie.org.cn
[root@node102 ~]#
[root@node102 ~]# hostname -i
172.30.1.102
[root@node102 ~]#
[root@node102 ~]# cat /etc/hosts | grep yinzhengjie
172.30.1.101 node101.yinzhengjie.org.cn
172.30.1.102 node102.yinzhengjie.org.cn
172.30.1.103 node103.yinzhengjie.org.cn
[root@node102 ~]#
[root@node102 ~]#
[root@node102 ~]# grep Server /etc/zabbix/zabbix_agentd.conf  | grep -v ^#
Server=127.0.0.1
ServerActive=127.0.0.1
[root@node102 ~]#
[root@node102 ~]#
[root@node102 ~]# sed -i 's#Server=127.0.0.1#Server=node101.yinzhengjie.org.cn#' /etc/zabbix/zabbix_agentd.conf
[root@node102 ~]#
[root@node102 ~]# sed -i 's#ServerActive=127.0.0.1#ServerActive=node101.yinzhengjie.org.cn#' /etc/zabbix/zabbix_agentd.conf
[root@node102 ~]#
[root@node102 ~]#
[root@node102 ~]# grep Server /etc/zabbix/zabbix_agentd.conf  | grep -v ^#
Server=node101.yinzhengjie.org.cn
ServerActive=node101.yinzhengjie.org.cn
[root@node102 ~]#
3>.启动zabbix-agent
[root@node102 ~]# systemctl enable zabbix-agent
Created symlink from /etc/systemd/system/multi-user.target.wants/zabbix-agent.service to /usr/lib/systemd/system/zabbix-agent.service.
[root@node102 ~]#
[root@node102 ~]# systemctl start zabbix-agent
[root@node102 ~]#
[root@node102 ~]# systemctl status zabbix-agent
● zabbix-agent.service - Zabbix Agent
   Loaded: loaded (/usr/lib/systemd/system/zabbix-agent.service; enabled; vendor preset: disabled)
   Active: active (running) since Fri 2019-02-15 04:53:25 PST; 3s ago
  Process: 2725 ExecStart=/usr/sbin/zabbix_agentd -c $CONFFILE (code=exited, status=0/SUCCESS)
 Main PID: 2727 (zabbix_agentd)
   CGroup: /system.slice/zabbix-agent.service
           ├─2727 /usr/sbin/zabbix_agentd -c /etc/zabbix/zabbix_agentd.conf
           ├─2728 /usr/sbin/zabbix_agentd: collector [idle 1 sec]
           ├─2729 /usr/sbin/zabbix_agentd: listener #1 [waiting for connection]
           ├─2730 /usr/sbin/zabbix_agentd: listener #2 [waiting for connection]
           ├─2731 /usr/sbin/zabbix_agentd: listener #3 [waiting for connection]
           └─2732 /usr/sbin/zabbix_agentd: active checks #1 [idle 1 sec]

Feb 15 04:53:25 node102.yinzhengjie.org.cn systemd[1]: Starting Zabbix Agent...
Feb 15 04:53:25 node102.yinzhengjie.org.cn systemd[1]: Started Zabbix Agent.
[root@node102 ~]#
[root@node102 ~]#
[root@node102 ~]# ss -ntl | grep 10050          #很显然服务已经启动成功了,端口是存在的,别忘记关闭防火墙和selinux哟,为了就是试验方便!
LISTEN     0      128          *:10050                    *:*
LISTEN     0      128         :::10050                   :::*
[root@node102 ~]#
[root@node102 ~]#
[root@node102 ~]# sed -i 's#SELINUX=enforcing#SELINUX=disabled#' /etc/selinux/config
[root@node102 ~]#
[root@node102 ~]# setenforce 0
[root@node102 ~]#
[root@node102 ~]# getenforce
Permissive
[root@node102 ~]#
[root@node102 ~]#
[root@node102 ~]# systemctl disable firewalld
Removed symlink /etc/systemd/system/dbus-org.fedoraproject.FirewallD1.service.
Removed symlink /etc/systemd/system/basic.target.wants/firewalld.service.
[root@node102 ~]#
[root@node102 ~]# systemctl stop firewalld
[root@node102 ~]#
[root@node102 ~]# systemctl status firewalld
● firewalld.service - firewalld - dynamic firewall daemon
   Loaded: loaded (/usr/lib/systemd/system/firewalld.service; disabled; vendor preset: enabled)
   Active: inactive (dead)

Feb 15 04:28:20 node102.yinzhengjie.org.cn systemd[1]: Starting firewalld - dynamic firewall daemon...
Feb 15 04:28:24 node102.yinzhengjie.org.cn systemd[1]: Started firewalld - dynamic firewall daemon.
Feb 15 04:54:31 node102.yinzhengjie.org.cn systemd[1]: Stopping firewalld - dynamic firewall daemon...
Feb 15 04:54:32 node102.yinzhengjie.org.cn systemd[1]: Stopped firewalld - dynamic firewall daemon.
[root@node102 ~]#
[root@node102 ~]#
4>.测试zabbix-agent服务是否正常
[root@node101 ~]# hostname
node101.yinzhengjie.org.cn
[root@node101 ~]#
[root@node101 ~]#
[root@node101 ~]# hostname -i
172.30.1.101
[root@node101 ~]#
[root@node101 ~]# yum -y install telnet
Loaded plugins: fastestmirror
base                                                                                                            | 3.6 kB  00:00:00
extras                                                                                                          | 3.4 kB  00:00:00
mysql-connectors-community                                                                                      | 2.5 kB  00:00:00
mysql-tools-community                                                                                           | 2.5 kB  00:00:00
mysql56-community                                                                                               | 2.5 kB  00:00:00
updates                                                                                                         | 3.4 kB  00:00:00
zabbix                                                                                                          | 2.9 kB  00:00:00
zabbix-non-supported                                                                                            |  951 B  00:00:00
Loading mirror speeds from cached hostfile
 * base: mirrors.aliyun.com
 * extras: ftp.sjtu.edu.cn
 * updates: mirrors.nwsuaf.edu.cn
Resolving Dependencies
--> Running transaction check
---> Package telnet.x86_64 1:0.17-64.el7 will be installed
--> Finished Dependency Resolution

Dependencies Resolved

=======================================================================================================================================
 Package                       Arch                          Version                                 Repository                   Size
=======================================================================================================================================
Installing:
 telnet                        x86_64                        1:0.17-64.el7                           base                         64 k

Transaction Summary
=======================================================================================================================================
Install  1 Package

Total download size: 64 k
Installed size: 113 k
Downloading packages:
telnet-0.17-64.el7.x86_64.rpm                                                                                   |  64 kB  00:00:00
Running transaction check
Running transaction test
Transaction test succeeded
Running transaction
  Installing : 1:telnet-0.17-64.el7.x86_64                                                                                         1/1
  Verifying  : 1:telnet-0.17-64.el7.x86_64                                                                                         1/1

Installed:
  telnet.x86_64 1:0.17-64.el7

Complete!
[root@node101 ~]#
[root@node101 ~]# telnet node102.yinzhengjie.org.cn 10050
Trying 172.30.1.102...
Connected to node102.yinzhengjie.org.cn.
Escape character is '^]'.                #很显然,服务时正常的
Connection closed by foreign host.
[root@node101 ~]#
二.在zabbix Server添加对node102.yinzhengjie.org.cn节点的监控
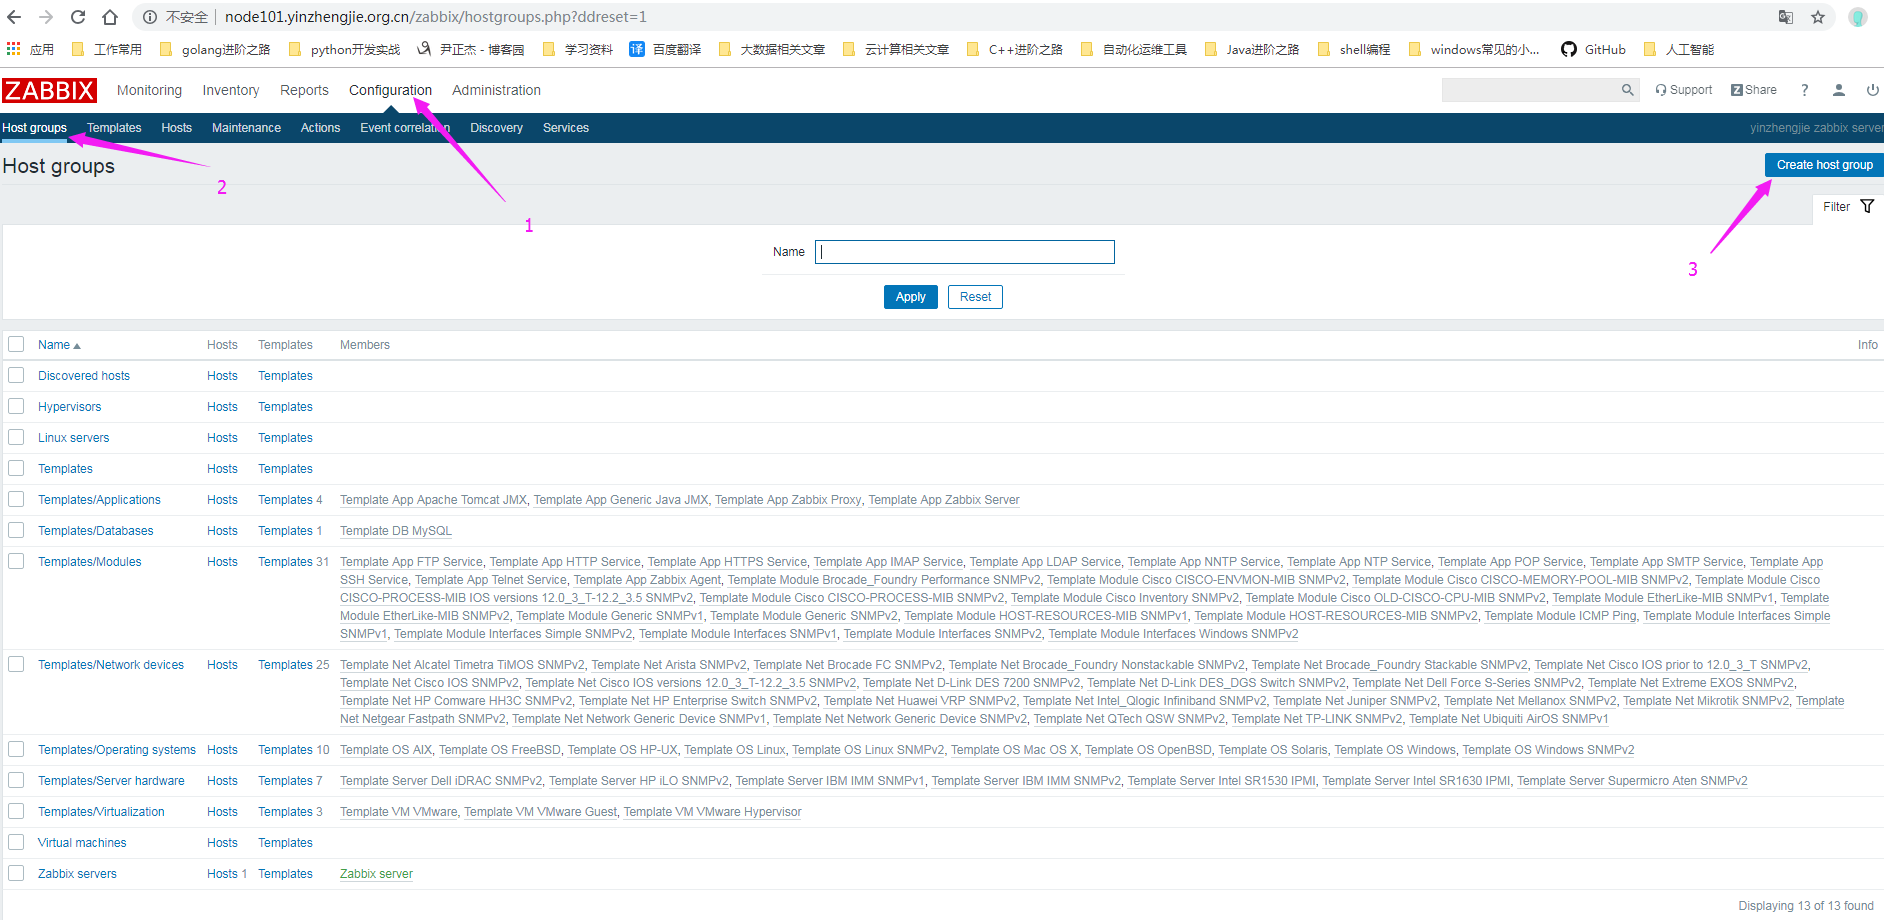
1>.如下图所示,点击创建一个主机组
2>.输入要创建的组名,名称你可以自定义
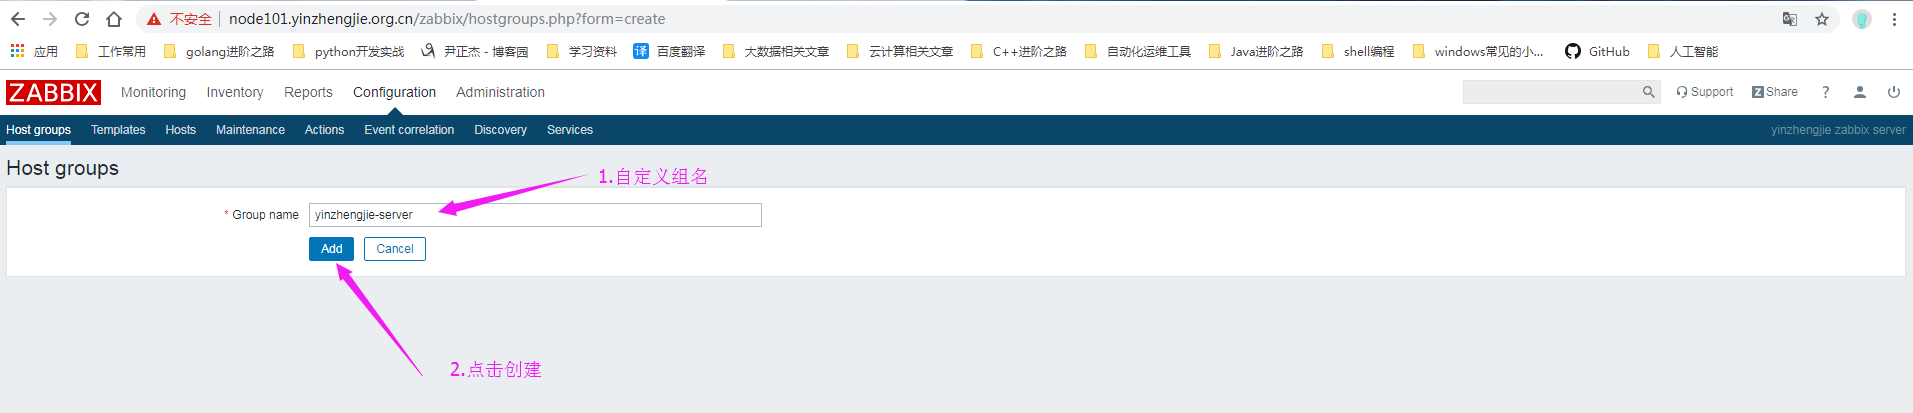
3>.组名添加完成

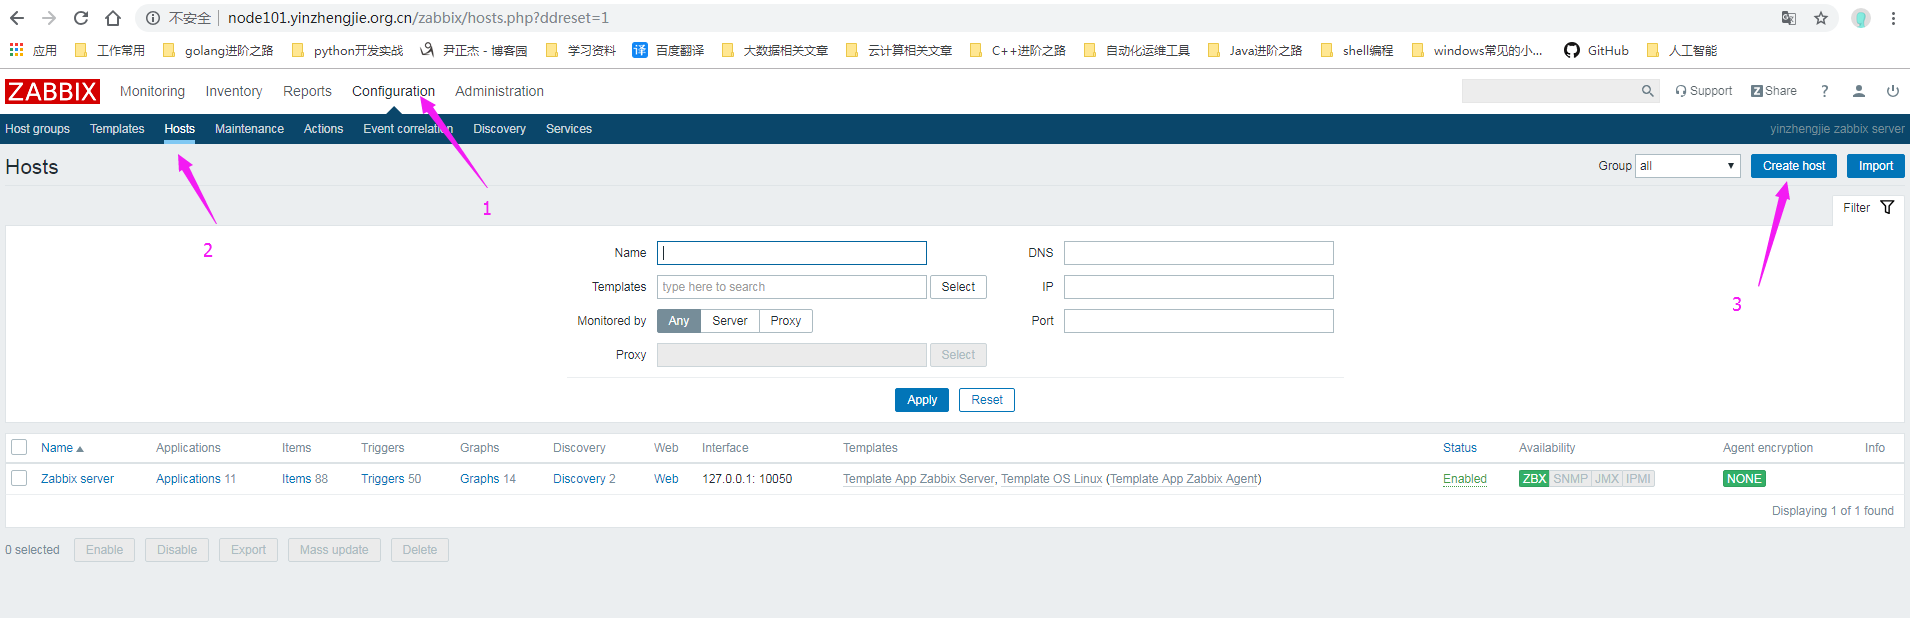
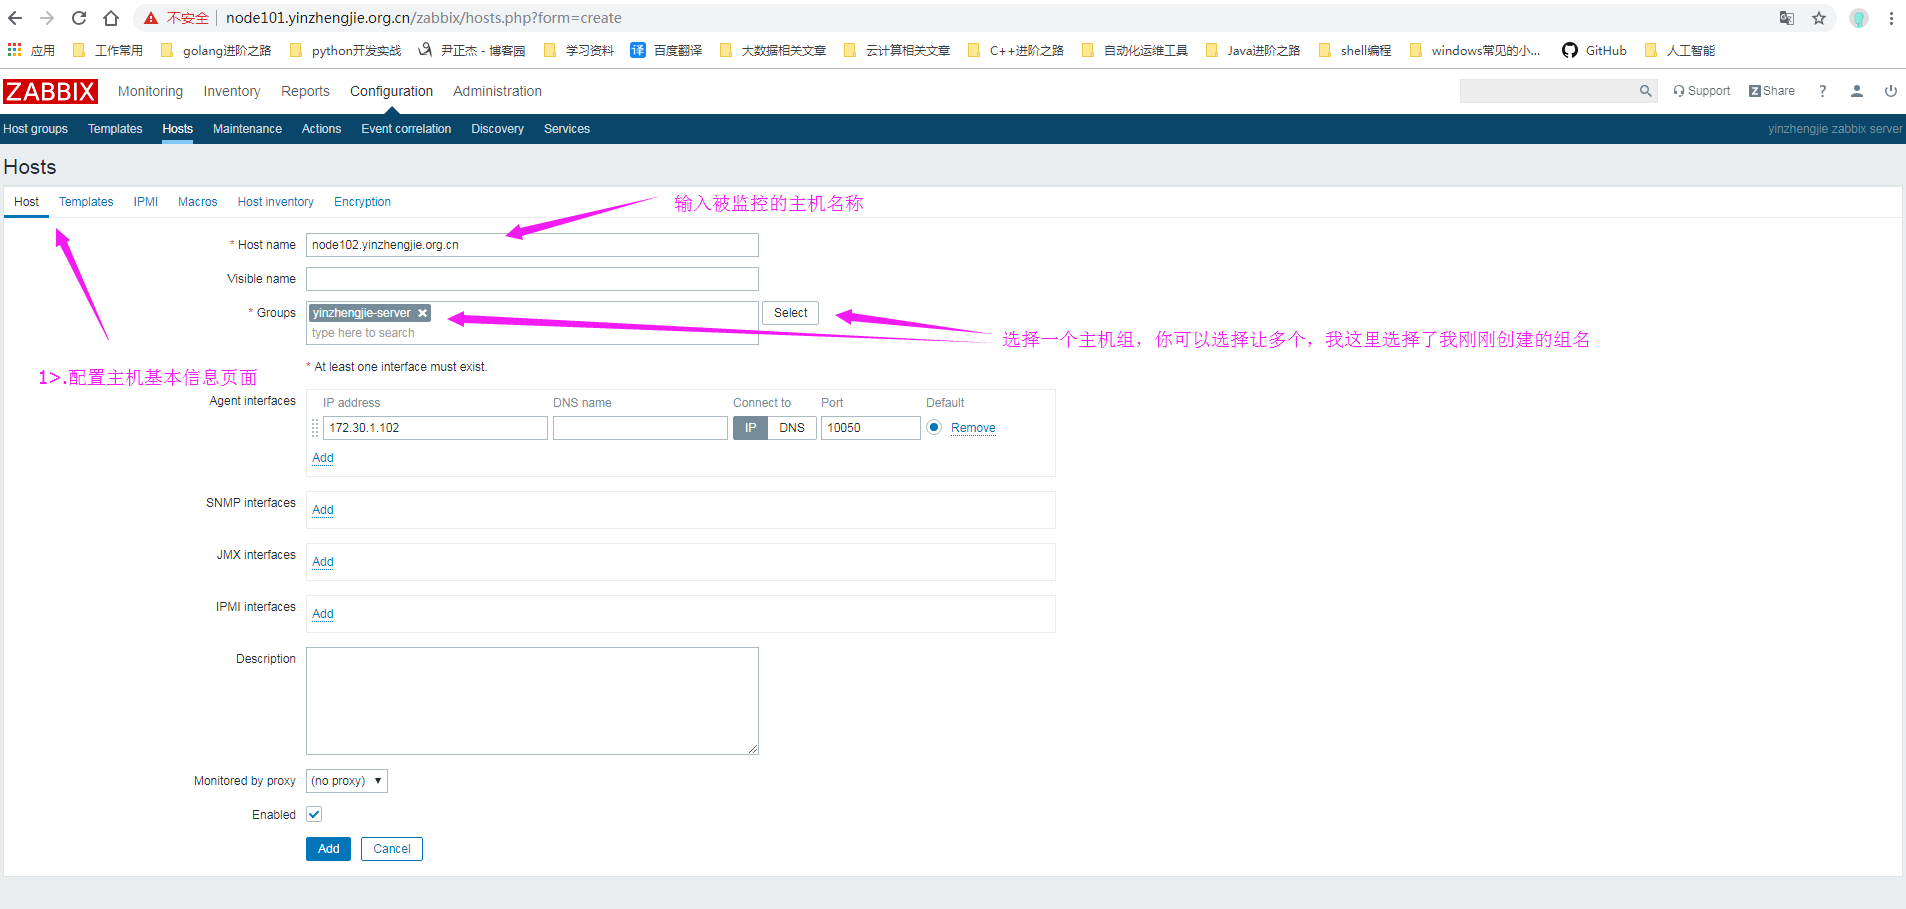
4>.如下图所示,点击创建主机
5>.配置被监控主机的基本信息(注意,带有*是必须要填写的!必须至少存在一个接口。)
6>.连接模板
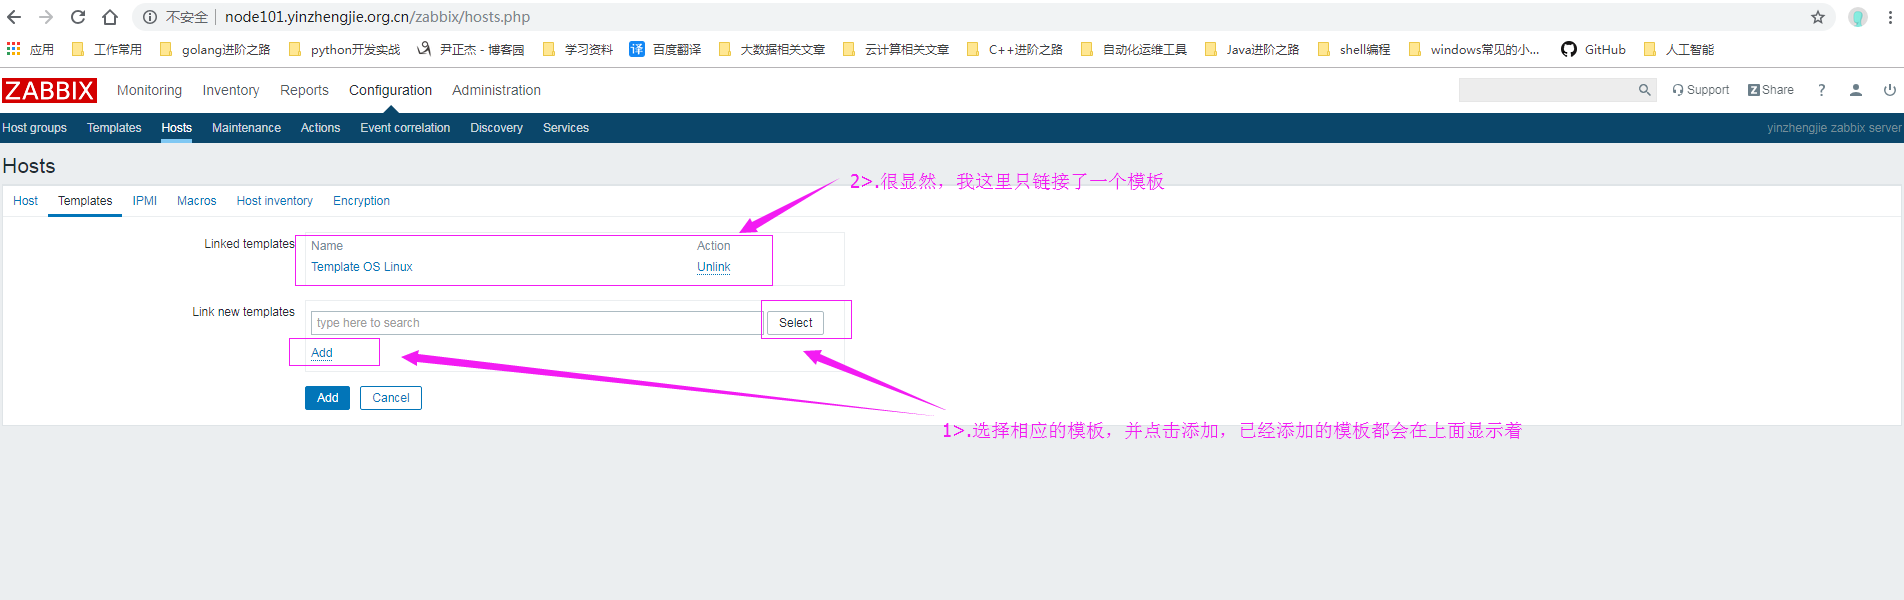
7>.点击添加按钮
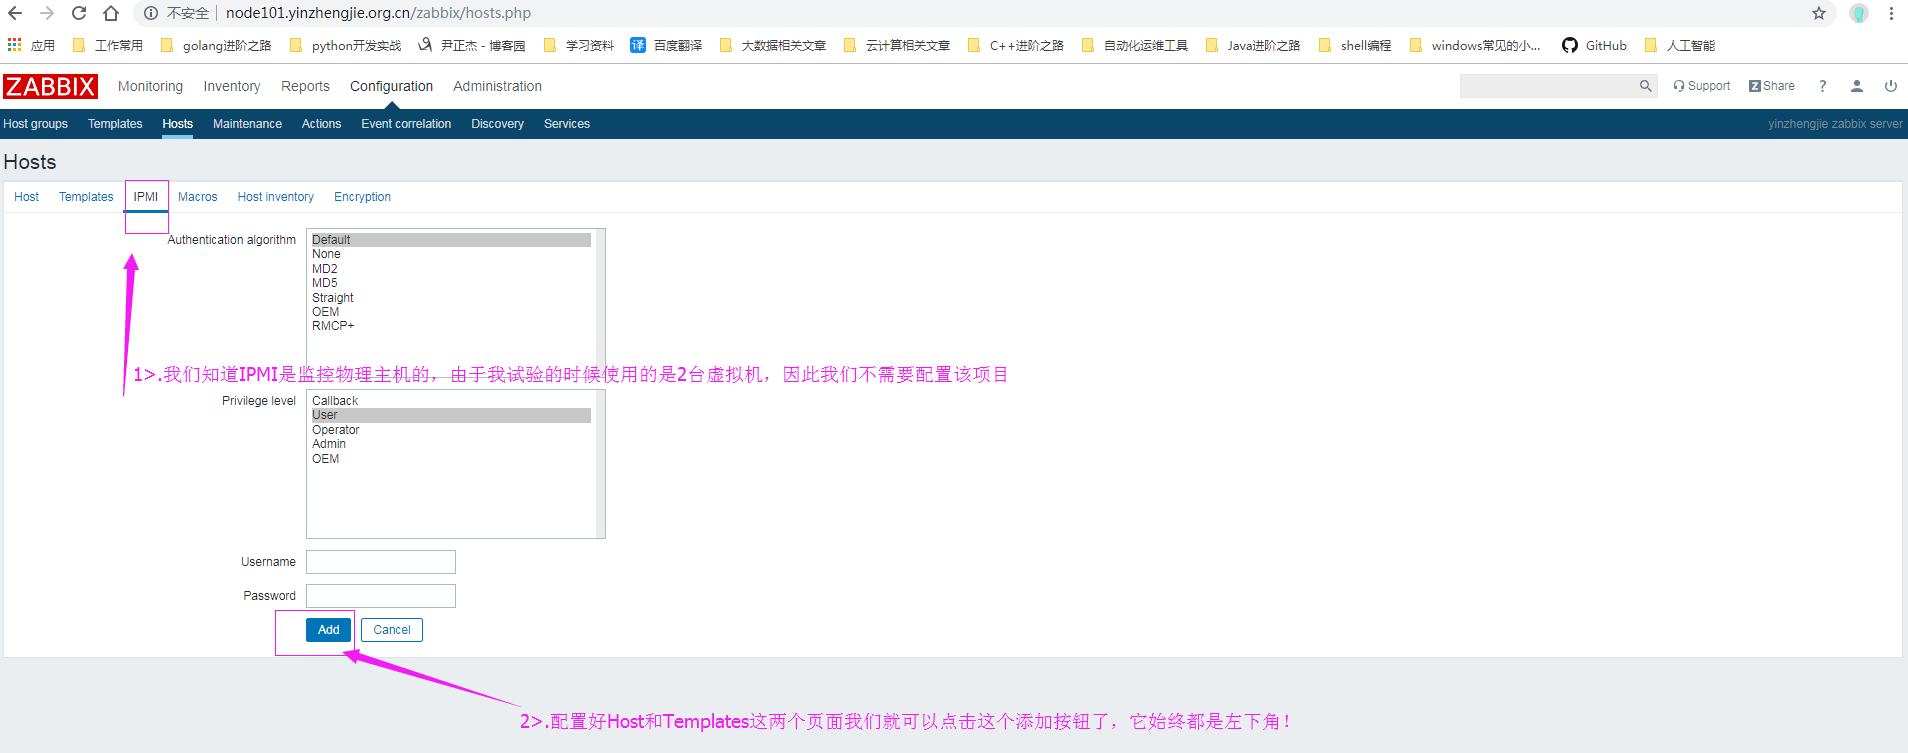
8>.添加完成

9>.等待30s左右,Zabbix Server就会监控到Zabbix agent的item了,监控成功,我们会看到一个绿灯
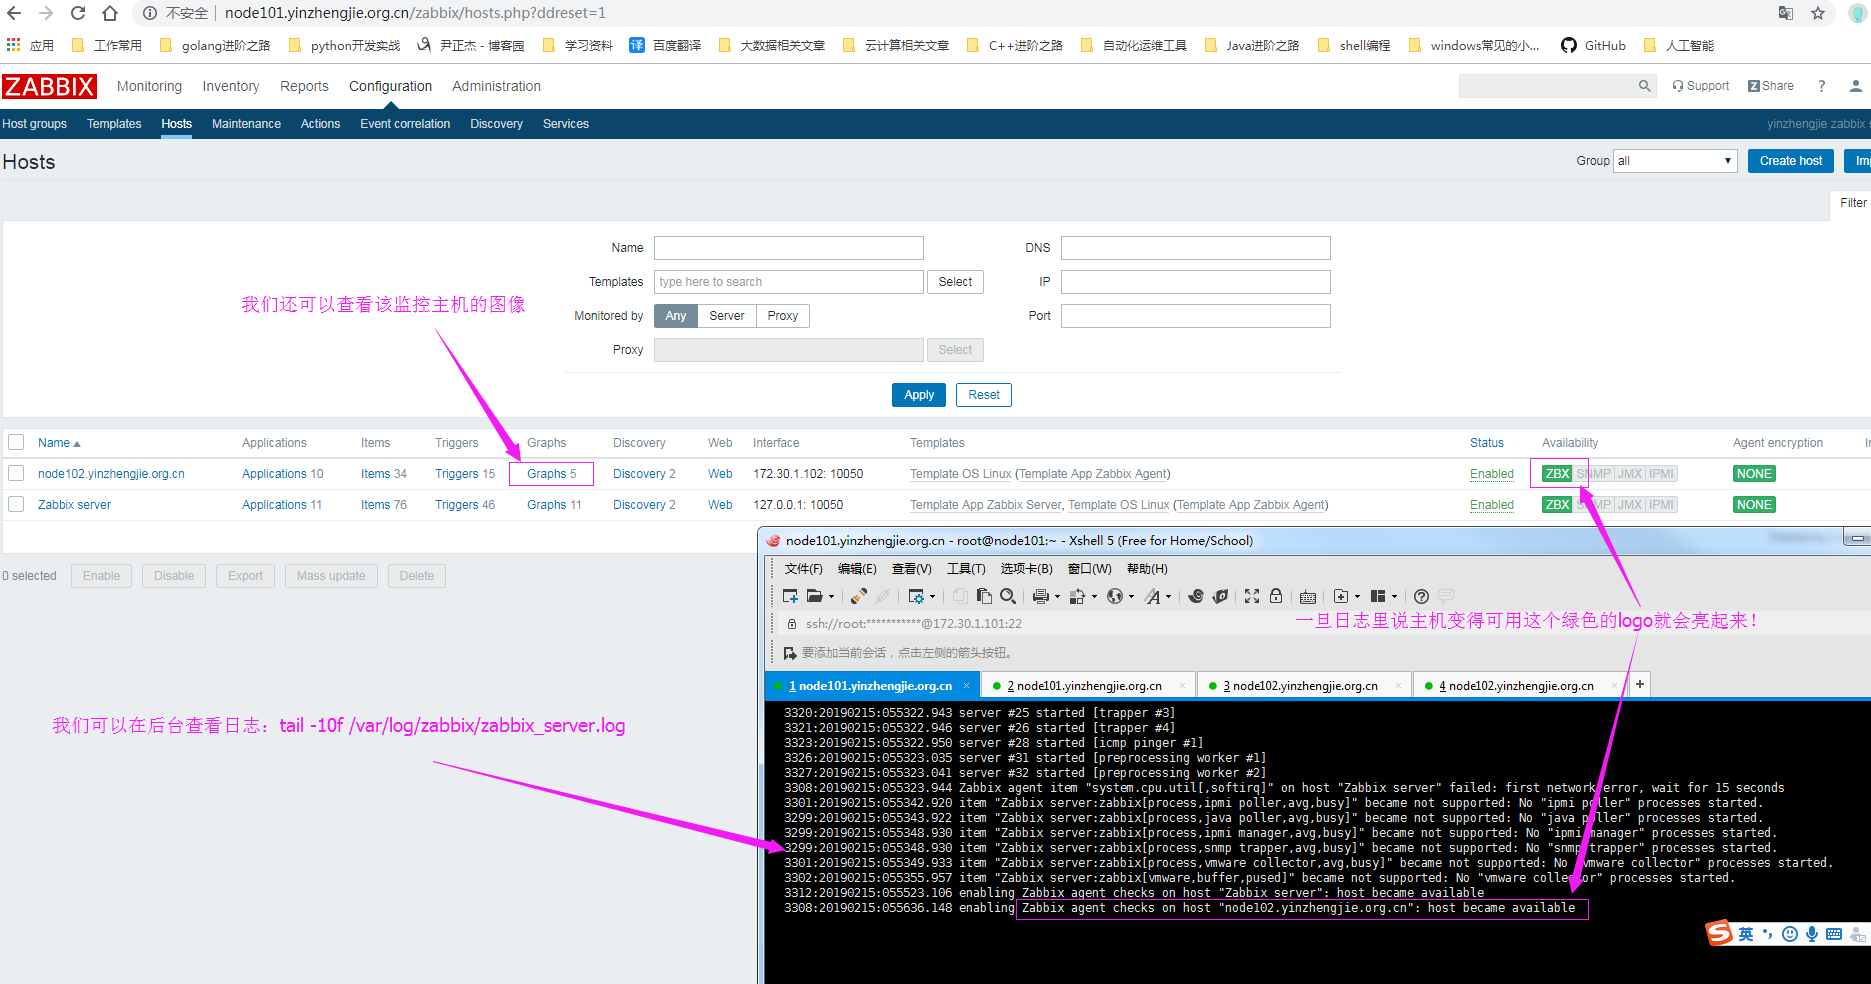
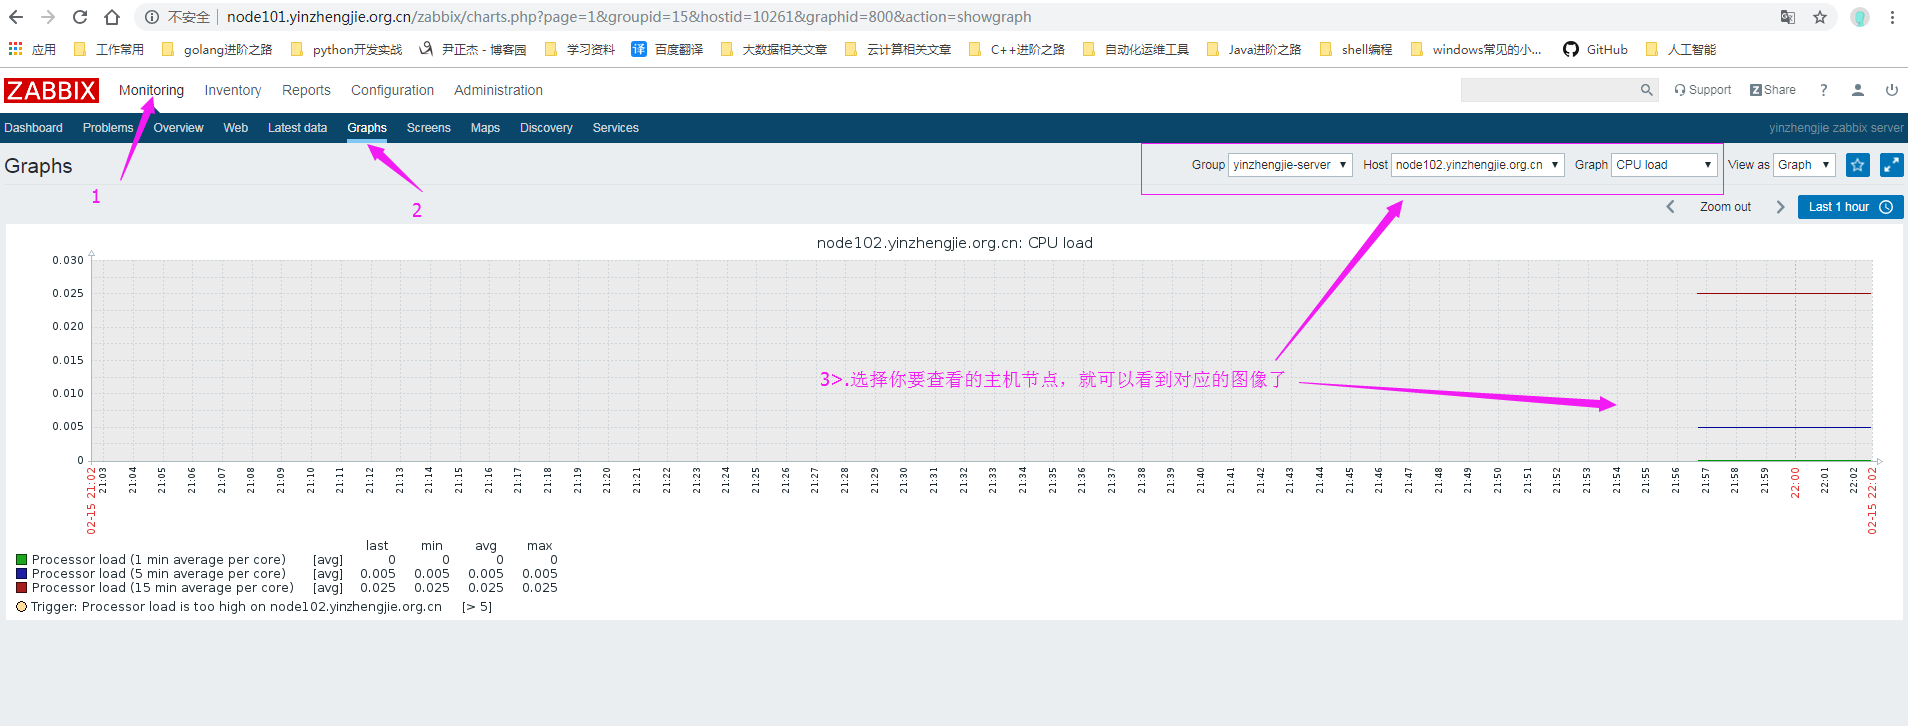
10>.查看监控的图像