基础知识
WPF(Windows Presentation Foundation)是Microsoft推荐的经典Windows桌面应用程序演示技术。 WPF不应与UWP(通用Windows平台)混淆,尽管两者之间存在相似之处。
WPF鼓励数据驱动的应用程序,重点关注多媒体,动画和数据绑定。使用称为XAML(可扩展应用程序标记语言)的语言创建接口,XAML是XML的衍生物。 XAML帮助WPF程序员保持视觉设计和界面逻辑的分离。
与其前身Windows窗体不同,WPF使用盒子模型来布局界面的所有元素。每个元素都有一个高度,宽度和边距,并在屏幕上相对于它的父元素排列。
WPF代表Windows Presentation Foundation,也以其Codename Avalon而闻名。它是一个图形框架,是Microsofts .NET Framework的一部分。 WPF预安装在Windows Vista,7,8和10中,可以安装在Windows XP和Server 2003上。
版本
版本4.6.1 - 2015年12月
Hello World应用程序#
在Visual Studio中创建和运行新的WPF项目:
单击文件→新建→项目
单击模板→Visual C#→Windows→WPF应用程序选择模板,然后按确定 :
在解决方案资源管理器中打开MainWindow.xaml文件(如果没有看到解决方案资源管理器窗口,请单击查看→解决方案资源管理器打开它):
在XAML部分(默认情况下在“ 设计”部分下面)添加此代码
<TextBlock>Hello world!</TextBlock>
在Grid 标签内:
代码应如下所示:
<Window x:Class="WpfApplication1.MainWindow"
        xmlns="http://schemas.microsoft.com/winfx/2006/xaml/presentation"
        xmlns:x="http://schemas.microsoft.com/winfx/2006/xaml"
        xmlns:d="http://schemas.microsoft.com/expression/blend/2008"
        xmlns:mc="http://schemas.openxmlformats.org/markup-compatibility/2006"
        xmlns:local="clr-namespace:WpfApplication1"
        mc:Ignorable="d"
        Title="MainWindow" Height="350" Width="525">
    <Grid>
        <TextBlock>Hello world!</TextBlock>
    </Grid>
</Window>
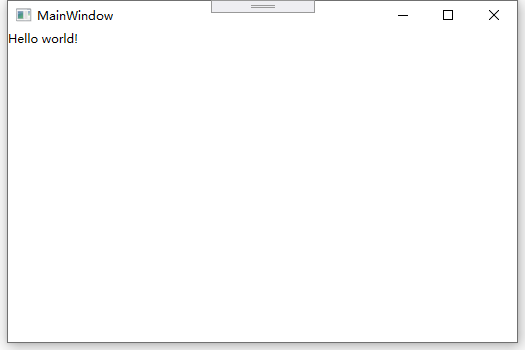
按F5或单击菜单Debug→Start Debugging运行应用程序。它应该看起来像:
“Half the Whitespace”设计原则
在布置控件时,很容易在边距和填充中硬编码特定值,以使事物适合所需的布局。但是,通过对这些值进行硬编码,维护变得更加昂贵。如果布局发生变化,可能被认为是一种微不足道的方式,那么很多工作必须用于纠正这些值。
该设计原理通过以不同方式考虑布局来降低布局的维护成本。
wpf 如何在实际代码中使用它
概括我们上面已经证明的内容:单个事物包含“半空白”的固定边距 ,并且它们所容纳的容器应该具有“半空白”的填充 。你可以在应用程序资源字典中应用这些样式,然后你甚至不需要在单个项目上提及它们。以下是你可以定义“HalfTheWhiteSpace”的方法:
<system:Double x:Key="DefaultMarginSize">2</system:Double>
<Thickness x:Key="HalfTheWhiteSpace" Left="{StaticResource DefaultMarginSize}" Top="{StaticResource DefaultMarginSize}" Right="{StaticResource DefaultMarginSize}" Bottom="{StaticResource DefaultMarginSize}"/>
然后我可以定义一个基本样式来基于我的其他控件样式:(这也可以包含你的默认FontFamily,FontSize等等)
<Style x:Key="BaseStyle" TargetType="{x:Type Control}">
    <Setter Property="Margin" Value="{StaticResource HalfTheWhiteSpace}"/>
</Style>
然后我可以为TextBox定义我的默认样式以使用此边距:
<Style TargetType="TextBox" BasedOn="{StaticResource BaseStyle}"/>
我可以为DatePickers,Labels等等做任何事情(可能在容器中保存的任何东西)。小心像这样的TextBlock样式......该控件在很多控件内部使用。我建议你创建自己的控件,它只是从TextBlock派生。你可以风格你的TextBlock使用默认的保证金;每当你明确地使用一个TextBlock在XAML,你应该用你的TextBlock。
你可以使用类似的方法将填充应用于常见容器(例如ScrollViewer,Border等)。
完成此操作后, 大多数控件都不需要边距和填充 - 你只需要在有意偏离此设计原则的位置指定值。
演示问题和解决方案
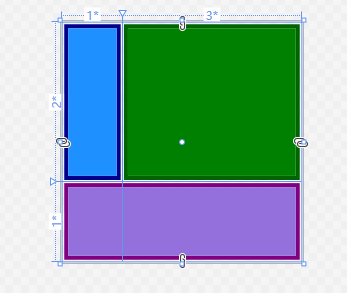
例如,想象一个有3个部分的屏幕,如下所示:
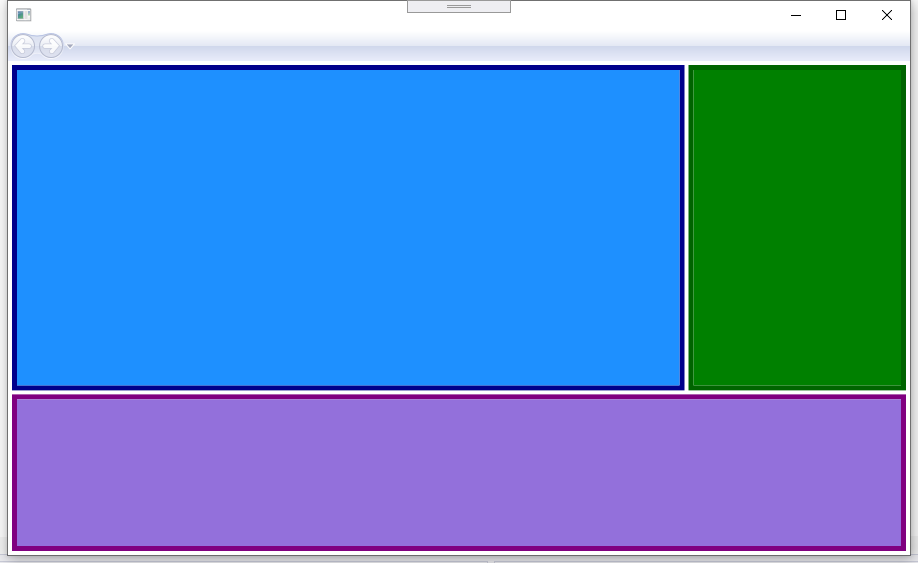
蓝框的边距可能为4,4,0,0。绿框的边距可能为4,4,4,0。紫色框边距为4,4,4,4。这是XAML :(我使用网格来实现布局;但无论您选择如何实现布局,此设计原则都适用):
<UserControl x:Class="WpfApplication1.UserControl1HardCoded"
             xmlns="http://schemas.microsoft.com/winfx/2006/xaml/presentation"
             xmlns:x="http://schemas.microsoft.com/winfx/2006/xaml"
             xmlns:mc="http://schemas.openxmlformats.org/markup-compatibility/2006"
             xmlns:d="http://schemas.microsoft.com/expression/blend/2008"
             mc:Ignorable="d"
             d:DesignHeight="300" d:DesignWidth="300">
<Grid>
    <Grid.ColumnDefinitions>
        <ColumnDefinition Width="3*"/>
        <ColumnDefinition Width="*"/>
    </Grid.ColumnDefinitions>
    <Grid.RowDefinitions>
        <RowDefinition Height="2*"/>
        <RowDefinition Height="*"/>
    </Grid.RowDefinitions>

    <Border Grid.Column="0" Grid.Row="0" Margin="4,4,0,0" Background="DodgerBlue" BorderBrush="DarkBlue" BorderThickness="5"/>
    <Border Grid.Column="1" Grid.Row="0" Margin="4,4,4,0" Background="Green" BorderBrush="DarkGreen" BorderThickness="5"/>
    <Border Grid.Column="0" Grid.ColumnSpan="2" Grid.Row="1" Margin="4,4,4,4" Background="MediumPurple" BorderBrush="Purple" BorderThickness="5"/>
</Grid>
</UserControl>
现在想象一下,我们想要更改布局,将绿色框放在蓝色框的左侧。应该简单,不应该吗?除了当我们移动那个盒子时,我们现在需要修补边缘。要么我们可以将蓝框的边距改为0,4,4,0;或者我们可以将蓝色变为4,4,4,0,将绿色变为4,4,0,0。这是XAML:
<UserControl x:Class="WpfApplication1.UserControl1HardCoded"
             xmlns="http://schemas.microsoft.com/winfx/2006/xaml/presentation"
             xmlns:x="http://schemas.microsoft.com/winfx/2006/xaml"
             xmlns:mc="http://schemas.openxmlformats.org/markup-compatibility/2006"
             xmlns:d="http://schemas.microsoft.com/expression/blend/2008"
             mc:Ignorable="d"
             d:DesignHeight="300" d:DesignWidth="300">
<Grid>
    <Grid.ColumnDefinitions>
        <ColumnDefinition Width="3*"/>
        <ColumnDefinition Width="*"/>
    </Grid.ColumnDefinitions>
    <Grid.RowDefinitions>
        <RowDefinition Height="2*"/>
        <RowDefinition Height="*"/>
    </Grid.RowDefinitions>

    <Border Grid.Column="0" Grid.Row="0" Margin="0,4,4,0" Background="DodgerBlue" BorderBrush="DarkBlue" BorderThickness="5"/>
    <Border Grid.Column="1" Grid.Row="0" Margin="4,4,4,0" Background="Green" BorderBrush="DarkGreen" BorderThickness="5"/>
    <Border Grid.Column="0" Grid.ColumnSpan="2" Grid.Row="1" Margin="4,4,4,4" Background="MediumPurple" BorderBrush="Purple" BorderThickness="5"/>
</Grid>
</UserControl>

现在让我们把紫色的盒子放在顶部。所以蓝色的利润率变为4,0,4,4;绿色变为4,0,0,4。
<UserControl x:Class="WpfApplication1.UserControl1HardCoded"
             xmlns="http://schemas.microsoft.com/winfx/2006/xaml/presentation"
             xmlns:x="http://schemas.microsoft.com/winfx/2006/xaml"
             xmlns:mc="http://schemas.openxmlformats.org/markup-compatibility/2006"
             xmlns:d="http://schemas.microsoft.com/expression/blend/2008"
             mc:Ignorable="d"
             d:DesignHeight="300" d:DesignWidth="300">
<Grid>
    <Grid.ColumnDefinitions>
        <ColumnDefinition Width="3*"/>
        <ColumnDefinition Width="*"/>
    </Grid.ColumnDefinitions>
    <Grid.RowDefinitions>
        <RowDefinition Height="2*"/>
        <RowDefinition Height="*"/>
    </Grid.RowDefinitions>

        <Border Grid.Column="0" Grid.Row="0" Margin="4,0,4,4" Background="DodgerBlue" BorderBrush="DarkBlue" BorderThickness="5"/>
    <Border Grid.Column="1" Grid.Row="0" Margin="4,0,0,4" Background="Green" BorderBrush="DarkGreen" BorderThickness="5"/>
    <Border Grid.Column="0" Grid.ColumnSpan="2" Grid.Row="1" Margin="4,4,4,4" Background="MediumPurple" BorderBrush="Purple" BorderThickness="5"/>
</Grid>
</UserControl>
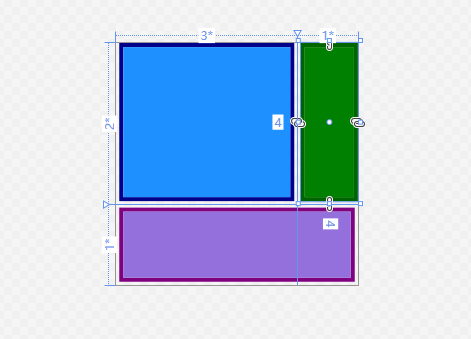
如果我们能够移动其他东西以便我们根本不需要调整这些值,那不是很好。这可以通过以不同的方式考虑空白来实现。想象一下将所有空白分配给一个控件或另一个控件,而不是将每个盒子的一半空白分配给每个盒子:(我的绘图不是很容易缩放 - 虚线应该在盒子边缘和它的邻居之间的中间位置) 。
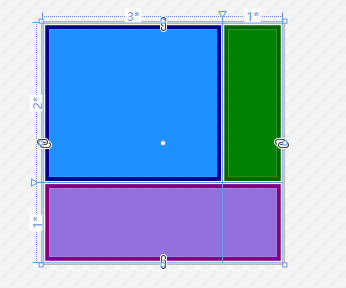
所以蓝盒的边距为2,2,2,2;绿箱的边距为2,2,2,2;紫色方框的边距为2,2,2,2。并且容纳它们的容器具有2,2,2,2的填充物(不是边缘)。这是XAML:
<UserControl x:Class="WpfApplication1.UserControl1HardCoded"
             xmlns="http://schemas.microsoft.com/winfx/2006/xaml/presentation"
             xmlns:x="http://schemas.microsoft.com/winfx/2006/xaml"
             xmlns:mc="http://schemas.openxmlformats.org/markup-compatibility/2006"
             xmlns:d="http://schemas.microsoft.com/expression/blend/2008"
             mc:Ignorable="d"
             d:DesignHeight="300" d:DesignWidth="300"
             Padding="2,2,2,2">
<Grid>
    <Grid.ColumnDefinitions>
        <ColumnDefinition Width="3*"/>
        <ColumnDefinition Width="*"/>
    </Grid.ColumnDefinitions>
    <Grid.RowDefinitions>
        <RowDefinition Height="2*"/>
        <RowDefinition Height="*"/>
    </Grid.RowDefinitions>

        <Border Grid.Column="0" Grid.Row="0" Margin="2,2,2,2" Background="DodgerBlue" BorderBrush="DarkBlue" BorderThickness="5"/>
        <Border Grid.Column="1" Grid.Row="0" Margin="2,2,2,2" Background="Green" BorderBrush="DarkGreen" BorderThickness="5"/>
        <Border Grid.Column="0" Grid.ColumnSpan="2" Grid.Row="1" Margin="2,2,2,2" Background="MediumPurple" BorderBrush="Purple" BorderThickness="5"/>
</Grid>
</UserControl>
现在让我们尝试移动盒子,就像以前一样......让我们把绿色框放在蓝色框的左边。 OK完成。并且无需更改任何填充或边距。这是XAML:
<UserControl x:Class="WpfApplication1.UserControl1HardCoded"
             xmlns="http://schemas.microsoft.com/winfx/2006/xaml/presentation"
             xmlns:x="http://schemas.microsoft.com/winfx/2006/xaml"
             xmlns:mc="http://schemas.openxmlformats.org/markup-compatibility/2006"
             xmlns:d="http://schemas.microsoft.com/expression/blend/2008"
             mc:Ignorable="d"
             d:DesignHeight="300" d:DesignWidth="300"
             Padding="2,2,2,2">
<Grid>
    <Grid.ColumnDefinitions>
            <ColumnDefinition Width="*"/>
            <ColumnDefinition Width="3*"/>
    </Grid.ColumnDefinitions>
    <Grid.RowDefinitions>
        <RowDefinition Height="2*"/>
        <RowDefinition Height="*"/>
    </Grid.RowDefinitions>

        <Border Grid.Column="0" Grid.Row="0" Margin="2,2,2,2" Background="DodgerBlue" BorderBrush="DarkBlue" BorderThickness="5"/>
        <Border Grid.Column="1" Grid.Row="0" Margin="2,2,2,2" Background="Green" BorderBrush="DarkGreen" BorderThickness="5"/>
        <Border Grid.Column="0" Grid.ColumnSpan="2" Grid.Row="1" Margin="2,2,2,2" Background="MediumPurple" BorderBrush="Purple" BorderThickness="5"/>
</Grid>
</UserContro>
现在让我们把紫色的盒子放在顶部。 OK完成。并且无需更改任何填充或边距。这是XAML:
<UserControl x:Class="WpfApplication1.UserControl1HardCoded"
             xmlns="http://schemas.microsoft.com/winfx/2006/xaml/presentation"
             xmlns:x="http://schemas.microsoft.com/winfx/2006/xaml"
             xmlns:mc="http://schemas.openxmlformats.org/markup-compatibility/2006"
             xmlns:d="http://schemas.microsoft.com/expression/blend/2008"
             mc:Ignorable="d"
             d:DesignHeight="300" d:DesignWidth="300"
             Padding="2,2,2,2">
<Grid>
    <Grid.ColumnDefinitions>
            <ColumnDefinition Width="*"/>
            <ColumnDefinition Width="3*"/>
        </Grid.ColumnDefinitions>
    <Grid.RowDefinitions>
        <RowDefinition Height="*"/>
        <RowDefinition Height="2*"/>
    </Grid.RowDefinitions>

        <Border Grid.Column="1" Grid.Row="1" Margin="2,2,2,2" Background="DodgerBlue" BorderBrush="DarkBlue" BorderThickness="5"/>
        <Border Grid.Column="0" Grid.Row="1" Margin="2,2,2,2" Background="Green" BorderBrush="DarkGreen" BorderThickness="5"/>
        <Border Grid.Column="0" Grid.ColumnSpan="2" Grid.Row="0" Margin="2,2,2,2" Background="MediumPurple" BorderBrush="Purple" BorderThickness="5"/>
</Grid>
</UserControl>
