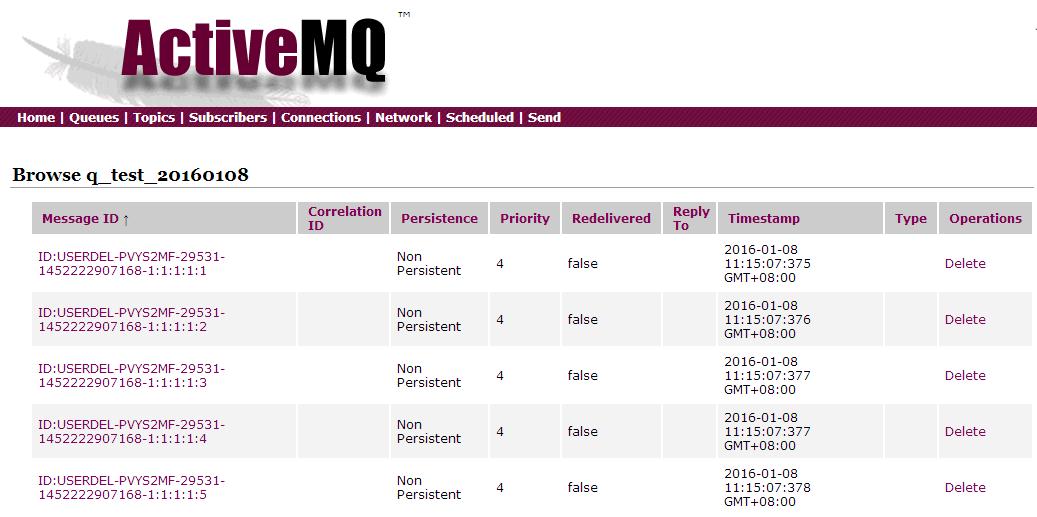
接上篇 JMS笔记(一),启动ActiveMQ后,打开http://127.0.0.1:8161/admin管理界面,用户名admin密码admin,点击上面的Queues菜单,创建一个q_test_20160108,之后就可以向这个queue写东西了
1. P2P模式
生产者示例代码:
  @Test
    public void testActiveMqSend(){
        // ConnectionFactory :连接工厂,JMS 用它创建连接
        ConnectionFactory connectionFactory;
        // Connection :JMS 客户端到JMS Provider 的连接
        Connection connection = null;
        // Session: 一个发送或接收消息的线程
        Session session;
        // Destination :消息的目的地;消息发送给谁.
        Destination destination;
        // MessageProducer:消息发送者
        MessageProducer producer;
        // TextMessage message;
        // 构造ConnectionFactory实例对象,此处采用ActiveMq的实现jar
        connectionFactory = new ActiveMQConnectionFactory(
                ActiveMQConnection.DEFAULT_USER,
                ActiveMQConnection.DEFAULT_PASSWORD,
                "tcp://127.0.0.1:61616");
        try {
            // 构造从工厂得到连接对象
            connection = connectionFactory.createConnection();
            // 启动
            connection.start();
            // 获取操作连接
            session = connection.createSession(Boolean.TRUE, Session.AUTO_ACKNOWLEDGE);
            // 获取session注意参数值q_test_20160108是一个服务器的queue,须在在ActiveMq的console配置
            destination = session.createQueue("q_test_20160108");
            // 得到消息生成者【发送者】
            producer = session.createProducer(destination);
            // 设置不持久化,实际根据项目决定
            producer.setDeliveryMode(DeliveryMode.NON_PERSISTENT);
            // 构造消息,
            sendMessage(session, producer);
            session.commit();
        } catch (Exception e) {
            e.printStackTrace();
        } finally {
            try {
                if (null != connection)
                    connection.close();
            } catch (Throwable ignore) {
            }
        }
    }

private static final int SEND_NUMBER = 5;
public static void sendMessage(Session session, MessageProducer producer)
        throws Exception {
    for (int i = 1; i <= SEND_NUMBER; i++) {
        TextMessage message = session.createTextMessage("ActiveMq 发送的消息" + i);
        // 发送消息到目的地方
        System.out.println("发送消息:" + "ActiveMq 发送的消息" + i);
        producer.send(message);
    }
}
运行完以上代码去管理界面查看q_test_20160108

消费者示例代码:
  @Test
    public void testActiveMqReceive(){
        // ConnectionFactory :连接工厂,JMS 用它创建连接
        ConnectionFactory connectionFactory;
        // Connection :JMS 客户端到JMS Provider 的连接
        Connection connection = null;
        // Session: 一个发送或接收消息的线程
        Session session;
        // Destination :消息的目的地;消息发送给谁.
        Destination destination;
        // 消费者,消息接收者
        MessageConsumer consumer;
        connectionFactory = new ActiveMQConnectionFactory(
                ActiveMQConnection.DEFAULT_USER,
                ActiveMQConnection.DEFAULT_PASSWORD,
                "tcp://127.0.0.1:61616");
        try {
            // 构造从工厂得到连接对象
            connection = connectionFactory.createConnection();
            // 启动
            connection.start();
            // 获取操作连接
            session = connection.createSession(Boolean.FALSE, Session.AUTO_ACKNOWLEDGE);
            // 获取session注意参数值q_test_20160108是一个服务器的queue,须在在ActiveMq的console配置
            destination = session.createQueue("q_test_20160108");
            consumer = session.createConsumer(destination);
            while (true) {
                //设置接收者接收消息的时间,为了便于测试,这里设定为100s
                TextMessage message = (TextMessage) consumer.receive(100000);
                if (null != message) {
                    System.out.println("收到消息" + message.getText());
                } else {
                    break;
                }
            }
        } catch (Exception e) {
            e.printStackTrace();
        } finally {
            try {
                if (null != connection)
                    connection.close();
            } catch (Throwable ignore) {
            }
        }
    }
以上代码去mq取消息,运行完之后,再去管理界面查看q_test_20160108,刚刚的消息没有了,但是能够看到统计,有多少消息进来,多少消息出去,当前还有多少消息
,当前多少消费者等

2. pub/sub模式
发布者示例:
   @Test
    public void testActiveMqSend(){
        // ConnectionFactory :连接工厂,JMS 用它创建连接
        ConnectionFactory connectionFactory;
        // Connection :JMS 客户端到JMS Provider 的连接
        Connection connection = null;
        // Session: 一个发送或接收消息的线程
        Session session;
        // Destination :消息的目的地;消息发送给谁.
        Destination destination;
        // MessageProducer:消息发送者
        MessageProducer producer;
        // TextMessage message;
        // 构造ConnectionFactory实例对象,此处采用ActiveMq的实现jar
        connectionFactory = new ActiveMQConnectionFactory(
                ActiveMQConnection.DEFAULT_USER,
                ActiveMQConnection.DEFAULT_PASSWORD,
                "tcp://127.0.0.1:61616");
        try {
            // 构造从工厂得到连接对象
            connection = connectionFactory.createConnection();
            // 启动
            connection.start();
            // 获取操作连接
            session = connection.createSession(Boolean.TRUE, Session.AUTO_ACKNOWLEDGE);

            destination = session.createTopic("topic_1");
            // 得到消息生成者【发送者】
            producer = session.createProducer(destination);
            // 设置不持久化,此处学习,实际根据项目决定
            producer.setDeliveryMode(DeliveryMode.NON_PERSISTENT);
            // 构造消息,此处写死,项目就是参数,或者方法获取
            sendMessage(session, producer);
            session.commit();
        } catch (Exception e) {
            e.printStackTrace();
        } finally {
            try {
                if (null != connection)
                    connection.close();
            } catch (Throwable ignore) {
            }
        }
    }
    private static final int SEND_NUMBER = 5;
    public static void sendMessage(Session session, MessageProducer producer)
            throws Exception {
        for (int i = 1; i <= SEND_NUMBER; i++) {
            TextMessage message = session.createTextMessage("ActiveMq 发送的消息" + i);
            // 发送消息到目的地方
            System.out.println("发送消息:" + "ActiveMq 发送的消息" + i);
            producer.send(message);
        }
    }
执行完以上语句,在管理界面点击topics菜单,可以看到topic_1
订阅者示例:
@Test
    public void testActiveMqReceive(){
        // ConnectionFactory :连接工厂,JMS 用它创建连接
        ConnectionFactory connectionFactory;
        // Connection :JMS 客户端到JMS Provider 的连接
        Connection connection = null;
        // Session: 一个发送或接收消息的线程
        Session session;
        // Destination :消息的目的地;消息发送给谁.
        Destination destination;
        // 消费者,消息接收者
        MessageConsumer consumer;
        connectionFactory = new ActiveMQConnectionFactory(
                ActiveMQConnection.DEFAULT_USER,
                ActiveMQConnection.DEFAULT_PASSWORD,
                "tcp://127.0.0.1:61616");
        try {
            // 构造从工厂得到连接对象
            connection = connectionFactory.createConnection();
       //持久化订阅必须使用下语句!!!!参数是clientid
            connection.setClientID("mysub_3");
            // 启动
            connection.start();
            // 获取操作连接
            session = connection.createSession(Boolean.FALSE, Session.AUTO_ACKNOWLEDGE);
            destination = session.createTopic("topic_1");
            //consumer = session.createConsumer(destination);普通订阅
       //持久化订阅!!!第二个参数是clientid
            consumer = session.createDurableSubscriber((Topic) destination,"mysub_3");
            while (true) {
                //设置接收者接收消息的时间,为了便于测试,这里设定为100s
                TextMessage message = (TextMessage) consumer.receive(100000);
                if (null != message) {
                    System.out.println("收到消息" + message.getText());
                } else {
                    break;
                }
            }
        } catch (Exception e) {
            e.printStackTrace();
        } finally {
            try {
                if (null != connection)
                    connection.close();
            } catch (Throwable ignore) {
            }
        }
    }
发现一个问题,运行以上代码,不能收到topic_1上的消息,开始一直以为有什么东西有问题,纠结了一阵子,后来想通了,对持久订阅理解不对,持久订阅从你订阅开始收到消息,离线了,然后在上线,期间的消息是可以收到了,但是你订阅之前的就不能收到了
在管理界面Subscribers菜单下可以看到订阅者列表

参考文章