你是否曾经尝试过运行复杂的计算,却发现它需要花费很长时间,并且拖慢了你的进程?
有很多方法可以解决这个问题,例如使用 web worker 或后台线程。GPU 减轻了 CPU 的处理负荷,给了 CPU 更多的空间来处理其他进程。同时,web worker 仍然运行在 CPU 上,但是运行在不同的线程上。
在该初学者指南中,我们将演示如何使用GPU.js执行复杂的数学计算并提高 JavaScript 应用的性能。
1.什么是 GPU.js?
GPU.js 是一个针对 Web 和 Node.js 构建的 JavaScript 加速库,用于在图形处理单元(GPGPU)上进行通用编程,它使你可以将复杂且耗时的计算移交给 GPU 而不是 CPU,以实现更快的计算和操作。还有一个备用选项:在系统上没有 GPU 的情况下,这些功能仍将在常规 JavaScript 引擎上运行。
当你要执行复杂的计算时,实质上是将这种负担转移给系统的 GPU 而不是 CPU,从而增加了处理速度和时间。
高性能计算是使用 GPU.js 的主要优势之一。如果你想在浏览器中进行并行计算,而不了解 WebGL,那么 GPU.js 是一个适合你的库。
2.为什么要使用 GPU.js
为什么要使用 GPU 执行复杂的计算的原因不胜枚举,有太多的原因无法在一篇文章中探讨。以下是使用 GPU 的一些最值得注意的好处。
- GPU 可用于执行大规模并行 GPGPU 计算。这是需要异步完成的计算类型
- 当系统中没有 GPU 时,它会优雅地退回到 JavaScript
- GPU 当前在浏览器和 Node.js 上运行,非常适合通过大量计算来加速网站
- GPU.js 是在考虑 JavaScript 的情况下构建的,因此这些功能均使用合法的 JavaScript 语法
如果你认为你的处理器可以胜任,你不需要 GPU.js,看看下面这个 GPU 和 CPU 运行计算的结果。

如你所见,GPU 比 CPU 快 22.97 倍。
3.GPU.js 的工作方式
考虑到这种速度水平,JavaScript 生态系统仿佛得到了一个可以乘坐的火箭。GPU 可以帮助网站更快地加载,特别是必须在首页上执行复杂计算的网站。你不再需要担心使用后台线程和加载器,因为 GPU 运行计算的速度是普通 CPU 的 22.97 倍。
gpu.createKernel 方法创建了一个从 JavaScript 函数移植过来的 GPU 加速内核。
与 GPU 并行运行内核函数会导致更快的计算速度——快 1-15 倍,这取决于你的硬件。
4.GPU.js 入门
为了展示如何使用 GPU.js 更快地计算复杂的计算,让我们快速启动一个实际的演示。
安装
sudo apt install mesa-common-dev libxi-dev // using Linux
npm install gpu.js --save
// OR
yarn add gpu.js
在你的 Node 项目中要导入 GPU.js。
import { GPU } from ('gpu.js')

// OR
const { GPU } = require('gpu.js')

const gpu = new GPU();
乘法演示
在下面的示例中,计算是在 GPU 上并行完成的。
首先,生成大量数据。

const getArrayValues = () => {

  // 在此处创建2D arrary
  const values = [[], []]

  // 将值插入第一个数组
  for (let y = 0; y < 600; y++){
    values[0].push([])
    values[1].push([])

    // 将值插入第二个数组
    for (let x = 0; x < 600; x++){
      values\[0\][y].push(Math.random())
      values\[1\][y].push(Math.random())
    }
  }

  // 返回填充数组
  return values
}
创建内核(运行在 GPU 上的函数的另一个词)。
const gpu = new GPU();

// 使用 `createKernel()` 方法将数组相乘
const multiplyLargeValues = gpu
  .createKernel(function(a, b) {
    let sum = 0;
    for (let i = 0; i < 600; i++) {
      sum +=
        a[this.thread.y][
          i
        ] *
        b[i][this.thread.x];
    }
    return sum;
  })
  .setOutput([600, 600]);
使用矩阵作为参数调用内核。
const largeArray = getArrayValues();
const out = multiplyLargeValues(
  largeArray[0],
  largeArray[1]
);
输出
console.log(out\[y\][x]) // 将元素记录在数组的第x行和第y列
console.log(out\[10\][12]) // 记录输出数组第10行和第12列的元素
5.运行 GPU 基准测试
你可以按照GitHub上指定的步骤运行基准测试。
npm install @gpujs/benchmark

const benchmark = require('@gpujs/benchmark')

const benchmarks = benchmark.benchmark(options);
options 对象包含可以传递给基准的各种配置。
前往 GPU.js 官方网站查看完整的计算基准,这将帮助你了解使用 GPU.js 进行复杂计算可以获得多少速度。
6.如何设置 GPU.js?
为您的项目安装 GPU.js 与其他的 JavaScript 库类似。
对于 Node 项目
npm install gpu.js --save
or
yarn add gpu.js
import { GPU } from ('gpu.js')
--- or ---
const { GPU } = require('gpu.js')
--- or ---
import { GPU } from 'gpu.js'; // Use this for TypeScript
const gpu = new GPU();
对于 Bowsers
在本地下载 GPU.js 或使用其 CDN。
<script src="dist/gpu-browser.min.js"></script>
--- or ---
<script
  src="https://unpkg.com/gpu.js@latest/dist/gpu- browser.min.js">
</script>
<script
  rc="https://cdn.jsdelivr.net/npm/gpu.js@latest/dist/gpu-browser.min.js">
</script>
<script>
 const gpu = new GPU();
 ...
</script>
注意:
如果你使用的是 Linux,你需要确保你安装了正确的文件,运行:sudo apt install mesa-common-dev libxi-dev
这就是你需要知道的关于安装和导入 GPU.js 的情况。
现在,你可以开始在你的应用程序中使用 GPU 编程。
此外,我强烈建议理解 GPU.js 的基本功能和概念。所以,让我们从 GPU.js 的一些基础知识开始。
创建函数
你可以在 GPU.js 中定义函数以在 GPU 中运行,使用一般的 JavaScript 语法。
const exampleKernel = gpu.createKernel(function() {
    ...
}, settings);
上面的代码样本显示了一个 GPU.js 函数的基本结构。我将该函数命名为 exampleKernel。正如你所看到的,我使用了 createKernel 函数,利用 GPU 进行计算。
另外,定义输出的大小是必须的。在上面的例子中,我使用了一个名为 settings 的参数来指定输出大小。
const settings = {
    output: [100]
};
内核函数的输出可以是 1D、2D 或 3D,这意味着它最多可以有 3 个线程。你可以使用 this.thread 命令在内核中访问这些线程。
- 1D : [长度] - 值[this.thread.x]
- 2D : [宽度,高度] - 值[this.thread.y][this.thread.x]
- 3D: [宽度,高度,深度] - 值[this.thread.z][this.thread.y][this.thread.x]。
最后,创建的函数可以像其他的 JavaScript 函数一样使用函数名来调用:exampleKernel()
内部支持的变量
Number
你可以在 GPU.js 函数中使用任何整数或浮点数。
const exampleKernel = gpu.createKernel(function() {
 const number1 = 10;
 const number2 = 0.10;
 return number1 + number2;
}, settings);
Boolean
GPU.js 中也支持布尔值,与 JavaScript 类似。
const kernel = gpu.createKernel(function() {
  const bool = true;
  if (bool) {
    return 1;
  }else{
    return 0;
  }
},settings);
Arrays
你可以在内核函数中定义任何大小的数字数组,并返回它们。
const exampleKernel = gpu.createKernel(function() {
 const array1 = [0.01, 1, 0.1, 10];
 return array1;
}, settings);
Functions
在内核函数中使用私有函数,在 GPU.js 中也是允许的。
const exampleKernel = gpu.createKernel(function() {
  function privateFunction() {
    return [0.01, 1, 0.1, 10];
  }
  return privateFunction();
}, settings);
支持的输入类型
除了上述变量类型外,你还可以向内核函数传递几种输入类型。
Numbers
与变量声明类似,你可以向内核函数传递整数或浮点数,如下所示。
const exampleKernel = gpu.createKernel(function(x) {
 return x;
}, settings);
exampleKernel(25);
1D,2D, or 3D Array of Numbers
你可以将 Array、Float32Array、Int16Array、Int8Array、Uint16Array、uInt8Array 等数组类型传入 GPU.js 内核。
const exampleKernel = gpu.createKernel(function(x) {
 return x;
}, settings);
exampleKernel([1, 2, 3]);
预扁平化的 2D 和 3D 数组也被内核函数所接受。这种方法使上传的速度更快,你必须使用 GPU.js 的输入选项来实现这一点。
const { input } = require('gpu.js');
const value = input(flattenedArray, [width, height, depth]);
HTML Images
与传统的 JavaScript 相比,将图像传递到函数中是我们在 GPU.js 中可以看到的一个新东西。使用 GPU.js,你可以将一个或多个 HTML 图像作为数组传递给内核函数。
//Single Image
const kernel = gpu.createKernel(function(image) {
    ...
})
  .setGraphical(true)
  .setOutput([100, 100]);

const image = document.createElement('img');
image.src = 'image1.png';
image.onload = () => {
  kernel(image);
  document.getElementsByTagName('body')[0].appendChild(kernel.canvas);
};
//Multiple Images
const kernel = gpu.createKernel(function(image) {
    const pixel = image[this.thread.z][this.thread.y][this.thread.x];
    this.color(pixel[0], pixel[1], pixel[2], pixel[3]);
})
  .setGraphical(true)
  .setOutput([100, 100]);

const image1 = document.createElement('img');
image1.src = 'image1.png';
image1.onload = onload;
....
//add another 2 images
....
const totalImages = 3;
let loadedImages = 0;
function onload() {
  loadedImages++;
  if (loadedImages === totalImages) {
    kernel([image1, image2, image3]);
     document.getElementsByTagName('body')[0].appendChild(kernel.canvas);
  }
};
除了上述配置外,还有许多令人兴奋的事情可以用 GPU.js 进行实验。你可以在其文档中找到它们。既然你现在了解了几种配置,让我们用 GPU.js 写一个函数并比较其性能。
7.使用 GPU.js 的第一个功能
通过结合我们之前讨论的所有内容,我写了一个小型的 angular 应用程序,通过将两个有 1000 个元素的数组相乘来比较 GPU 和 CPU 的计算性能。
第 1 步,生成 1000 个元素的数组的函数
我将生成一个每个元素有 1000 个数字的 2D 数组,并在接下来的步骤中使用它们进行计算。
generateMatrices() {
 this.matrices = [[], []];
 for (let y = 0; y < this.matrixSize; y++) {
  this.matrices[0].push([])
  this.matrices[1].push([])
  for (let x = 0; x < this.matrixSize; x++) {
   const value1 = parseInt((Math.random() * 10).toString())
   const value2 = parseInt((Math.random() * 10).toString())
   this.matrices[0][y].push(value1)
   this.matrices[1][y].push(value2)
  }
 }
}
第 2 步,内核函数
这是这个应用程序中最关键的函数,因为所有的 GPU 计算都发生在这里。
在这里,multiplyMatrix 函数将接收两个数字数组和矩阵的大小作为输入。
然后,它将把两个数组相乘并返回总和,同时使用性能 API 测量时间。
gpuMultiplyMatrix() {
  const gpu = new GPU();
  const multiplyMatrix = gpu.createKernel(function (a: number[][], b: number[][], matrixSize: number) {
   let sum = 0;

   for (let i = 0; i < matrixSize; i++) {
    sum += a[this.thread.y][i] * b[i][this.thread.x];
   }
   return sum;
  }).setOutput([this.matrixSize, this.matrixSize])
  const startTime = performance.now();
  const resultMatrix = multiplyMatrix(this.matrices[0],  this.matrices[1], this.matrixSize);

  const endTime = performance.now();
  this.gpuTime = (endTime - startTime) + " ms";

  console.log("GPU TIME : "+ this.gpuTime);
  this.gpuProduct = resultMatrix as number[][];
}
步骤 3,CPU 乘法函数。
这是一个传统的 TypeScript 函数,用于测量相同数组的计算时间。
cpuMutiplyMatrix() {
  const startTime = performance.now();
  const a = this.matrices[0];
  const b = this.matrices[1];
  let productRow = Array.apply(null, new Array(this.matrixSize)).map(Number.prototype.valueOf, 0);
  let product = new Array(this.matrixSize);

  for (let p = 0; p < this.matrixSize; p++) {
    product[p] = productRow.slice();
  }

  for (let i = 0; i < this.matrixSize; i++) {
    for (let j = 0; j < this.matrixSize; j++) {
      for (let k = 0; k < this.matrixSize; k++) {
        product[i][j] += a[i][k] * b[k][j];
      }
    }
  }
  const endTime = performance.now();
  this.cpuTime = (endTime — startTime) + “ ms”;
  console.log(“CPU TIME : “+ this.cpuTime);
  this.cpuProduct = product;
}
8.CPU vs GPU,性能比较
现在是时候看看围绕着 GPU.js 和 GPU 计算的所有讨论是否真实。由于我在上一节中创建了一个 Angular 应用程序,所以我用它来测量性能。
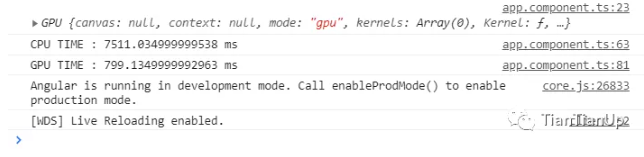
CPU vs GPU — Execution Time
你可以清楚地看到,GPU 编程的计算只花了 799ms,而 CPU 花了 7511ms,这几乎是 10 倍的时间。
我没有就此罢休,通过改变数组大小,对同样的测试进行了几个循环。
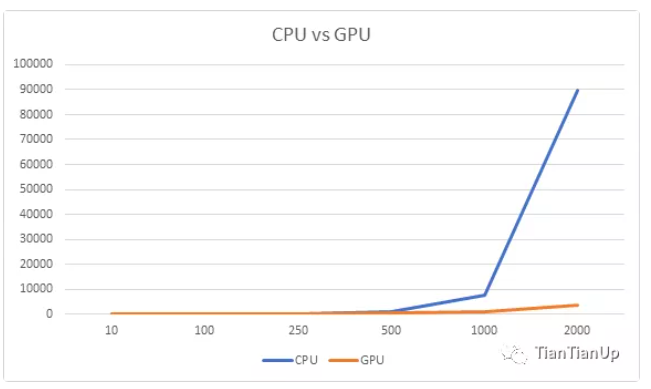
CPU vs GPU
首先,我试着用较小的数组大小,我注意到 CPU 比 GPU 花费的时间要少。例如,当我把数组大小减少到 10 个元素时,CPU 只花了 0.14ms,而 GPU 花了 108ms。
但随着数组大小的增加,GPU 和 CPU 所花的时间有明显的差距。正如你在上图中看到的,GPU 是赢家。
10.结论
根据我使用 GPU.js 的实验,它可以提高 JavaScript 应用程序的性能。
但是,我们必须注意只将 GPU 用于复杂的任务。否则,我们将浪费资源,最终会降低应用程序的性能,