相关文档:https://blog.hszofficial.site/TutorialForPython/%E8%BE%93%E5%85%A5%E8%BE%93%E5%87%BA%E7%AF%87/%E4%BA%BA%E6%9C%BA%E4%BA%A4%E4%BA%92/GUI/TK%E6%A1%86%E6%9E%B6GUI%E7%BC%96%E7%A8%8B%E7%9A%84%E5%9F%BA%E6%9C%AC%E6%80%9D%E8%B7%AF.html
https://www.cnblogs.com/chenyuebai/p/7150382.html
整体描述
窗口设置
实例化一个父容器(可理解为界面中的底层)
#创建窗口:
window =tk.Tk()
#显示窗口(父窗口进入事件循环,可以理解为保持窗口运行,否则界面不展示)
window.mainloop()
#页面属性:窗口默认大小、默认弹出位置、窗口名、父窗口颜色、虚化等等
#设置窗口属性:(修改窗口默认大小、默认弹出位置、窗口名、父窗口颜色、虚化等等)
windows.title('测试用例')
windows.geometry('600x600+20-20')#600x600是窗口大小(x是x不是*),+20-10定义窗口弹出时的默认展示位置+-20表示距离屏幕左边的距离,+-10表示+距离屏幕上面的距离,-距离屏幕下面的距离
windows['bg']='pink' #tkinter界面颜色:https://blog.csdn.net/chl0000/article/details/7657887
win.iconbitmap("app.ico")
# 设置背景色,以“蓝色”为例
win["background"] = "blue"
# 设置透明度
win.attributes("-alpha", 0.6)
# 设置窗口为工具样式:
win.attributes("-toolwindow", True)
# # 设置全屏:
win.attributes("-fullscreen", False)
# 设置窗体置顶
win.attributes("-topmost", True)
# 设置成脱离工具栏
win.overrideredirect(False)
控件相关文档:http://effbot.org/tkinterbook/entry.htm
控件:
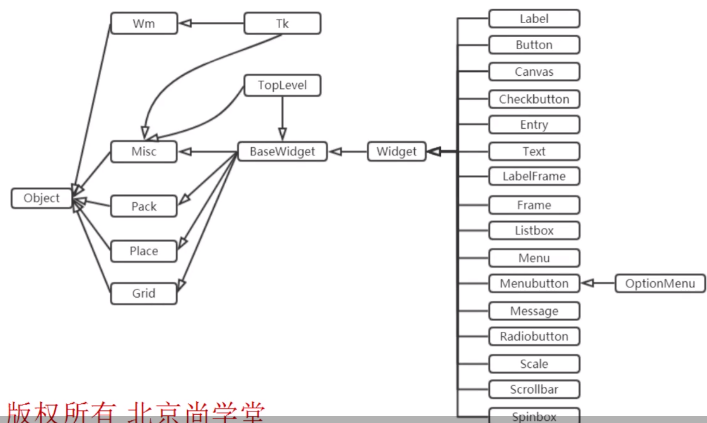
Tkinter支持16个核心的窗口部件,这个16个核心窗口部件类简要描述如下:
Button:一个简单的按钮,用来执行一个命令或别的操作。
Canvas:组织图形。这个部件可以用来绘制图表和图,创建图形编辑器,实现定制窗口部件。
Checkbutton:代表一个变量,它有两个不同的值。点击这个按钮将会在这两个值间切换。
Entry:文本输入域。
Frame:一个容器窗口部件。帧可以有边框和背景,当创建一个应用程序或dialog(对话)版面时,帧被用来组织其它的窗口部件。
Label:显示一个文本或图象。
Listbox:显示供选方案的一个列表。listbox能够被配置来得到radiobutton或checklist的行为。
Menu:菜单条。用来实现下拉和弹出式菜单。
Menubutton:菜单按钮。用来实现下拉式菜单。
Message:显示一文本。类似label窗口部件,但是能够自动地调整文本到给定的宽度或比率。
Radiobutton:代表一个变量,它可以有多个值中的一个。点击它将为这个变量设置值,并且清除与这同一变量相关的其它radiobutton。
Scale:允许你通过滑块来设置一数字值。
Scrollbar:为配合使用canvas, entry, listbox, and text窗口部件的标准滚动条。
Text:格式化文本显示。允许你用不同的样式和属性来显示和编辑文本。同时支持内嵌图象和窗口。
Toplevel:一个容器窗口部件,作为一个单独的、最上面的窗口显示。
messageBox:消息框,用于显示你应用程序的消息框。(Python2中为tkMessagebox)
注意在Tkinter中窗口部件类没有分级;所有的窗口部件类在树中都是兄弟关系。
所有这些窗口部件提供了Misc和几何管理方法、配置管理方法和部件自己定义的另外的方法。此外,Toplevel类也提供窗口管理接口。这意味一个典型的窗口部件类提供了大约150种方法。

一、Lable
Lable控件:显示文本和位图;文本不允许修改
调用方法:
#新建lable对象
lable1=tk.Lable(master(框架的父容器如:窗口windows),option(可设置属性))
lable1=tk.Lable(窗口对象,text='test text',font='',fg='',bg='',bd='',anchor='n,s,w,e,ne,nw,se,center')
参数:
master(窗口对象)
text: 文本内容可以包含(
)
font: 设置字体 ("华文黑体",20,"bold")
anchor: 图片或文本在背景内容区的位置:默认center n,s,w,e,ne,nw,se,center 东南西北方位首字母
bg:标签背景颜色
fg:字体颜色
bd:标签的大小,即标签背景颜色填涂区域
cursor:鼠标移动到表情是,光标的形状,可以设置为arrow,circle,cross,plus等
height:标签的高度,默认值是 0。
image:设置标签图像。
justify:定义对齐方式,可选值有:LEFT,RIGHT,CENTER,默认为 CENTER。
padx:轴间距,以像素计,默认 1(文字到边框的距离,水平方向)
pady:轴间距,以像素计,默认 1(文字到边框的距离,垂直方向)
relief:边框样式,可选的有:FLAT、SUNKEN、RAISED、GROOVE、RIDGE。默认为 FLAT。
textvariable:标签显示 Tkinter 变量,StringVar。如果变量被修改,标签文本将自动更新。
underline:设置下划线,默认 -1,如果设置 1,则是从第二个字符开始画下划线。
设置标签宽度,默认值是 0,都是以系统默认的中文的一个字体宽高为单位
heigth:设置标签高度,默认值是0,都是以系统默认的中文的一个字体宽高为单位
wraplength"设置标签文本为多少行显示,默认为 0。
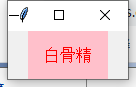
label1=tk.Label(windows,text='白骨精',bg='pink',font='宋体',fg='red',bd=15,cursor='plus')
label1.pack()
通过label['font'],label['text']等形式显示在页面上
root=tk.Tk()
label=Label(root)           #调用Label绘制函数,root参数为根窗体对象,即在root窗体上绘制label控件
label['text']='welcome to the first GUI program using python!'  #设置text属性,即显示内容
label['font']=14            #设置font属性,包括字体大小、字体类型等
lable['fg']='red'           #设置fg前景颜色,这里就是字体颜色
label.pack()                #使用pack方法实现空间的自动布局
root.mainloop()             #窗体消息循环,运行窗体对象
二、Button(https://www.cnblogs.com/zyg123/p/10351073.html#)
1.基本用法:
基本用法:Button(根对象, [属性列表])
根对象:在那个窗体显示,例如主窗体(windows=tk.Tk())。
属性列表:是可选的属性=属性值组成。
2.属性列表:
| 属性 | 说明 |
|---|---|
| text | 标签显示的文本 |
| font | 设置文本的字体和大小 |
| fg(foreground) | 字体的颜色, |
| bg (background) | 标签的背景色 |
| width | 标签的宽度(一个中文的字体宽为单位) |
| height | 标签的高度(一个中文的字体高为单位) |
| cursor | 鼠标的样式 |
| command | 绑定事件 |
| padx | 文字到边框的距离,水平方向 |
| pady | 文字到边框的距离,垂直方向 |
| bd(borderwidth) | 边框的宽度 |
| relief | 边框的样式 |
| justify | 文本对齐方式 |
| image | 图片 |
| compound | 图片与文字的混搭 |
| anchor | 方位 |
3.常用属性(同label参数):
(1)font 同Lable
font:设置字体与字体的大小
用法:font=("字体名",大小) 例如:font=(“黑体”, 20)
(2)fg与bg
fg 前景色,也就是字体的颜色,bg 背景颜色
用法:fg="red", fg="#121234"
(3)width 与 height
width height 标签的宽度与高度,都是以系统默认的中文的一个字体宽高为单位
用法:width = 5, height=2
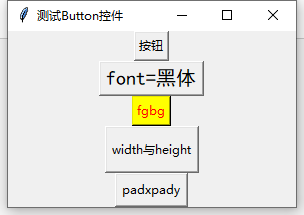
实例:
#Button控件
windows=tk.Tk()
windows.title('测试Button控件')
Button(windows,text='按钮').pack()
Button(windows,text='font=黑体',font=('黑体',15)).pack()
Button(windows,text='fgbg',fg='red',bg='yellow').pack()
Button(windows,text='width与height',width=12,height=2).pack()
Button(windows,text='padxpady',padx=3,pady=3).pack()
windows.mainloop()
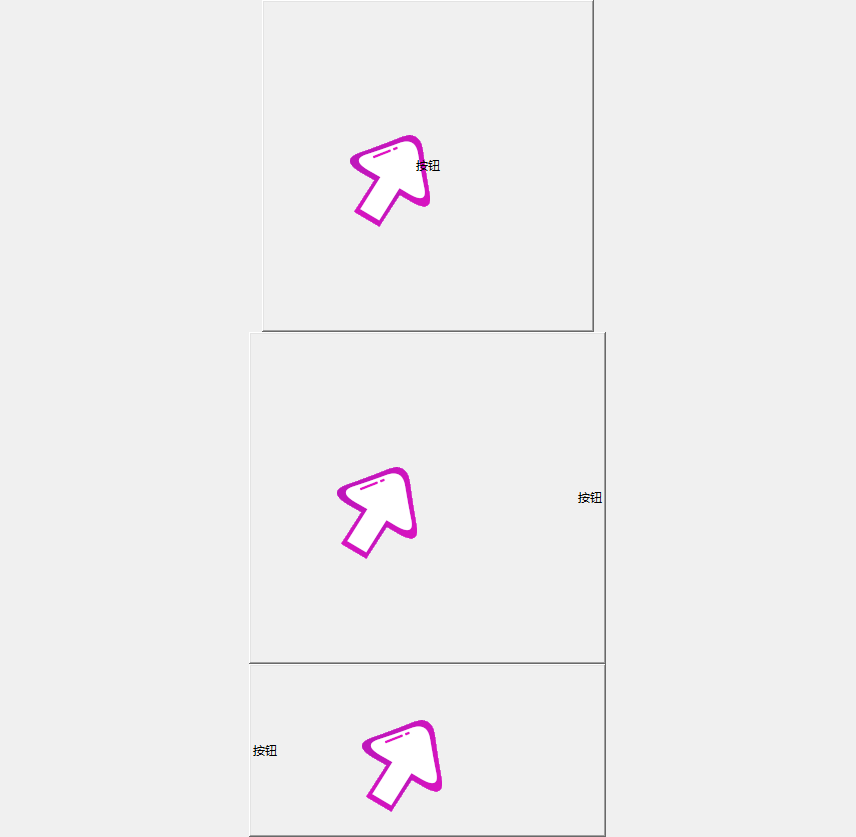
4.按钮中加入图片;image与compound参数的应用
(1)加入图片:
需要先导入图片的路径:img1 = tk.PhotoImage(file="image/01.png")
再使用:image=img1
注:目前支持 .png 与 .gif 格式, 还不支持 .jpg格式,Button的大小是根据图片的大小来确定的。
(2)compound参数使用:
需要使用:compound="对齐方式",
对齐方式有:'left', "right", "center"
windows=tk.Tk()
windows.title('测试Button控件')
jpg=PhotoImage(file="a.gif")
Button(windows,image=jpg,text='按钮',compound='center').pack()
Button(windows,image=jpg,text='按钮',compound='left').pack()
Button(windows,image=jpg,text='按钮',compound='right').pack()
windows.mainloop()
5.鼠标样式
cursor="鼠标的属性值" pencil:笔型 circle:圆形 hand1:手型1 hand2:手型2
windows=tk.Tk()
windows.title('测试鼠标样式')
Button(text='pencil',cursor='pencil').pack() #笔形
Button(text='circle',cursor='circle').pack()#圆环形
Button(text='hand1',cursor='hand1').pack()#手型1
Button(text='hand2',cursor='hand2').pack()#手型2
windows.mainloop()
6.按钮边框样式
relief= "边框样式值" flat 无边框 groove 中间凹 ridge 中间凸 raised 往中间凸 solid 往中间凹 sunken 中间下陷(这里为了便于显示可以使用bd扩展标签宽度)
windows=tk.Tk()
windows.title('测试按钮边框样式')
Button(text='无边框',relief='flat',bd=10).pack()
Button(text='中间凹',relief='groove',bd=10).pack()
Button(text='中间凸',relief='ridge',bd=10).pack()
Button(text='往中间凸',relief='raised',bd=10).pack()
Button(text='往中间凹',relief='solid',bd=10).pack()
Button(text='中间下陷',relief='sunken',bd=10).pack()
windows.mainloop()

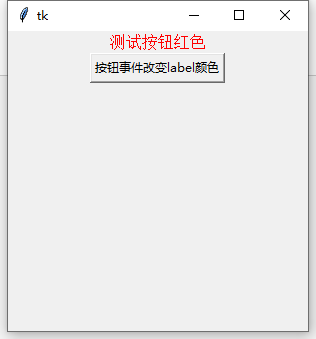
7.按钮的事件绑定
(1)普通按钮事件绑定
Button 使用 command=功能函数 来绑定
Button(win, text="确定", command=功能函数(函数名))
windows=tk.Tk()
windows.geometry('300x300')
label1=Label(text='测试按钮红色',fg='red',font=10)
label1.pack()
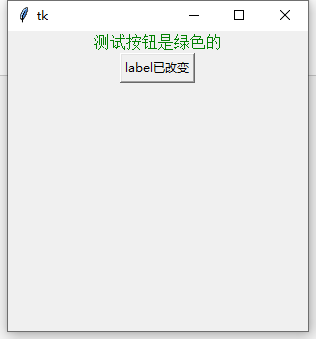
def change_func():
label1['text']='测试按钮是绿色的'
label1['fg']='green'
Button1['text']='label已改变'
Button1=Button(text='按钮事件改变label颜色',command=change_func)
Button1.pack()
windows.mainloop()
通过改进判断优化按钮循环变化调整
windows=tk.Tk()
windows.geometry('300x300')
label1=Label(text='测试按钮红色',fg='red',font=10)
label1.pack()

def change_func():

    if  label1['text'] == '测试按钮红色':
        label1['text']='测试按钮是绿色的'
        label1['fg']='green'
        Button1['text']='label已改变'
        change=False
    else:
        label1['text'] = '测试按钮红色'
        label1['fg'] = 'red'
        Button1['text'] = '按钮事件改变label颜色'
        change=True
Button1=Button(text='按钮事件改变label颜色',command=change_func)
Button1.pack()


windows.mainloop()
(2)传参数Button绑定事件
我们使用Button传递数值时,需要用:
lambda: 功能函数(var1, var2, ……)(lambda执行函数式)
我们同样创建一个简单的窗体,只有一个控件按钮
我们绑定的事件是,当我们点击按钮时,会传入两个参数,并在功能函数进行计算。
win=tk.Tk()
def sum_fun(a,b):
    result=a+b
    print('%d+%d=%d'%(a,b,result))
button=Button(win,text='传值事件',command=lambda :sum_fun(12,13))
button.pack()
win.mainloop()

## 网络实例:关于button按钮(转至:https://liushipeng.blog.csdn.net/article/details/103716375)
# -*- coding:utf-8 -*-
from tkinter import *
'''
NW N NE
W C E
SW S SE
'''
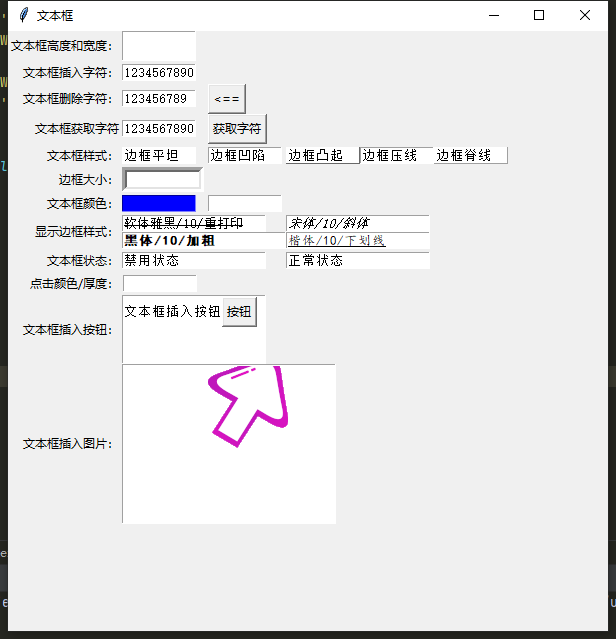
class textbox:
def __init__(self):
self.root = Tk()
self.root.title("文本框") # 设置窗口标题
self.root.geometry("600x600") # 设置窗口大小 注意:是x 不是*
'''文本框样式'''
# 设置文本框高度为1,宽度为2,height=2表示一行的高度,width=2表示宽度为两个字节
self.height_width_label = Label(self.root, text='文本框高度和宽度:')
self.height_width_text = Text(self.root, height=2, width=10)
# 文本框插入数据
self.insert_label = Label(self.root, text='文本框插入字符:')
self.insert_text = Text(self.root, height=1, width=10)
self.insert_text.insert('0.0', '1234567890')
# 文本框删除数据
self.del_label = Label(self.root, text='文本框删除字符:')
self.del_text = Text(self.root, height=1, width=10)
self.del_text.insert('0.0', '123456789')
self.button_del = Button(self.root, text='<==', command=self.delete_text)
# 文本框获取数据
self.get_label = Label(self.root, text='文本框获取字符')
self.get_text = Text(self.root, height=1, width=10)
self.get_text.insert('0.0', '1234567890')
self.button_get = Button(self.root, text='获取字符', command=self.text_get)
# 文本框样式
self.relief_label = Label(self.root, text='文本框样式:')
self.flat_text = Text(self.root, height=1, width=10, relief=FLAT)
self.flat_text.insert('0.0', '边框平坦')
self.sunken_text = Text(self.root, height=1, width=10, relief=SUNKEN)
self.sunken_text.insert('0.0', '边框凹陷')
self.taised_text = Text(self.root, height=1, width=10, relief=RAISED)
self.taised_text.insert('0.0', '边框凸起')
self.groove_text = Text(self.root, height=1, width=10, relief=GROOVE)
self.groove_text.insert('0.0', '边框压线')
self.tidge_text = Text(self.root, height=1, width=10, relief=RIDGE)
self.tidge_text.insert('0.0', '边框脊线')
# 文本框边框大小,bd='边框大小'
self.db_label = Label(self.root, text='边框大小:')
self.db_text = Text(self.root, height=1, width=10, bd=5)
# 文本框后颜色,bg='背景色',fg='前景色'
self.colour_label = Label(self.root, text='文本框颜色:')
self.activebackground_text = Text(self.root, height=1, width=10, bg='blue')
self.activeforeground_text = Text(self.root, height=1, width=10, fg='blue')
# 文本框文字字体格式, font=('字体', 字号, 'bold/italic/underline/overstrike')
self.font_Label = Label(self.root, text='显示边框样式:')
self.font_text_1 = Text(self.root, height=1, width=20, font=('软体雅黑', 10, 'overstrike'))
self.font_text_1.insert('0.0', '软体雅黑/10/重打印')
self.font_text_2 = Text(self.root, height=1, width=20, font=('宋体', 10, 'italic'))
self.font_text_2.insert('0.0', '宋体/10/斜体')
self.font_text_3 = Text(self.root, height=1, width=20, font=('黑体', 10, 'bold'))
self.font_text_3.insert('0.0', '黑体/10/加粗')
self.font_text_4 = Text(self.root, height=1, width=20, font=('楷体', 10, 'underline'))
self.font_text_4.insert('0.0', '楷体/10/下划线')
# 文本框状态,禁用状态无法输入,正常状态可以输入
self.state_Label = Label(self.root, text='文本框状态:')
self.state_text_1 = Text(self.root, height=1, width=20)
self.state_text_1.insert('0.0', '禁用状态')
self.state_text_1.config(state=DISABLED)
self.state_text_2 = Text(self.root, height=1, width=20)
self.state_text_2.insert('0.0', '正常状态')
self.state_text_2.config(state=NORMAL)
# 文本框点击颜色,及颜色厚度。highlightcolor='颜色',highlightthickness=厚度
self.label_colour = Label(self.root, text='点击颜色/厚度:')
self.highlightcolor = Text(self.root, height=1, width=10, highlightcolor='red', highlightthickness=1)
# 文本框插入按钮
self.button_text_label = Label(self.root, text='文本框插入按钮:')
self.button_text = Text(self.root, height=5, width=20)
self.button_text.insert('0.0', '文本框插入按钮')
self.text_button = Button(self.button_text, text='按钮', command=self.print_text)
self.button_text.window_create(INSERT, window=self.text_button)
# 文本框插入图片
self.image_text_label = Label(self.root, text='文本框插入图片:')
self.image_text = Text(self.root, height=12, width=30)
self.image_text.insert('0.0', '
文本框插入图片')
photo = PhotoImage(file="a.gif")
self.image_text.image_create('1.0', image=photo)
'''grid布局'''
self.height_width_label.grid(row=0, column=0, sticky=E)
self.height_width_text.grid(row=0, column=1, sticky=W)
self.insert_label.grid(row=1, column=0, sticky=E)
self.insert_text.grid(row=1, column=1, sticky=W)
self.del_label.grid(row=2, column=0, sticky=E)
self.del_text.grid(row=2, column=1, sticky=W)
self.button_del.grid(row=2, column=2, sticky=W)
self.get_label.grid(row=3, column=0, sticky=E)
self.get_text.grid(row=3, column=1, sticky=W)
self.button_get.grid(row=3, column=2, sticky=W)
self.relief_label.grid(row=4, column=0, sticky=E)
self.flat_text.grid(row=4, column=1, sticky=W)
self.sunken_text.grid(row=4, column=2, sticky=W)
self.taised_text.grid(row=4, column=3, sticky=W)
self.groove_text.grid(row=4, column=4, sticky=W)
self.tidge_text.grid(row=4, column=5, sticky=W)
self.db_label.grid(row=5, column=0, sticky=E)
self.db_text.grid(row=5, column=1, sticky=W)
self.colour_label.grid(row=6, column=0, sticky=E)
self.activebackground_text.grid(row=6, column=1, sticky=W)
self.activeforeground_text.grid(row=6, column=2, sticky=W)
self.font_Label.grid(row=7, column=0, rowspan=2, sticky=E)
self.font_text_1.grid(row=7, column=1, columnspan=2, sticky=W)
self.font_text_2.grid(row=7, column=3, columnspan=2, sticky=W)
self.font_text_3.grid(row=8, column=1, columnspan=2, sticky=W)
self.font_text_4.grid(row=8, column=3, columnspan=2, sticky=W)
self.state_Label.grid(row=9, column=0, sticky=E)
self.state_text_1.grid(row=9, column=1, columnspan=2, sticky=W)
self.state_text_2.grid(row=9, column=3, columnspan=2, sticky=W)
self.label_colour.grid(row=10, column=0, sticky=E)
self.highlightcolor.grid(row=10, column=1, sticky=W)
self.button_text_label.grid(row=11, column=0, sticky=E)
self.button_text.grid(row=11, column=1, columnspan=2, sticky=W)
self.image_text_label.grid(row=12, column=0, sticky=E)
self.image_text.grid(row=12, column=1, columnspan=3, sticky=W)
self.root.mainloop()
def print_text(self):
print(self.button_text.get('0.0', 'end'))
def delete_text(self):
self.del_text.delete('0.0', END)
def text_get(self):
print(self.get_text.get('0.0', END))
if __name__ == '__main__':
textbox()
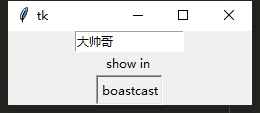
输入文字既可以语音读取 tk+pyttsx3的小
from tkinter import  *
import  pyttsx3

class Tool:
    def __init__(self,windows):
        self.windows=windows
        self.engine=pyttsx3.init()
        self.show_wind()

    def show_wind(self):
        self.entry=Entry(width=15)
        self.entry.pack()

        self.label=Label(text='show in ')
        self.label.pack()

        self.button=Button(text='boastcast',command=lambda :self.change(set=True))
        self.button.pack()
    def change(self,set=False):
        cont=self.entry.get()
        if set:
            self.engine.say(cont)
            self.engine.runAndWait()
        else:
            return

app=Tk()
Tool(app)
app.mainloop()
添加转化下载按钮(新建文件有瑕疵)
from tkinter import  *
import  pyttsx3
import os
import tkinter.messagebox as msgbox
class Tool:
    def __init__(self,windows,name):
        self.windows=windows
        self.engine=pyttsx3.init()
        self.show_wind()
        self.name=name
        self.file=os.getcwd()+name+'.mp3'

    def show_wind(self):
        self.entry=Entry(width=15)
        self.entry.pack()

        self.label=Label(text='show in ')
        self.label.pack()

        self.button=Button(text='boastcast',command=lambda :self.change(set=True))
        self.button.pack()
        self.button_download=Button(text='download',command=lambda :self.download(set_com=True))
        self.button_download.pack()
    def change(self,set=False):
        cont=self.entry.get()
        if set:
            self.engine.say(cont)
            self.engine.runAndWait()
        else:
            return
    def download(self,set_com=False):
        if set_com:
            conts=self.entry.get()
            if not os.path.exists(self.file):
                f=open(self.file,'wb')
                f.close()
                self.engine.save_to_file(conts,self.name+'.mp3')
                self.engine.runAndWait()
            else:
                msgbox.showinfo('出错','文件已存在')


app=Tk()
Tool(app,'language')
app.mainloop()
