关于使用python批量操作网络设备,这里本人目前只接触了两个模块,netmiko和pratmiko,后面的脚本也都将基于这两个模块。
一、netmiko模块
1、使用netmiko模块连接操作设备
import netmiko          #导入netmiko模块
import time             #导入time模块


#使用with语句打开用于ssh连接所需要的相关信息(用户名,密码,ip地址,需要配置的命令),这个打开了两个文件用户信息文件,命令文件,分别命名为devices_file,cmd_file
with open("ip_user_pass.txt", "r") as devices_file, open("cmdlist.txt", "r") as cmd_file:
    #将用户信息文件按行读取赋值给devices
    devices = devices_file.readlines()
    #将命令文件按行读取赋值给cmdlist
    cmdlist = cmd_file.readlines()
    #使用循环将用户名,密码,IP地址,分别赋值给username,password,ip_address变量,并依次登陆
    for line in devices:
        line = line.strip("
")
        ip_address = line.split(",")[0]   #split() 通过指定分隔符对字符串进行切片,如果参数 num 有指定值,则分隔 num+1 个子字符串
        username = line.split(",")[1]
        password = line.split(",")[2]


        #创建一个名为SW2的字典,该字典包含“device_type”“ip”“username”和“password”4个必选的键,如果设备类型是netmiko不支持的类型,不清楚还能不能连接
        SW2 = {
            'device_type': 'huawei',
            'ip': ip_address,
            'username': username,
            'password': password,
            }


        connect = netmiko.ConnectHandler(**SW2)     #函数ConnectHandler()。该函数用来实现SSH登录网络设备,是Netmiko最重要的函数。
        print("Successfully connect to" + SW2['ip'])
        #config_commands = ['dis arp']
        #output = connect.send_config_set(config_commands)
        #rint(output)


        #使用循环将cmdlist中的命令依次输入
        for cmd in cmdlist:
            output2 = connect.send_config_set(cmd)    #send_config_set()则可向设备一次输入多个命令
            print(output2)
            time.sleep(1)
        print("*" * 50 + "分割线" + "*" * 50)


        #result = connect.send_command('dis int LoopBack 0')
        #print(result)
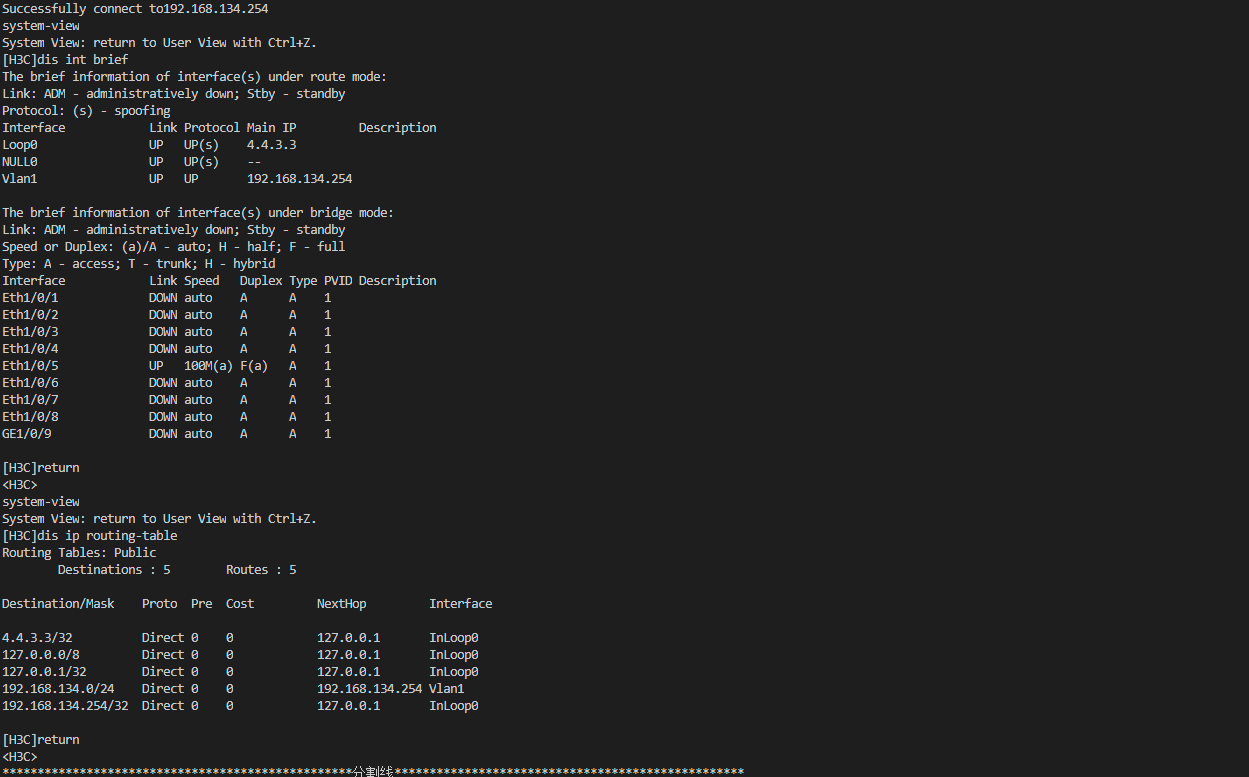
脚本运行结果如下:

2、ssh_netmiko_多线程
使用netmiko实现多线程操作网络设备
#coding=utf-8
import threading        #Python 3已经内置了threading模块来实现多线程,这里引入
from queue import Queue   #多线程中需要用的队列,这里引入,多线程中需要用的队列,这里引入,通过队列传递数据,安全,不会造成多个线程访问时混乱
import netmiko
import time


#定义连接函数,使用netmiko连接设备,并输入预定义命令
def ssh_session(ip, username, password,cmdlist, output_q):
    SW2 = {
        'device_type': 'huawei',
        'ip': ip_address,
        'username': username,
        'password': password,
        }


    connect = netmiko.ConnectHandler(**SW2)
    print("Successfully connect to" + SW2['ip'])
    '''
    config_commands = ['dis arp', 'dis ip routing-table', 'dis int brief']
    output = connect.send_config_set(config_commands)
    print(output)
    print("*" * 50 + "分割线" + "*" * 50)
    '''

    for cmd in cmdlist:
        output = connect.send_config_set(cmd)
        print(output)
        time.sleep(1)
        print("*" * 50 + "分割线" + "*" * 50)

    #result = connect.send_command('dis int LoopBack 0')
    #print(result)


print("程序于 {} 开始执行
".format(time.strftime("%X")))
threads = []
with open("ip_user_pass.txt", "r") as devices_file, open("cmdlist.txt", "r") as cmd_file:
    devices = devices_file.readlines()
    cmdlist = cmd_file.readlines()
    for line in devices:
        line = line.strip("
")
        ip_address = line.split(",")[0]   #split() 通过指定分隔符对字符串进行切片,如果参数 num 有指定值,则分隔 num+1 个子字符串
        username = line.split(",")[1]
        password = line.split(",")[2]
        #使用threading的Thread()函数为ssh_session函数创建一个线程并将它赋值给变量t,注意Thread()函数的target参数对应的是函数名称(即ssh_session)
        #args对应的是该ssh_session函数的参数
        t = threading.Thread(target=ssh_session, args=(ip_address, username, password, cmdlist, Queue()))
        t.start()
        threads.append(t)


for i in threads:
    i.join()    #threading的join()方法的作用是强制阻塞调用它的线程,直到该线程运行完毕或者终止(类似单线程同步)

print("程序于 {} 执行结束
".format(time.strftime("%X")))
脚本缺少错误控制加入try语句,可以更好的应用脚本,不会因为地址和用户名密码错误导致脚本中断,另外关于脚本里的使用了队列实现线程控制,但是为什么要写成这个形式
t = threading.Thread(target=ssh_session, args=(ip_address, username, password, cmdlist, Queue())),目前我还不太了解。希望知道原理的大大能告诉我一下~
二、prarmiko模块
1、使用prarmiko模块连接网络设备操作(连接协议ssh)
'''
需在命令行运行程序,并给四个文件参数,存放ip的文件在前,存放命令的文件在后,例如:python lab3_1.py ip.txt cmdlist.txt username.txt password.txt
'''


import paramiko
import time
import getpass
import sys
import socket


#username = input("username:")
#password = getpass.getpass("password:")
ip_file = sys.argv[1]       #sys.argv[]就是一个从程序外部获取参数的桥梁,外部取得的参数可以是多个,所以获得的是一个列表(list),其第一个元素是程序本身,随后才依次是外部给予的参数,
cmd_file = sys.argv[2]      #这里使用sys.argv(),即将保存的ip和命令的文件作为参数赋值给变量
user_file = sys.argv[3]
pass_file = sys.argv[4]


switch_with_authentication_issue = []   #认证失败的列表,用于存放用户认证失败的IP地址
switch_not_reachable = []               #连接失败的列表,用于存放连接失败的ip地址


#打开文件用户信息文件,IP地址文件
iplist = open(ip_file, "r")
userlist = open(user_file, "r")
passlist = open(pass_file, "r")


#使用循环按行读取,文件内容,这个用zip() 函数将可迭代的对象作为参数,将对象中对应的元素打包成一个个元组,然后返回由这些元组组成的对象
#例如:    192.168.1.1    admin    123
for line1, line2, line3  in zip(iplist.readlines(), userlist.readlines(), passlist.readlines()):
    try:
        ip = line1.strip()
        username = line2.strip()
        password = line3.strip()
        ssh_client = paramiko.SSHClient()   #调用paramiko的SSHClient方法连接网络设备,及本地设备为客户端
        '''
        默认情况下,Paramiko会拒绝任何未知的SSH公钥(publickey),这里我们需要使用ssh_client.set_missing_host_key_policy(paramiko.AutoAddPolicy())
        来让Paramiko接受SSH服务端(也就是SW3)提供的公钥,这是任何时候使用Paramiko都要用到的标准配置。
        '''
        ssh_client.set_missing_host_key_policy(paramiko.AutoAddPolicy())
        ssh_client.connect(hostname=ip, username=username, password=password)   #调用connect()方法,输入连接设备所需的ip,用户名,密码
        print("登录成功", ip)
        command = ssh_client.invoke_shell() #调用Paramiko.SSHClient()的invoke_shell()方法来唤醒shell
        cmdlist = open(cmd_file, "r")   #读入命令文件
        cmdlist.seek(0)      #seek() 方法用于移动文件读取指针到指定位置,参数为0代表从文件开头开始算起。
        for line in cmdlist.readlines():
            command.send(line + "
")
        time.sleep(5)
        cmdlist.close()
        output = command.recv(65535)
        print(output.decode("ascii"))
    except paramiko.ssh_exception.AuthenticationException:
        print("用户认证失败:" + ip)
        switch_with_authentication_issue.append(ip)
    except socket.error:
        print(ip + "连接失败")
        switch_not_reachable.append(ip)


iplist.close()
userlist.close()
passlist.close()
ssh_client.close


print("*" * 50 + "分割线" + "*" * 50)
print("
用户认证失败的交换机:
")
for i in switch_with_authentication_issue:
    print(i)

print("
网络连接失败交换机:
")
for i in switch_not_reachable:
    print(i)
三、配置文件备份
1、使用netmiko备份,用于备份netmiko支持的设备,使用h3c设备测试此脚本,备份失败(可能是netmiko中没有h3c的相关函数)
import netmiko
import time


with open("devices.txt") as devices_file:
    devices = devices_file.readlines()
    for line in devices:
        line = line.strip("
")
        ipaddr = line.split(",")[0]   #split() 通过指定分隔符对字符串进行切片,如果参数 num 有指定值,则分隔 num+1 个子字符串
        username = line.split(",")[1]
        password = line.split(",")[2]
        vendor = line.split(",")[3]


SW2 = {
    'device_type': vendor,
    'ip': ipaddr,
    'username': username,
    'password': password,
    }


now = time.strftime("%Y-%m-%d", time.localtime())

connect = netmiko.ConnectHandler(**SW2)
print("Successfully connect to" + SW2['ip'])
backup_cfg = connect.send_command("dis cur")    #将命令内容赋值给变量
print(backup_cfg)
#将变量的值写入文件,文件命名按时间划分
with open( "C:\ftp\交换机_"  + str(now) + "_{}.txt".format(ipaddr), "w") as f:
    f.write(backup_cfg)
2、使用prarmiko,基于tftp备份配置文件
首先要搭建一个tftp服务器,使用tftp相关软件即可
其次运行脚本
import paramiko
import time


with open("ip_user_pass.txt") as devices_file:
    devices = devices_file.readlines()
    for line in devices:
        line = line.strip("
")
        ip_address = line.split(",")[0]   #split() 通过指定分隔符对字符串进行切片,如果参数 num 有指定值,则分隔 num+1 个子字符串
        username = line.split(",")[1]
        password = line.split(",")[2]
        now = time.strftime("%Y-%m-%d", time.localtime())
        ssh_client = paramiko.SSHClient()
        ssh_client.set_missing_host_key_policy(paramiko.AutoAddPolicy())
        ssh_client.connect(hostname=ip_address, username=username, password=password)
        print("登陆成功:",ip_address)
        command = ssh_client.invoke_shell()
        command.send("copy startup.cfg {}_{}.cfg
".format(now,ip_address))
        command.send("y
")
        command.send("tftp 192.168.134.222 put {}_{}.cfg
".format(now,ip_address))
        time.sleep(15)
        command.send("delete  {}_{}.cfg
".format(now,ip_address))
        command.send("y
")
        time.sleep(5)
        output = command.recv(65535)
        print(output.decode("ascii"))
    ssh_client.close