一、互斥量Mutex同步多线程
1、Win32平台
相关函数和头文件
 1 #include <windows.h>
 2 HANDLE CreateMutex(
 3 LPSECURITY_ATTRIBUTESlpMutexAttributes, // 指向安全属性的指针
 4 BOOLbInitialOwner, // 初始化互斥对象的所有者
 5 LPCTSTRlpName // 指向互斥对象名的指针
 6 );
 7
 8 DWORD WINAPI WaitForSingleObject(
 9 __in HANDLE hHandle,//互斥量对象句柄
10 __in DWORD dwMilliseconds//等待时间
11 );
12
13 BOOL WINAPI ReleaseMutex(HANDLE hMutex);
14 返回值:BOOL,TRUE表示成功,FALSE表示失败。
15 参数表:hMutex:HANDLE,制定一个互斥体的句柄。
16
17 BOOL CloseHandle(HANDLE hObject);
18 参数: hObject 代表一个已打开对象handle。
19 返回值:
20 TRUE:执行成功;
21 FALSE:执行失败,可以调用GetLastError()获知失败原因。
源码:
从本篇开始,我对代码会进行一些封装,使之更贴近实际使用的情况。
 1 /***MyMutex.h头文件***/
 2
 3 #ifndef __MY_MUTEX_H
 4 #define __MY_MUTEX_H
 5 #include <windows.h>
 6
 7 class CMyMutex
 8 {
 9 public:
10     CMyMutex();
11
12     virtual ~CMyMutex();
13
14     void Lock();
15
16     void UnLock();
17
18 private:
19     HANDLE m_hMutex;
20 };
21
22 class CAutoLock
23 {
24 public:
25     CAutoLock(CMyMutex* pMutex);
26
27     virtual ~CAutoLock();
28
29 private:
30     CMyMutex*           m_pMutex;
31 };
32
33 #endif;
 1 /***MyMutex.cpp文件***/
 2
 3 #include <iostream>
 4 #include <windows.h>
 5 #include "MyMutex.h"
 6
 7 using namespace std;
 8
 9 CMyMutex::CMyMutex()
10 {
11     m_hMutex = CreateMutex(NULL               /*默认安全属性*/
12                         , false               /*创建线程不拥有该信号量*/
13                         , NULL                /*锁名称*/
14                         );
15 }
16
17 CMyMutex::~CMyMutex()
18 {
19     if(NULL != m_hMutex)
20     {
21         CloseHandle(m_hMutex);
22         cout<<"m_hMutex被关闭"<<endl;
23     }
24 }
25
26 void CMyMutex::Lock()
27 {
28     if(NULL == m_hMutex)
29     {
30         cout<<"m_hMutex为空"<<endl;
31         return;
32     }
33     DWORD dRes = -1;
34     dRes = WaitForSingleObject(m_hMutex, INFINITE);
35     if(WAIT_OBJECT_0  == dRes)
36     {
37 //      cout<<"上锁成功!"<<endl;
38     }
39     else if(WAIT_ABANDONED == dRes)
40     {
41         cout<<"发生锁死现象"<<endl;
42     }
43     else if(WAIT_TIMEOUT == dRes)
44     {
45         cout<<"等待超时"<<endl;
46     }
47     else if(WAIT_FAILED == dRes)
48     {
49         cout<<"发生错误"<<endl;
50     }
51     else
52     {
53         cout<<"上锁失败!"<<endl;
54     }
55
56 }
57
58 void CMyMutex::UnLock()
59 {
60     ReleaseMutex(m_hMutex);
61 }
62
63 //****************************CAutoLock*****************************************
64 CAutoLock::CAutoLock(CMyMutex* pMutex)
65 {
66     m_pMutex = pMutex;
67     m_pMutex->Lock();
68 }
69
70 CAutoLock::~CAutoLock()
71 {
72     m_pMutex->UnLock();
73 }
 1 /***main.cpp文件***/
 2
 3 #include <iostream>
 4 #include <windows.h>
 5 #include "MySemaphore.h"
 6 #include "MyMutex.h"
 7 using namespace std;
 8
 9 CMyMutex        MyMutex;/*声明一个全局的互斥量对象(自己封装的)*/
10
11 DWORD WINAPI Fun(LPVOID lpParamter)
12 {
13     string strPrint((const char*)lpParamter);
14     int iRunTime = 0;
15     //执行100次跳出
16     while(++iRunTime<100)
17     {
18         /*利用CMyMutex的构造函数和析构函数分别取创建和关闭互斥量
19           利用CAutoLock的构造和析构函数去WaitForSingleObject和ReleaseMutex互斥量
20         */
21         CAutoLock cLock(&MyMutex);
22         cout <<"["<< iRunTime <<"]:"<< strPrint.c_str()<<endl;
23         //线程函数阻塞,交出CPU使用权限
24         Sleep(10);
25     }
26     return 0;
27 }
28
29 int main()
30 {
31     //创建子线程
32     string str1 = "A";
33     string str2 = "B";
34     string str3 = "C";
35     string str4 = "D";
36     string str5 = "E";
37
38     HANDLE hThread1 = CreateThread(NULL, 0, Fun, (void*)str1.c_str(), 0, NULL);
39     HANDLE hThread2 = CreateThread(NULL, 0, Fun, (void*)str2.c_str(), 0, NULL);
40     HANDLE hThread3 = CreateThread(NULL, 0, Fun, (void*)str3.c_str(), 0, NULL);
41     HANDLE hThread4 = CreateThread(NULL, 0, Fun, (void*)str4.c_str(), 0, NULL);
42     HANDLE hThread5 = CreateThread(NULL, 0, Fun, (void*)str5.c_str(), 0, NULL);
43
44     //关闭线程
45     CloseHandle(hThread1);
46     CloseHandle(hThread2);
47     CloseHandle(hThread3);
48     CloseHandle(hThread4);
49     CloseHandle(hThread5);
50
51     getchar();
52 //  system("pause");
53     return 0;
54 }
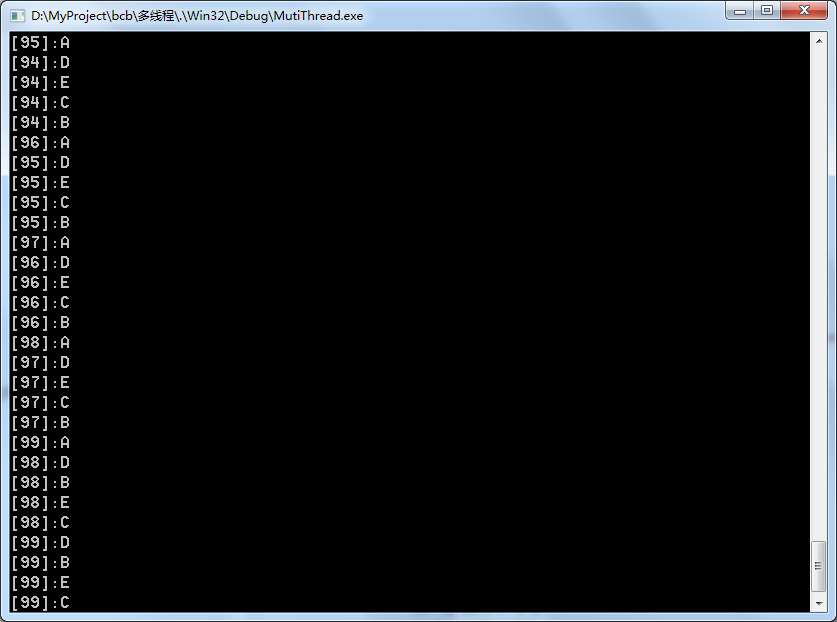
运行结果:
五个线程分别打印字符串A到E,各执行99次,没有出现打印混乱(对屏幕资源进行争夺)的情况。
另外有兴趣的读者可以把代码敲一遍,每个线程打印9次,然后把CAutoLock的析构函数内的 m_pMutex->UnLock();注释起来会出现什么情况?可以思考一下。
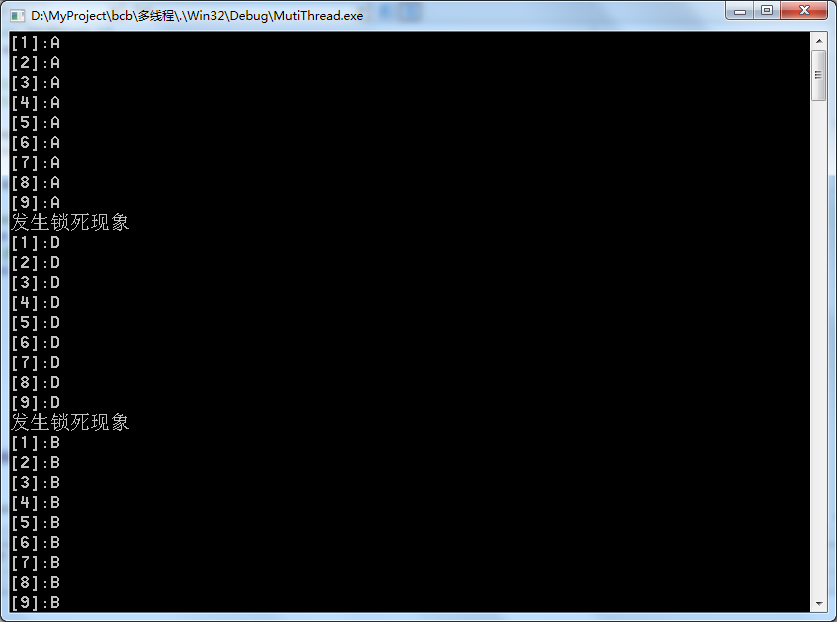
运行结果:
出现的现象是:每个线程打印了9次就出现了“发生死锁现象”,而且打印A的线程居然可以不停的对m_pMutex->Lock();这是为什么呢?
WAIT_ABANDONED 0x00000080:当hHandle为mutex时,如果拥有mutex的线程在结束时没有释放核心对象会引发此返回值。这就是为什么会打印“发生死锁现象”,可能这里的提示写的不是很恰当。
另外可以重复执行m_pMutex->Lock();是因为打印A线程从最开始已经WaitForSingleObject到该互斥量,并且处于有信号状态,因此该线程可以一直打印,打印9次之后,线程已经关闭(实际上线程在打印完9次之前已经被CloseHandle()了),因此才会出现返回WAIT_ABANDONED 。
在这里为什么打印D线程又能WaitForSingleObject,使互斥量变为有信号状态,那可能就需要知道系统会对未释放核心对象互斥量进行什么处理。从执行结果看,系统又把它变为有信号状态,让其他线程可用了。
2、Linux平台
相关头文件和API
 1 #include<pthread.h>
 2 #include<errno.h>
 3 //初始化信号量接口,如果使用默认的属性初始化互斥量, 只需把attr设为NULL.
 4 int pthread_mutex_init(pthread_mutex_t *restrict mutex, const pthread_mutexattr_t *restric attr);
 5 //销毁信号量对象接口
 6 int pthread_mutex_destroy(pthread_mutex_t *mutex);
 7 //互斥量加锁接口--阻塞式
 8 //说明:对共享资源的访问, 要对互斥量进行加锁, 如果互斥量已经上了锁, 调用线程会阻塞, 直到互斥量被解锁。在完成了对共享资源的访问后, 要对互斥量进行解锁。
 9 int pthread_mutex_lock(pthread_mutex_t *mutex);
10
11 //互斥量加锁接口--非阻塞式
12 //说明: 这个函数是非阻塞调用模式, 也就是说, 如果互斥量没被锁住, trylock函数将把互斥量加锁, 并获得对共享资源的访问权限; 如果互斥量被锁住了, trylock函数将不会阻塞等待而直接返回EBUSY,表示共享资源处于忙状态。
13 int pthread_mutex_trylock(pthread_mutex_t *mutex);
14 //互斥量解锁接口
15 int pthread_mutex_unlock(pthread_mutex_t *mutex);
16
17 //上述所有返回值: 成功则返回0, 出错则返回错误编号。
初始化:
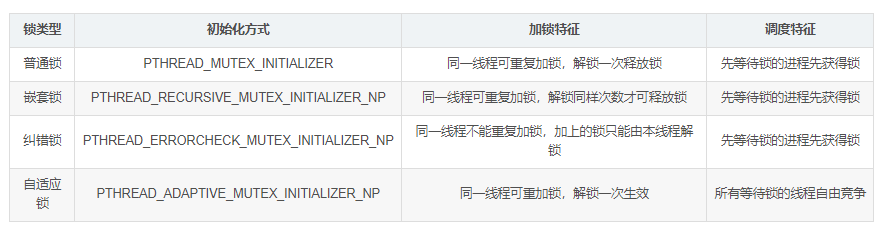
在Linux下, 线程的互斥量数据类型是pthread_mutex_t. 在使用前, 要对它进行初始化:
对于静态分配的互斥量,可以把它设置为PTHREAD_MUTEX_INITIALIZER,或者调用pthread_mutex_init;
对于动态分配的互斥量, 在申请内存(malloc)之后, 通过pthread_mutex_init进行初始化,并且在释放内存(free)前需要调用pthread_mutex_destroy;
死锁:
死锁主要发生在有多个依赖锁存在时, 会在一个线程试图以与另一个线程相反顺序锁住互斥量时发生。如何避免死锁是使用互斥量应该格外注意的东西。
总体来讲, 有几个不成文的基本原则:
对共享资源操作前一定要获得锁。
完成操作以后一定要释放锁。
尽量短时间地占用锁。
如果有多锁, 如获得顺序是ABC连环扣, 释放顺序也应该是ABC。
线程错误返回时应该释放它所获得的锁。
各种Mutex的区别:
代码:
 1 /********************************Copyright Qinlong*****************************
 2 ** File   Name:  Mutex.cpp
 3 ** Create Date:  2016.11.15
 4 ** Modify Time:  2016.11.16
 5 ** Function:     mutex synchornization
 6 ** Author:       qin long
 7 ** Modifier:     **
 8 ** Version:      1.0
 9 *******************************************************************************/
10
11 #include <iostream>
12 #include <pthread.h>
13 #include <errno.h>
14 using namespace std;
15
16 //普通锁
17 static pthread_mutex_t g_mutex=PTHREAD_MUTEX_INITIALIZER;
18 //循环执行次数
19 static const int g_iRunTime = 100;
20
21 void* Fun(void* ptr)
22 {
23    int iRunTime = 0;
24    while(++iRunTime< g_iRunTime)
25    {
26       pthread_mutex_lock(&g_mutex);
27       cout << iRunTime << ": Fun() is running!" << endl;
28 //    若下面一行代码不注释,则主函数输出会出现打印"main trylock failed!",
29 //    原因就在于g_mutex锁被本线程函数长期占用的结果.
30 //    usleep(200);
31       pthread_mutex_unlock(&g_mutex);
32       usleep(100000);
33     }
34 }
35
36
37 int main()
38 {
39    pthread_t hHandle;
40    int iRet = pthread_create(&hHandle, NULL, Fun, NULL);    //create a thread;
41    if(0 != iRet)
42    {
43        cout << "Create thread failed!" << endl;
44    }
45    sleep(1);
46    int iRunTime = 0;
47    while(++iRunTime<g_iRunTime)
48    {
49         //这里仅仅是为了测试pthread_mutex_trylock的用法
50       if(EBUSY==pthread_mutex_trylock(&g_mutex))
51       {
52            cout<< "main trylock failed!"<<endl;
53            --iRunTime;
54       }
55       else
56       {
57            cout <<iRunTime<< ": main is running!" << endl;
58            pthread_mutex_unlock(&g_mutex);
59            usleep(100000);
60       }
61    }
62    pthread_join(hHandle, NULL);
63    return 0;
64 }
运行结果:
注释掉Fun中uSleep(200);的结果如下图所示,
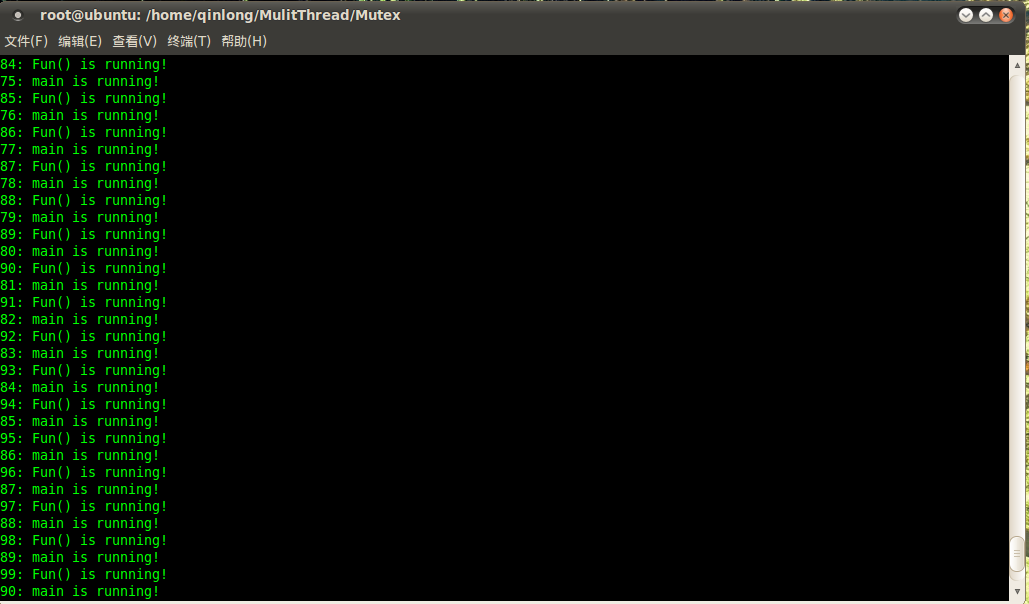
未注释掉Fun中uSleep(200);的结果如下图所示,
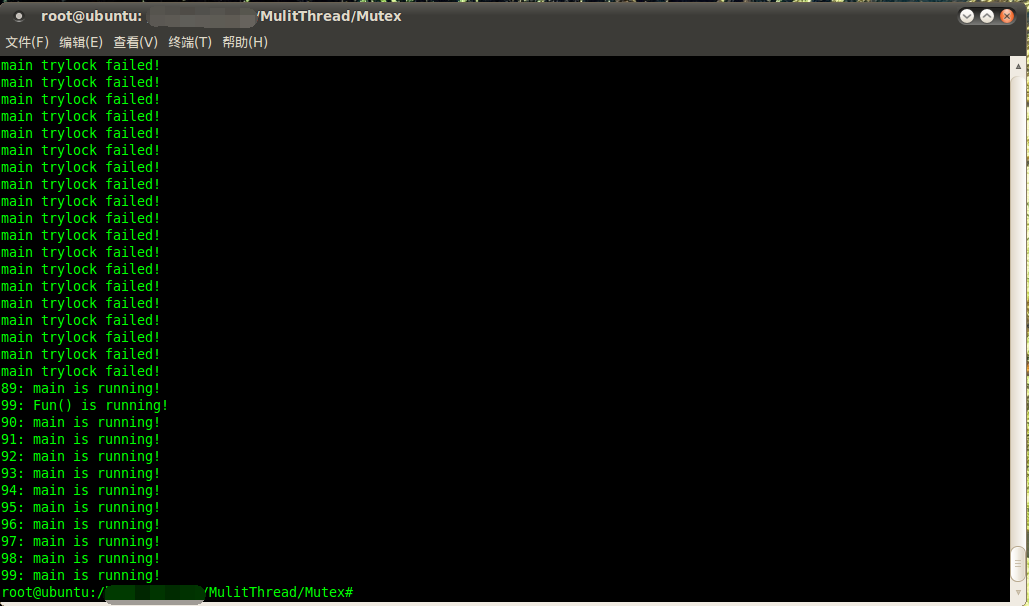
这里运行结果出现了main trylock failed!原因是由于Fun函数在打印输出完毕后使用uSleep(200)“长时间占用”锁导致的,从使用pthread_mutex_trylock我们可以看到主函数在经过多次尝试进行加锁都失败了。因此我们的设计原则应该就是尽可能短时间去占用锁,才能提高多线程之间的运行以及同步效率。