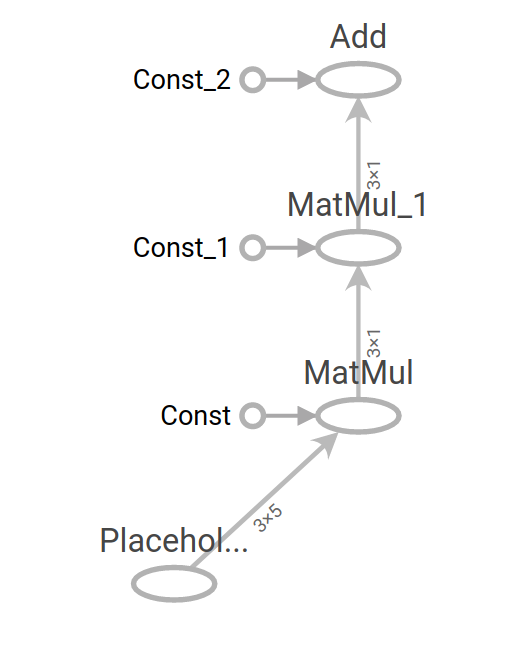
#-*- coding:utf-8 -*-
#Tensorflow的嵌入Layer
import numpy as np
import tensorflow as tf
sess=tf.Session()

#创建占位符和数据
my_array=np.array([[1.,3.,5.,7.,9.],
                   [-2.,0.,2.,4.,6.],
                   [-6,-3,0.,3.,6.]])
x_vars=np.array([my_array,my_array+1])
x_data=tf.placeholder(tf.float32,shape=(3,5))
#创建矩阵乘法和加法中要用到的常用矩阵
m1=tf.constant([[1.],[0.],[-1.],[2.],[4.]])
m2=tf.constant([[2.]])
a1=tf.constant([[10.]])

#声明操作,表示成计算图
prod1=tf.matmul(x_data,m1)
print sess.run(prod1,feed_dict={x_data:my_array})
print '-'*80
prod2=tf.matmul(prod1,m2)
print sess.run(prod2,feed_dict={x_data:my_array})
print '-'*80
add1=tf.add(prod2,a1)
print sess.run(add1,feed_dict={x_data:my_array})
print '-'*80

#tensorboard --logdir=/path/to/log-directory
#运行上面的代码,可以用tensorboard可视化,最好利用chrome,Firefox好像不怎么支持
for x_var in x_vars:
    writer = tf.summary.FileWriter('./graphs', sess.graph)
    print sess.run(add1,feed_dict={x_data:x_var})
    writer.close()
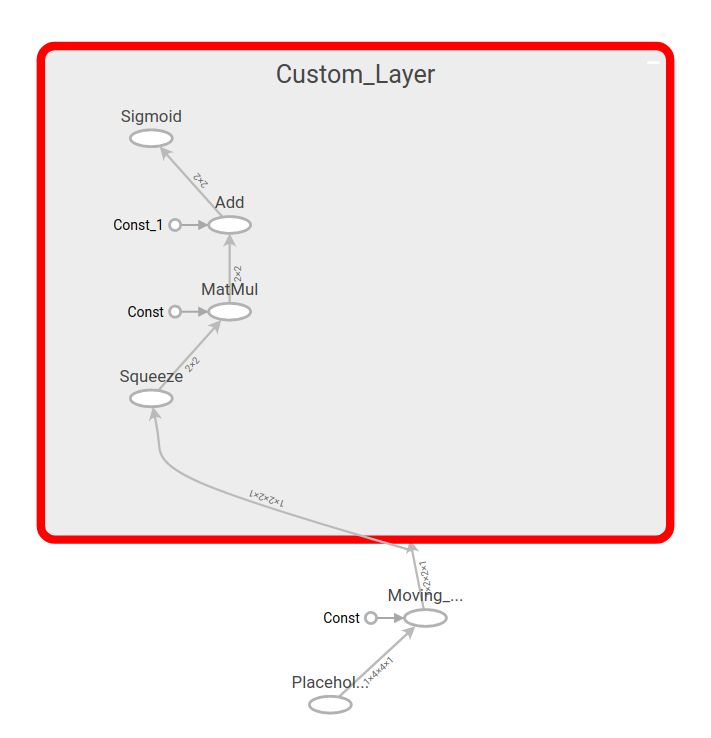
#-*- coding:utf-8 -*-
#Tensorflow的多层Layer
import numpy as np
import tensorflow as tf
sess=tf.Session()

#通过numpy创建2D图像,4x4像素
x_shape=[1,4,4,1]
x_val=np.random.uniform(size=x_shape)

#创建占位符
x_data=tf.placeholder(tf.float32,shape=x_shape)

#创建滑动窗口
my_filter=tf.constant(0.25,shape=[2,2,1,1])
my_strides=[1,2,2,1]
mov_avg_layer=tf.nn.conv2d(x_data,my_filter,my_strides,padding='SAME',name='Moving_Avg_Window')

#自定义Layer,操作滑动窗口平均的2x2的返回值
def custom_layer(input_matrix):
    input_matrix_sqeezed=tf.squeeze(input_matrix)
    A=tf.constant([[1.,2.],[-1.,3.]])
    b=tf.constant(1.,shape=[2,2])
    temp1=tf.matmul(A,input_matrix_sqeezed)#
    temp=tf.add(temp1,b)#  Ax+b
    return tf.sigmoid(temp)

with tf.name_scope('Custom_Layer') as scope:
    custom_layer1=custom_layer(mov_avg_layer)

print sess.run(custom_layer1,feed_dict={x_data:x_val})