准备知识
面向对象双下方法
__call__ 对象后面加括号,触发执行
__getattr__系列
使用 . 操作对象属性,如果对象中没有这个属性,会执行类中的__getattr__方法
__getitem__系列
使用 [ ] 操作对象属性,如果对象中没有这个属性,会执行类中的__getitem__方法


class Foo(object):
    def __setitem__(self, key, value):
        print("setitem",key,value)

    def __setattr__(self, key, value):
        print("setattr",key,value)

    def __getitem__(self, item):
        print("getitem",item)

    def __getattr__(self, item):
        print("getattr",item)

foo = Foo()
foo.name = "666"  #setattr name 666
foo.name              #getattr name

foo["age"] = 10    #setitem age 10
foo["age"]            #getitem age
为什么设计上下文这样的机制?
就是保证多线程环境下,实现线程之间的隔离.
在了解flask上下文机制之前,我们先了解下线程的数据安全.
线程安全
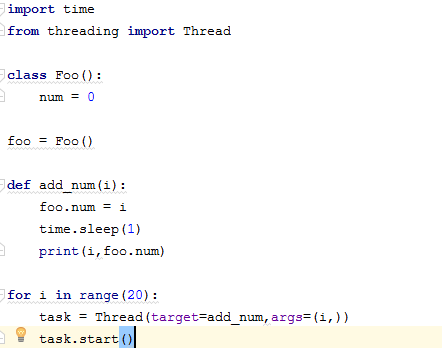
如上代码段,在1s内开启20个线程,执行add_num(),结果foo.num都为 19,说明线程间数据是不隔离的.

那么,如何保证线程间数据隔离呢? 有一种 threading.local 方法
Thread Local
threading.local 在多线程操作时,为每一个线程开辟一个空间来保存它的值,使得线程之间的值互不影响.
import time
from threading import Thread,local

class Foo(local):
    num = 0

foo = Foo()

def add_num(i):
    foo.num = i
    time.sleep(1)
    print(i,foo.num)

for i in range(20):
    task = Thread(target=add_num,args=(i,))
    task.start()
也可以自定义一个线程安全: 定义一个全局字典,key为当前线程的线程ID,value为具体的值
import copy
import time
from threading import Thread,get_ident

class Foo():
    num = 0

foo = Foo()

dic = {}
def add_num(i):
    dic[get_ident()] = copy.copy(foo)
    dic[get_ident()].num = i
    time.sleep(1)
    print(get_ident(),dic[get_ident()].num)

for i in range(5):
    task = Thread(target=add_num,args=(i,))
    task.start()
Flask的上下文机制就是基于Werkzeug 的 Local Stack 实现的. 而Local Stack又依赖于local类.
Flask的请求上下文机制
先启动一个flask项目,会执行app.run()方法,这是整个项目的入口,执行run方法,里面封装了werkzeug模块中的run_simple.
from flask import Flask

app = Flask(__name__)

app.run()
我们用 werkzeug 来实现一个请求和响应:
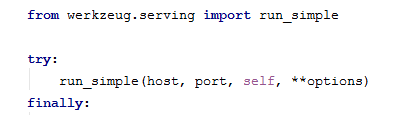
from werkzeug.serving import run_simple
from werkzeug.wrappers import Request,Response

@Request.application
def app(req):
    print(req)
    return Response("200 OK!")

run_simple("127.0.0.1", 5000, app)
run_simple最终就是执行 app函数,即 app(), 那么在flask中,
run_simple中的 self 就是Flask对象,所以执行 run_simple 就触发了Flask的__call__方法.
请求上文
触发执行__call__方法,__call__方法的逻辑很简单,直接执行wsgi_app方法,将原始请求数据和一个响应函数传进去。

在 wsgi_app()中,首先执行了

    def request_context(self, environ): #self = app
        """Create a :class:`~flask.ctx.RequestContext` representing a
        WSGI environment. Use a ``with`` block to push the context,
        which will make :data:`request` point at this request.

        See :doc:`/reqcontext`.

        Typically you should not call this from your own code. A request
        context is automatically pushed by the :meth:`wsgi_app` when
        handling a request. Use :meth:`test_request_context` to create
        an environment and context instead of this method.

        :param environ: a WSGI environment
        """
        return RequestContext(self, environ)
request_context()最终返回了一个 RequestContext类的对象,被 ctx 接收.
RequestContext()在初始化时,得到了三个我们很熟悉的属性,分别是 app, request 和 session.
app,我们在应用上下文中再详细说明,先来说说request和session.
request 是一个Resquest()对象,这个对象就是我们在flask中使用的request对象,为我们提供了很多属性和方法,比如: request.method, request.form 等等;另一个属性session,初始值为None,一般用来做登录校验.
现在我们知道了,ctx 中包含了 request 和 session,还有 app.
接着执行
ctx.push()
ctx.push()的执行流程:
# 第一步
ctx.py: top = _request_ctx_stack.top # _request_ctx_stack 就是 LocalStack()对象
  global.py: _request_ctx_stack = LocalStack() # 为了方便理解,我们将LocalStack()对象字典化:{}

#经过 LocalStack()的初始化,LocalStack()最终 ={'_local':{'__storage__':{},'__ident_func__':get_ident}}
LocalStack()对象初始化:
class LocalStack(object):

    def __init__(self):
        self._local = Local()  # LocalStack() = {'_local':Local()}
class Local(object):
    __slots__ = ('__storage__', '__ident_func__') # 类的插槽:当前这个类只允许有这两个属性

    def __init__(self):  # LocalStack() = {'_local':{'__storage__':{},'__ident_func__':get_ident}}
        object.__setattr__(self, '__storage__', {})
        object.__setattr__(self, '__ident_func__', get_ident)
再.top
def top(self):

        try:
            return self._local.stack[-1]  # 取stack的最后一个值,LocalStack中没有,所以执行类中的__getattr__方法
except (AttributeError, IndexError): # __getattr__返回AttributeError,return None,所以 top = None
return None
__getattr__
class Local(object):
    ...

    def __getattr__(self, name):
        try:
            return self.__storage__[self.__ident_func__()][name]
        except KeyError:
            raise AttributeError(name) # KeyError,返回 AttributeError
# 第二步
ctx.py: _request_ctx_stack.push(self)
    def push(self, obj):
        """Pushes a new item to the stack"""
        rv = getattr(self._local, 'stack', None)
        if rv is None:
            self._local.stack = rv = []
        rv.append(obj)
        return rv