Oracle 11gR2 RAC Installation on Oracle Linux 6.5
In this article we will be installing 2 node 11gR2 RAC on Oracle Linux 6.5. We will be looking at below steps:
Configure VM for Node 1
Open virtual box and create a new VM for node 1. We will be installing OEL 6.5 on both RAC nodes.
Create New VM
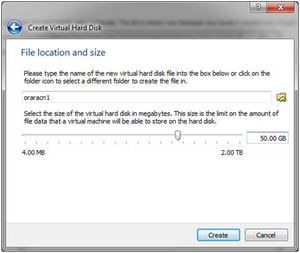
Open virtual box and click on New. Create first virtual machine with oraracn1 as the name.


Min RAM allocation should be 4 GB per RAC node.


Create a virtual disk now
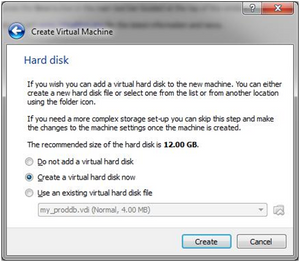

Select VDI and click next


Select Dynamically allocated option and click next


Allocate Min 80 GB HDD to your virtual machine. You can allocate even more if you have good hard disk space. Click on Create

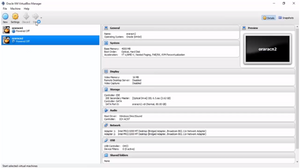
Now your virtual machine should be created. This is how your virtual box will look like


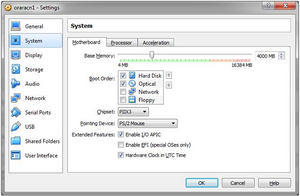
Right click on virtual machine and select settings. Under System settings, make sure to set below bootorder

Under storage > Optical Drive > choose OEL 6.5 iso file from your system.


Under Network, make sure attached to is set to Bridged Adapter and Enable the Network Adapter


In RAC, we need to have two network adapters. So, enable the second adapter same like the first one.


Click on OK to complete the RAC node 1 setup.
Install OEL 6.5 on Node 1
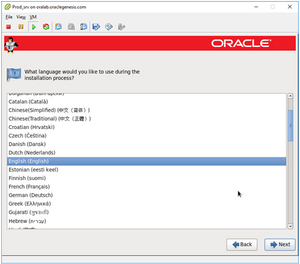
Now that our virtual machine is ready, go ahead, start the virtual machine and install OEL 6.5


Skip media test


Click next to continue


Go with default language > click next


Go with default keyboard type and click on next


Select Basic Storage Devices > Click Next


Select Yes, Discard and data


Give a hostname to your machine oraracn1.oraclgenesis.com


Click on configure network and assign a static IP


Assign public IP to your machine. In my case, I have assigned 192.168.0.101 as the machine IP.


Select second network card and click on edit


Assign private IP to your node 1 on a different subnet mask. Leave Gateway blank


Click next and select your timezone


Give a root password


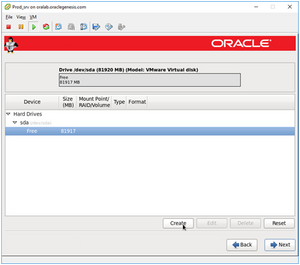
Select create custom layout and click next


Select Free disk space and click on create

Choose standard partition and click Create


Create boot partition with 512 MB size


Once again choose free disk space and click on create


Select file system type as Swap and give 15 GB size (Approx 15000 MB)


Again select free space and click on create


Give mount point as root (/) and chose option Fill to maximum allowable size


Click next and chose Forma option


Select Write changes to disk


No changes on below screen, just click next


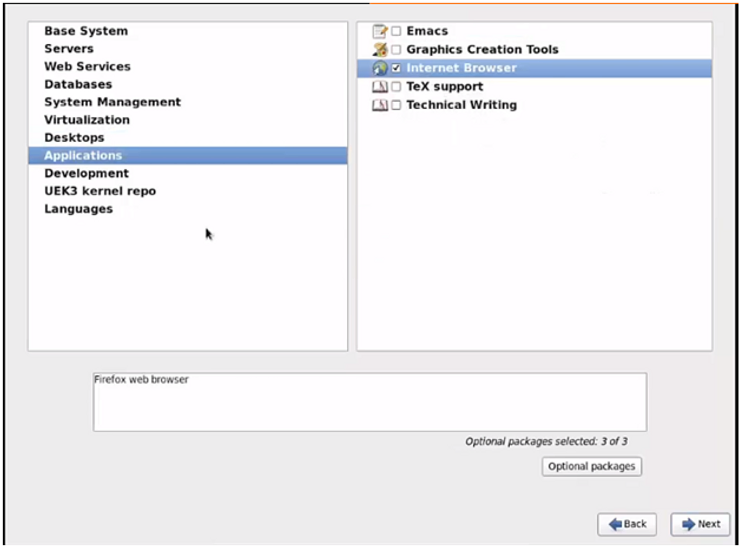
Choose customize now and just click next


From the list, select packages as below:
Base System:
-
Base
-
Client management tools
-
Compatibility libraries
-
Hardware monitoring utilities
-
Large Systems Performance
-
Network file system client
-
Performance Tools
-
Perl Support
Servers:
-
Server Platform
-
System administration tools
-
Desktops
-
Desktop
-
Desktop Platform
-
Fonts
-
General Purpose Desktop
-
Graphical Administration Tools
-
Input Methods
-
X Window System
Development:
-
Additional Development
-
Development Tools
Applications:
-
Internet Browser


Click next and OEL installation will begin


Once done, click on Reboot


After reboot, there are few post installation steps. Click on Forward


Accept the license and click on Forward


Choose No and click on Forward


Select No thanks and proceed


Click forward


Do not create any user at this stage, click forward
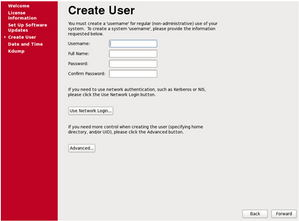

Choose Yes


Check the Date and Time settings and click on forward


Nothing to choose under Kdump, click forward


OEL 6.5 installation is completed.
Configure VM for Node 2
You need to create Node 2 like how you have created Node 1 in virtual box. This will be a separate new virtual machine. I have used below configuration for node 2:


Install OEL 6.5 on Node 2
Now that our virtual machine is ready, go ahead and start the virtual machine.

Start virtual machine and install OEL 6.5
Skip media test
Click next to continue
Go with default language > click next

Go with default keyboard type and click on next
Select Basic Storage Devices > Click Next
Select Yes, Discard and data
Give a hostname to your machine oraracn2.oraclgenesis.com
Click on configure network and assign a static IP
Assign public IP to your machine. In my case, I have assigned 192.168.0.102 as the machine IP.


Select second network card and click on edit


Assign private IP to your node 2 on a different subnet mask. Leave Gateway blank


Click next and select your timezone
Give a root password
Select create custom layout and click next
Select Free disk space and click on create
Choose standard partition and click Create
Create boot partition with 512 MB size


Once again choose free disk space and click on create
Select file system type as Swap and give 15 GB size (Approx 15000 MB)


Again select free space and click on create
Give mount point as root (/) and chose option Fill to maximum allowable size


Click next and chose Format option


Select Write changes to disk
No changes on below screen, just click next
Choose customize now and just click next
From the list, select packages as below:
Base System:


Servers:Desktops:


Desktops:


Applications:

Development:


Click next and OEL installation will begin
Once done, click on Reboot
After reboot, there are few post installation steps. Click on Forward
Accept the license and click on Forward
Choose No and click on Forward
Select No thanks and proceed
Click forward
Do not create any user at this stage, click forward
Choose Yes
Check the Date and Time settings and click on forward
Nothing to choose under Kdump, click forward
OEL 6.5 installation on Node 2 is completed.


OS Prerequisites – All Nodes
Connect to both RAC nodes via putty and execute all the below commands on both nodes.
Check if your machine is able to speak to internet. You can ping yahoo.com. Then install below package to perform all oracle installation pre-requisites
yum -y install oracle-rdbms*
Install ASM packages
yum -y install oracleasm*
yum -y install kmod-oracleasm
Change password for oracle user
passwd oracle
Disable firewall
/etc/rc.d/init.d/iptables status
/etc/rc.d/init.d/iptables stop
service iptables stop
chkconfig iptables off
echo 0 > /selinux/enforce
Create directories to install grid and oracle software
mkdir -p /u01/app/11.2.0/grid mkdir -p /u01/app/oracle/product/11.2.0/db_1 chown -R oracle:oinstall /u01 chmod -R 775 /u01/

mkdir -p /u02
chown -R oracle:oinstall /u02
Download Oracle 11.2.0.4 gird and database binaries. Copy it to /u02 location (Only on Node 1)


Setup Public & Private Network
We have below public and private network configuration for our RAC setup:


Also, below are the Virtual IP and Scan IP details:


Depending upon your environment, change IP addresses and put below under /etc/hosts file on both oraracn1 and oraracn2 nodes
On both nodes:
==============
127.0.0.1 localhost.localdomain localhost

# Public Network	- (eth0)
192.168.0.101	oraracn1.oraclegenesis.com	oraracn1
192.168.0.102	oraracn2.oraclegenesis.com	oraracn2

# Private Interconnect - (eth1)
10.10.10.101	oraracn1-priv.oraclegenesis.com	oraracn1-priv
10.10.10.102	oraracn2-priv.oraclegenesis.com	oraracn2-priv

# Public Virtual	IP (VIP) addresses - (eth0:1)
192.168.0.105	oraracn1-vip.oraclegenesis.com	oraracn1-vip
192.168.0.106	oraracn2-vip.oraclegenesis.com	oraracn2-vip

# Single Client Access Name (SCAN)
192.168.0.110	orarac-scan.oraclegenesis.com	orarac-scan
Test the network configuration
On oraracn1:
============
# ping oraracn1          --> use Ctrl+C to exit from ping
# ping oraracn2
# ping oraracn1-priv
# ping oraracn2-priv

On oraracn2:
============
# ping oraracn1          --> use Ctrl+C to exit from ping
# ping oraracn2
# ping oraracn1-priv
# ping oraracn2-priv
Note: You cannot ping VIP and SCAN IP. Those IPs can only be used by an application and are not ping-able!
Configure Shared Storage
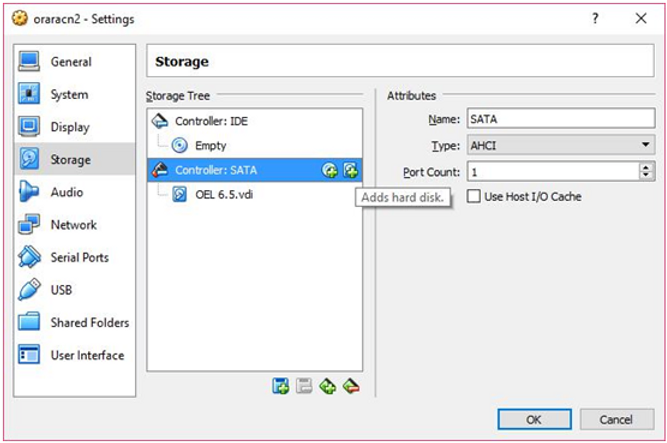
At this stage, shutdown both the virtual machines. We will allocate shared disks to RAC nodes. Open oraracn1 virtual machine settings and select storage. Click on Adds Hard Disk button under SATA controller


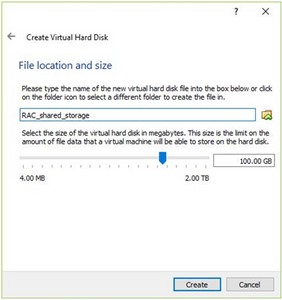
Choose Create new disk


Choose VDI and click Next
Select Fixed size and click Next


Allocate 100 GB of shared storage to your RAC setup

This will take some time to add shared disk to Node 1


Once disk is added, you can see the disk under Node 1 settings > storage


Now our goal is to make newly added disk on node 1 shared with node 2. For this, go to File > Virtual Media Manager


Select your shared disk > right click > choose Modify

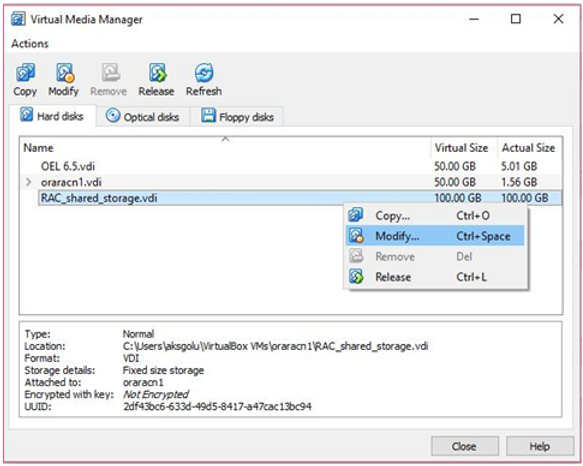
Change the property from Normal to Shareable and click on OK


Now we are ready to share the disk with Node 2. Open oraracn2 settings > Storage > Adds hard disk icon

Do not create a new disk, Choose existing disk


Locate your shared disk at OS level. It must mostly be stored under your Node 1 location


The disk must now be shared with node 2 as well. You will see the RAC Shared Storage below


Create Shared Partitions
Now that we have 100 GB of shared storage, we need to create three partitions for the main three ASM disk groups


Create three partitions under the newly added 100 GB shared disk via node 1
On Node 1:
==========
fdisk /dev/sdb
n
p
1
<enter>
+10G
============ Frist partition is created, create second one ============
n
p
1
<enter>
+45G
============ Second partition is created, create third one =============
n
p
1
<enter>
+45G
======= All partitions are created, now save the partition table ==========
w this command will save the partition table
Configure ASM & ASM Disks
As we have created 3 partitions, we must allocate each partition to single ASM disks, which will then be allocated to ASM Disk groups


Configure ASM on both nodes
On Node 1 as root user:
=======================
/usr/sbin/oracleasm configure -i

Default user to own the driver interface []: oracle
Default group to own the driver interface []: dba
Start Oracle ASM library driver on boot (y/n) [n]: y
Scan for Oracle ASM disks on boot (y/n) [y]: y

On Node 2 as root user:
=======================
/usr/sbin/oracleasm configure -i

Default user to own the driver interface []: oracle
Default group to own the driver interface []: dba
Start Oracle ASM library driver on boot (y/n) [n]: y
Scan for Oracle ASM disks on boot (y/n) [y]: y
Load oracle-asm kernel module on both nodes. This command Creates the /etc/sysconfig/oracleasm configuration file, creates the /dev/oracleasm mount point and mounts the ASMLib driver file system
On Node 1 as root user:
=======================
/usr/sbin/oracleasm init


On Node 2 as root user:
=======================
/usr/sbin/oracleasm init
Create ASM disks – Any one Node
On Node 1 as root user:
=======================
oracleasm createdisk CRS1 /dev/sdb5
oracleasm createdisk DATA1 /dev/sdb6
oracleasm createdisk FRA1 /dev/sdb7
Run below commands on both nodes to scan and list ASM disks
oracleasm scandisks
oracleasm listdisks
Oracle Grid Installation
Oracle grid software is the one which binds multiple independent servers into a cluster. You can configure ASM only when Oracle grid is installed because ASM is bundled with Oracle Grid Software.
Configure NTP – All Nodes
On Node 1 and Node 2:
=====================
#	yum install ntp
#	service ntpd start
#	chkconfig ntpd on

# vi /etc/sysconfig/ntpd	-> Open file delete all and put below line

OPTIONS="-x -u ntp:ntp -p /var/run/ntpd.pid -g"

#	service ntpd stop
#	ntpdate 1.tw.pool.ntp.org
#	service ntpd start
Now its good time to clean-up the YUM repository to release some space from the disk
On both nodes as root user:
===========================
# yum clean all
Set Bash Profile
Setup oracle user bash profile on node 1
#	su - oracle
#	vi .bash_profile

#	Oracle Settings
TMP=/tmp; export TMP
TMPDIR=$TMP; export TMPDIR
ORACLE_HOSTNAME=oraracn1; export ORACLE_HOSTNAME
ORACLE_UNQNAME=RAC; export ORACLE_UNQNAME
ORACLE_BASE=/u01/app/oracle; export ORACLE_BASE
GRID_HOME=/u01/app/11.2.0/grid; export GRID_HOME
DB_HOME=$ORACLE_BASE/product/11.2.0/db_1; export DB_HOME
ORACLE_HOME=$DB_HOME; export ORACLE_HOME
ORACLE_SID=RAC1; export ORACLE_SID
ORACLE_TERM=xterm; export ORACLE_TERM
BASE_PATH=/usr/sbin:$PATH; export BASE_PATH
PATH=$ORACLE_HOME/bin:$BASE_PATH; export PATH

LD_LIBRARY_PATH=$ORACLE_HOME/lib:/lib:/usr/lib; export LD_LIBRARY_PATH
CLASSPATH=$ORACLE_HOME/JRE:$ORACLE_HOME/jlib:$ORACLE_HOME/rdbms/jlib; export CLASSPAT H

alias grid_env='. /home/oracle/grid_env'
alias db_env='. /home/oracle/db_env'
Create a file to set grid variables on node 1. This file will set grid environmental variables making it easy to switch between DB home and grid home.
# vi /home/oracle/grid_env

ORACLE_SID=+ASM1; export ORACLE_SID
ORACLE_HOME=$GRID_HOME; export ORACLE_HOME
PATH=$ORACLE_HOME/bin:$BASE_PATH; export PATH

LD_LIBRARY_PATH=$ORACLE_HOME/lib:/lib:/usr/lib; export LD_LIBRARY_PATH
CLASSPATH=$ORACLE_HOME/JRE:$ORACLE_HOME/jlib:$ORACLE_HOME/rdbms/jlib; export CLASSPAT H
Create below file to set database environmental variables on Node 1
# vi /home/oracle/db_env

ORACLE_SID=RAC1; export ORACLE_SID
ORACLE_HOME=$DB_HOME; export ORACLE_HOME
PATH=$ORACLE_HOME/bin:$BASE_PATH; export PATH

LD_LIBRARY_PATH=$ORACLE_HOME/lib:/lib:/usr/lib; export LD_LIBRARY_PATH
CLASSPATH=$ORACLE_HOME/JRE:$ORACLE_HOME/jlib:$ORACLE_HOME/rdbms/jlib; export CLASSPAT H
Setup oracle user bash profile on node 2
# su - oracle
# vi .bash_profile

# Oracle Settings
TMP=/tmp; export TMP
TMPDIR=$TMP; export TMPDIR

ORACLE_HOSTNAME=oraracn2; export ORACLE_HOSTNAME
ORACLE_UNQNAME=RAC; export ORACLE_UNQNAME
ORACLE_BASE=/u01/app/oracle; export ORACLE_BASE
GRID_HOME=/u01/app/11.2.0/grid; export GRID_HOME
DB_HOME=$ORACLE_BASE/product/11.2.0/db_1; export DB_HOME
ORACLE_HOME=$DB_HOME; export ORACLE_HOME
ORACLE_SID=RAC2; export ORACLE_SID
ORACLE_TERM=xterm; export ORACLE_TERM
BASE_PATH=/usr/sbin:$PATH; export BASE_PATH
PATH=$ORACLE_HOME/bin:$BASE_PATH; export PATH

LD_LIBRARY_PATH=$ORACLE_HOME/lib:/lib:/usr/lib; export LD_LIBRARY_PATH
CLASSPATH=$ORACLE_HOME/JRE:$ORACLE_HOME/jlib:$ORACLE_HOME/rdbms/jlib; export CLASSPAT H

alias grid_env='. /home/oracle/grid_env'
alias db_env='. /home/oracle/db_env'
Create a file to set grid variables on node 2. This file will set grid environmental variables making it easy to switch between DB home and grid home.
# vi /home/oracle/grid_env

ORACLE_SID=+ASM2; export ORACLE_SID
ORACLE_HOME=$GRID_HOME; export ORACLE_HOME
PATH=$ORACLE_HOME/bin:$BASE_PATH; export PATH

LD_LIBRARY_PATH=$ORACLE_HOME/lib:/lib:/usr/lib; export LD_LIBRARY_PATH
CLASSPATH=$ORACLE_HOME/JRE:$ORACLE_HOME/jlib:$ORACLE_HOME/rdbms/jlib; export CLASSPAT H
Create below file to set database environmental variables on Node 2
# vi /home/oracle/db_env

ORACLE_SID=RAC2; export ORACLE_SID
ORACLE_HOME=$DB_HOME; export ORACLE_HOME
PATH=$ORACLE_HOME/bin:$BASE_PATH; export PATH

LD_LIBRARY_PATH=$ORACLE_HOME/lib:/lib:/usr/lib; export LD_LIBRARY_PATH
CLASSPATH=$ORACLE_HOME/JRE:$ORACLE_HOME/jlib:$ORACLE_HOME/rdbms/jlib; export CLASSPAT H
At this stage, exit as oracle user and the open another terminal with new session OR switch to root user and then back to oracle user. This will make the new environmental variables in effect.
Now it’s time to test our environment variables and check if they are working fine or not. As oracle user, execute below commands on both nodes to check if environmental variables are set properly
Node	1:
-------
su –	oracle
# . grid_env	     --To set grid env variables
# env |grep ORA
ORACLE_UNQNAME=RAC
ORACLE_SID=+ASM1
ORACLE_BASE=/u01/app/oracle
ORACLE_HOSTNAME=oraracn1
ORACLE_TERM=xterm
ORACLE_HOME=/u01/app/11.2.0/grid

# . db_env	     --To set DB env variables
# env |grep ORA
ORACLE_UNQNAME=RAC
ORACLE_SID=RAC1
ORACLE_BASE=/u01/app/oracle
ORACLE_HOSTNAME=oraracn1
ORACLE_TERM=xterm
ORACLE_HOME=/u01/app/oracle/product/11.2.0/db_1
Node	2:
-------
su –	oracle
# . grid_env	     --To set grid env variables
# env |grep ORA
ORACLE_UNQNAME=RAC
ORACLE_SID=+ASM2
ORACLE_BASE=/u01/app/oracle
ORACLE_HOSTNAME=oraracn2
ORACLE_TERM=xterm
ORACLE_HOME=/u01/app/11.2.0/grid

# . db_env	     --To set DB env variables
# env |grep ORA
ORACLE_UNQNAME=RAC
ORACLE_SID=RAC2
ORACLE_BASE=/u01/app/oracle
ORACLE_HOSTNAME=oraracn2
ORACLE_TERM=xterm
ORACLE_HOME=/u01/app/oracle/product/11.2.0/db_1
Configure SSH Between Nodes
Configure SSH connectivity between the nodes as oracle user. There are two methods to setup SSH connectivity between the nodes is: Manual method and automatic method. The manual method is very long and you might encounter errors while doing it. The easy way is the automatic method via script provided by oracle.
As you have already copied the grid and database software files under /u02, unzip the grid software file. This will create a new folder name grid under /u02. Oracle provides automatic ssh setup script
On node 1 as oracle user:
=========================
cd /u02
unzip <grid_software_file_name>

cd grid/sshsetup

./sshUserSetup.sh -user oracle -hosts "oraracn1 oraracn2" -noPromptPassphrase -confir m -advanced
Run cluvfy utility
Oracle provide a pre-installation utility which is called as Cluster Verification Utility (CLUVFY). This utility performs cluster verification before, during and after install of grid software. Let us run CLUVFY utility to check cluster before installation of grid
# /u01/softwares/grid
# ./runcluvfy.sh stage -pre crsinst -n oraracn1,oraracn2 -fixup -verbose
Below is the sample output:
[oracle@oraracn1 grid]$ ./runcluvfy.sh stage -pre crsinst -n oraracn1,oraracn2 -fixup -verbose

Performing pre-checks for cluster services setup

Checking node reachability...

Check: Node reachability from node "oraracn1"
Destination Node                      Reachable?
------------------------------------  ------------------------
oraracn2                              yes
oraracn1                              yes
Result: Node reachability check passed from node "oraracn1"

Checking user equivalence...

Check: User equivalence for user "oracle"
Node Name                             Comment
------------------------------------  ------------------------
oraracn1                              passed
oraracn2                              passed
Result: User equivalence check passed for user "oracle"

Checking node connectivity...

Checking hosts config file...
Node Name     Status                    Comment
------------  ------------------------  ------------------------
oraracn1      passed
oraracn2      passed

Verification of the hosts config file successful

Interface information for node "oraracn1"
Name   IP Address      Subnet          Gateway         Def. Gateway    HW Address        MTU
------ --------------- --------------- --------------- --------------- ---------------- ------
eth0   192.168.0.151   192.168.0.0     0.0.0.0         192.168.0.1     00:0C:29:B6:0 F:87 1500
eth1   10.10.10.151    10.10.10.0      0.0.0.0         192.168.0.1     00:0C:29:B6:0 F:91 1500


Interface information for node "oraracn2"
Name   IP Address      Subnet          Gateway         Def. Gateway    HW Address        MTU
------ ---------------