Linux系统在启动的时候就已经启动了很多的进程信息。
root@ubuntu:/# ps -ef   (系统启动就有了,相当于windows的服务)
UID         PID   PPID  C STIME TTY          TIME CMD
root          1      0  0 04:27 ?        00:00:01 /sbin/init auto noprompt
root          4      2  0 04:27 ?        00:00:00 [kworker/0:0H]
root          6      2  0 04:27 ?        00:00:00 [mm_percpu_wq]
root          7      2  0 04:27 ?        00:00:00 [ksoftirqd/0]
root          8      2  0 04:27 ?        00:00:00 [rcu_sched]


守护进程是后台运行的,随着操作系统的启动而启动。相当于windows的服务。
守护进程分为2大类:1.系统级守护进程(硬件管理级的,登陆级的)。2.网络级的守护进程(蓝牙,拨号,web服务器,应用服务器,ftp服务器,邮件服务器,)。


(ps是查看进程信息)
root@ubuntu:/# ps -ef | grep init
root          1      0  0 04:27 ?        00:00:01 /sbin/init auto noprompt  (init进程)
root       5177   5136  0 05:12 pts/2    00:00:00 grep --color=auto init  (这个是当前查找进程)


root@ubuntu:/# ps -ef | grep ftp
root       1390      1  0 04:27 ?        00:00:00 /usr/sbin/vsftpd /etc/vsftpd.conf  (ftp进程)
root       5285   5136  0 05:16 pts/2    00:00:00 grep --color=auto ftp   (这个是当前查找进程)
(pstree是查看守护进程信息,守护进程树)
root@ubuntu:/# pstree
(第一个运行的是systemd进程,)
systemd─┬─ManagementAgent───6*[{ManagementAgent}]
        ├─ModemManager─┬─{gdbus}
        │              └─{gmain}
        ├─NetworkManager─┬─dnsmasq
        │                ├─{gdbus}
        │                └─{gmain}
        ├─VGAuthService
        ├─accounts-daemon─┬─{gdbus}
        │                 └─{gmain}
        ├─lightdm─┬─Xorg───{InputThread}
        │         ├─lightdm─┬─upstart─┬─at-spi-bus-laun─┬─dbus-daemon
        │         │         │         │                 ├─{dconf worker}
        │         │         │         │                 ├─{gdbus}
        │         │         │         │                 └─{gmain}
        │         │         │         ├─at-spi2-registr─┬─{gdbus}
        │         │         │         │                 └─{gmain}
        ├─rtkit-daemon───2*[{rtkit-daemon}]
        ├─snapd───6*[{snapd}]
        ├─systemd-timesyn───{sd-resolve}
        ├─systemd-udevd
        ├─udisksd─┬─{cleanup}
        │         ├─{gdbus}
        │         ├─{gmain}
        │         └─{probing-thread}
        ├─upowerd─┬─{gdbus}
        │         └─{gmain}
        ├─vmtoolsd───{vmtoolsd}
        ├─vmware-vmblock-───2*[{vmware-vmblock-}]
        ├─vsftpd
        └─whoopsie─┬─{gdbus}
                   └─{gmain}
守护进程操作:
service crond stop
service crond start
service crond restart : 修改配置文件要重启。
service crond reload : 重新读取配置文件,进程不会停。

root@ubuntu:/# sysv-rc-conf (守护进程列表,相当于windows的服务列表,查看守护进程的启动方式)
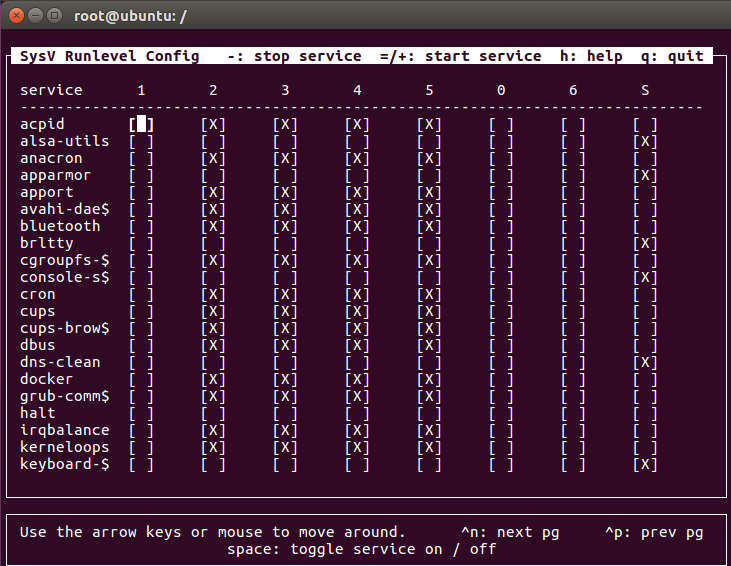
(0:关机,1:单用户,2:  多用户模式,没有NFS网络支持,3:多用户模式,有NFS,登录后进入控制台命令行模式,4:备用,自定义模式,5:有图形界面模式,6:重启)

(0,6是关机和重启,都是要关闭的。1是单用户不支持网络功能,所以网络功能的进程不需要启动,也会有一个功能限制,所以有些不启动。2,3,4,5可以随便定制)

root@ubuntu:/# sysv-rc-conf --list
acpid        2:on    3:on    4:on    5:on
alsa-utils   0:off    1:off    6:off    S:on
anacron      2:on    3:on    4:on    5:on
apparmor     S:on
apport       2:on    3:on    4:on    5:on
avahi-daemon 0:off    1:off    2:on    3:on    4:on    5:on    6:off
bluetooth    0:off    1:off    2:on    3:on    4:on    5:on    6:off
brltty       S:on
cgroupfs-mou 0:off    1:off    2:on    3:on    4:on    5:on    6:off
console-setu S:on
cron         2:on    3:on    4:on    5:on
cups         1:off    2:on    3:on    4:on    5:on
cups-browsed 0:off    1:off    2:on    3:on    4:on    5:on    6:off
dbus         2:on    3:on    4:on    5:on
dns-clean    S:on
docker       0:off    1:off    2:on    3:on    4:on    5:on    6:off
grub-common  2:on    3:on    4:on    5:on
halt         0:off
irqbalance   0:off    1:off    2:on    3:on    4:on    5:on    6:off
kerneloops   0:off    1:off    2:on    3:on    4:on    5:on    6:off
keyboard-set S:on
root@ubuntu:/# man runlevel
       ┌─────────┬───────────────────┐
       │Runlevel │ Target            │
       ├─────────┼───────────────────┤
       │0        │ poweroff.target   │
       ├─────────┼───────────────────┤
       │1        │ rescue.target     │
       ├─────────┼───────────────────┤
       │2, 3, 4  │ multi-user.target │
       ├─────────┼───────────────────┤
       │5        │ graphical.target  │
       ├─────────┼───────────────────┤
       │6        │ reboot.target     │
       └─────────┴───────────────────┘

root@ubuntu:/# sysv-rc-conf  --level  2345  crond  off (把crond在2345模式下都设置成off)
root@ubuntu:/# sysv-rc-conf --list crond
crond        2:off       3:off            4:off         5:off

root@ubuntu:/# sysv-rc-conf --level 213465 crond on  (把crond全部设置成on)
root@ubuntu:/# sysv-rc-conf --list crond
crond        1:on    2:on       3:on      4:on         5:on        6:on
时间同步
windows服务器和linux服务器都有时钟同步,生产环境,需要经常与互联网时钟同步。windows每7天同步一次。

windows的时间只有一个系统时间。linux的时钟有2种,一种是系统时间,一种是硬件时钟。
yw1989@ubuntu:~$ date  :系统时间
2018年 02月 15日 星期四 16:53:02 PST
yw1989@ubuntu:~$ time :硬件时钟,硬件时钟和系统时间不一致也会形成冲突。
real    0m0.000s
user    0m0.000s
sys    0m0.000s

root@ubuntu:/# hwclock :硬件时间,和系统时间一样的。
2018年02月15日 星期四 16时57分12秒  .337802 seconds

root@ubuntu:/# date -s '2018-02-16 08:59:00'   :手动调整系统时间,硬件时钟没变。
2018年 02月 16日 星期五 08:59:00 PST

系统时间来源于硬件时钟,重启后系统时间又变了。

root@ubuntu:/# hwclock --systohc  :系统时间同步到硬件时间

网络时间同步:安装ntp
root@ubuntu:/# ntpdate time.windows.com  :同步
15 Feb 20:34:31 ntpdate[10354]: adjust time server 52.163.118.68 offset -0.033132 sec

root@ubuntu:/etc# vim ntp.conf
pool 0.ubuntu.pool.ntp.org iburst  :同步的时间服务器地址
pool 1.ubuntu.pool.ntp.org iburst
pool 2.ubuntu.pool.ntp.org iburst
pool 3.ubuntu.pool.ntp.org iburst

(时间服务器的守护进程启动起来,并且加入开机启动服务)
root@ubuntu:/etc# service ntp start