一. 常用指令1
1. Mustache语法(双大括号)
如果我们希望把数据显示到模板(template)中,使用最多的语法是 “Mustache”语法 (双大括号) 的文本插值。并且我们知道,data返回的对象是有添加到Vue的响应式系统中;
当data中的数据发生改变时,对应的内容也会发生更新。当然,Mustache中不仅仅可以是data中的属性,也可以是一个JavaScript的表达式。
    <body>
        <div id="app"></div>
        <template id="myApp">
            <!-- 1.基本用法 -->
            <div> {{message}} </div>
            <!-- 2.表达式 -->
            <div>{{count*12}}</div>
            <!-- 3.调用函数 -->
            <div>{{getCount()}}</div>
            <!-- 4.三元运算符 -->
            <div>{{isShow?'ypf':'lmr'}}</div>
            <button @click="toggle">切换</button>
        </template>

        <script src="../js/vue3.js"></script>
        <script>
            Vue.createApp({
                template: '#myApp',
                data() {
                    return {
                        message: 'Hello Vue3!',
                        count:20,
                        isShow:true
                    }
                },
                methods:{
                    getCount(){
                        return this.count*12;
                    },
                    toggle(){
                        this.isShow=!this.isShow;
                    }
                }
            }).mount('#app');
        </script>
    </body>
2. v-once
用于指定元素或者组件只渲染一次。
当数据发生变化时,元素或者组件以及其所有的子元素将视为静态内容并且跳过;
该指令可以用于性能优化;
    <body>
        <div id="app"></div>
        <template id="myApp">
            <!-- 单个元素 -->
            <span v-once>This will never change: {{msg}}</span>
            <!-- 有子元素 -->
            <div v-once>
              <p>comment</p>
              <p>{{msg}}</p>
            </div>
        </template>

        <script src="../js/vue3.js" ></script>
        <script>
            Vue.createApp({
                template: '#myApp',
                data() {
                    return {
                        msg: 'Hello Vue3!'
                    }
                }
            }).mount('#app');
        </script>
    </body>
3. v-text 和 v-html
(1). v-text 用于更新元素的 textContent,等价于 mustache语法。
(2). v-html 用于把html渲染出来。
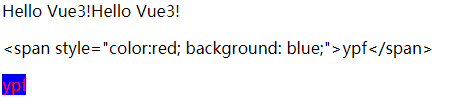
    <body>
        <div id="app"></div>
        <template id="myApp">
            <!-- 1. v-text用法 -->
            <div>
                <span v-text="message"></span>
                <!-- 等价于 mustache -->
                <span>{{message}}</span>
            </div>
            <!-- 2. v-html用法 -->
            <div>
                <p>{{myHtml}}</p>
                <p v-html="myHtml"></p>
            </div>
        </template>

        <script src="../js/vue3.js" ></script>
        <script>
            Vue.createApp({
                template: '#myApp',
                data() {
                    return {
                        message: 'Hello Vue3!',
                        myHtml:'<span style="color:red; background: blue;">ypf</span>'
                    }
                }
            }).mount('#app');
        </script>
运行效果:
4. v-pre
v-pre用于跳过元素和它的子元素的编译过程,显示原始的Mustache标签:跳过不需要编译的节点,加快编译的速度;
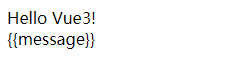
    <body>
        <div id="app"></div>
        <template id="myApp">
            <div> {{message}} </div>
            <div v-pre>{{message}}</div>
        </template>
        <script src="../js/vue3.js"></script>
        <script>
            Vue.createApp({
                template: '#myApp',
                data() {
                    return {
                        message: 'Hello Vue3!'
                    }
                }
            }).mount('#app');
        </script>
    </body>
运行结果:
5. v-cloak
这个指令保持在元素上直到关联组件实例结束编译。和 CSS 规则如 [v-cloak] { display: none } 一起用时,这个指令可以隐藏未编译的 Mustache 标签直到组件实例准备完毕。
<style type="text/css">
        [v-cloak]{
            display: none;
        }
    </style>
    <body>
        <div id="app"></div>
        <template id="myApp">
            <div v-cloak>
                {{msg}}
            </div>
        </template>

        <script src="../js/vue3.js" ></script>
        <script>
            Vue.createApp({
                template: '#myApp',
                data() {
                    return {
                        msg: 'Hello Vue3!'
                    }
                }
            }).mount('#app');
        </script>
    </body>
二. 常用指令2
1. v-bind
(1). 基本用法
v-bind用于绑定一个或多个属性值,或者向另一个组件传递props值
(2). 动态属性绑定
如果属性名称不是固定的,我们可以使用 :[属性名]=“值” 的格式来定义;
(3). 直接绑定一个对象
将一个对象的所有属性,绑定到元素上的所有属性
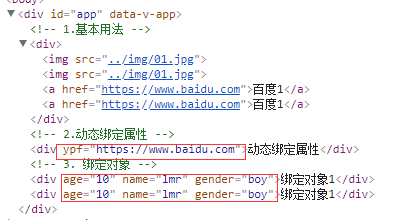
<body>
        <div id="app"></div>
        <template id="myApp">
            <!-- 1.基本用法 -->
            <div>
                <img v-bind:src="img1" >
                <img :src="img1" >
                <a v-bind:href="url1">百度1</a>
                <a :href="url1">百度1</a>
            </div>
            <!-- 2.动态绑定属性 -->
            <div :[myname]='url1'>动态绑定属性</div>
            <!-- 3. 绑定对象 -->
            <div v-bind='user'>绑定对象1</div>
            <div :='user'>绑定对象1</div>
        </template>

        <script src="../js/vue3.js" ></script>
        <script>
            Vue.createApp({
                template: '#myApp',
                data() {
                    return {
                        img1:'../img/01.jpg',
                        url1:'https://www.baidu.com',
                        myname:'ypf',
                        user:{
                            age:10,
                            name:'lmr',
                            gender:'boy'
                        }
                    }
                }
            }).mount('#app');
        </script>
结果查看:
(4). 绑定class-对象语法


<style type="text/css">
        .myColor {
            color: red;
        }

        .mySize {
            font-size: 20px;
        }

        .myback {
            background-color: aquamarine;
        }
    </style>
    <body>
        <div id="app"></div>
        <template id="myApp">
            <!-- 1.普通绑定 -->
            <div :class="color1">普通绑定</div>
            <!-- 2. 对象语法  引号可加可不加,是否生效关键看后面是true 还是 false-->
            <div :class="{myColor:true,mySize:true}">对象语法1</div>
            <div :class="{'myColor':true,'mySize':true}">对象语法2</div>
            <div :class="{myColor:isTrue,mySize:isTrue}">对象语法3</div>
            <div><button @click="toggle">切换</button></div>
            <!-- 3. 默认class 和 动态class结合 -->
            <div class="myback" :class="{myColor:isTrue,mySize:isTrue}">对象语法3</div>
            <!-- 4.对象封装在单个属性中 -->
            <div :class="myStyle">对象封装在属性中 </div>
            <!-- 5.对象封装在方法中 或计算属性中 -->
            <div :class="getStyle()">对象封装在方法中</div>
            <div :class="myStyle2">对象封装在计算属性中</div>
        </template>

        <script src="../js/vue3.js"></script>
        <script>
            Vue.createApp({
                template: '#myApp',
                data() {
                    return {
                        color1: 'myColor',
                        isTrue: true,
                        myStyle: {
                            myColor: true,
                            myFont: true
                        }
                    }
                },
                methods: {
                    toggle() {
                        this.isTrue = !this.isTrue;
                    },
                    getStyle() {
                        return {
                            myColor: true,
                            myFont: true
                        }
                    }
                },
                computed:{
                    myStyle2(){
                        return {
                            myColor: true,
                            myFont: true
                        }
                    }
                }
            }).mount('#app');
        </script>
    </body>
(5). 绑定class-数组语法
 <style type="text/css">
        .myColor {
            color: red;
        }

        .mySize {
            font-size: 20px;
        }

        .myback {
            background-color: aquamarine;
        }
    </style>
    <body>
        <div id="app"></div>
        <template id="myApp">
            <!-- 1.直接绑定数组 -->
            <div :class="[c1,c2]">哈哈哈哈</div>
            <!-- 2. 计算绑定 -->
            <div :class="[c1,c2, isTrue?'myback':'']">哈哈哈哈</div>
            <div :class="[c1,c2,{myback:isTrue}]">哈哈哈哈</div>
        </template>

        <script src="../js/vue3.js"></script>
        <script>
            Vue.createApp({
                template: '#myApp',
                data() {
                    return {
                        c1: 'myColor',
                        c2: 'mySize',
                        isTrue: true
                    }
                }
            }).mount('#app');
        </script>
    </body>
(6). 绑定style-对象语法
特别说明:可以用驼峰式 (camelCase) 或短横线分隔 (kebab-case,必须用引号括起来) 来命名;(比如: 'font-size':14px 可以写成 fontSize:14px)
<body>
        <div id="app"></div>
        <template id="myApp">
            <!-- 1.普通用法   注意,如果用短横线的模式,必须加单引号!!!-->
            <div :style="{'background-color': myColor,'font-size': mySize}">哈哈哈哈</div>
            <div :style="{backgroundColor: myColor,fontSize: mySize}">哈哈哈哈</div>
            <!-- 2.直接绑定一个对象 -->
            <div :style="myStyle">直接绑定一个对象 </div>
            <!-- 3.绑定方法 -->
            <div :style="getStyle()">直接绑定一个对象 </div>
            <!-- 4. 绑定计算属性 -->
            <div :style="myStyle2">直接绑定一个对象 </div>
        </template>

        <script src="../js/vue3.js"></script>
        <script>
            Vue.createApp({
                template: '#myApp',
                data() {
                    return {
                        myColor: 'pink',
                        mySize: '22px',
                        myStyle: {
                            'font-size': '25px',
                            fontWeight: 700
                        }
                    }
                },
                methods:{
                    getStyle(){
                        return {
                            'font-size': '25px',
                            fontWeight: 700
                        }
                    }
                },
                computed:{
                    myStyle2(){
                        return {
                            'font-size': '25px',
                            fontWeight: 700
                        }
                    }
                }
            }).mount('#app');
        </script>
    </body>
(7). 绑定style-数组语法
<body>
        <div id="app"></div>
        <template id="myApp">
            <div :style="[style1,style2]">绑定数组</div>
        </template>
        <script src="../js/vue3.js"></script>
        <script>
            Vue.createApp({
                template: '#myApp',
                data() {
                    return {
                        style1: {
                            color: 'red',
                            fontSize: '20px',
                            // 用短横线必须加单引号
                            'background-color': 'pink'
                        },
                        style2: {
                            textDecoration: "underline"
                        }
                    }
                }
            }).mount('#app');
        </script>
    </body>
2. v-on
绑定事件监听器。事件类型由参数指定。表达式可以是一个方法的名字或一个内联语句,如果没有修饰符也可以省略。 简写: @
(1). 基本使用
<body>
        <div id="app"></div>
        <template id="myApp">
            <!-- 1.基本用法 -->
            <button v-on:click="btn1">基本用法1</button>
            <button @click="btn1">基本用法1</button>
            <!-- 2.绑定表达式 -->
            <button @click="count++">{{count}}</button>
            <!-- 3. 绑定多个事件 -->
            <button v-on:="{click:btn1,mousemove:btn2}">绑定多个事件1</button>
            <button @="{click:btn1,mousemove:btn2}">绑定多个事件1</button>
        </template>

        <script src="../js/vue3.js" ></script>
        <script>
            Vue.createApp({
                template: '#myApp',
                data() {
                    return {
                        count: 0
                    }
                },
                methods:{
                    btn1(){
                        console.log(1111);
                    },
                    btn2(){
                        console.log(2222);
                    }
                }
            }).mount('#app');
        </script>
    </body>
(2). 参数传递
没有参数的时候,默认会传入event对象,当有参数的时候,需要通过$event进行传递,可以放到任意位置,习惯上我们把它放在最后面。
拿到event对象,通过event.target.innerHtml可以获取内容等。
<body>
        <div id="app"></div>
        <template id="myApp">
            <!-- 1.没有参数的时候默认传入event对象 -->
            <button @click="btn1">按钮1</button>
            <!-- 2.有参数的时候,需要通过$event传入,位置任意 -->
            <button @click="btn2(12,'ypf',$event)">按钮2</button>
            <button @click="btn3($event,12,'ypf')">按钮3</button>
            <button @click="btn4(12,$event,'ypf')">按钮4</button>
        </template>

        <script src="../js/vue3.js" ></script>
        <script>
            Vue.createApp({
                template: '#myApp',
                methods:{
                    btn1(event){
                        console.log(event);
                        console.log(event.target.innerHTML);
                    },
                    btn2(age,name,event){
                        console.log(age,name,event);
                        console.log(event.target.innerHTML);
                    },
                    btn3(event,age,name){
                        console.log(age,name,event);
                        console.log(event.target.innerHTML);
                    },
                    btn4(age,event,name){
                        console.log(age,name,event);
                        console.log(event.target.innerHTML);
                    }
                }
            }).mount('#app');
        </script>
    </body>
(3). 修饰符
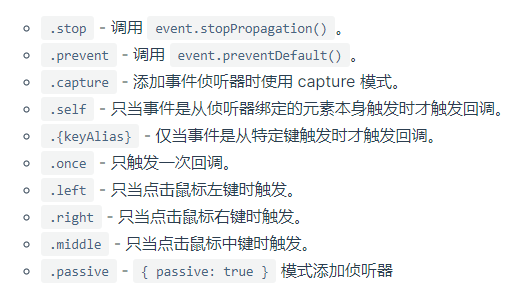
<body>
        <div id="app"></div>
        <template id="myApp">
            <!-- 停止冒泡 -->
            <button @click.stop="doThis">按钮1</button>
            <!-- 阻止默认行为 -->
            <button @click.prevent="doThis">按钮2</button>
            <!-- 阻止默认行为,没有表达式 -->
            <form @submit.prevent>Form表单</form>
            <!-- 串联修饰符 -->
            <button @click.stop.prevent="doThis">串联修饰符</button>
            <!-- 键修饰符,键别名 -->
            <input @keyup.enter="onEnter" />
            <!-- 点击回调只会触发一次 -->
            <button v-on:click.once="doThis">点击回调只会触发一次</button>
        </template>

        <script src="../js/vue3.js" ></script>
        <script>
            Vue.createApp({
                template: '#myApp',
                methods:{
                    doThis(){
                        console.log(111);
                    },
                    onEnter(){
                        console.log(2222);
                    }
                }
            }).mount('#app');
        </script>
    </body>
3. v-if、v-else、v-if-else
(1). 条件渲染
这些内容只有在条件为true时,才会被渲染出来;这三个指令与JavaScript的条件语句if、else、else if类似。
<body>
        <div id="app"></div>
        <template id="myApp">
            <!-- 1.单个条件渲染 -->
            <div>
                <h3 v-if="isShow1">单个条件渲染</h3>
                <button @click="toggle1">切换</button>
            </div>
            <!-- 2.多条件渲染 -->
            <div>
                <input type="text" v-model="score" />
                <h3 v-if="score>=90">优秀</h3>
                <h3 v-else-if=" score <90 && score >=80">良好</h3>
                <h3 v-else-if=" score <80 && score >=60">及格</h3>
                <h3 v-else>不及格</h3>
            </div>
        </template>

        <script src="../js/vue3.js"></script>
        <script>
            Vue.createApp({
                template: '#myApp',
                data() {
                    return {
                        isShow1: true,
                        score: 50,
                    }
                },
                methods: {
                    toggle1() {
                        this.isShow1 = !this.isShow1;
                    }
                }
            }).mount('#app');
        </script>
    </body>
(2). 与template结合
template元素可以当做不可见的包裹元素,并且在v-if上使用,但是最终template不会被渲染出来,从而防止产生不必要元素。
<body>
        <div id="app"></div>
        <template id="myApp">
             <template v-if="isShowHa">
                  <h2>哈哈哈哈</h2>
                  <h2>哈哈哈哈</h2>
                  <h2>哈哈哈哈</h2>
                </template>

                <template v-else>
                  <h2>呵呵呵呵</h2>
                  <h2>呵呵呵呵</h2>
                  <h2>呵呵呵呵</h2>
                </template>
        </template>

        <script src="../js/vue3.js" ></script>
        <script>
            Vue.createApp({
                template: '#myApp',
                data() {
                    return {
                        isShowHa: true
                    }
                }
            }).mount('#app');
        </script>
    </body>
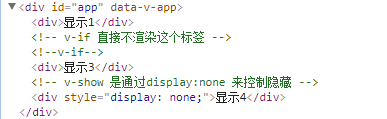
4. v-show
v-show和v-if的用法看起来是一致的,也是根据一个条件决定是否显示元素或者组件:
<body>
        <div id="app"></div>
        <template id="myApp">
            <div v-if="isShow1">显示1</div>
            <!-- v-if 直接不渲染这个标签 -->
            <div v-if="isShow2">显示2</div>
            <div v-show="isShow1">显示3</div>
            <!-- v-show 是通过display:none 来控制隐藏 -->
            <div v-show="isShow2">显示4</div>
        </template>

        <script src="../js/vue3.js" ></script>
        <script>
            Vue.createApp({
                template: '#myApp',
                data() {
                    return {
                        isShow1:true,
                        isShow2:false,
                    }
                }
            }).mount('#app');
        </script>
    </body>
查看渲染:
对比总结:
首先,在用法上的区别:
v-show是不支持template;
v-show不可以和v-else一起使用;
其次,本质的区别:
v-show元素无论是否需要显示到浏览器上,它的DOM实际都是有渲染的,只是通过CSS的display属性来进行切换;
v-if当条件为false时,其对应的原生压根不会被渲染到DOM中;
开发中如何进行选择呢?
如果我们的原生需要在显示和隐藏之间频繁的切换,那么使用v-show;
如果不会频繁的发生切换,那么使用v-if;
!
- 作 者 : Yaopengfei(姚鹏飞)
- 博客地址 : http://www.cnblogs.com/yaopengfei/
- 声 明1 : 如有错误,欢迎讨论,请勿谩骂^_^。
- 声 明2 : 原创博客请在转载时保留原文链接或在文章开头加上本人博客地址,否则保留追究法律责任的权利。