一. MyBatis简介
1. 背景
原始 JDBC 的操作问题分析
(1). 频繁创建和销毁数据库的连接会造成系统资源浪费从而影响系统性能。
(2). sql 语句在代码中硬编码,如果要修改 sql 语句,就需要修改 java 代码,造成代码不易维护。
(3). 查询操作时,需要手动将结果集中的数据封装到实体对象中。
(4). 增删改查操作需要参数时,需要手动将实体对象的数据设置到 sql 语句的占位符。
当然也有相应的解决方案:使用数据库连接池初始化连接资源、 将 sql 语句抽取到配置文件中、使用反射、内省等底层技术,将实体与表进行属性与字段的自动映射 。
2. 什么是MyBatis?
mybatis 是一个优秀的基于java的持久层框架,它内部封装了jdbc,使开发者只需要关注sql语句本身,而不需要花费精力去处理加载驱动、创建连接、创建statement等繁杂的过程。
mybatis通过xml或注解的方式将要执行的各种 statement配置起来,并通过java对象和statement中sql的动态参数进行映射生成最终执行的sql语句。
最后mybatis框架执行sql并将结果映射为java对象并返回。采用ORM思想解决了实体和数据库映射的问题,对jdbc 进行了封装,屏蔽了jdbc api 底层访问细节,使我们不用与jdbc api 打交道,就可以完成对数据库的持久化操作。
MyBatis官网地址:https://mybatis.org/mybatis-3/zh/index.html
二.配置文件详解
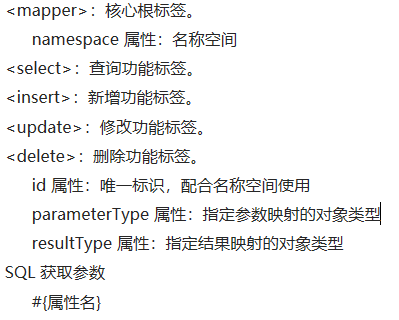
1. 映射配置文件
映射配置文件包含了数据和对象之间的映射关系以及要执行的 SQL 语句

配置文件案例如下:

<?xml version="1.0" encoding="UTF-8" ?>
<!--MyBatis的DTD约束-->
<!DOCTYPE mapper
        PUBLIC "-//mybatis.org//DTD Mapper 3.0//EN"
        "http://mybatis.org/dtd/mybatis-3-mapper.dtd">

<!--
    mapper:核心根标签
    namespace属性:名称空间
-->
<mapper namespace="StudentMapper">
    <!--
       select:查询功能的标签
       id属性:唯一标识
       resultType属性:指定结果映射对象类型
       parameterType属性:指定参数映射对象类型
   -->
    <select id="selectAll" resultType="student">
        SELECT * FROM student
    </select>

    <select id="selectById" resultType="student" parameterType="int">
        SELECT * FROM student WHERE id = #{id}
    </select>

    <insert id="insert" parameterType="student">
        INSERT INTO student VALUES (#{id},#{name},#{age})
    </insert>

    <update id="update" parameterType="student">
        UPDATE student SET name = #{name},age = #{age} WHERE id = #{id}
    </update>

    <delete id="delete" parameterType="int">
        DELETE FROM student WHERE id = #{id}
    </delete>
</mapper>
2. 核心配置文件
(1). 整体说明
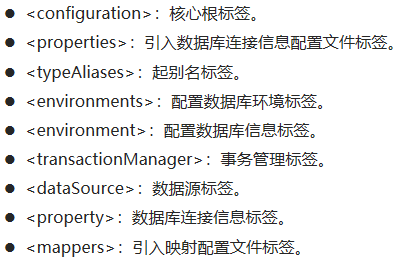
核心配置文件包含了 MyBatis 最核心的设置和属性信息。如数据库的连接、事务、连接池信息等。

代码如下:

<?xml version="1.0" encoding="UTF-8" ?>
<!--MyBatis的DTD约束-->
<!DOCTYPE configuration PUBLIC "-//mybatis.org//DTD Config 3.0//EN" "http://mybatis.org/dtd/mybatis-3-config.dtd">

<!--configuration 核心根标签-->
<configuration>

    <!--引入数据库连接的配置文件-->
    <properties resource="jdbc.properties"/>

    <!--配置LOG4J-->
    <settings>
        <setting name="logImpl" value="log4j"/>
    </settings>

    <!--起别名-->
    <typeAliases>
        <!--<typeAlias type="com.ypf.bean.Student" alias="student"/>-->

        <!-- 全局别名通用配置 -->
        <package name="com.ypf.bean"/>
    </typeAliases>

    <!--environments配置数据库环境,环境可以有多个。default属性指定使用的是哪个-->
    <environments default="mysql">
        <!--environment配置数据库环境  id属性唯一标识-->
        <environment id="mysql">
            <!-- transactionManager事务管理。  type属性,采用JDBC默认的事务-->
            <transactionManager type="JDBC"></transactionManager>
            <!-- dataSource数据源信息   type属性 连接池-->
            <dataSource type="POOLED">
                <!-- property获取数据库连接的配置信息 -->
                <property name="driver" value="${driver}"/>
                <property name="url" value="${url}"/>
                <property name="username" value="${username}"/>
                <property name="password" value="${password}"/>
            </dataSource>
        </environment>
    </environments>

    <!-- mappers引入映射配置文件 -->
    <mappers>
        <!-- mapper 引入指定的映射配置文件   resource属性指定映射配置文件的名称 -->
        <mapper resource="StudentMapper.xml"/>
    </mappers>
</configuration>
(2). 单独分离DB的配置文件
新建1个jdbc.properties,存放DB的配置信息,如下:
driver=com.mysql.jdbc.Driver
#url=jdbc:mysql://xxx:3306/db1
# 下面配置防止中文乱码
url=jdbc:mysql://xxx:3306/db1?useUnicode=true&characterEncoding=utf8&rewriteBatchedStatements=true
username=root
password=xxx
然后进行引入即可:
<!--引入数据库连接的配置文件-->
<properties resource="jdbc.properties"/>
 <!-- property获取数据库连接的配置信息 -->
    <property name="driver" value="${driver}" />
    <property name="url" value="${url}" />
    <property name="username" value="${username}" />
    <property name="password" value="${password}" />
(3). 起别名
默认映射配置中的resultType需要写完整的命名空间,太过繁琐,可以通过别名的方式进行简化一下:
    <select id="selectAll" resultType="com.ypf.bean.Student">
        SELECT * FROM student
    </select>
可以单独配置,也可以整体配置,整体配置后直接就是类名小写
   <!--起别名-->
    <typeAliases>
        <!--<typeAlias type="com.ypf.bean.Student" alias="student"/>-->

        <!-- 全局别名通用配置 -->
        <package name="com.ypf.bean"/>
    </typeAliases>
(4). 引入log4j日志
新建log4j.properties文件,代码如下:
# Global logging configuration
# ERROR WARN INFO DEBUG
log4j.rootLogger=DEBUG, stdout
# Console output...
log4j.appender.stdout=org.apache.log4j.ConsoleAppender
log4j.appender.stdout.layout=org.apache.log4j.PatternLayout
log4j.appender.stdout.layout.ConversionPattern=%5p [%t] - %m%n
然后将其引入:
    <!--配置LOG4J-->
    <settings>
        <setting name="logImpl" value="log4j"/>
    </settings>
(5). DB核心配置
    <!--environments配置数据库环境,环境可以有多个。default属性指定使用的是哪个-->
    <environments default="mysql">
        <!--environment配置数据库环境  id属性唯一标识-->
        <environment id="mysql">
            <!-- transactionManager事务管理。  type属性,采用JDBC默认的事务-->
            <transactionManager type="JDBC"></transactionManager>
            <!-- dataSource数据源信息   type属性 连接池-->
            <dataSource type="POOLED">
                <!-- property获取数据库连接的配置信息 -->
                <property name="driver" value="${driver}"/>
                <property name="url" value="${url}"/>
                <property name="username" value="${username}"/>
                <property name="password" value="${password}"/>
            </dataSource>
        </environment>
    </environments>
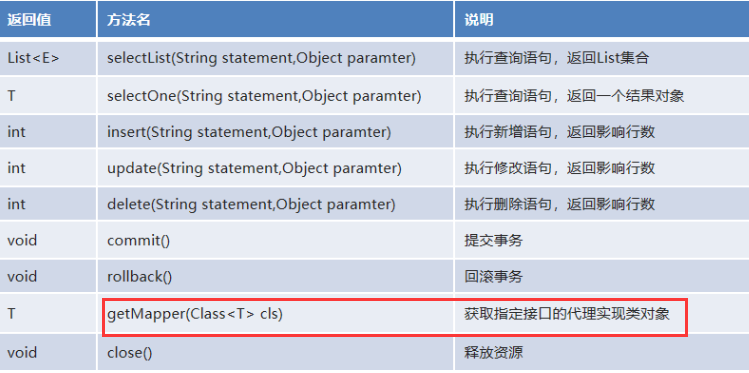
3. Api详解
代码如下:
  @Test
    public void insert() throws Exception{
        //1.加载核心配置文件
        InputStream is = Resources.getResourceAsStream("MyBatisConfig.xml");

        //2.获取SqlSession工厂对象
        SqlSessionFactory sqlSessionFactory = new SqlSessionFactoryBuilder().build(is);

        //3.通过工厂对象获取SqlSession对象
        //SqlSession sqlSession = sqlSessionFactory.openSession();
        SqlSession sqlSession = sqlSessionFactory.openSession(true);   //设为true,表示自动提交事务,后面则不需要sqlSession.commit了

        //4.执行映射配置文件中的sql语句,并接收结果
        Student stu = new Student(5,"周七",27);
        int result = sqlSession.insert("StudentMapper.insert", stu);

        //5.提交事务
        //sqlSession.commit();

        //6.处理结果
        System.out.println(result);

        //7.释放资源
        sqlSession.close();
        is.close();
    }
分析:
(1). openSession:可以设置是否自动提交事务,如果设置true,则后续不再需要Commit了
(2). SqlSession对象:用于执行 SQL、管理事务、接口代理。

三. 实战演练
1. 新建jdb.properties、log4j.properties、MyBatisConfig.xml、StudentMapper.xml 4个配置文件 和 Student实体类
jdb.properties

driver=com.mysql.jdbc.Driver
#url=jdbc:mysql://x:3306/db1
# 下面配置防止中文乱码
url=jdbc:mysql://x:3306/db1?useUnicode=true&characterEncoding=utf8&rewriteBatchedStatements=true
username=root
password=x
log4j.properties

# Global logging configuration
# ERROR WARN INFO DEBUG
log4j.rootLogger=DEBUG, stdout
# Console output...
log4j.appender.stdout=org.apache.log4j.ConsoleAppender
log4j.appender.stdout.layout=org.apache.log4j.PatternLayout
log4j.appender.stdout.layout.ConversionPattern=%5p [%t] - %m%n
MyBatisConfig.xml

<?xml version="1.0" encoding="UTF-8" ?>
<!--MyBatis的DTD约束-->
<!DOCTYPE configuration PUBLIC "-//mybatis.org//DTD Config 3.0//EN" "http://mybatis.org/dtd/mybatis-3-config.dtd">

<!--configuration 核心根标签-->
<configuration>

    <!--引入数据库连接的配置文件-->
    <properties resource="jdbc.properties"/>

    <!--配置LOG4J-->
    <settings>
        <setting name="logImpl" value="log4j"/>
    </settings>

    <!--起别名-->
    <typeAliases>
        <!--<typeAlias type="com.ypf.bean.Student" alias="student"/>-->

        <!-- 全局别名通用配置 -->
        <package name="com.ypf.bean"/>
    </typeAliases>

    <!--environments配置数据库环境,环境可以有多个。default属性指定使用的是哪个-->
    <environments default="mysql">
        <!--environment配置数据库环境  id属性唯一标识-->
        <environment id="mysql">
            <!-- transactionManager事务管理。  type属性,采用JDBC默认的事务-->
            <transactionManager type="JDBC"></transactionManager>
            <!-- dataSource数据源信息   type属性 连接池-->
            <dataSource type="POOLED">
                <!-- property获取数据库连接的配置信息 -->
                <property name="driver" value="${driver}"/>
                <property name="url" value="${url}"/>
                <property name="username" value="${username}"/>
                <property name="password" value="${password}"/>
            </dataSource>
        </environment>
    </environments>

    <!-- mappers引入映射配置文件 -->
    <mappers>
        <!-- mapper 引入指定的映射配置文件   resource属性指定映射配置文件的名称 -->
        <mapper resource="StudentMapper.xml"/>
    </mappers>
</configuration>
StudentMapper.xml

<?xml version="1.0" encoding="UTF-8" ?>
<!--MyBatis的DTD约束-->
<!DOCTYPE mapper
        PUBLIC "-//mybatis.org//DTD Mapper 3.0//EN"
        "http://mybatis.org/dtd/mybatis-3-mapper.dtd">

<!--
    mapper:核心根标签
    namespace属性:名称空间
-->
<mapper namespace="StudentMapper">
    <!--
       select:查询功能的标签
       id属性:唯一标识
       resultType属性:指定结果映射对象类型
       parameterType属性:指定参数映射对象类型
   -->
    <select id="selectAll" resultType="student">
        SELECT * FROM student
    </select>

    <select id="selectById" resultType="student" parameterType="int">
        SELECT * FROM student WHERE id = #{id}
    </select>

    <insert id="insert" parameterType="student">
        INSERT INTO student VALUES (#{id},#{name},#{age})
    </insert>

    <update id="update" parameterType="student">
        UPDATE student SET name = #{name},age = #{age} WHERE id = #{id}
    </update>

    <delete id="delete" parameterType="int">
        DELETE FROM student WHERE id = #{id}
    </delete>
</mapper>
2. 直接新建StudentTest1类进行测试
增删改查的实现方法如下:

package com.ypf.test;

import com.ypf.bean.Student;
import org.apache.ibatis.io.Resources;
import org.apache.ibatis.session.SqlSession;
import org.apache.ibatis.session.SqlSessionFactory;
import org.apache.ibatis.session.SqlSessionFactoryBuilder;
import org.junit.Test;

import java.io.InputStream;
import java.util.List;


//单纯测试MyBatis用法
public class StudentTest1 {

    /*
         删除功能
      */
    @Test
    public void delete() throws Exception{
        //1.加载核心配置文件
        InputStream is = Resources.getResourceAsStream("MyBatisConfig.xml");

        //2.获取SqlSession工厂对象
        SqlSessionFactory sqlSessionFactory = new SqlSessionFactoryBuilder().build(is);

        //3.通过工厂对象获取SqlSession对象
        SqlSession sqlSession = sqlSessionFactory.openSession();
        //SqlSession sqlSession = sqlSessionFactory.openSession(true);

        //4.执行映射配置文件中的sql语句,并接收结果
        int result = sqlSession.delete("StudentMapper.delete",5);

        //5.提交事务
        sqlSession.commit();

        //6.处理结果
        System.out.println(result);

        //7.释放资源
        sqlSession.close();
        is.close();
    }

    /*
        修改功能
     */
    @Test
    public void update() throws Exception{
        //1.加载核心配置文件
        InputStream is = Resources.getResourceAsStream("MyBatisConfig.xml");

        //2.获取SqlSession工厂对象
        SqlSessionFactory sqlSessionFactory = new SqlSessionFactoryBuilder().build(is);

        //3.通过工厂对象获取SqlSession对象
        SqlSession sqlSession = sqlSessionFactory.openSession();
        //SqlSession sqlSession = sqlSessionFactory.openSession(true);

        //4.执行映射配置文件中的sql语句,并接收结果
        Student stu = new Student(5,"周七",37);
        int result = sqlSession.update("StudentMapper.update",stu);

        //5.提交事务
        sqlSession.commit();

        //6.处理结果
        System.out.println(result);

        //7.释放资源
        sqlSession.close();
        is.close();
    }

    /*
        新增功能
     */
    @Test
    public void insert() throws Exception{
        //1.加载核心配置文件
        InputStream is = Resources.getResourceAsStream("MyBatisConfig.xml");

        //2.获取SqlSession工厂对象
        SqlSessionFactory sqlSessionFactory = new SqlSessionFactoryBuilder().build(is);

        //3.通过工厂对象获取SqlSession对象
        //SqlSession sqlSession = sqlSessionFactory.openSession();
        SqlSession sqlSession = sqlSessionFactory.openSession(true);   //设为true,表示自动提交事务,后面则不需要sqlSession.commit了

        //4.执行映射配置文件中的sql语句,并接收结果
        Student stu = new Student(5,"周七",27);
        int result = sqlSession.insert("StudentMapper.insert", stu);

        //5.提交事务
        //sqlSession.commit();

        //6.处理结果
        System.out.println(result);

        //7.释放资源
        sqlSession.close();
        is.close();
    }

    /*
        根据id查询
     */
    @Test
    public void selectById() throws Exception{
        //1.加载核心配置文件
        InputStream is = Resources.getResourceAsStream("MyBatisConfig.xml");

        //2.获取SqlSession工厂对象
        SqlSessionFactory sqlSessionFactory = new SqlSessionFactoryBuilder().build(is);

        //3.通过工厂对象获取SqlSession对象
        SqlSession sqlSession = sqlSessionFactory.openSession();

        //4.执行映射配置文件中的sql语句,并接收结果
        Student stu = sqlSession.selectOne("StudentMapper.selectById", 3);

        //5.处理结果
        System.out.println(stu);

        //6.释放资源
        sqlSession.close();
        is.close();
    }

    /*
        查询全部
     */
    @Test
    public void selectAll() throws Exception{
        //1.加载核心配置文件
        //InputStream is = Resources.getResourceAsStream("MyBatisConfig.xml");
        InputStream is = StudentTest1.class.getClassLoader().getResourceAsStream("MyBatisConfig.xml");

        //2.获取SqlSession工厂对象
        SqlSessionFactory sqlSessionFactory = new SqlSessionFactoryBuilder().build(is);

        //3.通过SqlSession工厂对象获取SqlSession对象
        SqlSession sqlSession = sqlSessionFactory.openSession();

        //4.执行映射配置文件中的sql语句,并接收结果
        List<Student> list = sqlSession.selectList("StudentMapper.selectAll");

        //5.处理结果
        for (Student stu : list) {
            System.out.println(stu);
        }

        //6.释放资源
        sqlSession.close();
        is.close();
    }
}
任意找一个方法,分析,比如
int result = sqlSession.delete("StudentMapper.delete",5);
我们发现 "StudentMapper.delete",这是硬编码,其中的delete对应的StudentMapper中相应节点的id,不是很友好,下一节介绍接口代理的方式代替这种硬编码。

!
- 作 者 : Yaopengfei(姚鹏飞)
- 博客地址 : http://www.cnblogs.com/yaopengfei/
- 声 明1 : 如有错误,欢迎讨论,请勿谩骂^_^。
- 声 明2 : 原创博客请在转载时保留原文链接或在文章开头加上本人博客地址,否则保留追究法律责任的权利。
