一、环境介绍
[root@kimissVPN ~]# cat /etc/redhat-release
CentOS release 6.8 (Final)
[root@kimissVPN ~]# uname -r
4.10.4-1.el6.elrepo.i686
[root@kimissVPN ~]# uname -m
i686
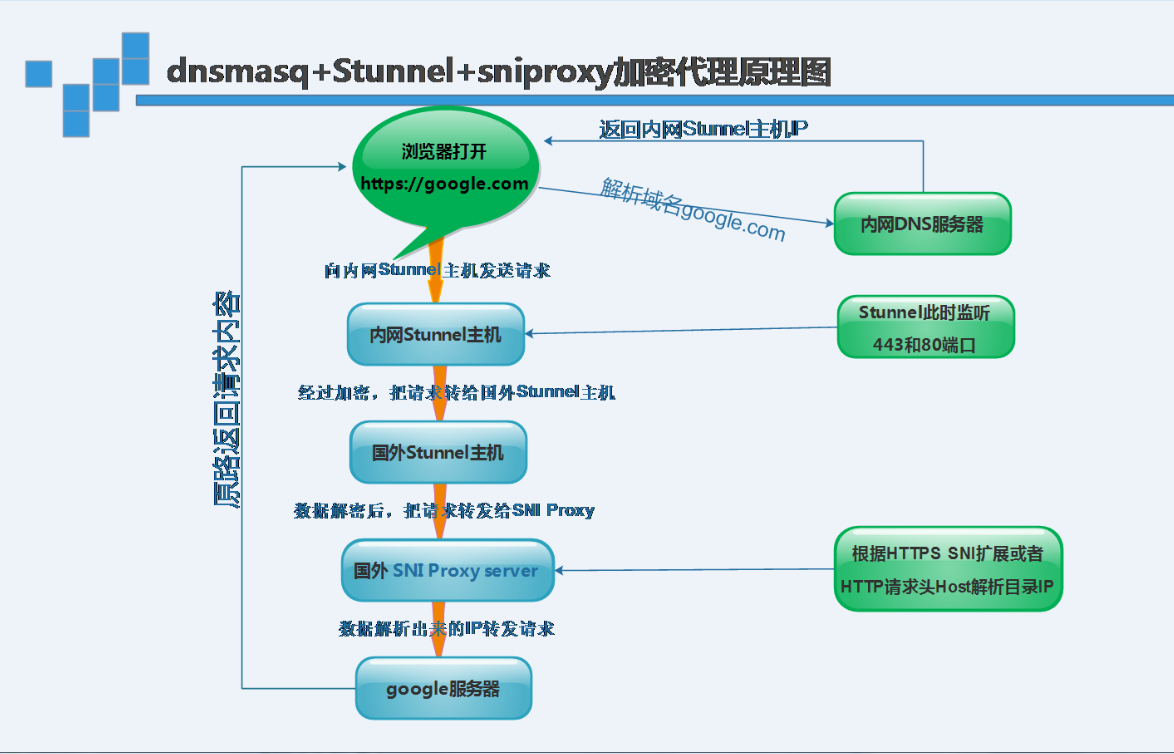
原理图:
二、安装Dnsmasq域名解析系统
Dnsmasq使用上比bind要简便得多,可以做正向、反向dns解析,支持DHCP服务。也可以做内部dns服务器用。默认下dnsmasq使用系统的/etc/resolv.conf,并读取/etc/hosts文件
①软件安装
yum install dnsmasq -y
②编辑配置文件/etc/dnsmasq.conf
resolv-file=/etc/dnsresolv.conf #上一级DNS,dnsmasq会从这个文件寻找上级dns服务器
strict-order
##################################################
address=/pinterest.com/108.3.139.110
address=/qiye.aliyun.com/56.110.55.136
listen-address=108.3.139.106,127.0.0.1
###########################################
no-hosts
cache-size=1500                  #缓存数目
local-ttl=1000                   #DHCP租约时间
neg-ttl=1000
log-queries
log-facility=/var/log/dns.log    #日志文件
③编辑上级DNS配置文件/etc/dns_resolv.conf
/etc/dns_resolv.conf             #设置的是真正的nameserver,可以用电信、联通等公共的DNS
nameserver 114.114.114.114
nameserver 223.5.5.5
nameserver 114.114.114.114
④启动dnsmasq服务
/etc/init.d/dnsmasq start
lsof -i:53
COMMAND PID USER FD TYPE DEVICE SIZE/OFF NODE NAME
dnsmasq 23173 nobody 4u IPv4 3136642 0t0 UDP *:domain
dnsmasq 23173 nobody 5u IPv4 3136643 0t0 TCP *:domain (LISTEN)
dnsmasq 23173 nobody 6u IPv6 3136644 0t0 UDP *:domain
dnsmasq 23173 nobody 7u IPv6 3136645 0t0 TCP *:domain (LISTEN)
三、安装Stunnel
使用TLS对tcp协议进行加密,也就是对tcp建立一条加密线路
①在内网dns服务器和国外服务器都安装stunnel
yum install stunnel -y
②生成ssl证书stunnel.pem文件
openssl genrsa -out key.pem 2048
openssl req -new -x509 -key key.pem -out cert.pem -days 1095
cat key.pem cert.pem >> /etc/stunnel/stunnel.pem
③编辑/etc/stunnel/stunnel.conf
cat > /etc/stunnel/stunnel.conf <<EOF
client = no
[http]
accept = 1.2.3.4:8082     #此处地址为国外服务器ip
connect = 127.0.0.1:8082
cert = /etc/stunnel/stunnel.pem

[https]
accept = 1.2.3.4:4433
connect = 127.0.0.1:4433
cert = /etc/stunnel/stunnel.pem
EOF
说明:此配置文件表示,监听了1.2.3.4:8082,并转发此地址流量到127.0.0.1:8082,监听了1.2.3.4:4433,并转发给地址流量到127.0.0.1:4433
④启动启动stunnel
stunnel
四、安装sniproxy
代理软件,对于HTTP协议,它可以根据Host请求头解析得出目标站IP;对于HTTPS协议,它可以根据SNI扩展中的域名解析得出目标站IP
①安装epel源
wget -O /etc/yum.repos.d/epel.repo http://mirrors.aliyun.com/repo/epel-6.repo
②安装依赖软件
yum install autoconf automake curl gettext-devel libev-devel pcre-devel perl pkgconfig rpm-build udns-devel gcc-c++ cc -y
③喜欢高版本的依赖包也可以选择编译安装
cd /server/tools
wget http://dist.schmorp.de/libev/Attic/libev-4.22.tar.gz
tar xzf libev-4.22.tar.gz
cd libev-4.22
./configure
make
make install
echo -e '/usr/local/lib
/usr/local/lib64' > /etc/ld.so.conf.d/local.conf
ldconfig
cd /opt
wget http://www.corpit.ru/mjt/udns/udns-0.4.tar.gz
tar xzf udns-0.4.tar.gz
cd udns-0.4
./configure
make
cd ..
mv udns-0.4 /usr/local/udns
echo -e '/usr/local/udns' > /etc/ld.so.conf.d/udns.conf
ldconfig
④创建存放软件目录
mkdir /server/tools -p && cd /server/tools/
wget -O sniproxy-0.4.0.tar.gz https://github.com/dlundquist/sniproxy/archive/0.4.0.tar.gz
tar xf sniproxy-0.4.0.tar.gz
cd sniproxy-0.4.0
./autogen.sh && ./configure && make install
⑤编辑/etc/sniproxy.conf
# sniproxy example configuration file
user nobody
pidfile /var/tmp/sniproxy.pid
error_log {
    syslog daemon
    priority notice
}
access_log {
    filename /tmp/sniproxy-access.log
}
listen 127.0.0.1:8082 {
    proto http
    table http_hosts
    access_log {
        filename /tmp/sniproxy.log
    }
}

table http_hosts {
    .*.google.com  *:80
    .*.google.com$ 172.217.0.228 80
    google.com$ 172.217.0.228 80

}

listen 127.0.0.1:4433 {
    proto tls
    table https_hosts
    access_log {
        filename /tmp/sniproxy.log
    }
}

 table https_hosts {
    .*.google.com * 443
    .*.google.com$ 172.217.0.228 443
    google.com$ 172.217.0.228 443
}
说明:此配置文件表示,监听了127.0.0.1:8082地址,并解析http协议中的Host请求头为IP,然后转发请求到此IP;监听了127.0.0.1:4433地址,
并解析TLS中SNI扩展中的域名为IP,并转发请求到此IP
⑥启动sniproxy服务
sniproxy
方案中的HTTP明文协议,利用stunnel使用了TLS加密,变成了HTTPS协议,使得数据包无法被解析出明文。方案中的HTTPS协议,本身是加密的,但为了防止SNI扩展的中域名被嗅探,还是走了stunnel的加密通道