spring版本
spring的发展:
第一阶段,spring1.x阶段所有的bean都是在xml中配置。
第二阶段,spring2.x阶段出现了基于注解的bean配置。
第三阶段,spring3.x阶段使用java配置类配置bean。
当前spring4.x阶段,推荐基于spring boot+java配置类。
bean的作用域
通过注解@Scope可以指定bean的作用域。bean有5种作用域:
1、Singleton单利:整个spring容器中只有一个实例 ,默认就是单利
2、protoType:每次调用新建一个实例。
3、request:在web应用中,每个请求创建一个实例
4、session:在web应用中,每个回话创建一个实例
5、globalSession:这个只在portal应用中存在。
spring四种实例化bean的方式
第一种:使用构造器实例化Bean。
这是最简单的方式,Spring IoC容器即能使用默认空构造器也能使用有参数构造器两种方式创建Bean。


第二种:使用静态工厂方式实例化Bean,使用这种方式除了指定必须的class属性,还要指定factory-method属性来指定实例化Bean的方法,而且使用静态工厂方法也允许指定方法参数,spring IoC容器将调用此属性指定的方法来获取Bean.


第三种:使用实例工厂方法实例化Bean,使用这种方式不能指定class属性,此时必须使用factory-bean属性来指定工厂Bean,factory-method属性指定实例化Bean的方法,而且使用实例工厂方法允许指定方法参数,方式和使用构造器方式一样。

第四种:用 setter 方式.这种方式,只要写上对应的set、get方法,然后再bean.xml文件中利用property注入值即可。

关于bean别名
每个 Bean 在 Spring 容器中都有一个唯一的名字(beanName)和 0 个或多个别名(aliases)。
我们从 Spring 容器中获取 Bean 的时候,可以根据 beanName,也可以通过别名。
beanFactory.getBean("beanName or alias");
在配置
<bean id="messageService" name="m1, m2, m3" class="com.javadoop.example.MessageServiceImpl">
以上配置的结果就是:beanName 为 messageService,别名有 3 个,分别为 m1、m2、m3。
<bean name="m1, m2, m3" class="com.javadoop.example.MessageServiceImpl" />
以上配置的结果就是:beanName 为 m1,别名有 2 个,分别为 m2、m3。
<bean class="com.javadoop.example.MessageServiceImpl">
以上配置的结果就是beanName 为:com.javadoop.example.MessageServiceImpl#0,别名 1 个,为: com.javadoop.example.MessageServiceImpl
<bean id="messageService" class="com.javadoop.example.MessageServiceImpl">
以上配置的结果就是:beanName 为 messageService,没有别名。
bean循环依赖
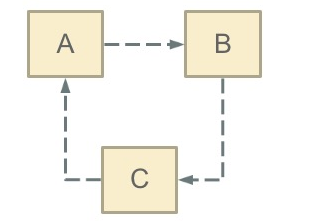
循环依赖其实就是循环引用,也就是两个或者两个以上的bean互相持有对方,最终形成闭环。比如A依赖于B,B依赖于C,C又依赖于A。如下图:
Spring中循环依赖场景有:
(1)构造器的循环依赖
(2)field属性的循环依赖
其中,构造器的循环依赖问题无法解决,只能拋出BeanCurrentlyInCreationException异常,在解决属性循环依赖时,spring采用的是提前暴露对象的方法。
构造器循环依赖:场景1
public class A{
   public A(B b){
   }
}

public class B{
   public B(A a){
   }
}
非构造器依赖:场景2
public class A{
  @Autowired
  B b;

}

public class B{
  @Autowired
  A a;

}
或者:场景3
public class A{
   public A(B b){
   }
}

public class B{
  @Autowired
  A a;
}
ioc bean创建过程如下:

createBeanInstance:实例化bean(执行的是构造器)。
populateBean:给bean初始化值(执行bean依赖的属性)
spring是通过三级缓存解决循环依赖:
singletonFactories(三级) : 单例对象工厂的cache
earlySingletonObjects (二级):提前暴光的单例对象的Cache (执行了构造器,但是未初始化)
singletonObjects(一级):单例对象的cache(一个完整的bean对象)
先分析以下非构造器循环依赖接是如何解决的:上面场景2的代码
1、实例化A,执行A的createBeanInstance,将A添加到三级缓存,然后执行A的populateBean方法,发现依赖B,从一、二、三级缓存中都没有B。
2、开始创建B,执行B的createBeanInstance,将B添加到三级缓存,然后执行B的populateBean方法,返现依赖A,从三级缓存中发现了A(虽然是不完整的A,但是也可以用于bean依赖),B的初始化完毕。
3、回到A继续,A可以拿到完整的B,流程结束。
方法createBeanInstance就是执行构造器的,所以只有构造器能成功执行对象才会被添加到三级缓存,而构造器依赖是在构造器中发生的依赖,对象还未被添加到三级缓存,所以构造器依赖无法解决。
spring构造器依赖抛异常是如何实现的呢?
Spring容器会将每一个正在创建的Bean 标识符放在一个“当前创建Bean池”中,Bean标识符在创建过程中将一直保持在这个池中,因此如果在创建Bean过程中发现自己已经在“当前创建Bean池”里时将抛出BeanCurrentlyInCreationException异常表示循环依赖;而对于创建完毕的Bean将从“当前创建Bean池”中清除掉。
Spring容器先创建单例A,A依赖B,然后将A放在“当前创建Bean池”中,此时创建B,B依赖C ,然后将B放在“当前创建Bean池”中,此时创建C,C又依赖A, 但是,此时A已经在池中,所以会报错,,因为在池中的Bean都是未初始化完的,所以会依赖错误 ,(初始化完的Bean会从池中移除)
BeanPostProcessor
public interface BeanPostProcessor {

	Object postProcessBeforeInitialization(Object bean, String beanName) throws BeansException;

	Object postProcessAfterInitialization(Object bean, String beanName) throws BeansException;

}

如何使用?
package com.dpb.processor;

import org.springframework.beans.BeansException;
import org.springframework.beans.factory.config.BeanPostProcessor;
/**
 * 自定义BeanPostProcessor实现类
 * BeanPostProcessor接口的作用是:
 * 	 我们可以通过该接口中的方法在bean实例化、配置以及其他初始化方法前后添加一些我们自己的逻辑
 * @author dengp
 *
 */
public class MyBeanPostProcessor implements BeanPostProcessor{

	/**
	 * 实例化、依赖注入完毕,在调用显示的初始化之前完成一些定制的初始化任务
	 * 注意:方法返回值不能为null
	 * 如果返回null那么在后续初始化方法将报空指针异常或者通过getBean()方法获取不到bena实例对象
	 * 因为后置处理器从Spring IoC容器中取出bean实例对象没有再次放回IoC容器中
	 */
	@Override
	public Object postProcessBeforeInitialization(Object bean, String beanName) throws BeansException {
		System.out.println("初始化 before--实例化的bean对象:"+bean+"	"+beanName);
		// 可以根据beanName不同执行不同的处理操作
		return bean;
	}

	/**
	 * 实例化、依赖注入、初始化完毕时执行
	 * 注意:方法返回值不能为null
	 * 如果返回null那么在后续初始化方法将报空指针异常或者通过getBean()方法获取不到bena实例对象
	 * 因为后置处理器从Spring IoC容器中取出bean实例对象没有再次放回IoC容器中
	 */
	@Override
	public Object postProcessAfterInitialization(Object bean, String beanName) throws BeansException {
		System.out.println("初始化 after...实例化的bean对象:"+bean+"	"+beanName);
		// 可以根据beanName不同执行不同的处理操作
		return bean;
	}

}
public class User {

	private int id;

	private String name;

	private String beanName;

	public User(){
		System.out.println("User 被实例化");
	}

	public int getId() {
		return id;
	}

	public void setId(int id) {
		this.id = id;
	}

	public String getName() {
		return name;
	}

	public void setName(String name) {
		System.out.println("设置:"+name);
		this.name = name;
	}

	public String getBeanName() {
		return beanName;
	}

	public void setBeanName(String beanName) {
		this.beanName = beanName;
	}
	/**
	 * 自定义的初始化方法
	 */
	public void start(){
		System.out.println("User 中自定义的初始化方法");
	}
}
<?xml version="1.0" encoding="UTF-8"?>
<beans xmlns="http://www.springframework.org/schema/beans"
	xmlns:xsi="http://www.w3.org/2001/XMLSchema-instance"
	xsi:schemaLocation="http://www.springframework.org/schema/beans
 http://www.springframework.org/schema/beans/spring-beans.xsd">

	<bean class="com.dpb.pojo.User" id="user" init-method="start">
		<property name="name" value="波波烤鸭" />
	</bean>

	<!-- 注册处理器 -->
	<bean class="com.dpb.processor.MyBeanPostProcessor"></bean>
</beans>
	@Test
public void test() {
	ApplicationContext ac = new ClassPathXmlApplicationContext("applicationContext.xml");
	User user = ac.getBean(User.class);
	System.out.println(user);
}
User 被实例化
设置:波波烤鸭
初始化 before--实例化的bean对象:com.dpb.pojo.User@65e2dbf3	user
User 中自定义的初始化方法
初始化 after...实例化的bean对象:com.dpb.pojo.User@65e2dbf3	user
com.dpb.pojo.User@65e2dbf3
- 注意:接口中两个方法不能返回null,如果返回null那么在后续初始化方法将报空指针异常或者通过getBean()方法获取不到bena实例对象,因为后置处理器从Spring IoC容器中取出bean实例对象没有再次放回IoC容器中
- 通过输出语句我们也能看到postProcessBeforeInitialization方法的输出语句是在Bean实例化及属性注入后执行的,且在自定义的初始化方法之前执行(通过init-method指定)。而postProcessAfterInitialization方法是在自定义初始化方法执行之后执行的。
上面演示了BeanPostProcessor在bean创建的生命周期的执行流程:
- 首先通过refresh的registerBeanPostProcessors方法,将所有BeanPostProcessors类型的bean添加到beanFactory
- 在refresh的finishBeanFactoryInitialization方法
- createBeanInstance方法对bean进行实例化,即执行构造器
- 通过populateBean方法进行初始化,即执行属性的注入
- 通过initializeBean方法进行BeanPostProcessor的后置处理
- 执行BeanPostProcessor的前置处理
- 执行显示初始化方法,即init-method方法
- 执行BeanPostProcessor的后置处理
【首先通过refresh的registerBeanPostProcessors方法,将所有BeanPostProcessors类型的bean添加到beanFactory】
//PostProcessorRegistrationDelegate
 protected void registerBeanPostProcessors(ConfigurableListableBeanFactory beanFactory) {
        PostProcessorRegistrationDelegate.registerBeanPostProcessors(beanFactory, this);
    }
    public static void registerBeanPostProcessors(
            ConfigurableListableBeanFactory beanFactory, AbstractApplicationContext applicationContext) {
        /**
         *1.代码走到了这里的时候其实 BeanDefinition数据已经被加载了,只是bean还没有被实例化
         所以这个是去容器里面找到所有类型为BeanPostProcessor的beanName
         */
        String[] postProcessorNames = beanFactory.getBeanNamesForType(BeanPostProcessor.class, true, false);

        //记录所有的beanProcessor数量,在这之前也可能注册了一部分Spring内部的BeanPostProcessors接口,例如:ApplicationContextAwareProcessor
        int beanProcessorTargetCount = beanFactory.getBeanPostProcessorCount() + 1 + postProcessorNames.length;
        //貌似只是记录日志用的
        beanFactory.addBeanPostProcessor(new BeanPostProcessorChecker(beanFactory, beanProcessorTargetCount));

        // 优先级最高的BeanPostProcessors,这类最先调用;需要实现PriorityOrdered接口
        List<BeanPostProcessor> priorityOrderedPostProcessors = new ArrayList<BeanPostProcessor>();
        //内部BeanPostProcessors
        List<BeanPostProcessor> internalPostProcessors = new ArrayList<BeanPostProcessor>();
        //继承了Ordered接口,优先级比上面低一点
        List<String> orderedPostProcessorNames = new ArrayList<String>();
        //这就是普通的了,优先级最低
        List<String> nonOrderedPostProcessorNames = new ArrayList<String>();
        //下面的这些代码就是遍历所有postProcessorNames,按优先级排序;类型PriorityOrdered>Ordered>普通;在这个类型基础上,还要对他们的order属性就行排序;
        for (String ppName : postProcessorNames) {
            if (beanFactory.isTypeMatch(ppName, PriorityOrdered.class)) {
                BeanPostProcessor pp = beanFactory.getBean(ppName, BeanPostProcessor.class);
                priorityOrderedPostProcessors.add(pp);
                if (pp instanceof MergedBeanDefinitionPostProcessor) {
                    internalPostProcessors.add(pp);
                }
            }
            else if (beanFactory.isTypeMatch(ppName, Ordered.class)) {
                orderedPostProcessorNames.add(ppName);
            }
            else {
                nonOrderedPostProcessorNames.add(ppName);
            }
        }

        // First, register the BeanPostProcessors that implement PriorityOrdered.
        sortPostProcessors(beanFactory, priorityOrderedPostProcessors);
        registerBeanPostProcessors(beanFactory, priorityOrderedPostProcessors);//入口

        // Next, register the BeanPostProcessors that implement Ordered.
        List<BeanPostProcessor> orderedPostProcessors = new ArrayList<BeanPostProcessor>();
        for (String ppName : orderedPostProcessorNames) {
            BeanPostProcessor pp = beanFactory.getBean(ppName, BeanPostProcessor.class);
            orderedPostProcessors.add(pp);
            if (pp instanceof MergedBeanDefinitionPostProcessor) {
                internalPostProcessors.add(pp);
            }
        }
        sortPostProcessors(beanFactory, orderedPostProcessors);
        registerBeanPostProcessors(beanFactory, orderedPostProcessors);//入口

        // Now, register all regular BeanPostProcessors.
        List<BeanPostProcessor> nonOrderedPostProcessors = new ArrayList<BeanPostProcessor>();
        for (String ppName : nonOrderedPostProcessorNames) {
            //这里要注意一下了,看到没有,这个时候已经调用了getBean来生成实例对象了;
            BeanPostProcessor pp = beanFactory.getBean(ppName, BeanPostProcessor.class);
            nonOrderedPostProcessors.add(pp);
            if (pp instanceof MergedBeanDefinitionPostProcessor) {
                internalPostProcessors.add(pp);
            }
        }
        registerBeanPostProcessors(beanFactory, nonOrderedPostProcessors);//入口

        // 排序
        sortPostProcessors(beanFactory, internalPostProcessors);
        //注册
        registerBeanPostProcessors(beanFactory, internalPostProcessors);//入口

        // 加入ApplicationListenerDetector
        beanFactory.addBeanPostProcessor(new ApplicationListenerDetector(applicationContext));
    }

    /**
     * 注册 BeanPostProcessor beans.
     * 容器中beanPostProcessors是一个ArrayList来持有这些BeanPostProcessors
     */
    private static void registerBeanPostProcessors(
            ConfigurableListableBeanFactory beanFactory, List<BeanPostProcessor> postProcessors) {
        for (BeanPostProcessor postProcessor : postProcessors) {
            beanFactory.addBeanPostProcessor(postProcessor);
        }
    }

    //AbstractBeanFactory
    @Override
    public void addBeanPostProcessor(BeanPostProcessor beanPostProcessor) {
        this.beanPostProcessors.remove(beanPostProcessor);
        this.beanPostProcessors.add(beanPostProcessor);
        //将是否 hasInstantiationAwareBeanPostProcessors设置为true
        if (beanPostProcessor instanceof InstantiationAwareBeanPostProcessor) {
            this.hasInstantiationAwareBeanPostProcessors = true;
        }
        if (beanPostProcessor instanceof DestructionAwareBeanPostProcessor) {
            this.hasDestructionAwareBeanPostProcessors = true;
        }
    }
- Spring加载完了所有的BeanDefinition之后,找到所有类型为BeanPostProcessors的BeanDefinition对象;
- 声明四个集合分别装四种类型的BeanPostProcessors
- 实现了PriorityOrdered的
- 类型为MergedBeanDefinitionPostProcessor的
- 实现了Ordered
- 普通的
- 对实现了PriorityOrdered的BeanPostProcessors进行排序
- 将实现了PriorityOrdered的BeanPostProcessors添加到beanFactory中,每个beanFactory有一个BeanPostProcessor类型的list来存储BeanPostProcessor
- 对实现了Ordered的BeanPostProcessors进行排序
- 将实现了Ordered的BeanPostProcessors添加到beanFactory中
- 对普通的BeanPostProcessors通过getBean进行初始化,然后添加到beanFactory中
- 类型为MergedBeanDefinitionPostProcessor的BeanPostProcessors进行排序
- 类型为MergedBeanDefinitionPostProcessor的BeanPostProcessors添加到beanFactory中
- 总结:分别对四种类型的BeanPostProcessors进行排序,然后按照PriorityOrdered > Ordered > 普通> MergedBeanDefinitionPostProcessor的顺序添加到beanFactory中。其中普通的BeanPostProcessors在这一步就通过getBean提前进行初始化了。
【通过initializeBean方法进行BeanPostProcessor的后置处理】
protected Object initializeBean(final String beanName, final Object bean, RootBeanDefinition mbd) {
        //省略....
        if (mbd == null || !mbd.isSynthetic()) {
            //初始化之前
            wrappedBean = applyBeanPostProcessorsBeforeInitialization(wrappedBean, beanName);
        }

        try {//初始化
            invokeInitMethods(beanName, wrappedBean, mbd);
        }
        //初始化之后
        if (mbd == null || !mbd.isSynthetic()) {
            wrappedBean = applyBeanPostProcessorsAfterInitialization(wrappedBean, beanName);
        }
        //省略...
    }
//注意 每一个实例对象触发这个的时候 都是执行所有的BeanPostProcessors实例对象
        @Override
        public Object applyBeanPostProcessorsAfterInitialization(Object existingBean, String beanName)
			throws BeansException {

            Object result = existingBean;
            for (BeanPostProcessor beanProcessor : getBeanPostProcessors()) {
                //这里是循环
                //	result =BeanPostProcessor调用执行方法;返回的对象还是result,
                //	只是有可能被某个BeanPostProcessor加强了
                //	beanProcessor.postProcessAfterInitialization(result, beanName);
                if (result == null) {
                    return result;
                }
            }
            return result;
        }
所以只要调用getBean方法,就会执行BeanPostProcessors。
InstantiationAwareBeanPostProcessor
InstantiationAwareBeanPostProcessor接口是BeanPostProcessor的子接口,对BeanPostProcessor扩展更强大的功能。
package org.springframework.beans.factory.config;
public interface InstantiationAwareBeanPostProcessor extends BeanPostProcessor {

	Object postProcessBeforeInstantiation(Class<?> beanClass, String beanName) throws BeansException;

	boolean postProcessAfterInstantiation(Object bean, String beanName) throws BeansException;

	PropertyValues postProcessPropertyValues(
			PropertyValues pvs, PropertyDescriptor[] pds, Object bean, String beanName) throws BeansException;

}
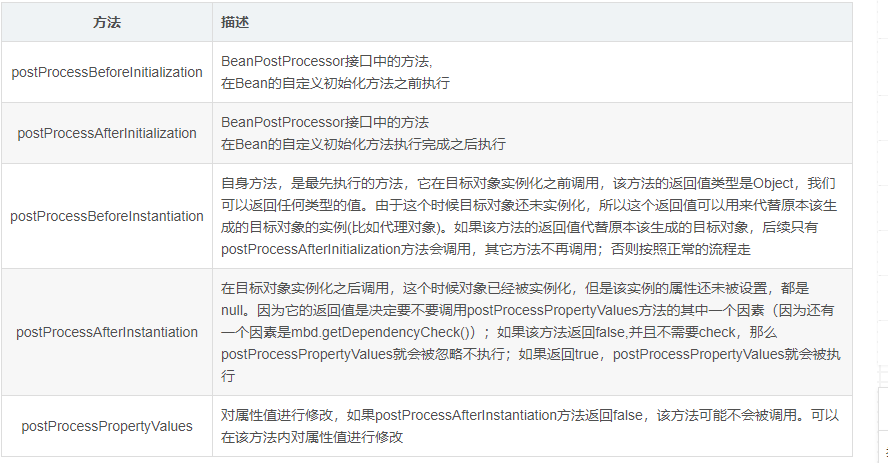
从源码中我们可以获知的信息是该接口除了具有父接口中的两个方法以外还自己额外定义了三个方法。所以该接口一共定义了5个方法,这5个方法的作用分别是
/**
 * 自定义处理器
 * @author dengp
 *
 */
public class MyInstantiationAwareBeanPostProcessor implements InstantiationAwareBeanPostProcessor{

	/**
	 * BeanPostProcessor接口中的方法
	 * 在Bean的自定义初始化方法之前执行
	 * Bean对象已经存在了
	 */
	@Override
	public Object postProcessBeforeInitialization(Object bean, String beanName) throws BeansException {
		// TODO Auto-generated method stub
		System.out.println(">>postProcessBeforeInitialization");
		return bean;
	}

	/**
	 * BeanPostProcessor接口中的方法
	 * 在Bean的自定义初始化方法执行完成之后执行
	 * Bean对象已经存在了
	 */
	@Override
	public Object postProcessAfterInitialization(Object bean, String beanName) throws BeansException {
		System.out.println("<<postProcessAfterInitialization");
		return bean;
	}

	/**
	 * InstantiationAwareBeanPostProcessor中自定义的方法
	 * 在方法实例化之前执行  Bean对象还没有
	 */
	@Override
	public Object postProcessBeforeInstantiation(Class<?> beanClass, String beanName) throws BeansException {
		System.out.println("--->postProcessBeforeInstantiation");
		return null;
	}

	/**
	 * InstantiationAwareBeanPostProcessor中自定义的方法
	 * 在方法实例化之后执行  Bean对象已经创建出来了
	 */
	@Override
	public boolean postProcessAfterInstantiation(Object bean, String beanName) throws BeansException {
		System.out.println("<---postProcessAfterInstantiation");
		return true;
	}

	/**
	 * InstantiationAwareBeanPostProcessor中自定义的方法
	 * 可以用来修改Bean中属性的内容
	 */
	@Override
	public PropertyValues postProcessPropertyValues(PropertyValues pvs, PropertyDescriptor[] pds, Object bean,
			String beanName) throws BeansException {
		System.out.println("<---postProcessPropertyValues--->");
		return pvs;
	}
}
public class User {

	private int id;

	private String name;

	private String beanName;

	public User(){
		System.out.println("User 被实例化");
	}

	public int getId() {
		return id;
	}

	public void setId(int id) {
		this.id = id;
	}

	public String getName() {
		return name;
	}

	public void setName(String name) {
		System.out.println("设置:"+name);
		this.name = name;
	}

	public String getBeanName() {
		return beanName;
	}

	public void setBeanName(String beanName) {
		this.beanName = beanName;
	}
	public void start(){
		System.out.println("自定义初始化的方法....");
	}

	@Override
	public String toString() {
		return "User [id=" + id + ", name=" + name + ", beanName=" + beanName + "]";
	}
}
<?xml version="1.0" encoding="UTF-8"?>
<beans xmlns="http://www.springframework.org/schema/beans"
	xmlns:xsi="http://www.w3.org/2001/XMLSchema-instance"
	xsi:schemaLocation="http://www.springframework.org/schema/beans
 http://www.springframework.org/schema/beans/spring-beans.xsd">

	<bean class="com.dpb.pojo.User" id="user" init-method="start">
		<property name="name" value="波波烤鸭"></property>
	</bean>

	<!-- 注册InstantiationAwareBeanPostProcessor对象 -->
	<bean class="com.dpb.processor.MyInstantiationAwareBeanPostProcessor"></bean>
</beans>
@Test
public void test1() {
	ClassPathXmlApplicationContext ac = new ClassPathXmlApplicationContext("applicationContext.xml");
	User user = ac.getBean(User.class);
	System.out.println(user);
	// 关闭销毁
	ac.registerShutdownHook();
}
--->postProcessBeforeInstantiation
User 被实例化
<---postProcessAfterInstantiation
<---postProcessPropertyValues--->
设置:波波烤鸭
>>postProcessBeforeInitialization
自定义初始化的方法....
<<postProcessAfterInitialization
User [id=0, name=波波烤鸭, beanName=null]
InstantiationAwareBeanPostProcessor不紧能能增加前置后置处理,还能动态控制其他方法是否执行。
执行顺序:
- postProcessBeforeInstantiation:首先执行该方法,如果返回null,则进入第2步继续流程。如果不返回null,证明需要通过该方法进行bean的定制创建,则直接到第7步
- createBeanInstance
- populateBean:
- postProcessAfterInstantiation:如果该方法返回true,则通过postProcessPropertyValues方法进行初始化,然后跳出populateBean方法,继续后续流程。如果该方法返回false,则继续populateBean及后续流程。
- postProcessBeforeInitialization
- init-method
- postProcessAfterInitialization
postProcessBeforeInstantiation和postProcessAfterInstantiation的控制逻辑:
        protected Object resolveBeforeInstantiation(String beanName, RootBeanDefinition mbd) {
            Object bean = null;
            //如果beforeInstantiationResolved还没有设置或者是false(说明还没有需要在实例化前执行的操作)
            if (!Boolean.FALSE.equals(mbd.beforeInstantiationResolved)) {
                // 判断是否有注册过InstantiationAwareBeanPostProcessor类型的bean
                if (!mbd.isSynthetic() && hasInstantiationAwareBeanPostProcessors()) {
                    Class<?> targetType = determineTargetType(beanName, mbd);
                    if (targetType != null) {
                        //入口1
                        bean = applyBeanPostProcessorsBeforeInstantiation(targetType, beanName);
                        if (bean != null) {
                            bean = applyBeanPostProcessorsAfterInitialization(bean, beanName);//入口2
                        }
                    }
                }
                mbd.beforeInstantiationResolved = (bean != null);
            }
            return bean;
        }

        protected Object applyBeanPostProcessorsBeforeInstantiation(Class<?> beanClass, String beanName) {
            for (BeanPostProcessor bp : getBeanPostProcessors()) {
                if (bp instanceof InstantiationAwareBeanPostProcessor) {
                    InstantiationAwareBeanPostProcessor ibp = (InstantiationAwareBeanPostProcessor) bp;
                    Object result = ibp.postProcessBeforeInstantiation(beanClass, beanName);
                    //只要有一个result不为null;后面的所有 后置处理器的方法就不执行了,直接返回(所以执行顺序很重要)
                    if (result != null) {
                        return result;
                    }
                }
            }
            return null;
        }

        @Override
        public Object applyBeanPostProcessorsAfterInitialization(Object existingBean, String beanName)
			throws BeansException {

            Object result = existingBean;
            for (BeanPostProcessor beanProcessor : getBeanPostProcessors()) {
                result = beanProcessor.postProcessAfterInitialization(result, beanName);
                //如果返回null;后面的所有 后置处理器的方法就不执行,直接返回(所以执行顺序很重要)
                if (result == null) {
                    return result;
                }
            }
            return result;
        }
postProcessPropertyValues的控制逻辑:
protected void populateBean(String beanName, RootBeanDefinition mbd, BeanWrapper bw) {
	// 省略 。。
	boolean continueWithPropertyPopulation = true;

	if (!mbd.isSynthetic() && hasInstantiationAwareBeanPostProcessors()) {
		for (BeanPostProcessor bp : getBeanPostProcessors()) {
			if (bp instanceof InstantiationAwareBeanPostProcessor) {
				InstantiationAwareBeanPostProcessor ibp = (InstantiationAwareBeanPostProcessor) bp;
				// 此处执行 postProcessAfterInstantiation方法
				if (!ibp.postProcessAfterInstantiation(bw.getWrappedInstance(), beanName)) {
					// postProcessAfterInstantiation 返回true与false决定
					// continueWithPropertyPopulation
					continueWithPropertyPopulation = false;
					break;
				}
			}
		}
	}
	// postProcessAfterInstantiation false
	// continueWithPropertyPopulation 就为false 然后该方法就结束了!!!
	if (!continueWithPropertyPopulation) {
		return;
	}
	// 省略 ...
	boolean hasInstAwareBpps = hasInstantiationAwareBeanPostProcessors();
	boolean needsDepCheck = (mbd.getDependencyCheck() != RootBeanDefinition.DEPENDENCY_CHECK_NONE);

	if (hasInstAwareBpps || needsDepCheck) {
		PropertyDescriptor[] filteredPds = filterPropertyDescriptorsForDependencyCheck(bw, mbd.allowCaching);
		if (hasInstAwareBpps) {
			for (BeanPostProcessor bp : getBeanPostProcessors()) {
				if (bp instanceof InstantiationAwareBeanPostProcessor) {
					InstantiationAwareBeanPostProcessor ibp = (InstantiationAwareBeanPostProcessor) bp;
					// 调用 postProcessPropertyValues方法
					pvs = ibp.postProcessPropertyValues(pvs, filteredPds, bw.getWrappedInstance(), beanName);
					if (pvs == null) {
						return;
					}
				}
			}
		}
		if (needsDepCheck) {
			checkDependencies(beanName, mbd, filteredPds, pvs);
		}
	}
	// 真正设置属性的方法。
	applyPropertyValues(beanName, mbd, bw, pvs);
}


/**
 * InstantiationAwareBeanPostProcessor中自定义的方法 可以用来修改Bean中属性的内容
 */
@Override
public PropertyValues postProcessPropertyValues(PropertyValues pvs, PropertyDescriptor[] pds, Object bean,
		String beanName) throws BeansException {
	System.out.println("<---postProcessPropertyValues--->");
	if(bean instanceof User){
		PropertyValue value = pvs.getPropertyValue("name");
		System.out.println("修改前name的值是:"+value.getValue());
		value.setConvertedValue("bobo");
	}
	return pvs;
}
ApplicationListener
spring容器事件监听,对spring容器的各种状态进行监听。
使用:
@Component
public class TestApplicationListener implements ApplicationListener<ContextRefreshedEvent>{
    @Override
    public void onApplicationEvent(ContextRefreshedEvent contextRefreshedEvent) {
        System.out.println(contextRefreshedEvent);
        System.out.println("TestApplicationListener............................");
    }
}
- 实现ApplicationListener,重写onApplicationEvent方法,参数即监听的事件类型。spring提供哪些事件类型:
- ContextRefreshedEvent:ApplicationContext refresh方法最后一步触发该事件
- ContextStartedEvent:当使用 ConfigurableApplicationContext (ApplicationContext子接口)接口中的 start() 方法启动 ApplicationContext 时,该事件被发布。你可以调查你的数据库,或者你可以在接受到这个事件后重启任何停止的应用程序
- ContextStoppedEvent:当使用 ConfigurableApplicationContext 接口中的 stop() 停止 ApplicationContext 时,发布这个事件。你可以在接受到这个事件后做必要的清理的工作
- ContextClosedEvent:当使用 ConfigurableApplicationContext 接口中的 close() 方法关闭 ApplicationContext 时,该事件被发布。一个已关闭的上下文到达生命周期末端;它不能被刷新或重启
- RequestHandledEvent:这是一个 web-specific 事件,告诉所有 bean HTTP 请求已经被服务。只能应用于使用DispatcherServlet的Web应用。在使用Spring作为前端的MVC控制器时,当Spring处理用户请求结束后,系统会自动触发该事件
除了上面spring内置的事件外,还可以自定义事件
public class EmailEvent extends ApplicationEvent{
   private String address;
   private String text;
   public EmailEvent(Object source, String address, String text){
   super(source);
      this.address = address;
      this.text = text;
   }
   public EmailEvent(Object source) {
     super(source);
   }
   //......address和text的setter、getter
}
public class EmailNotifier implements ApplicationListener{
   public void onApplicationEvent(ApplicationEvent event) {
     if (event instanceof EmailEvent) {
        EmailEvent emailEvent = (EmailEvent)event;
        System.out.println("邮件地址:" + emailEvent.getAddress());
        System.our.println("邮件内容:" + emailEvent.getText());
     } else {
        System.our.println("容器本身事件:" + event);
     }
   }
}
public class SpringTest {
   public static void main(String args[]){
     ApplicationContext context = new ClassPathXmlApplicationContext("bean.xml");
     //创建一个ApplicationEvent对象
     EmailEvent event = new EmailEvent("hello","abc@163.com","This is a test");
     //主动触发该事件
     context.publishEvent(event);
   }
}
实现原理:
- 初始化广播器
- 注册监听到广播器
- 通过广播器发布事件到监听
我们跟踪一下ContextRefreshedEvent事件流程。
【1. 初始化广播器】入口在refresh的initApplicationEventMulticaster方法
protected void initApplicationEventMulticaster() {
        ConfigurableListableBeanFactory beanFactory = this.getBeanFactory();
        if (beanFactory.containsLocalBean("applicationEventMulticaster")) {
            this.applicationEventMulticaster = (ApplicationEventMulticaster)beanFactory.getBean("applicationEventMulticaster", ApplicationEventMulticaster.class);
            if (this.logger.isDebugEnabled()) {
                this.logger.debug("Using ApplicationEventMulticaster [" + this.applicationEventMulticaster + "]");
            }
        } else {
            this.applicationEventMulticaster = new SimpleApplicationEventMulticaster(beanFactory);
            beanFactory.registerSingleton("applicationEventMulticaster", this.applicationEventMulticaster);
            if (this.logger.isDebugEnabled()) {
                this.logger.debug("Unable to locate ApplicationEventMulticaster with name 'applicationEventMulticaster': using default [" + this.applicationEventMulticaster + "]");
            }
        }

    }
- 如果未配置,默认使用SimpleApplicationEventMulticaster
【2. 注册监听到广播器】入口在refresh的registerListeners方法
protected void registerListeners() {
            // 和手动注册BeanPostProcess一样,可以自己通过set手动注册监听器
            for (ApplicationListener<?> listener : getApplicationListeners()) {
                //手动注册的监听器绑定到广播器
                getApplicationEventMulticaster().addApplicationListener(listener);
            }

            //取到监听器的名称,设置到广播器
            String[] listenerBeanNames = getBeanNamesForType(ApplicationListener.class, true, false);
            for (String listenerBeanName : listenerBeanNames) {
                getApplicationEventMulticaster().addApplicationListenerBean(listenerBeanName);
            }

            // 如果存在早期应用事件,发布
            Set<ApplicationEvent> earlyEventsToProcess = this.earlyApplicationEvents;
            this.earlyApplicationEvents = null;
            if (earlyEventsToProcess != null) {
                for (ApplicationEvent earlyEvent : earlyEventsToProcess) {
                    getApplicationEventMulticaster().multicastEvent(earlyEvent);
                }
            }
        }
【3. 通过广播器发布事件到监听】,入口在refresh的finishRefresh方法
    protected void finishRefresh() {
        this.initLifecycleProcessor();
        this.getLifecycleProcessor().onRefresh();
        this.publishEvent((ApplicationEvent)(new ContextRefreshedEvent(this)));//入口
        LiveBeansView.registerApplicationContext(this);
    }
    protected void publishEvent(Object event, ResolvableType eventType) {
        Assert.notNull(event, "Event must not be null");
        if (this.logger.isTraceEnabled()) {
            this.logger.trace("Publishing event in " + this.getDisplayName() + ": " + event);
        }

        Object applicationEvent;
        if (event instanceof ApplicationEvent) {
            applicationEvent = (ApplicationEvent)event;
        } else {
            applicationEvent = new PayloadApplicationEvent(this, event);
            if (eventType == null) {
                eventType = ((PayloadApplicationEvent)applicationEvent).getResolvableType();
            }
        }

        if (this.earlyApplicationEvents != null) {
            this.earlyApplicationEvents.add(applicationEvent);
        } else {
            //入口
            this.getApplicationEventMulticaster().multicastEvent((ApplicationEvent)applicationEvent, eventType);
        }

        if (this.parent != null) {
            if (this.parent instanceof AbstractApplicationContext) {
                ((AbstractApplicationContext)this.parent).publishEvent(event, eventType);
            } else {
                this.parent.publishEvent(event);
            }
        }

    }
    public void multicastEvent(final ApplicationEvent event, ResolvableType eventType) {
        ResolvableType type = eventType != null ? eventType : this.resolveDefaultEventType(event);
        Iterator var4 = this.getApplicationListeners(event, type).iterator();

        while(var4.hasNext()) {
            final ApplicationListener<?> listener = (ApplicationListener)var4.next();
            Executor executor = this.getTaskExecutor();
            if (executor != null) {
                executor.execute(new Runnable() {
                    public void run() {
                        SimpleApplicationEventMulticaster.this.invokeListener(listener, event);
                    }
                });
            } else {
                this.invokeListener(listener, event);
            }
        }

    }
ApplicationContextAware
/**
* @Title: SpringJobBeanFactory.java
* @Package com.founder.mrp.job
* @Description: TODO
* @version V1.0
*/

package com.founder.mrp.job;

import org.springframework.beans.BeansException;
import org.springframework.context.ApplicationContext;
import org.springframework.context.ApplicationContextAware;
import org.springframework.stereotype.Component;

@Component
public class SpringJobBeanFactory implements ApplicationContextAware {


    private static ApplicationContext applicationContext;

    @Override
    public void setApplicationContext(ApplicationContext applicationContext) throws BeansException {
        SpringJobBeanFactory.applicationContext=applicationContext;

    }
     public static ApplicationContext getApplicationContext() {
            return applicationContext;
    }
    @SuppressWarnings("unchecked")
    public static <T> T getBean(String name) throws BeansException {
            if (applicationContext == null){
                return null;
            }
            return (T)applicationContext.getBean(name);
      }
}


使用:

TypeSetErpService typeSetErpServ = SpringJobBeanFactory.getBean("typeSetErpServiceImpl");
实现该接口的bean,会自动将spring容器注入进去。