Scrapy
第一步:安装
linux:
pip3 install scrapy
windows:
1:pip3 install wheel ,安装wheel模块
2.下载twisted:http://www.lfd.uci.edu/~gohlke/pythonlibs/#twisted(根据python版本下载一般为36,也可以尝试下载32位的)
3.进入第二步下载文件的目录,执行 pip3 install Twisted-18.7.0-cp36-cp36m-win_amd64.whl
4,pip3 install pywin32
5.pip3 install scrapy
第二步:创建工程 scrapy startproject xxx xxx:表示工程的名字

第四步:创建爬虫文件 scrapy genspider fileName xxx.com fileName:爬虫文件的名字 xxx.com :后面网址即指定要爬取网页的地址

第五步:执行爬虫文件 scrapy crawl xxx xxx:即第四步爬虫文件的名字

实例1:爬取https://www.qiushibaike.com/pic/糗事百科-糗图,下面发表的作者及文字内容

settings.py设置:
#google浏览器
USER_AGENT ='Mozilla/5.0 (Windows NT 10.0; WOW64) AppleWebKit/537.36 (KHTML, like Gecko) Chrome/69.0.3497.81 Safari/537.36'

#网站协议设置为false
ROBOTSTXT_OBEY = False

#开启管道(后面数字指管道的优先级,值越小,优先级越高)
ITEM_PIPELINES = {
   'qiubai_all.pipelines.QiubaiAllPipeline': 300,
}
items.py的设置:
import scrapy


class QiubaiAllItem(scrapy.Item):
    # define the fields for your item here like:
    # name = scrapy.Field()
    #设置2个属性,对应爬取文件qiutu调用,存放爬取的相应数据(存什么样的数据都可以)
    author = scrapy.Field()
    content = scrapy.Field()
qiutu.py爬取文件设置
# -*- coding: utf-8 -*-
import scrapy
from qiubai_all.items import QiubaiAllItem

class QiutuSpider(scrapy.Spider):
    name = 'qiutu'
    # allowed_domains = ['https://www.qiushibaike.com/pic/']
    start_urls = ['http://www.qiushibaike.com/pic/']

    # 指定一个页码通用的url,为了爬取全部分页内容
    url="https://www.qiushibaike.com/pic/page/%d/?s=5127071"
    pageNum=1

    def parse(self, response):
        # div_list=response.xpath('//div[@class='author clearfix']/a[2]/h2/text()')
        div_list=response.xpath('//*[@id="content-left"]/div')
        for div in div_list:
            #xpath函数的返回值是selector对象(使用xpath表达式解析出来的内容是存放在Selector对象中的)
            item = QiubaiAllItem()
            item['author']=div.xpath('.//h2/text()').extract_first()
            item['content']=div.xpath('.//div[@class="content"]/span/text()').extract_first()

            #循环多少次就会向管道提交多少次数据
            yield item

            if self.pageNum <= 35:
                self.pageNum += 1

                print('开始爬取第%d页数据'%self.pageNum)

                #新页码的url
                new_url = format(self.url%self.pageNum)

                #向新的页面发送请求,回调函数从新调用上面的parse方法
                # callback:回调函数(指定解析数据的规则)
                yield scrapy.Request(url=new_url,callback=self.parse)
pipelines.py管道设置:
# -*- coding: utf-8 -*-

# Define your item pipelines here
#
# Don't forget to add your pipeline to the ITEM_PIPELINES setting
# See: https://doc.scrapy.org/en/latest/topics/item-pipeline.html


class QiubaiAllPipeline(object):

    def __init__(self):
        self.fp=None

    #爬虫开始时执行,只执行一次
    def open_spider(self,spider):
        print('开始爬虫')
        self.fp=open('./data1.txt','w',encoding='utf-8')

    #该函数作用:items中每来一个yiled数据,就会执行一次这个文件,逐步写入
    def process_item(self, item, spider):
        #获取item中的数据
        self.fp.write(item['author'] + ':' + item['content'] + '

')

        return item #返回给了引擎

    # 爬虫结束时执行,只执行一次
    def close_spider(self,spider):
        print('结束爬虫')
        self.fp.close()
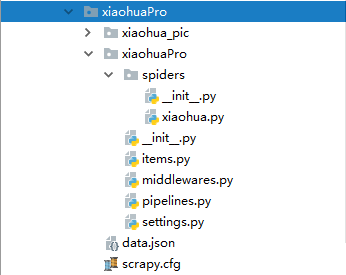
实例2:爬取校花网http://www.521609.com/meinvxiaohua/,下载里面所有的图片和标题

大家Scrapy配置环境:

settings里面的设置:
BOT_NAME = 'xiaohuaPro'

SPIDER_MODULES = ['xiaohuaPro.spiders']
NEWSPIDER_MODULE = 'xiaohuaPro.spiders'


# Crawl responsibly by identifying yourself (and your website) on the user-agent
#USER_AGENT = 'xiaohuaPro (+http://www.yourdomain.com)'
USER_AGENT ='Mozilla/5.0 (Windows NT 10.0; WOW64) AppleWebKit/537.36 (KHTML, like Gecko) Chrome/69.0.3497.81 Safari/537.36'

# Obey robots.txt rules
ROBOTSTXT_OBEY = True

ITEM_PIPELINES = {
   'xiaohuaPro.pipelines.XiaohuaproPipeline': 300,
}
items.py里面的设置:
import scrapy


class XiaohuaproItem(scrapy.Item):
    # define the fields for your item here like:
    # name = scrapy.Field()
    img_url = scrapy.Field()
    img_name = scrapy.Field()
xiaohua.py爬虫文件里面的设置:
# -*- coding: utf-8 -*-
import scrapy

from xiaohuaPro.items import XiaohuaproItem

class XiaohuaSpider(scrapy.Spider):

    name = 'xiaohua' #指定运行爬虫程序时用的名字

    # allowed_domains = ['www.521609.com/daxuemeinv']
    start_urls = ['http://www.521609.com/daxuemeinv/']

    #爬取多页
    url='http://www.521609.com/daxuemeinv/list8%d.html' #每页的url
    page_num=1  #起始页


    def parse(self, response):
        li_list=response.xpath("//*[@id='content']/div[2]/div[2]/ul/li")
        for li in li_list:
            item=XiaohuaproItem()
            item['img_url'] = li.xpath('./a/img/@src').extract_first()
            #拼接上图片完整的路径
            item['img_url'] =  'http://www.521609.com'+item['img_url']

            item['img_name'] = li.xpath('./a/img/@alt').extract_first()

            yield item  #提交item到管道进行持久化

        #爬取所有页码数据
        if self.page_num <=23:
            self.page_num+=1
            url = format(self.url%self.page_num)

            #递归爬取函数
            yield scrapy.Request(url=url,callback=self.parse)
pipelines.py管道里面的设置:
# -*- coding: utf-8 -*-

# Define your item pipelines here
#
# Don't forget to add your pipeline to the ITEM_PIPELINES setting
# See: https://doc.scrapy.org/en/latest/topics/item-pipeline.html

import json,os
import urllib.request

class XiaohuaproPipeline(object):
    def __init__(self):
        self.fp=None

    def open_spider(self,spider):
        print('开始爬虫')
        self.fp = open('./data.json','w',encoding='utf-8')

    def process_item(self, item, spider):
        img_dic = {
            'img_url':item['img_url'],
            'img_name':item['img_name']
        }

        json_string = json.dumps(img_dic,ensure_ascii=False)
        self.fp.write(json_string)

        if not os.path.exists('xiaohua_pic'):
            os.mkdir('xiaohua_pic')

        #下载图片
        #拼接下载后的图片名字
        filePath='xiaohua_pic/'+item['img_name']+'.png'
        urllib.request.urlretrieve(url=item['img_url'],filename=filePath)
        print(filePath+'下载成功')

        return item
    def close_spider(self,spider):
        self.fp.close()
        print('爬虫结束')