Saltstack的httpapi
1.在官网跟新yum源信息:
2.yum安装
yum install -y gcc make python-devel libffi-devel salt-api openssl
pip install cherrypy
生成证书:
#cd /etc/salt
#mkdir keycrt
#cd keycrt
#openssl genrsa –out key.pem 4098
#openssl req –new –x 509 –key key.pem –out cert.pem –days 1826
3. 配置用户以及权限:
a.首先需要在master上检查配置文件:
default_include: master.d/*.conf
interface: 192.168.48.128
conf_file: /etc/salt/master
pki_dir: /etc/salt/pki/master
auto_accept: True
file_roots:
base:
- /srv/salt/
log_file: /var/log/salt/master
log_level_logfile: debug
b. 配置salt-api的配置文件:
[root@localhost master.d]# cd /etc/salt/master.d/
[root@localhost master.d]# ls api.conf eauth.conf
[root@localhost master.d]#
[root@localhost master.d]# cat api.conf
rest_cherrypy:
port: 8000
ssl_crt: /etc/salt/keycrt/cert.pem
ssl_key: /etc/salt/keycrt/key.pem
[root@localhost master.d]# cat eauth.conf
external_auth:
pam:
saltapi:
- .*
- '@wheel'
- '@runner'
创建用户:
c. 创建用户
useradd -M -s /sbin/nologin/ saltapi
echo “saltapi” |passwd saltapi --stdin
注意这个应用名和上面的saltapi要对应一致。
启动salt-api
systemctl restart salt-api
netstat –anp |grep 8000
对于ubuntu系统,我们可能使用https也是没法使用,我们可以使用http协议,具体的配置如下:
root@ling-virtual-machine:/etc/salt/master.d# cat api.conf
rest_cherrypy:
port: 8000
disable_ssl: True
#ssl_crt: /etc/salt/keycrt/cert.pem
#ssl_key: /etc/salt/keycrt/key.pem
注意以上的: disable_ssl: True
然后把ssl秘钥和公钥注释掉,eauth.conf不发生变化
获取tocken: http协议的
curl -X POST -k http://192.168.48.134:8000/login -d username='saltapi' -d password='saltapi' -d eauth='pam' |python -mjson.tool
% Total % Received % Xferd Average Speed Time Time Time Current
Dload Upload Total Spent Left Speed
100 240 100 197 100 43 45 9 0:00:04 0:00:04 --:--:-- 45
{
"return": [
{
"eauth": "pam",
"expire": 1517235285.554001,
"perms": [
".*",
"@wheel",
"@runner"
],
"start": 1517192085.554001,
"token": "105ee1f28109d67855ce7898e75e173a678f5174",
"user": "saltapi"
}
]
}
 1 获取tocken:   https协议的(centos7)
 2 [root@localhost master.d]# curl -X POST -k https://192.168.48.131:8000/login -d username='saltapi' -d password='saltapi' -d eauth='pam' |python -mjson.tool
 3   % Total    % Received % Xferd  Average Speed   Time    Time     Time  Current
 4                                  Dload  Upload   Total   Spent    Left  Speed
 5 100   240  100   197  100    43    908    198 --:--:-- --:--:-- --:--:--   912
 6 {
 7     "return": [
 8         {
 9             "eauth": "pam",
10             "expire": 1517235312.537542,
11             "perms": [
12                 ".*",
13                 "@wheel",
14                 "@runner"
15             ],
16             "start": 1517192112.537541,
17             "token": "bd5922438e9ae10db039816728c2b86f9462a0bb",
18             "user": "saltapi"
19         }
20     ]
21 }
Headers里面是用来存放headers的信息的
Body里面来存放数据的,常用的data数据就是x-www-
form-urlencoded form-data 是用来存放页面form表单数据的
只要salt-api不重启,tocken就不会过期,salt-api重启以后,tocken就会过期
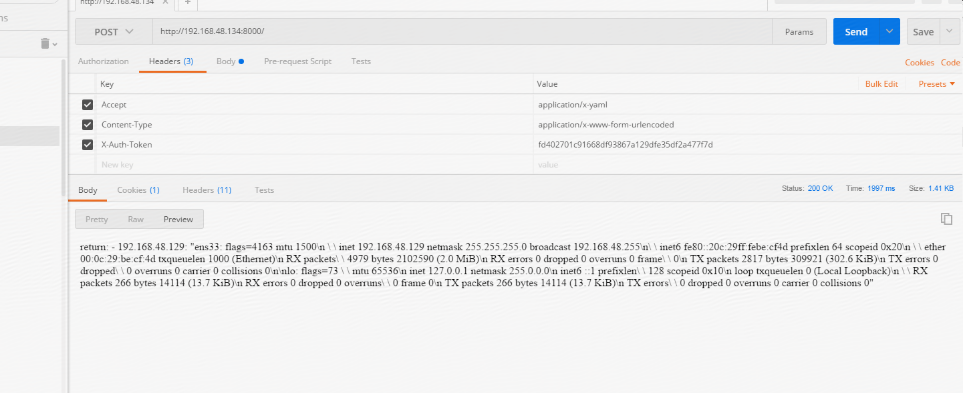
通过postman来获取执行module:
通过curl来获取执行module:
root@ling-virtual-machine:/etc/salt/master.d# curl -k http://192.168.48.134:8000 -H "Accept: application/x-yaml" -H "X-Auth-Token: ec623ed62de7dd62cfdadb94ad0044b7f46c9549" -d client='local' -d tgt='*' -d fun='test.ping'
return:
192.168.48.129: true
运行runner
root@ling-virtual-machine:/etc/salt/master.d# curl -k http://192.168.48.134:8000 -H "Accept: application/x-yaml" -H "X-Auth-Token: ec623ed62de7dd62cfdadb94ad0044b7f46c9549" -d client='runner' -d fun='manage.status'
return:
- down: []
up:
- 192.168.48.129
1.自定义一些module
2. 线上使用runner的实例