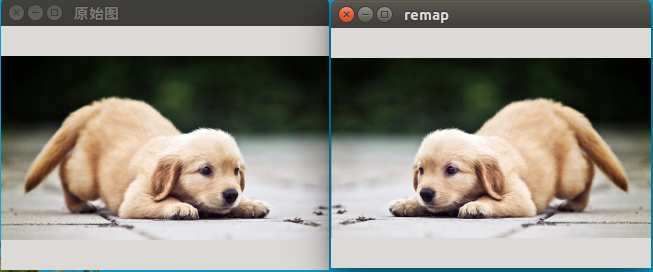
重映射,就是把一幅图像中某位置的像素放置到另一个图片指定位置的过程。
为了完成映射过程, 我们需要获得一些插值为非整数像素的坐标,因为源图像与目标图像的像素坐标不是一一对应的。
一般情况下,我们通过重映射来表达每个像素的位置 (x,y),
像这样 : g(x,y) = f ( h(x,y) )
在这里, g( ) 是目标图像, f() 是源图像, 而h(x,y) 是作用于 (x,y) 的映射方法函数。
在OpenCV中,我们用函数remap( )来实现简单重映射。

C++:
void remap(InputArray src, //输入图像
           OutputArraydst, //输出图像
           InputArray map1,//第一个映射
           InputArray map2, //第二个映射
           int interpolation, //插值
           intborderMode=BORDER_CONSTANT,
           const Scalar& borderValue=Scalar()
           )
第三个参数,InputArray类型的map1,它有两种可能的表示对象:
表示点(x,y)的第一个映射。
表示CV_16SC2 , CV_32FC1 或CV_32FC2类型的X值。

第四个参数,InputArray类型的map2,同样,它也有两种可能的表示对象,而且他是根据map1来确定表示那种对象。
若map1表示点(x,y)时。这个参数不代表任何值。
表示CV_16UC1 , CV_32FC1类型的Y值(第二个值)。

第五个参数,int类型的interpolation,插值方式,之前的resize( )函数中有讲到,需要注意,resize( )函数中提到的INTER_AREA插值方式在这里是不支持的,所以可选的插值方式如下:
    INTER_NEAREST - 最近邻插值
    INTER_LINEAR – 双线性插值(默认值)
    INTER_CUBIC – 双三次样条插值(逾4×4像素邻域内的双三次插值)
    INTER_LANCZOS4 -Lanczos插值(逾8×8像素邻域的Lanczos插值)

第六个参数,int类型的borderMode,边界模式,有默认值BORDER_CONSTANT,表示目标图像中“离群点(outliers)”的像素值不会被此函数修改。

第七个参数,const Scalar&类型的borderValue,当有常数边界时使用的值,其有默认值Scalar( ),即默认值为0。
.pro文件
QT -= gui

CONFIG += c++11 console
CONFIG -= app_bundle

# The following define makes your compiler emit warnings if you use
# any feature of Qt which as been marked deprecated (the exact warnings
# depend on your compiler). Please consult the documentation of the
# deprecated API in order to know how to port your code away from it.
DEFINES += QT_DEPRECATED_WARNINGS

# You can also make your code fail to compile if you use deprecated APIs.
# In order to do so, uncomment the following line.
# You can also select to disable deprecated APIs only up to a certain version of Qt.
#DEFINES += QT_DISABLE_DEPRECATED_BEFORE=0x060000    # disables all the APIs deprecated before Qt 6.0.0

SOURCES += main.cpp

OPENCV_ROOT_PATH = /home/yhl/software_install/opencv3.2


INCLUDEPATH += $${OPENCV_ROOT_PATH}/include
               $${OPENCV_ROOT_PATH}/include/opencv
               $${OPENCV_ROOT_PATH}/include/opencv2

LIBS += -L$${OPENCV_ROOT_PATH}/lib

LIBS += -lopencv_core
        -lopencv_highgui
        -lopencv_imgproc
        -lopencv_imgcodecs
        -lopencv_videoio
        -lopencv_calib3d
//-----------------------------------【头文件包含部分】---------------------------------------
//       描述:包含程序所依赖的头文件
//----------------------------------------------------------------------------------------------
#include"opencv2/highgui/highgui.hpp"
#include"opencv2/imgproc/imgproc.hpp"
#include <iostream>

//-----------------------------------【命名空间声明部分】--------------------------------------
//    描述:包含程序所使用的命名空间
//-----------------------------------------------------------------------------------------------
using namespace cv;

//-----------------------------------【main( )函数】--------------------------------------------
//    描述:控制台应用程序的入口函数,我们的程序从这里开始执行
//-----------------------------------------------------------------------------------------------
int main( )
{
    //【0】变量定义
    Mat srcImage, dstImage;
    Mat map_x, map_y;

    //【1】载入原始图
    srcImage= imread( "/data_2/everyday/1223/dog.jpeg", 1 );
    if(!srcImage.data) { printf("读取图片错误,请确定目录下是否有imread函数指定的图片存在~!
"); return false; }
    namedWindow("原始图",0);
    imshow("原始图",srcImage);

    //【2】创建和原始图一样的效果图,x重映射图,y重映射图
    dstImage.create(srcImage.size(), srcImage.type() );
    map_x.create(srcImage.size(), CV_32FC1 );
    map_y.create(srcImage.size(), CV_32FC1 );

    //【3】双层循环,遍历每一个像素点,改变map_x & map_y的值
    for(int j = 0; j < srcImage.rows;j++)
    {
        for(int i = 0; i < srcImage.cols;i++)
        {
            //改变map_x & map_y的值.
            map_x.at<float>(j,i)= static_cast<float>(srcImage.cols - i);
            map_y.at<float>(j,i)= static_cast<float>(j);
        }
    }

    //【4】进行重映射操作
    remap(srcImage, dstImage, map_x, map_y, CV_INTER_LINEAR, BORDER_CONSTANT, Scalar(0,0,0) );

    //【5】显示效果图
    namedWindow("remap",0);
    imshow("remap", dstImage );
    waitKey();

    return 0;
}
测试图片如下,治愈系的小奶狗,_
