参考文档 https://cwiki.apache.org/confluence/display/OFBIZ/OFBiz+Tutorial+-+A+Beginners+Development+Guide
Going ahead, you will create some advanced GUI patterns, interact with existing database tables and will learn how to secure your web application.
1 Doing Some Advancements To User Interface
a. 在widget目录下创建 CommonScreens.xml 文件,这个文件将包含被用于整个应用的 common screens
<?xml version="1.0" encoding="UTF-8"?>
<screens xmlns:xsi="http://www.w3.org/2001/XMLSchema-instance"
    xsi:noNamespaceSchemaLocation="http://ofbiz.apache.org/dtds/widget-screen.xsd">
    <screen name="CommonPracticeDecorator">
        <section>
            <widgets>
                <decorator-section-include name="body"/>
            </widgets>
        </section>
    </screen>
</screens>
在web.xml中添加如下配置,来关联CommonScreens.xml
<context-param>
     <param-name>commonDecoratorLocation</param-name>
     <param-value>component://practice/widget/CommonScreens.xml</param-value>
     <description>The location of the common-decorator screen to use for this webapp; referred to as a context variable in screen def XML files.</description>
</context-param>
b. 为本应用创建一个menu ,在widget目录下创建 PracticeMenus.xml 文件
<?xml version="1.0" encoding="UTF-8"?>
<menus xmlns:xsi="http://www.w3.org/2001/XMLSchema-instance" xsi:noNamespaceSchemaLocation="http://ofbiz.apache.org/dtds/widget-menu.xsd">
    <menu name="PracticeAppBar" title="PracticeApplication" extends="CommonAppBarMenu" extends-resource="component://common/widget/CommonMenus.xml">
        <menu-item name="main" title="Main"><link target="main"/></menu-item>
    </menu>
</menus>
在CommonPracticeDecorator中引用PracticeMenus.xml
<screen name="CommonPracticeDecorator">
    <section>
        <widgets>
            <include-menu location="component://practice/widget/PracticeMenus.xml" name="PracticeAppBar"/>
            <decorator-section-include name="body"/>
        </widgets>
    </section>
</screen>
c. 在WEB-INF下创建目录actions
在此目录下我们将放置脚本文件,这些脚本文件用于准备页面数据。这些文件使用groovy语言编写,早期使用bsh(beanshell)文件。
参考:Tips & Tricks while working with Groovy & http://groovy.codehaus.org/。
在actions下创建文件Person.groovy
context.persons = delegator.findList("Person", null, null, null, null, false);
d. 在webapp/practice下创建Person.ftl文件
参考:http://freemarker.sourceforge.net/docs/。
<#if persons?has_content>
  <h2>Some of the people who visited our site are:</h2>
  <br>
  <ul>
    <#list persons as person>
      <li>${person.firstName?if_exists} ${person.lastName?if_exists}</li>
    </#list>
  </ul>
</#if>
e. 在PracticeScreens.xml下创建一个新的screen,名字为person
<screen name="person">
    <section>
        <actions>
            <script location="component://practice/webapp/practice/WEB-INF/actions/Person.groovy"/>
        </actions>
        <widgets>
            <decorator-screen name="CommonPracticeDecorator" location="${parameters.commonDecoratorLocation}">
                <decorator-section name="body">
                    <platform-specific>
                        <html>
                            <html-template location="component://practice/webapp/practice/Person.ftl"/>
                        </html>
                    </platform-specific>
                </decorator-section>
            </decorator-screen>
        </widgets>
    </section>
</screen>
在PracticeMenus.xml下创建一个新的menu-item
<menu-item name="person" title="Person">
<link target="person" />
</menu-item>
f. 配置controller.xml.
<request-map uri="person">
<security https="false" auth="false" />
<response name="success" type="view" value="person" />
</request-map>
<view-map name="person" type="screen" page="component://practice/widget/PracticeScreens.xml#person" />
g. 运行:http://localhost:8080/practice/control/person
运行结果如下:
-------------------------------------------------------------------------------------------------------------------

--------------------------------------------------------------------------------------------------------------
注意:菜单中Main没有显示出来解决办法:重新配置menu-item:(更改name为非main的一个值,即可显示,原理未知)
<menu-item name="main1" title="Main">
    <link target="main" />
</menu-item>
2 Now moving to create a form for showing the content of Person entity on the screen (Using Form Widget)
a. 在PracticeMenus.xml中添加名字为PersonForm的 menu-item
<menu-item name="PersonForm" title="PersonForm">
    <link target="PersonForm" />
</menu-item>
b. 在widget下创建文件PracticeForms.xml,创建一个list form来展示person实体的记录
(参考ExampleScreens.xml和ExampleForms.xml文件).
<?xml version="1.0" encoding="UTF-8"?>
<forms xmlns:xsi="http://www.w3.org/2001/XMLSchema-instance"
        xsi:noNamespaceSchemaLocation="http://ofbiz.apache.org/dtds/widget-form.xsd">
    <form name="ListPersons" type="list" list-name="persons" list-entry-name="person"  default-map-name="person" paginate-target="personForm">
        <!-- Important: Here service definition for updatePracticePerson has been used for automatically rendering the form fields, which you can use after completing CRUD operations from Part-3 -->
         <!-- auto-fields-service service-name="updatePracticePerson" default-field-type="display" map-name="person"/-->

         <!-- The above method can be used in case a service specific form is being rendered, otherwise form-fields can be explicitly mentioned as given below:-->
         <field name="firstName"><display/></field>
         <field name="middleName" ><display/> </field>
         <field name="lastName" ><display/> </field>
    </form>
</forms>
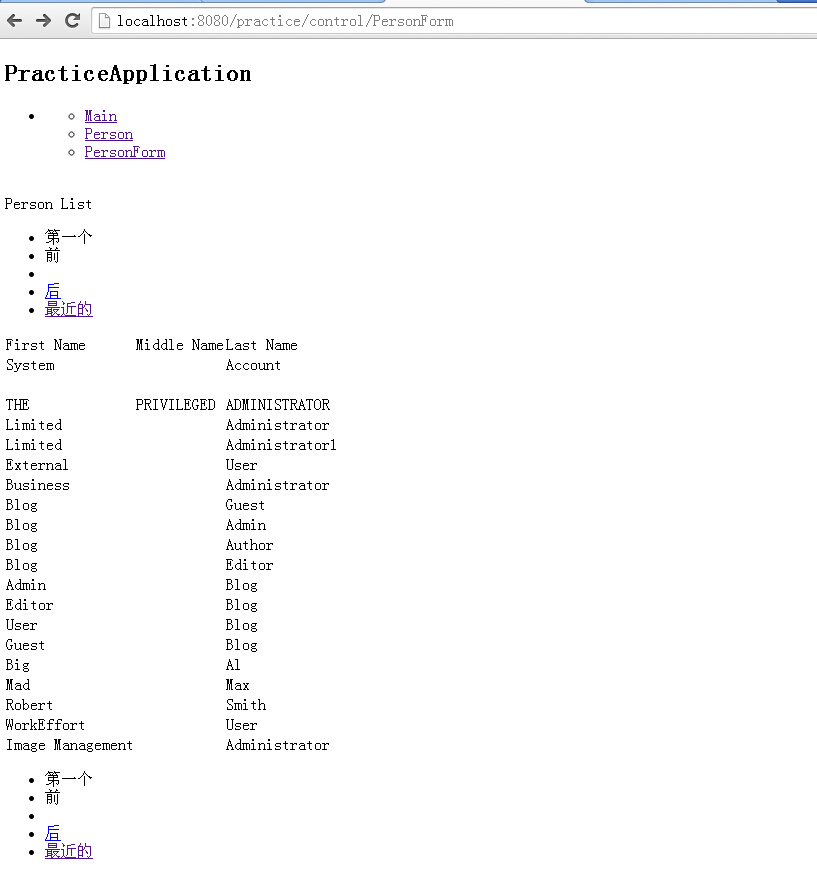
c. 在PracticeScreens.xml中创建一个名字为personForm的screen
<screen name="PersonForm">
        <section>
            <actions>
                <set field="headerItem" value="personForm"/>
                <set field="titleProperty" value="PageTitlePracticePersonForm"/>
                <entity-condition entity-name="Person" list="persons"/>
            </actions>
            <widgets>
                <decorator-screen name="CommonPracticeDecorator" location="${parameters.commonDecoratorLocation}">
                    <decorator-section name="body">
                        <label text="Person List" style="h2"/>
                        <include-form name="ListPersons" location="component://practice/widget/PracticeForms.xml"></include-form>
                    </decorator-section>
                </decorator-screen>
            </widgets>
        </section>
</screen>
d. 配置controller.xml.
<request-map uri="PersonForm">
<security https="false" auth="false" />
<response name="success" type="view" value="PersonForm" />
</request-map>
<view-map name="PersonForm" type="screen" page="component://practice/widget/PracticeScreens.xml#PersonForm" />
e. 运行:http://localhost:8080/practice/control/PersonForm
运行结果如下:
-------------------------------------------------------------------------------------------------
3 Create main Decorator for decorating this application
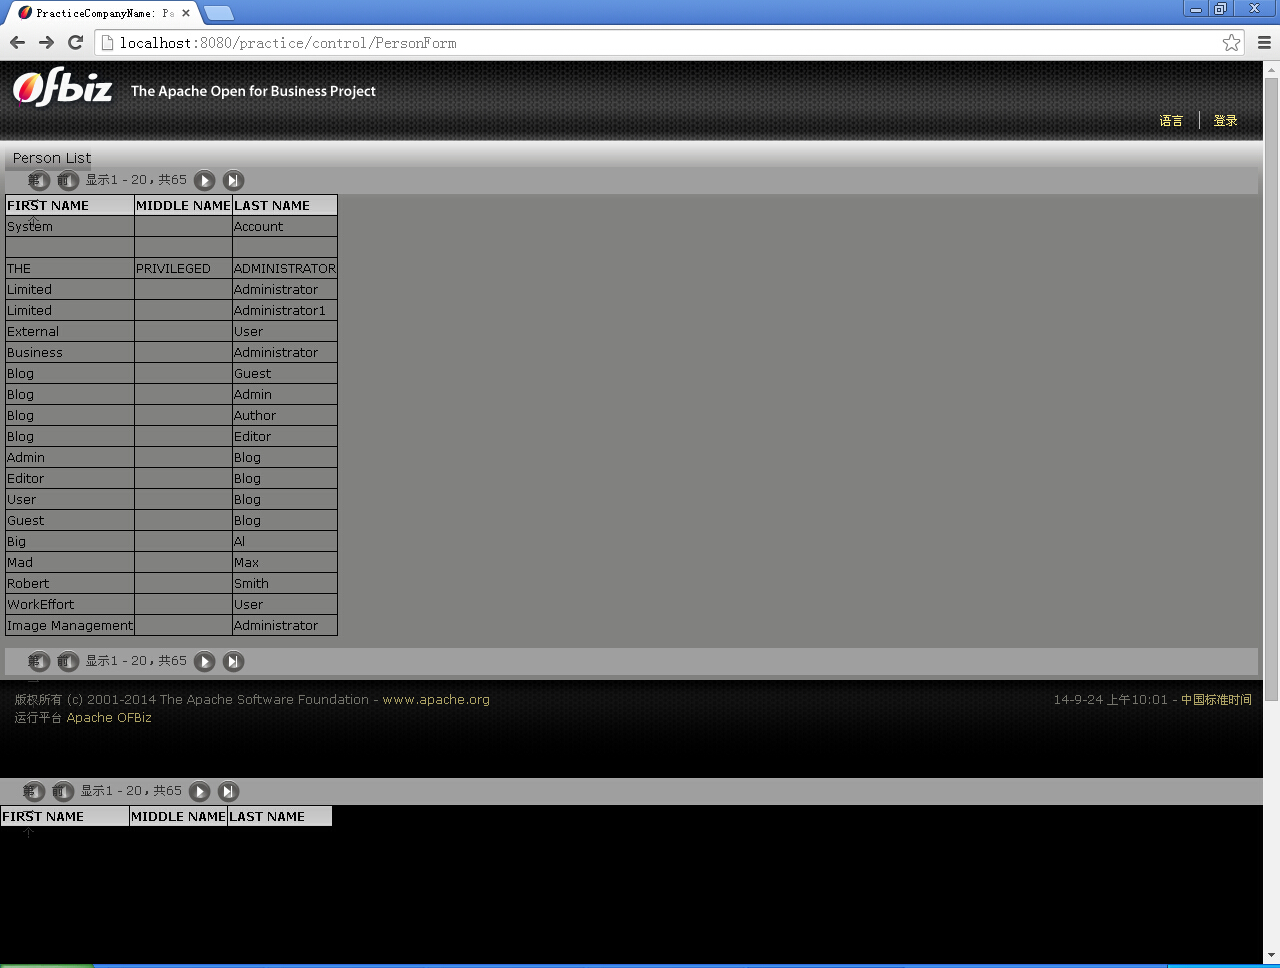
a. 在CommonScreens.xml中创建名字为"main-decorator"的screen
(参考 CommonScreens.xml)
<screen name="main-decorator">
       <section>
           <actions>
               <property-map resource="CommonUiLabels" map-name="uiLabelMap" global="true"/>
               <property-map resource="PracticeUiLabels" map-name="uiLabelMap" global="true"/>
               <set field="layoutSettings.companyName" from-field="uiLabelMap.PracticeCompanyName" global="true"/>
               <set field="activeApp" value="practice" global="true"/>
               <set field="applicationMenuName" value="PracticeAppBar" global="true"/>
               <set field="applicationMenuLocation" value="component://practice/widget/PracticeMenus.xml" global="true"/>
           </actions>
           <widgets>
               <include-screen name="GlobalDecorator" location="component://common/widget/CommonScreens.xml"/>
           </widgets>
       </section>
</screen>
b. 修改CommonPracticeDecorator
<screen name="CommonPracticeDecorator">
    <section>
        <widgets>
               <!-- <include-menu location="component://practice/widget/PracticeMenus.xml" name="PracticeAppBar"/> -->
               <include-screen name="main-decorator" location=""></include-screen>
               <decorator-section-include name="body"/>
        </widgets>
    </section>
</screen>
c. 运行:http://localhost:8080/practice/control/PersonForm
运行结果如下:
4 Now its the time to show practice application in the app bar
将组件显示在主应用标签:ofbiz-component.xml中配置app-bar-display="true"
运行:http://localhost:8080/practice/control/PersonForm
运行结果如下:
5 Create UI Labels
a. 在practice下创建config文件夹
在ofbiz-component.xml文件中为此文件夹配置entry
<classpath type="dir" location="config"/>
That means you have to place the config directory on the classpath to access configuration files.
b. 创建文件PracticeUiLabels.xml,添加一些ui labels
(参考:ExampleUiLabels.xml)
Here remember one thing whenever you make a change in UiLabels then you have to restart the server for having the changes in effect. At first create only 2 ui labels like
<?xml version="1.0" encoding="UTF-8"?>
<resource xmlns:xsi="http://www.w3.org/2001/XMLSchema-instance">
    <property key="PracticeApplication">
        <value xml:lang="en">This is first practice</value>
    </property>
    <property key="PracticeCompanyName">
        <value xml:lang="en">OFBiz: Practice</value>
    </property>
</resource>
c. 在main-decorator中引用PracticeUiLabels.xml
参见上面配置CommonScreens.xml : "main-decorator"
<property-map resource="PracticeUiLabels" map-name="uiLabelMap" global="true"/>
<set field="layoutSettings.companyName" from-field="uiLabelMap.PracticeCompanyName" global="true"/>
<set field="layoutSettings.label1" from-field="uiLabelMap.PracticeApplication" global="true"/>
在ftl中即可通过${layoutSettings.label1}进行调用。
6 Secure Your Application by Authentication
a. 参考 ExampleMenus.xml 文件添加登入、登出菜单。
启用以上菜单能够启用:
方法一、在controller.xml中添加如下配置
<!- Request Mappings ->
<!-- Security Mappings -->
 <request-map uri="checkLogin" edit="false">
    <description>Verify a user is logged in.</description>
        <security https="true" auth="false"/>
        <event type="java" path="org.ofbiz.webapp.control.LoginWorker" invoke="checkLogin" />
        <response name="success" type="view" value="main"/>
        <response name="error" type="view" value="login"/>
    </request-map>
    <request-map uri="login">
        <security https="true" auth="false"/>
        <event type="java" path="org.ofbiz.webapp.control.LoginWorker" invoke="login"/>
        <response name="success" type="view" value="main"/>
        <response name="error" type="view" value="login"/>
    </request-map>
    <request-map uri="logout">
        <security https="true" auth="true"/>
        <event type="java" path="org.ofbiz.webapp.control.LoginWorker" invoke="logout"/>
        <response name="success" type="request" value="checkLogin"/>
        <response name="error" type="view" value="main"/>
    </request-map>

    <view-map name="login" type="screen" page="component://common/widget/CommonScreens.xml#login"/>
方法二、在controller.xml中引入component://common/webcommon/WEB-INF/common-controller.xml
<include location="component://common/webcommon/WEB-INF/common-controller.xml" />
b. 在practice/widget/PracticeScreens.xml中添加如下配置
<screen name="main-decorator">
        <section>
            <actions>
                <property-map resource="CommonUiLabels" map-name="uiLabelMap" global="true"/>
                <property-map resource="PracticeUiLabels" map-name="uiLabelMap" global="true"/>
                <set field="layoutSettings.companyName" from-field="uiLabelMap.PracticeCompanyName" global="true"/>
                <set field="layoutSettings.label1" from-field="uiLabelMap.PracticeApplication" global="true"/>
                <set field="layoutSettings.label1" from-field="uiLabelMap.PracticeApplication" global="true"/>
                <set field="activeApp" value="practice" global="true"/>
                <set field="applicationMenuName" value="PracticeAppBar" global="true"/>
                <set field="applicationMenuLocation" value="component://practice/widget/PracticeMenus.xml" global="true"/>
            </actions>
            <widgets>
                <include-screen name="GlobalDecorator" location="component://common/widget/CommonScreens.xml"/>
            </widgets>
        </section>
    </screen>
c. 对需要权限验证的请求添加以下内容(修改controller.xml中)
<request-map uri="main">
    <security https="true" auth="true"/>
    <response name="success" type="view" value="main"/>
    <response name="error" type="view" value="main"/>
</request-map>
d. 再次运行http://localhost:8080/practice/control/main
如未登录及跳转到登陆界面
用户名 : admin
密码 : ofbiz
