介绍:
Asp.Net Core在Windows上可以采用两种运行方式。一种是自托管运行,另一种是发布到IIS托管运行。
自托管
首先有一个完好的.Net Core WebAPI测试项目,然后进入根目录运行 dotnet publish ,来进行编译:
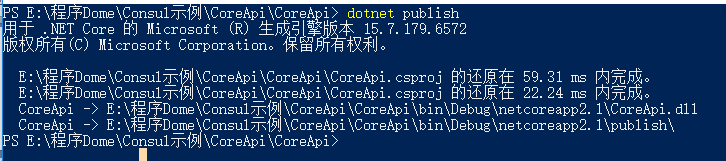
然后在进入dll目录,也就是程序集目录:运行当前项目的主程序dll: dotnet xxx.dll

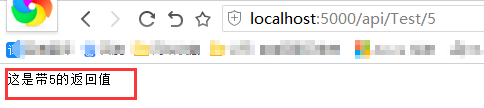
出现上面情况就是完成了,发布在了5000端口;
验证看一下:
修改默认端口:
.NET Core WebAP默认的端口号是5000,但是我们可以通过配置来修改端口号。
第一步:创建hosting.json文件:
{
  "server.urls": "http://*:8001;http://*:8002;http://*:8003"
}
第二部读取,并注册:


     public static void Main(string[] args)
        {
            //BuildWebHost(args).Run();
            var config = new ConfigurationBuilder()
               .SetBasePath(Directory.GetCurrentDirectory())
               .AddJsonFile("hosting.json", optional: true)
               .Build();

            var host = new WebHostBuilder()
                .UseKestrel()
                .UseConfiguration(config)
                .UseContentRoot(Directory.GetCurrentDirectory())
                .UseIISIntegration()
                .UseStartup<Startup>()
                .UseApplicationInsights()
                .Build();

            host.Run();
        }
还有一个就是如果出现一些与:CoreApi.deps.json相关的错误,解决办法:
找到这个文件然后在里面添加: <PublishWithAspNetCoreTargetManifest>false</PublishWithAspNetCoreTargetManifest>
<?xml version="1.0" encoding="utf-8"?>
<Project ToolsVersion="15.0" xmlns="http://schemas.microsoft.com/developer/msbuild/2003">
  <PropertyGroup>
    <PublishWithAspNetCoreTargetManifest>false</PublishWithAspNetCoreTargetManifest>
  </PropertyGroup>
</Project>
注:如果只是修改一个端口不做多端口发布只需要这样即可:
  public static IWebHost BuildWebHost(string[] args) =>
            WebHost.CreateDefaultBuilder(args)
             .UseUrls("http://localhost:8002")
             .UseKestrel()
            .UseContentRoot(Directory.GetCurrentDirectory())
            .UseIISIntegration()
            .UseStartup<Startup>()
            .UseApplicationInsights()
            .Build();
还有一种可以多次运行命令行来实现不同的端口:
首先Program.cs:
  public static IWebHost BuildWebHost(string[] args)
        {

            var config = new ConfigurationBuilder().AddCommandLine(args)
                .Build();
            string ip = config["ip"];
            string port= config["port"];
            return WebHost.CreateDefaultBuilder(args)
             .UseUrls($"http://{ip}:{port}")
             .UseKestrel()
            .UseContentRoot(Directory.GetCurrentDirectory())
            .UseIISIntegration()
            .UseStartup<Startup>()
            .UseApplicationInsights()
            .Build();

        }
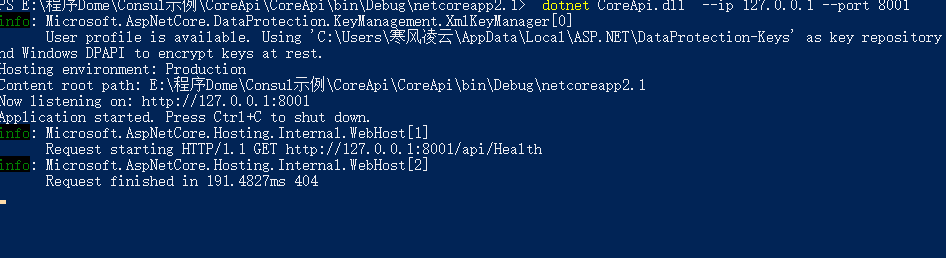
然后在命令行输入:
dotnet CoreApi.dll --ip 127.0.0.1 --port 8001