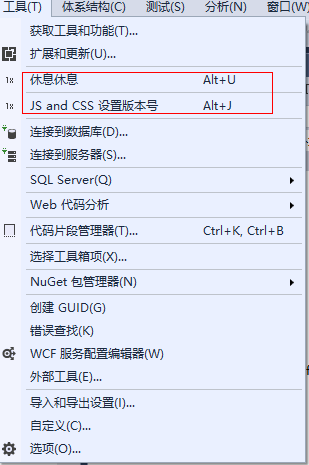
先上个效果图: ,类似的对应的google的扩展程序。
环境:win10,vs2017 如果是其他版本的就不知道有没有对应的模板。(如果没有可能需要下载一下对应的模板)
第一步:新建项目

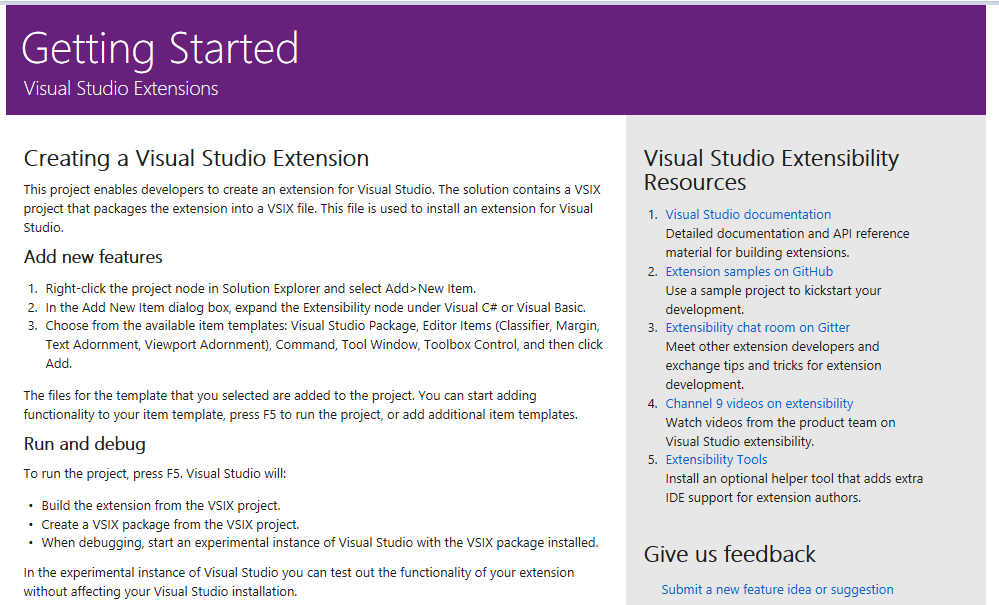
新建好以后会出现一个页面:大概意思插件的
一些介绍。

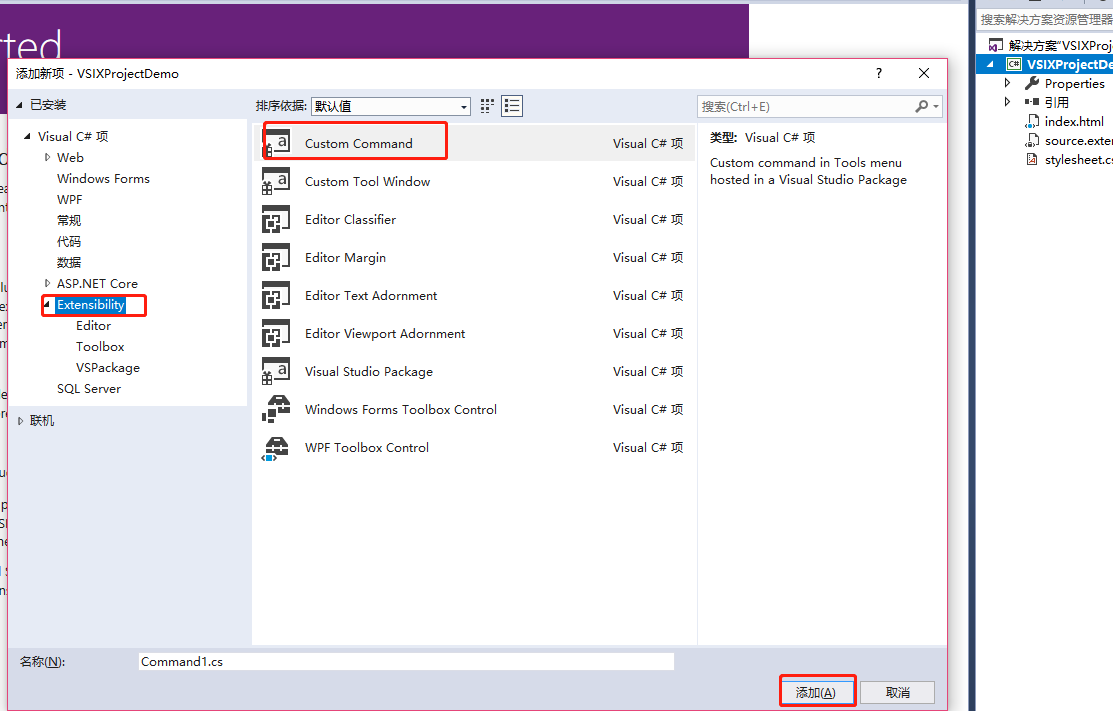
第2步:对着项目右击【添加项】


需求:给js,css 添加版本号.
code:里面用到了 HtmlAgilityPack 添加引用 nuget
Install-Package HtmlAgilityPack -Version 1.11.12
       /// <summary>
        /// This function is the callback used to execute the command when the menu item is clicked.
        /// See the constructor to see how the menu item is associated with this function using
        /// OleMenuCommandService service and MenuCommand class.
        /// </summary>
        /// <param name="sender">Event sender.</param>
        /// <param name="e">Event args.</param>
        private void MenuItemCallback(object sender, EventArgs e)
        {
            //获取服务,这玩意儿……可以理解为vs的服务对象吧。
            var dte = this.ServiceProvider.GetService(typeof(DTE)) as DTE;
            var selection = dte.ActiveDocument.Selection as TextSelection;//当前文档中选中的部分
            if (selection == null)
            {
                return;
            }
            var newcontent = new StringBuilder();
            string versionstr = "?v=" + DateTime.Now.ToString("yyyyMMddss");

            var doc = new HtmlDocument();
            doc.LoadHtml(selection.Text);

            SetCSS(doc, newcontent, versionstr);

            SetJavaScript(doc, newcontent, versionstr);

            ////重新写入文档
            if (newcontent.Length>0)
            {
                selection.Insert(newcontent.ToString());
            }
        }


        /// <summary>
        /// set JavaScript version
        /// </summary>
        /// <param name="doc"></param>
        /// <param name="newcontent"></param>
        /// <param name="versionstr"></param>
        private void SetJavaScript(HtmlDocument doc, StringBuilder newcontent, string versionstr)
        {
            var script = doc.DocumentNode.SelectNodes("//script");
            if (script == null) return;
            foreach (var categoryNode in script)
            {
                string src = categoryNode.Attributes["src"].Value;
                if (src.IndexOf("?", StringComparison.Ordinal) > 0)
                {
                    src = src.Substring(0, src.IndexOf("?", StringComparison.Ordinal));
                }
                src += versionstr;
                newcontent.Append("<script src="" + src + ""></script>
");
            }
        }

        /// <summary>
        /// set css version
        /// </summary>
        /// <param name="doc"></param>
        /// <param name="newcontent"></param>
        /// <param name="versionstr"></param>
        private void SetCSS(HtmlDocument doc, StringBuilder newcontent, string versionstr)
        {
            var link = doc.DocumentNode.SelectNodes("//link");
            if (link == null) return;
            foreach (var categoryNode in link)
            {
                string href = categoryNode.Attributes["href"].Value;
                if (href.IndexOf("?", StringComparison.Ordinal) > 0)
                {
                    href = href.Substring(0, href.IndexOf("?", StringComparison.Ordinal));
                }
                href += versionstr;
                newcontent.Append("<link type="text/css" rel="stylesheet" href="" + href + "" />
");
            }
        }
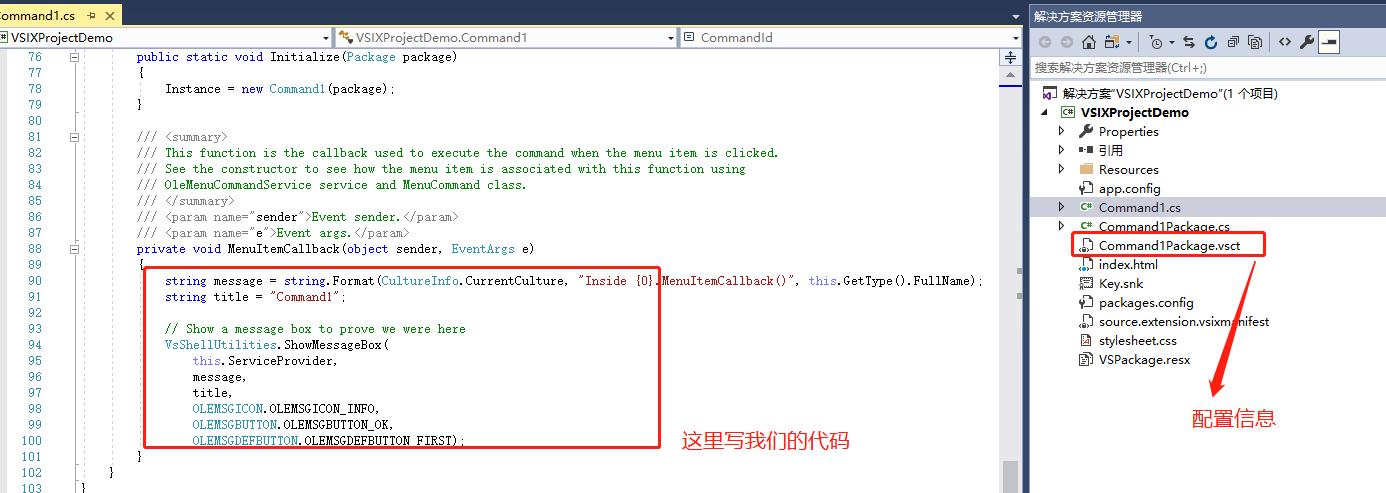
修改配置信息 :绑定的键盘快捷方式菜单 注意guid 和id 有点要求一致


<?xml version="1.0" encoding="utf-8"?>
<CommandTable xmlns="http://schemas.microsoft.com/VisualStudio/2005-10-18/CommandTable" xmlns:xs="http://www.w3.org/2001/XMLSchema">

  <!--  This is the file that defines the actual layout and type of the commands.
        It is divided in different sections (e.g. command definition, command
        placement, ...), with each defining a specific set of properties.
        See the comment before each section for more details about how to
        use it. -->

  <!--  The VSCT compiler (the tool that translates this file into the binary
        format that VisualStudio will consume) has the ability to run a preprocessor
        on the vsct file; this preprocessor is (usually) the C++ preprocessor, so
        it is possible to define includes and macros with the same syntax used
        in C++ files. Using this ability of the compiler here, we include some files
        defining some of the constants that we will use inside the file. -->

  <!--This is the file that defines the IDs for all the commands exposed by VisualStudio. -->
  <Extern href="stdidcmd.h"/>

  <!--This header contains the command ids for the menus provided by the shell. -->
  <Extern href="vsshlids.h"/>

  <!--The Commands section is where commands, menus, and menu groups are defined.
      This section uses a Guid to identify the package that provides the command defined inside it. -->
  <Commands package="guidJsAndCSSPackage">
    <!-- Inside this section we have different sub-sections: one for the menus, another
    for the menu groups, one for the buttons (the actual commands), one for the combos
    and the last one for the bitmaps used. Each element is identified by a command id that
    is a unique pair of guid and numeric identifier; the guid part of the identifier is usually
    called "command set" and is used to group different command inside a logically related
    group; your package should define its own command set in order to avoid collisions
    with command ids defined by other packages. -->

    <!-- In this section you can define new menu groups. A menu group is a container for
         other menus or buttons (commands); from a visual point of view you can see the
         group as the part of a menu contained between two lines. The parent of a group
         must be a menu. -->
    <Groups>
      <Group guid="guidJsAndCSSPackageCmdSet" id="MyMenuGroup" priority="0x0600">
        <Parent guid="guidSHLMainMenu" id="IDM_VS_MENU_TOOLS"/>
      </Group>
    </Groups>

    <!--Buttons section. -->
    <!--This section defines the elements the user can interact with, like a menu command or a button
        or combo box in a toolbar. -->
    <Buttons>
      <!--To define a menu group you have to specify its ID, the parent menu and its display priority.
          The command is visible and enabled by default. If you need to change the visibility, status, etc, you can use
          the CommandFlag node.
          You can add more than one CommandFlag node e.g.:
              <CommandFlag>DefaultInvisible</CommandFlag>
              <CommandFlag>DynamicVisibility</CommandFlag>
          If you do not want an image next to your command, remove the Icon node /> -->
      <Button guid="guidJsAndCSSPackageCmdSet" id="JsAndCSSId" priority="0x0100" type="Button">
        <Parent guid="guidJsAndCSSPackageCmdSet" id="MyMenuGroup" />
        <Icon guid="guidImages" id="bmpPic1" />
        <Strings>
          <ButtonText>JS and CSS 设置版本号</ButtonText>
        </Strings>
      </Button>
    </Buttons>


    <!--The bitmaps section is used to define the bitmaps that are used for the commands.-->
    <Bitmaps>
      <!--  The bitmap id is defined in a way that is a little bit different from the others:
            the declaration starts with a guid for the bitmap strip, then there is the resource id of the
            bitmap strip containing the bitmaps and then there are the numeric ids of the elements used
            inside a button definition. An important aspect of this declaration is that the element id
            must be the actual index (1-based) of the bitmap inside the bitmap strip. -->
      <Bitmap guid="guidImages" href="ResourcesJsAndCSS.png" usedList="bmpPic1, bmpPic2, bmpPicSearch, bmpPicX, bmpPicArrows, bmpPicStrikethrough"/>
    </Bitmaps>
  </Commands>

  <KeyBindings>
    <!-- 设置快捷键 alt+J. -->
    <KeyBinding guid="guidJsAndCSSPackageCmdSet" id="JsAndCSSId" editor="guidVSStd97" key1="J" mod1="ALT" />
  </KeyBindings>

  <Symbols>
    <!-- This is the package guid. -->
    <GuidSymbol name="guidJsAndCSSPackage" value="{b28778ca-bd3b-41f2-819a-de06836fbaae}" />

    <!-- This is the guid used to group the menu commands together -->
    <GuidSymbol name="guidJsAndCSSPackageCmdSet" value="{5d134a8a-8232-4e9e-9be7-733adf6935bb}">
      <IDSymbol name="MyMenuGroup" value="0x1020" />
      <IDSymbol name="JsAndCSSId" value="0x0100" />
    </GuidSymbol>

    <GuidSymbol name="guidImages" value="{b09c3530-3da3-4a33-a834-de000f823530}" >
      <IDSymbol name="bmpPic1" value="1" />
      <IDSymbol name="bmpPic2" value="2" />
      <IDSymbol name="bmpPicSearch" value="3" />
      <IDSymbol name="bmpPicX" value="4" />
      <IDSymbol name="bmpPicArrows" value="5" />
      <IDSymbol name="bmpPicStrikethrough" value="6" />
    </GuidSymbol>
  </Symbols>
</CommandTable>
代码写好以后,按 f5 会启动一个新的vs 打开你需要调试操作新的解决方案 (比如这里给js 或者css添加版本号 要先选中) 按快捷键alt+j 或者在工具里面 调试就会进入 MenuItemCallback方法。
安装:在bin 或者 Release目录下找到 【xx.vsix】双击安装就好了

附近信息:

code无误 安装后最后结果如图:

资料:https://www.cnblogs.com/LCHL/p/5519520.html
扩展:比如实现代码自动补全 (ibatis) 一下新的语法 但是写的不熟悉 等等。 这里只是抛砖引玉
