Grunt可以执行像压缩, 编译, 单元测试, 代码检查以及打包发布的任务。
本文介绍使用Grunt实现nodejs程序自启动功能。
目录:
- Grunt介绍
- Grunt安装
- Grunt使用
- Grunt常用加载任务的插件:
1)grunt-contrib-watch
2)grunt-nodemon
3)grunt-concurrent
1.Grunt介绍
Grunt是一个自动化的项目构建工具. 如果你需要重复的执行像压缩, 编译, 单元测试, 代码检查以及打包发布的任务. 那么你可以使用Grunt来处理这些任务, 你所需要做的只是配置好Grunt, 这样能很大程度的简化你的工作.
如果在团队中使用Grunt, 你只需要与其他人员约定好使用Grunt应该规避的问题, 就能够很方便的自动化的处理大部分的常见工作任务, 你所付出的努力几乎为0.
1.Grunt安装
我目录下的文件(使用express -e test新建的一个项目)

Grunt和Grunt插件都是通过npm, Node.js包管理器安装和管理的
我的系统环境:
- win7 64bit
- nodejs:6.3.1
- npm:3.10.3

本地安装grunt

后面加上 --save-dev,可以直接把grunt作为devDependencies写入的package.json中
安装完grunt后,还需要安装一个grunt插件:grunt-cli,为什么需要grunt-cli这个模块,有了grunt-cli,你可以在项目的任意子目录中运行grunt 。

grunt-cli的工作原理:每次运行grunt 时,他就利用node提供的require()系统查找本地安装的 Grunt。正是由于这一机制,你可以在项目的任意子目录中运行grunt 。如果找到一份本地安装的 Grunt,CLI就将其加载,并传递Gruntfile中的配置信息,然后执行你所指定的任务。
grunt-cli需要全局安装的原因:当执行grunt命令时,会默认先去全局的grunt-cli下找grunt-cli模块,而不会先走当前目录下的node_modules的grunt-cli
此时执行grunt,会报如下错误:

实际上grunt运行,依赖package.json和Gruntfile.js两个文件,项目初始化时,已经生成了package.json文件,这里还缺少Gruntfile.js文件
新建Gruntfile.js文件:

再次运行grunt:

没有报错,但是提示默认的任务没有找到,这是因为我们在Gruntfile.js文件中没有添加任务,包括默认任务。
gurnt的自启动实现,需要三个加载任务的插件:
他们的安装方式如下:
 npm install grunt-contrib-watch  --save-dev
 npm install grunt-nodemon  --save-dev
 npm install grunt-concurrent --save-dev
安装完的package.js文件如下:
{
  "name": "test",
  "version": "0.0.0",
  "private": true,
  "scripts": {
    "start": "node ./bin/www"
  },
  "dependencies": {
    "body-parser": "~1.15.1",
    "cookie-parser": "~1.4.3",
    "debug": "~2.2.0",
    "ejs": "~2.4.1",
    "express": "~4.13.4",
    "morgan": "~1.7.0",
    "serve-favicon": "~2.3.0"
  },
  "devDependencies": {
    "grunt": "^1.0.1",
    "grunt-concurrent": "^2.3.1",
    "grunt-contrib-watch": "^1.0.0",
    "grunt-nodemon": "^0.4.2"
  }
}
grunt、grunt-concurrent、grunt-contrib-watch、grunt-nodemon模块名分别存放在devDependencies下。
grunt-concurrent:针对慢任务的插件,优化慢任务
grunt-contrib-watch:可以监控特定的文件,在添加文件、修改文件、或者删除文件的时候自动执行自定义的任务,比如 livereload 等等
grunt-nodemon:实时监听入口文件(app.js),入口文件出现改动,就会自动重启
下面来编写Gruntfilr.js文件
module.exports = function(grunt){
    grunt.initConfig({
        watch:{
            ejs:{
                files:['views/*'],
                options:{
                    livereload:true
                }
            },
            js:{
                files:['public/javascripts/*'],
        //        tasks:['jshint'],
                options:{
                    livereload:true
                }
            }
        },
        nodemon:{
            dev:{
                options:{
                    file:'app.js',
                    args:[],
                    ignoredFiles:['node_modules/**','DS_store'],
                    watchedExtensions:['js'],
                    watchedFolders:['./'],
                    debug:true,
                    delayTime:1,
                    env:{
                        PORT:3000
                    },
                    cwd:__dirname
                }
            }
        },
        concurrent:{
            tasks:['nodemon','watch'],
            options:{
                logConcurrentOutput:true
            }
        }
    });

    grunt.loadNpmTasks('grunt-contrib-watch');  //只要有文件修改,增加删除,就会重新执行
    grunt.loadNpmTasks('grunt-nodemon');    //实时监听入口文件(app.js),入口文件出现改动,就会自动重启
    grunt.loadNpmTasks('grunt-concurrent'); //针对慢任务的插件,优化慢任务

    grunt.option('force',true);
    grunt.registerTask('default',['concurrent']);
}
上述livereload:true,表示监听的文件被修改以后,自动刷新页面。
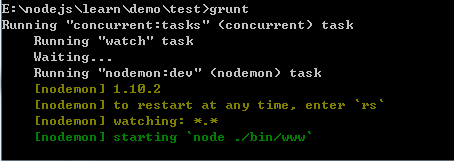
再次运行grunt:

启动成功!!!!
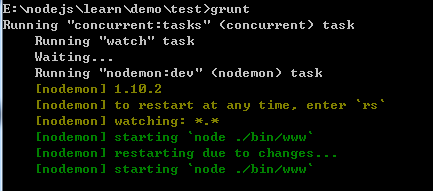
打开app.js文件,随便敲几个空格并保存之后,看到控制台有如下变化:
