名词一栏
haystack :Django的包可以对我们的model即兴快速筛选和搜索
有四个引擎:solr,Xapian,Elasticsearc,whoosh
haystack :是个全文检索框架
whoosh : python写的轻量级引擎
额拉血Search : 妙查引擎
大致流程
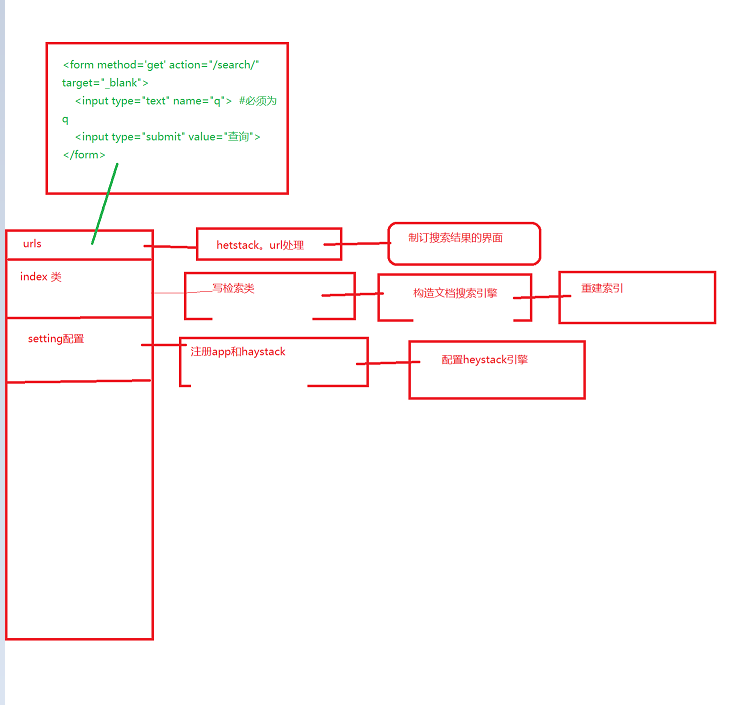

配置
INSTALLED_APPS = [
    'django.contrib.admin',
    'django.contrib.auth',
    'django.contrib.contenttypes',
    'django.contrib.sessions',
    'django.contrib.sites',

    # 添加
    'haystack',

    # 你的app
    'blog',
]
使用的4个引擎配置


#### Elasticsearch示例

```python
HAYSTACK_CONNECTIONS = {
    'default': {
        'ENGINE': 'haystack.backends.elasticsearch_backend.ElasticsearchSearchEngine',
        'URL': 'http://127.0.0.1:9200/',
        'INDEX_NAME': 'haystack',
    },
}
```

#### Whoosh示例

```python
#需要设置PATH到你的Whoosh索引的文件系统位置
import os
HAYSTACK_CONNECTIONS = {
    'default': {
        'ENGINE': 'haystack.backends.whoosh_backend.WhooshEngine',
        'PATH': os.path.join(os.path.dirname(__file__), 'whoosh_index'),
    },
}

# 自动更新索引
HAYSTACK_SIGNAL_PROCESSOR = 'haystack.signals.RealtimeSignalProcessor'
```

#### Xapian示例

```python
#首先安装Xapian后端(http://github.com/notanumber/xapian-haystack/tree/master)
#需要设置PATH到你的Xapian索引的文件系统位置。
import os
HAYSTACK_CONNECTIONS = {
    'default': {
        'ENGINE': 'xapian_backend.XapianEngine',
        'PATH': os.path.join(os.path.dirname(__file__), 'xapian_index'),
    },
}
自动更新索引
HAYSTACK_SIGNAL_PROCESSOR = 'haystack.signals.RealtimeSignalProcessor'
定义索引模型
app下 search_indexes.py
注意点
1 必须在有且只有一个字段为 document=True 并且该字段变量名必须为text
2.表名必须是 字段index
3.必须重写get_model
from haystack import indexes
from app01.models import Article

class ArticleIndex(indexes.SearchIndex, indexes.Indexable):
#类名必须为需要检索的Model_name+Index,这里需要检索Article,所以创建ArticleIndex
text = indexes.CharField(document=True, use_template=True)#创建一个text字段
#其它字段
desc = indexes.CharField(model_attr='desc')
content = indexes.CharField(model_attr='content')

def get_model(self):#重载get_model方法,必须要有!
  return Article

def index_queryset(self, using=None):
  return self.get_model().objects.all()
新建模板
search
indexes
应用名
模型类名称__text.txt
# 模板类_text  告诉这三个都要是使用检索匹配
{{ object.title }}
{{ object.desc }}
{{ object.content }}
设置url
(r'^search/', include('haystack.urls')),
制定搜索结果的html页面
temptags/search/search.html
page.object_list 是查询的结果
还会给我们分页 有上一页下一页
<!DOCTYPE html>
<html>
<head>
<title></title>
<style>
span.highlighted {
color: red;
}
</style>
</head>
<body>
{% load highlight %}
{% if query %}
<h3>搜索结果如下:</h3>
{% for result in page.object_list %}
{# <a href="/{{ result.object.id }}/">{{ result.object.title }}</a><br/>#}
<a href="/{{ result.object.id }}/">{% highlight result.object.title with query max_length 2%}</a><br/>
<p>{{ result.object.content|safe }}</p>
<p>{% highlight result.content with query %}</p>
{% empty %}
<p>啥也没找到</p>
{% endfor %}
{% if page.has_previous or page.has_next %}
<div>
{% if page.has_previous %}
<a href="?q={{ query }}&page={{ page.previous_page_number }}">{% endif %}« 上一页
{% if page.has_previous %}</a>{% endif %}
|
{% if page.has_next %}<a href="?q={{ query }}&page={{ page.next_page_number }}">{% endif %}下一页 »
{% if page.has_next %}</a>{% endif %}
</div>
{% endif %}
{% endif %}
</body>
</html>
```
重建索引
manage.py rebuild_index 数据放入进行索引
使用Jieba分词
在 D:python3Libsite-packageshaystack 路径下新建ChineseAnalyzer.py文件
import jieba
from whoosh.analysis import Tokenizer, Token

class ChineseTokenizer(Tokenizer):
    def __call__(self, value, positions=False, chars=False,
                 keeporiginal=False, removestops=True,
                 start_pos=0, start_char=0, mode='', **kwargs):
        t = Token(positions, chars, removestops=removestops, mode=mode,
                  **kwargs)
        seglist = jieba.cut(value, cut_all=True)
        for w in seglist:
            t.original = t.text = w
            t.boost = 1.0
            if positions:
                t.pos = start_pos + value.find(w)
            if chars:
                t.startchar = start_char + value.find(w)
                t.endchar = start_char + value.find(w) + len(w)
            yield t


def ChineseAnalyzer():
    return ChineseTokenizer()
复制whoosh_backend.py文件,改名为whoosh_cn_backend.py
在这个文件里面修改
from .ChineseAnalyzer import ChineseAnalyzer   #添加刚才模块
查找
analyzer=StemmingAnalyzer()
改为
analyzer=ChineseAnalyzer()
搜索栏
```html
<form method='get' action="/search/" target="_blank">
    <input type="text" name="q">  #必须为q
    <input type="submit" value="查询">
</form>
```
8.其它配置
from haystack.views import SearchView
from .models import *

class MySeachView(SearchView):
     def extra_context(self):       #重载extra_context来添加额外的context内容
         context = super(MySeachView,self).extra_context()
         side_list = Topic.objects.filter(kind='major').order_by('add_date')[:8]
         context['side_list'] = side_list
         return context


#路由修改
url(r'^search/', search_views.MySeachView(), name='haystack_search'),
```

### 高亮显示

```python
{% highlight result.summary with query %}
# 这里可以限制最终{{ result.summary }}被高亮处理后的长度
{% highlight result.summary with query max_length 40 %}

#html中
    <style>
        span.highlighted {
            color: red;
        }
    </style>
```