一、准备环境
1、准备3台服务器:
1)192.168.88.10 --Nginx服务器
2)192.168.88.20 --apache服务器
3)192.168.88.30 --apache服务器
2、关闭SELinux和防火墙
3、在/etc/hosts/ 目录下添加解析地址 192.168.88.10 blog.com
二、设置apache主机的index.html
分别进入 apache服务器的 /var/www/html/目录
编辑index.html
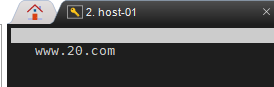
192.168.88.20 服务器 写 www.20.com
192.168.88.30 服务器 写 www.30.com
三、反向代理实验
编辑Nginx服务器的 /usr/local/nginx/conf/ 目录下 的nginx.conf 配置文件
vim nginx.conf
新建一个server服务
server {
        listen 80;
        server_name blog.com;
        index index.html index.htm index.php;
        root html/blog;
        access_log logs/blog-access.log main;
        location ~ .php$ {
            root           html/blog;
            fastcgi_pass   127.0.0.1:9000;
            fastcgi_index  index.php;
            fastcgi_param  SCRIPT_FILENAME  /scripts$fastcgi_script_name;
            include        fastcgi.conf;
        }
        location / {
            proxy_pass http://192.168.88.20:80;
        }
}
修改之后输入nginx -t 查看状态是否正常
然后重启nginx服务器 service nginx restart
实验演示
在nginx主机上 输入命令
elinks 192.168.88.20
结果
四、负载均衡实验
在上面的基础下、继续编辑 nginx.conf 配置文件
添加主机访问分配,upstream 负责将用户请求分配给不同的apache服务器来响应
upstream blog {
        server 192.168.88.20:80;
        server 192.168.88.30:80;
}
然后在server下添加
proxy_pass http://blog; 反向代理 blog声明的名字,
proxy_set_header Host $Host; #重写请求头部,保证网站所有页面都可以访问成功
server {
        listen 80;
        server_name blog.com;
        index index.html index.htm index.php;
        root html/blog;
        access_log logs/blog-access.log main;
        location ~ .php$ {
            root           html/blog;
            fastcgi_pass   127.0.0.1:9000;
            fastcgi_index  index.php;
            fastcgi_param  SCRIPT_FILENAME  /scripts$fastcgi_script_name;
            include        fastcgi.conf;
        }
        location / {
            proxy_pass http://blog;
            proxy_set_header Host $Host;
        }
}
修改之后输入nginx -t 查看状态是否正常
然后重启nginx服务器 service nginx restart
实验效果 。
curl blog.com
效果:
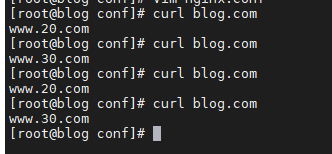
可以看到nginx服务器 将用户的请求分配给不同的主机。